[denoising] New kind of rendering denoising (windows x64, x86)

Hi,

I have made a new simple denoising algorithm and simple application so you can test it.

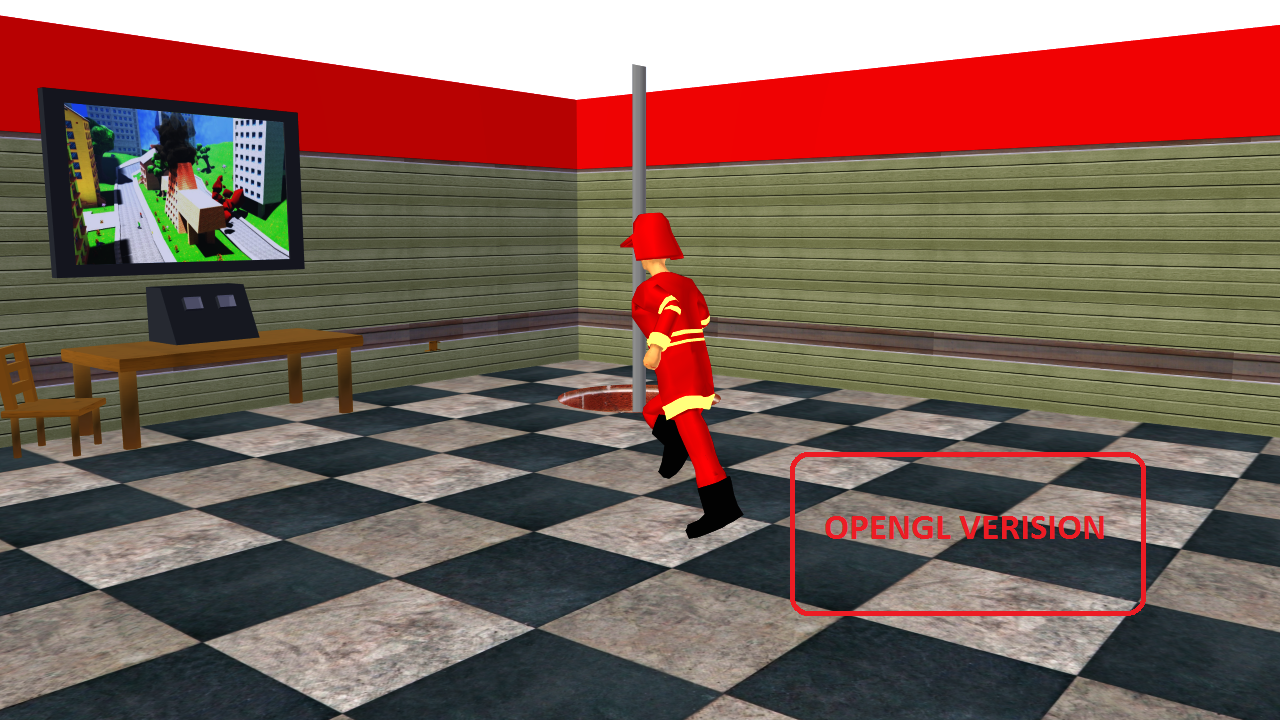
The denoising process depends on normal rendered frame and frame from OpenGL view (OpenGL simple OpenGL preview from the scene).

You can download the application and sample images here (to generate denoised version simply run the app and click denoise - it can take from 5 sec to 30) - you can use your own images and experiment.:slight_smile:

the newest version 4

version 3

version 2

the oldest version 1

This is really the first version and it’s slow. It can be 10 times faster or more because it currently only uses 1 CPU core and it’s not optimized in any way (this is the raw version). But I will wait with optimization. I have some ideas how to make it better (if I will continue working on it :])…

Anyway, I have made a simple application. It’s java “jar” file packet to “exe” for simplified usage on windows. It uses JAVA so if you don’t have java installed it will automatically redirect you to java download and auto install java.

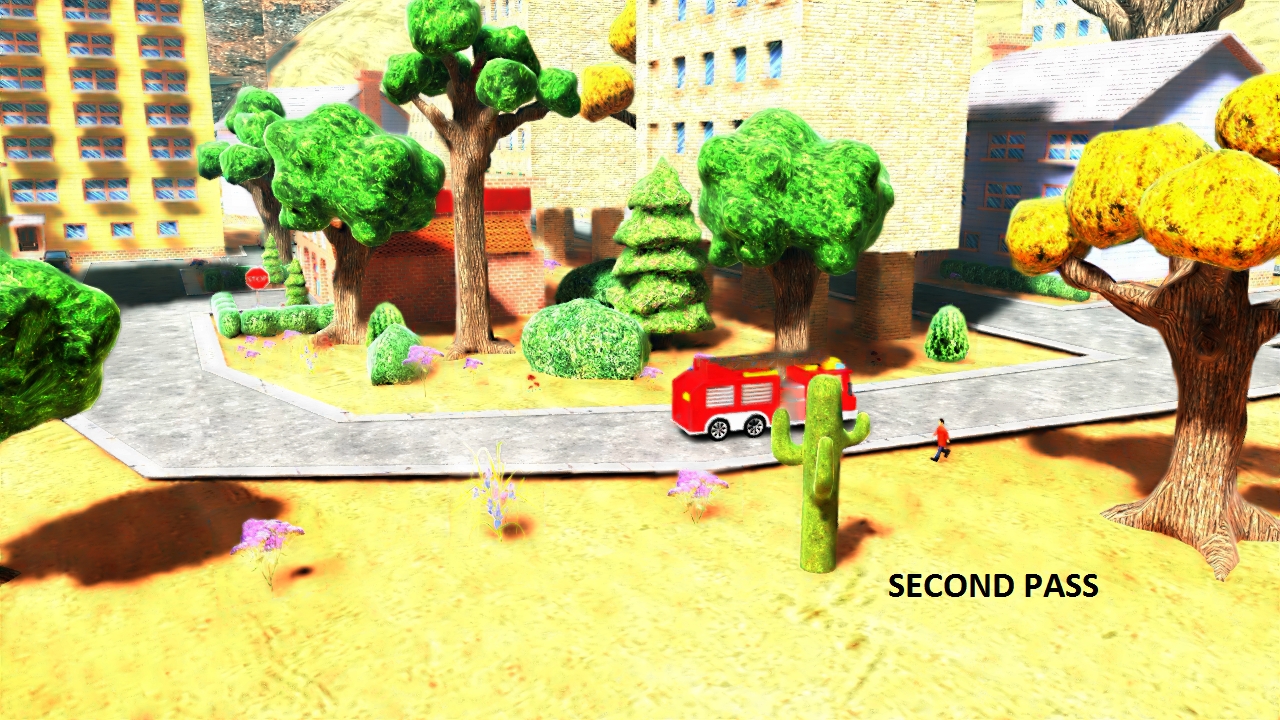
After denoising process, you can compare before and after denoising by clicking the image on the right side of the tool. There will be outputted 2 images in the applicaion folder. “first_pass.png” and “second_pass.png”.

The tool is using only png files - just for testing.

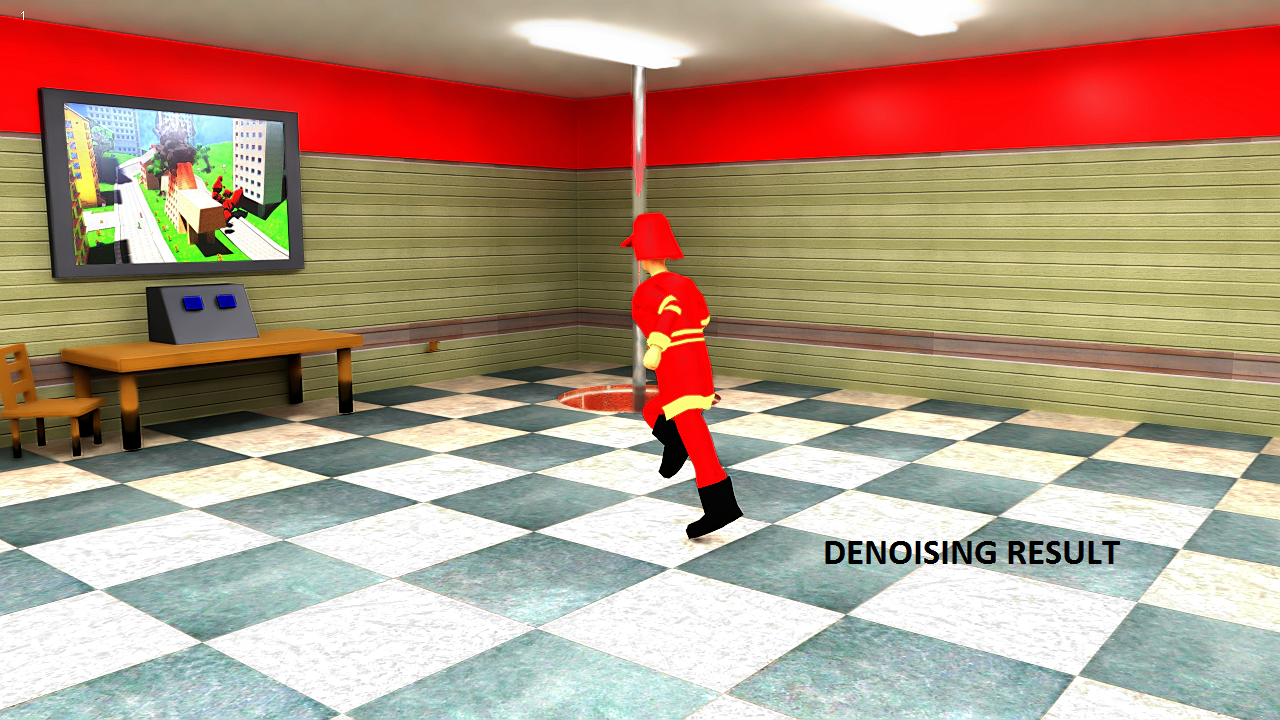
here is an image from the tool

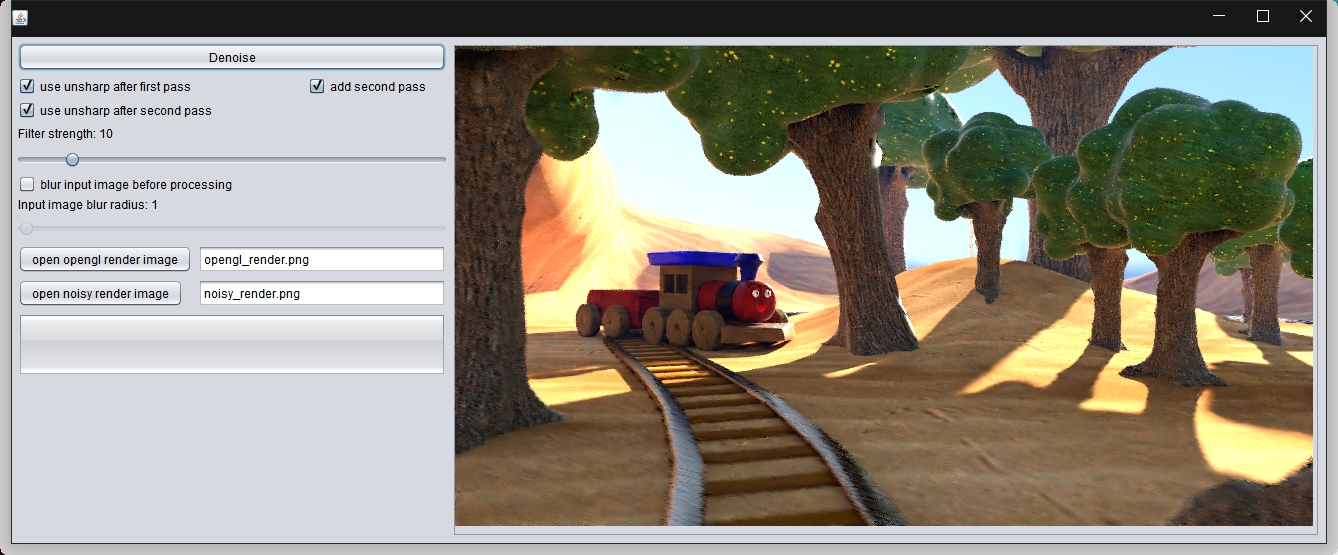
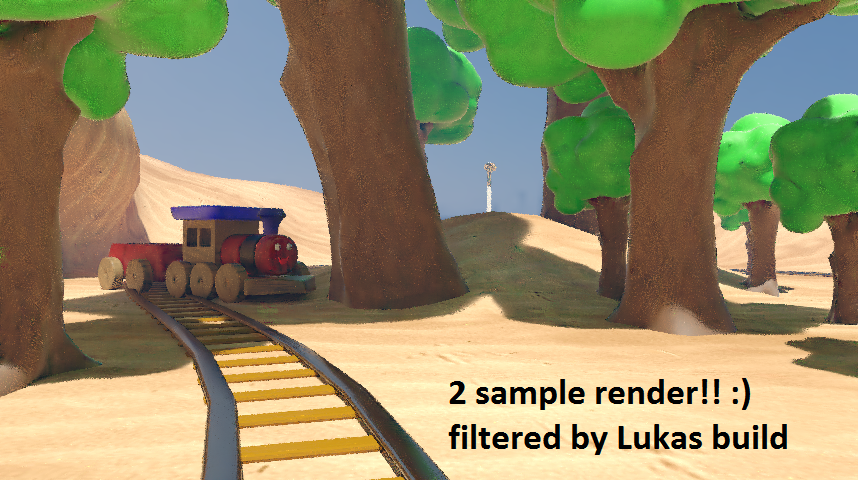
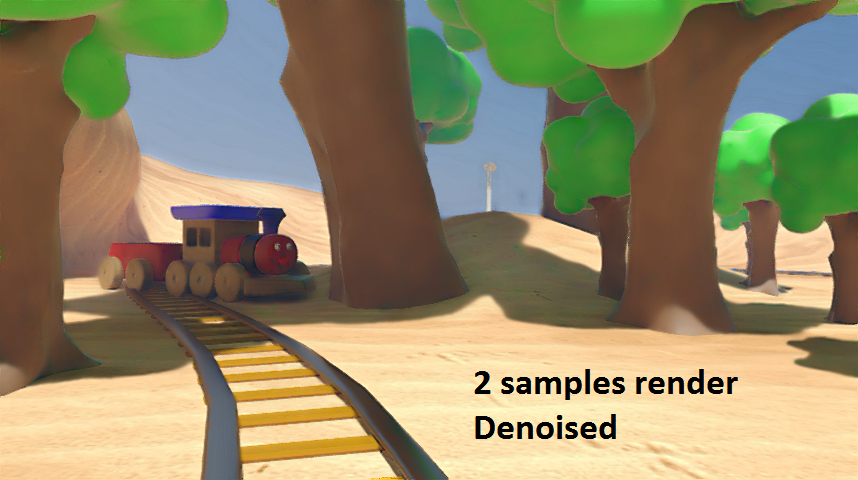
The tool was written in one or two hours and it’s really simple. Just for testing this algo. The algorithm uses some of my calculation and OpenCV non-local means denoising. Non-local means gives a good result but details are lost so my version extends it a lot with additional information from OpenGL view.

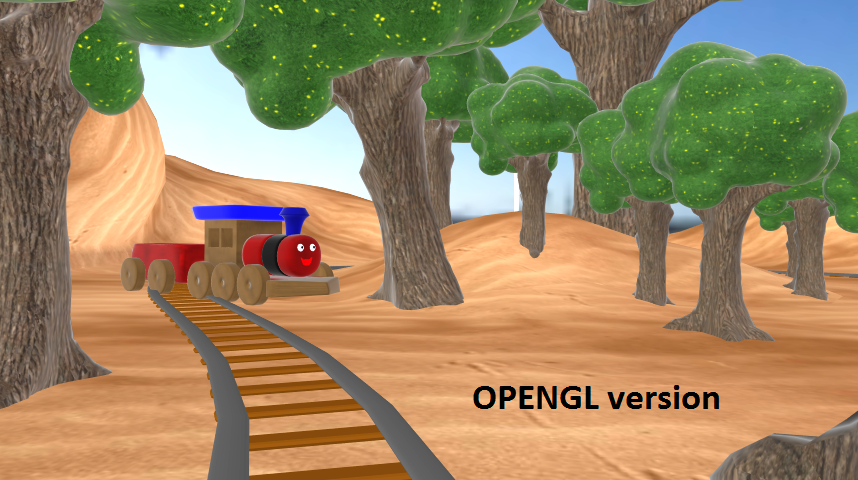
The OpenGL version is important in denoising process. You can just extract OpenGL render from the diffuse color pass of you rendering, but it has to have good quality to get best details on denoising result. Anyway, it can be just rendered viewport using camera icon (I think everybody knows what I am talking about :slight_smile: ).

If this is useless or will be useless soon because you think like that then let me know.

The algorithm uses only 2 images it could be better if I could use all passes from rendering. I will edit the post and upload more images later.

I was working on rendering manager which uses blender command line and I was thinking about adding some denoising options like avi synth, opencv multiframe denoising and some of my algos :smiley:


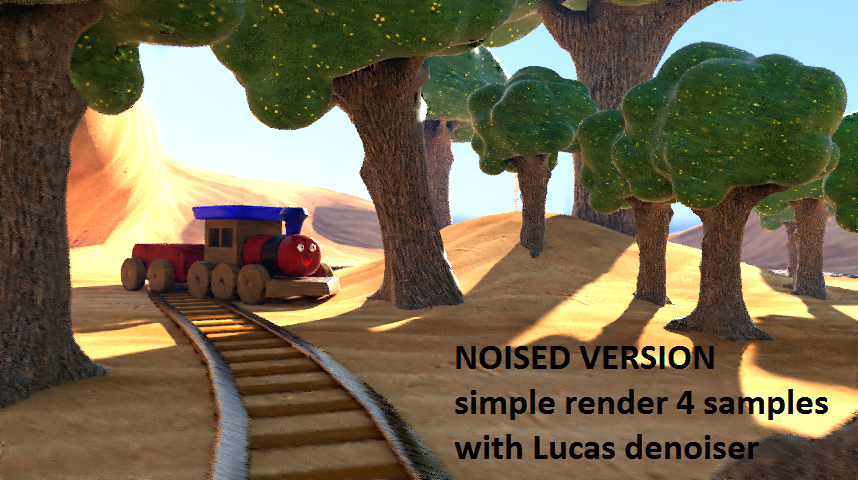
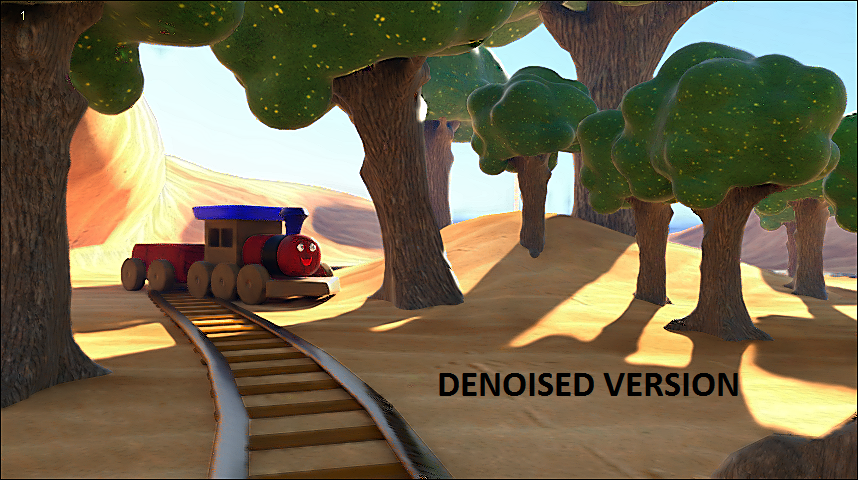
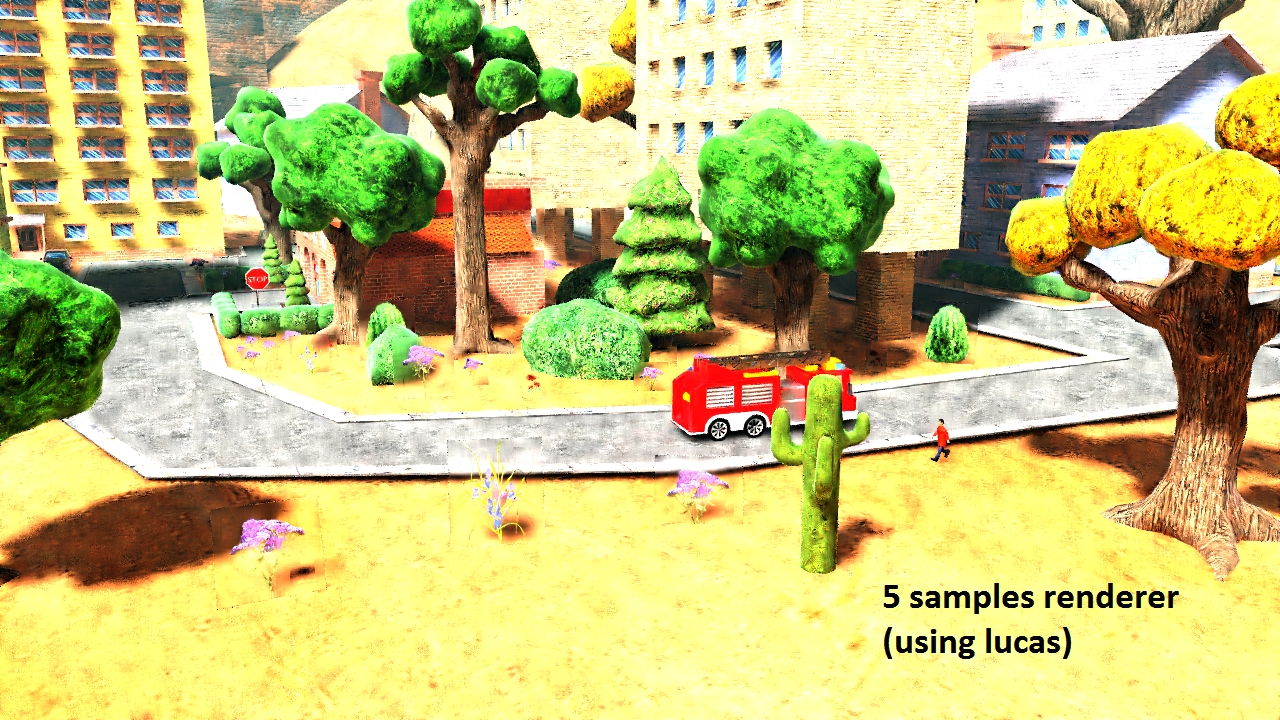
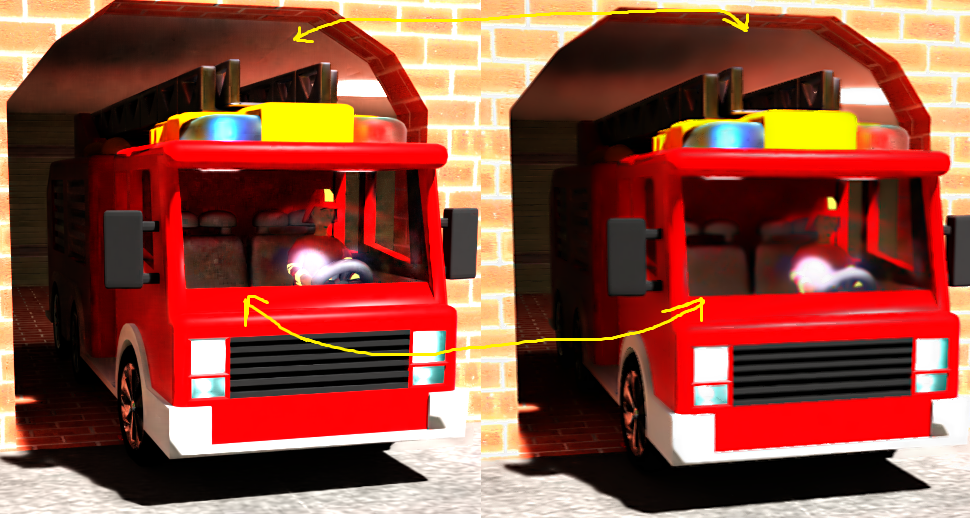
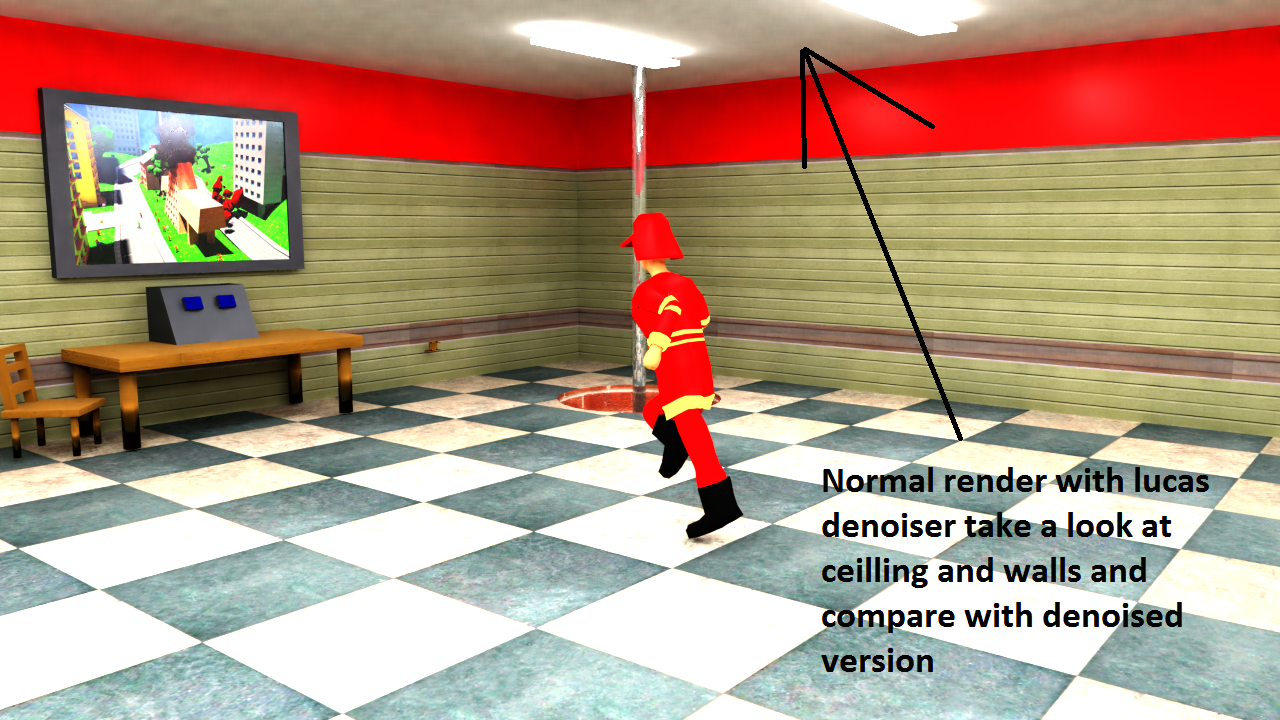
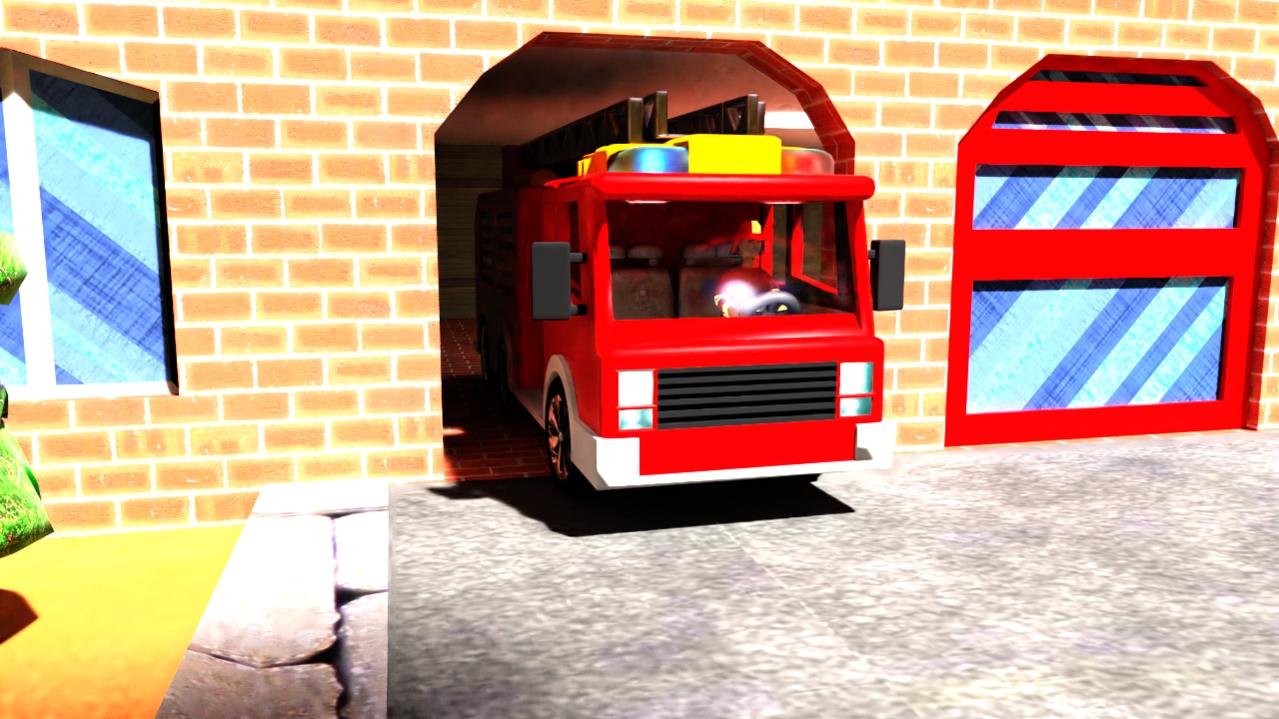
other images to compare

I couldn’t add more attachments than three so I will write additional post sorry x]

If you like it or hate it - let me know :]


How would it work with details only visible via mirrors and glass (you can’t readily get the normals of those in OpenGL, the denoising passes created by Lukas meanwhile do at least for mirrors)?

well mirrors will not get OpenGL information, but depending on size of what they show the openGL function might be able to reduce some noise in them (it looks for similar patterns in an image),
This similair part is then used as a extra set to average upon.

btw this method has been tried before.
Here is a link to do it in a few lines of python code :


import cv2
import os
import numpy as np
from matplotlib import pyplot as plt
files = os.listdir("metabubbles/")
for f in files:
    if f.endswith('.png') and f.startswith('0'):
        print f
        img = cv2.imread("metabubbles/%s" %f);
        dst = cv2.fastNlMeansDenoisingColored(img)
        cv2.imwrite('res/%s' %f, dst);

There is even an option for this denoise method to do denoising based upon multiple (mostly) similair images.
Just lookup that function, which in theory then could be used to do movie denoising.
However because the way it works, its not realy fast (despite it can give nice results).
Not sure how you got openGL mixed into this. (have not looked at your code).

A simple way of mixing it in might be to use the openGL, as a gray scale
Then asume the rendered image got the correct colors (this is almost always the case with blender).
For rendered images their noise is typically in the intensenity (brightness). (HSL >> L)
Good render results are a value nearing problem*
So then one might recolor the openGL grayscale image by the colors ( H+S ) of the rendered image.
Next the local means function to smooth it a bit nicer…
Well maybe you did it differently i’m only guessing this, perhaps me writing this is even usefully to you.

I myself also have some denoise plans, and will work them out (but family life and work take almost all my time). Lately i am mostly thinking of going to code an advanced denoiser based on different fast statistics, and a neural net denoiser. But i tend to think long about ideas before i actually start coding, and your posting acts a a reminder to me. :slight_smile:
The plans should faster then openCV fastNLMeans.

*valeu nearing problem : Take a value, add a random number to it between -50 and +50 repeat it a lot times, with only the result try to find the original value

original value = (sum ( val[n]+rand(time) ) ) / last n
where n goes 1 2 3 4 … 1000 (last n = 1000)
the higher n gets the more precise we can calculate back the original number
time seeds the random generator

It’s really simple algorithm. I haven’t tried mirrors, but it may be poor in mirror areas like in for example transparent glass in the car with driver. Because driver in opengl view isn’t visible so the details will be lost. You can extract render passes with transparent glass like - it could look like opengl render (diffuse pases and others).

The algorithm may fail in many cases, but If I could find more time I will try improve it. Or develop the other kind of denoising :). This version doesn’t work well with hair, transparent areas (sometimes), or mirrors (maybe).

Take a look on the driver and glass on the screen :slight_smile:

Attachments


What about the denoising passes that you can generate using Blender’s solution. One of them is the non-denoised image (maybe you can take a stab at a group node that uses the same pass information to get a better result).

deleted double posting see previous post with corrections.

yes, I am using OpenCV fastNLMeansDenoisingColored as one of the steps in my algorithm :).

As I said before I am working on rendering manager and I will add standard OpenCV denoising as an option.

If I remember correctly I told you (some time ago) or someone else that OpenCV is slow. I was some way wrong. I didn’t know that there is a GPU version and I didn’t know how to use denoising parameters correctly. So, now I have to say that it’s not so slow, but denoising result is much worse than for example neat-video application or AviSynth scripts. Anyway, it’s worth to add it as an option just for additional denoising.

Denoising is an interesting subject. I am poor at math so I couldn’t make it perfect but I have some ideas.

I am too poor in English so I will write my previous algorithm in the longer form (you can read if you are interested - or want to have new ideas :slight_smile: ). So, I was trying to write another kind of denoising algorithm. Instead of finding a motion of pixel block to join frames to reduce noise based on multi frames (like AviSynth) I just used OpenCV to generate:

  • similar points between two frames (Points that are in the same areas in different images - this showed me the motion).
  • next, I matched these points so one point in the first frame is the same point in the second frame.
  • next, I have generated triangles for the first image and second image based on these points.
  • Because points are in the same areas in both images (of course moved by motion in the second image), so the triangles order is the same in the first and second image.
  • I wanted to move pixels from frame 2 to frame 1 position (to compensate motion). So I have used triangles from the second image:
    a). I have set their texture UV cords to their position in the second image.
    b). move them to the position of the same triangles on the first image
    c). so the second image is mapped to the first image.:slight_smile:

Finally, I had 2 frames in the same position but there was some distortion (because I didn’t use the patented methods of finding points in two images - that could help alot).

When I had these pictures matched together I useOpenCVcv non-local means denoising for multi frame but the result wasn’t as good as I wanted (like in AviSynth) and because I am poor at math I gave up x] and tried another ideas and I have written this algorithm which is hard to describe.:slight_smile: (If I only have a knowledge of math like Lucas :slight_smile: )

Denoising is fascinating for me ( I don’t know why) If I only had a time,:smiley: but I am wondering if It will be needed if Unreal could generate nearly the same quality like Cycles renderer.

I was trying to use multiple passes in Blender. But only simple things. I didn’t know how to connect nodes properly and export them easily - I was trying to do simple solution. I could try to learn blender code but I gave up thinking about it because of my lack of knowledge in the field of math. I was learning blender for a few months but gave up and returned to programming which I was doing before. It takes a lot of time to learn blender :/. I saw the topic about the unreal engine and I thought about denoising. I think that soon no denoising will be needed because real-time graphics is so good right now, anyway its interesting subject so I will try to make some improvement in my algorithms :).

I forgot to reply to this part. Yes, the family is important - I have 3 small children so I know this.:slight_smile: I can hardly code anything.:slight_smile:

As I said before I am poor at math - I didn’t even know about fast statistic algorithm. I think with your knowledge you can write good denoiser. Don’t give up.:slight_smile: I will try to improve my algorithm maybe someone finds it useful - or maybe next version will be acceptable. I tried it with input image of 2 samples render without Lucas denoiser. But it was darker than above 4 sample renderer Lucas denoising as input (screen with train).

In this algorithm, I am using the difference between OpenGL pixels and noise pixels and other mixes simple medium pixels calculation. This is a few mixed calculations that is hard to describe :slight_smile:

woops, sorry, this post never existed.

Ehm, are you aware that the the openCV functions:

fastNlMeansDenoisingColored (works on a single image)
fastNlMeansDenoisingColoredMulti (thats the other function, should work on multiple video frames).

Dont require pixels to be on the same place, they try to find similar pixel patterns on the same image(s)
so i dont think you need to triangulate and check for movements of triangles.

Yes, I use fastNlMeansDenoisingColored as one of the steps of my algorithm. fastNlMeansDenoisingColoredMulti is ok but result is only a little bit better than single frame denoising and a lot worse than Avisynth which use motion estimation/ compensation and other algorithms to denoise frame areas (I don’t know what they are doing - I am not an expert,:slight_smile: but I have noticed that motion compensation algorithms are better ).

FastNlMeansDenoisingColoredMulti is someway slow but I have seen that there is a GPU version (but I am programming in Java where there is a problem with GPU version of OpenCV :confused: ).

So because I am not an expert in this field and I noticed that motion compensation algorithms are better than non_local means versions - that’s way I have done this triangle compensation.:slight_smile:

I don’t really understand the purpose of this denoiser when we have a very powerful denoiser for Cycles now. What is it about this technique that makes it useful and for which use cases ?

Lucas denoiser is really great but there is a problem with flickering between frames of animation rendering. So, you have to have higher sample rate to reduce flickering. I was wondering if I can use simple OpenGL render to improve the result of rendering to reduce flickering. So, I have written an algorithm. The newer - better version is almost ready. I know that this algorithm isn’t perfect but maybe it could be acceptable in the future to use in simple animation for youtube. If there will be no good result then I will drop this project :).

I have written a new version of denoiser (maybe last one x]). It’s much better in some cases.

here is a link

The application will generate some different variation images of denoising. So in the acceptable version, you could use one kind of this denoising step as final image for every frame of an animation :).

here is an example renderer using Lucas denoiser 5 samples only and two passes of denoiser output based on this 5 samples renderer :slight_smile: 
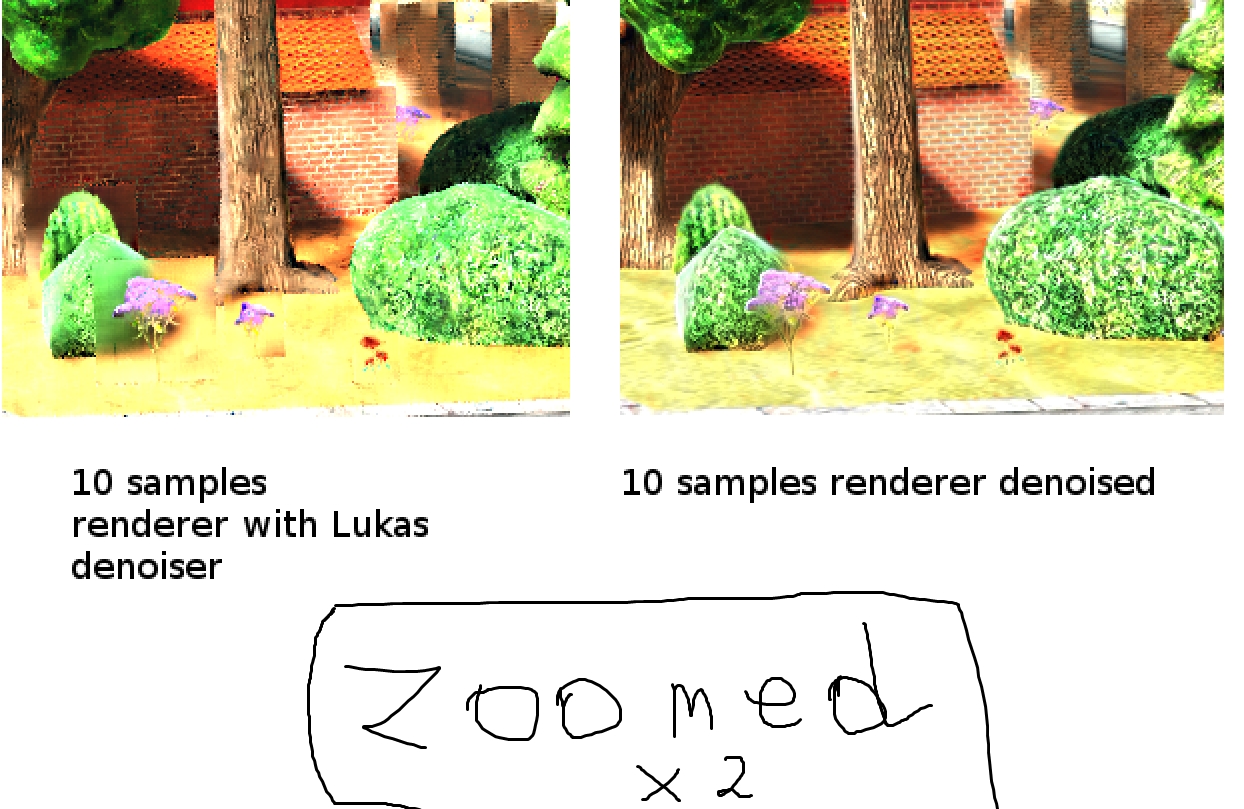
(using Lucas build from 18.04.2017 because the newest version gives me darken lighting)


this app is more a result of love to programming than a job for a realiable project that will not fail.

denoising is slow now - it’s unoptimized and uses only 1 cpu core :slight_smile:

Honestly it’s hard to get a grip on the improvements it makes with such saturated and burnt colors. It even looks like there’s some jpeg compression on top of it. And the low-res geometry and textures are not helping either. I’d recommend using a scene or a model with high-res geometry and much less saturated textures. Even a basic clay material could do the job, like this comparison I did some days ago of Lukas’s denoiser (btw it’s “Lukas” with a k) :
http://i.imgur.com/YEguUX9t.png
This skull model is available on Blendswap btw : https://www.blendswap.com/blends/view/88177

Yes, ups I have written Lucas by mistake. You’re right it’s harder to see the difference, but I have uploaded jpeg 100 percen of quality so it is like lossless anyway. I have made some updates - the new version gives better quality and is 25 % faster (still only on 1 cpu core).

I will upload soon. I have to download some model and check like you said with clay or something.

I have rendered the scene from the first post without textures and only 2 samples + Lukas denoiser and applied denoiser to it. Here is a result - should be noticeable. I didn’t upload OpenGL view image (because I can only upload 3 attachments for the post)


There are areas with improper light propagation but maybe I will fix it x). On the screen with firefighter - the firefighter is blurred because I have used OpenGL view with a white window (because transparency is not enabled in OpenGL view). So the firefighter was hidden behind this white area and the denoiser couldn’t use an opengl view for reconstructing this area :).

Algo doesn’t support bumps, hairs, transparent areas (but transparent sprites works sometimes), dof and hmm. Anyway, it bases only on OpenGL view and low sample render - maybe I will add some other info from passes from blender exr file or another kind of info. For now, it’s like it is :).

Images are somway blurred - but unsharp mask or sharpen could help a lot.

Hm today i did a lot of neural network training, and observations.

A network could be trained to solve the flickering i believe, (though that was not the goal of me training a network at work).
The thing is though, one would need quite a lot of nodes; and the more nodes the more training time.
So processing large pixel sets on R and G and B channel, becomes tedious.

But there is a trick one can do with a lighter neural network with less nodes, if the task can be split up.
Training does cost a lot of time, however once trained the training can be saved, and another network model can be load that has been trained for a different task. hence the aplying of a neural net is then super fast, as the training again would not be required if one loads a previous training. (only initial training then takes (a lot) of time.)

Then the neural net can do various calculations after eachother with less nodes (reducing the learning time a lot).
if one goes from RGB to HSL, mostly L needs adjustments, but pixels might move as well so a processing kernel should be some pixels wide (say 5x5 or 7x7) x n frames…
or without n frames … to do something like NEAT image filter does.

Well its still in my mind, but not coded on it, as well meanwhile the thoughts about it improve.
(well probaply lucas produces a solution faster then I, but still neural networks are strange math beats…)

As I said before, here is a new version v3. Propably last one :slight_smile:

Your version should work much better. My algo is simple in comparison to trained version :). You must be good in the field of math :). I hope you will make it :).

I didn’t try to convert to HSL (this could simplify the denoising process but the conversion from/to is an additional cost).

Finally. My result so far in example scene. I don’t remember if noise input was rendered with 5, 10, or 20 samples (but I think it was 10 samples):


denoiser failed in some scenes and I don’t have time to improve it. So it’s probably the last version. I hope someone could use it :slight_smile: (I don’t even know is anyone manages to run it).

edit: you probably noticed blurry edge around plants - this is because I have used an olded denoiser from Lukas. Newer versions gives me much darken lighting with this test low sample count (it looks like 1 bounces while I set 3 bounces or more, so I retured to older denoiser to render an input image).