I have a model with particle hairs that I like, but I need to convert them into a mesh for Unity. The “normal” way of doing this, as far as I understand, is :
“apply” the particle hairs.
mesh to curve.
add bevel.
curve to mesh.
So, we have a nice mesh that closely ressembles the particle hairs. But, problem : it’s way too polygon heavy for Unity to use it at runtime. So, in order to simplify that mesh, I thought of creating a spheric “envelop” mesh and flatten it around the hair mesh, to make some kind of helmet that would roughly look like the original hairs but with less polygons. But I don’t understand how to do this : “snap during transform” seems to almost do the trick… but not completely.
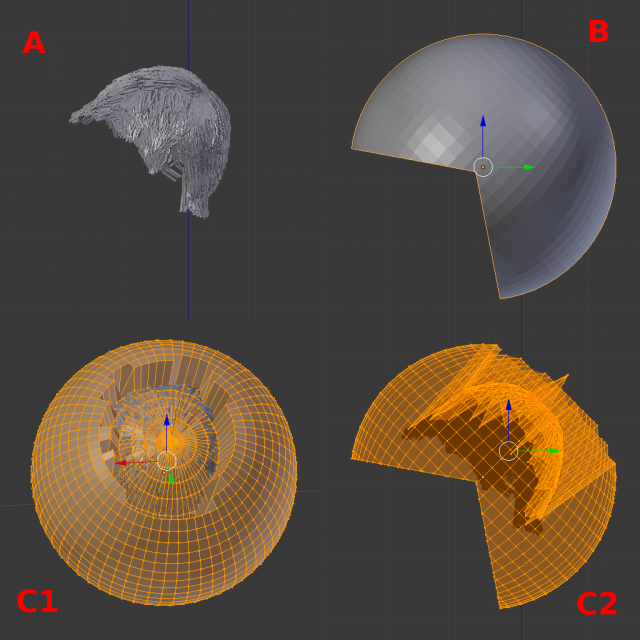
Here is a picture to illustrate :
A) the polygon-intensive source hair mesh that I obtain from the particle hairs.
B) the cut sphere from which I intend to create the simplified “helmet” hairs.
C1 and C2) the best result I could obtains with snap during transform : I thought that maybe doing the same thing from several different angles would model the sphere correctly, but no, and becomes worse everytime.
If it’s for real-time use, I’d agree with finalbarrage’s suggestion. It may seem simplistic but you can get some decent results using double- sided planes. This video seems quite good. Don’t mind the fact he’s using Maya. The method is still useable. Another one that seems like it might suit your needs. And it’s geared towards Blender.
Exactly. There really is nothing specific to Maya in the process.
As someone said in the comments for the Maya video the downside might be issues with alpha sorting. Where the engine doesn’t render the planes in the right order relative to the view. So you might get some planes disappearing as they move in front of others. That’s why you see a lot of folks going with “solid” hair. While it doesn’t work in every case, it seems to be more reliable technically. Although maybe not quite a good visually.
This seems to only affect 8 bit blended alphas. He mentions it in relation to Maya’s viewport, around 33.43. But nothing about Unity itself. He actually shows the potential problem and what it would look like. But I assume he wouldn’t be bothering with it, if the problem existed in Unity. Or at least if he couldn’t work around it.
“This” is the video the Maya commenter mentioned. From the Blender foundation apparently.
Thanks for your replies, I haven’t finished watching everything yet but there are good ideas there. The thing is that all those methods start the polygon hair from scratch - I was just hoping to approximate the existing particle hairs with a lighter “envelop” mesh.
Or to put this otherwise : I have created detailed 3D models with particle hairs, but the game itself will have a fairly low resolution : for the actual animated characters on-screen I only need simple low-poly models to spare some CPU load. That’s why I was hoping to emulate the actual particle hair with a low-poly mesh of roughly the same shape, to display small characters on-screen that would faithfully resemble their occasional close-ups.
I continued experimentation with my first idea : projecting finely subdivided plans onto the complex hair mesh (particle hair turned into mesh) from all 6 cardinal directions then joining them provides with some sort of 3D-pixelated approximation of the original hair and effectively reduces dramatically the number of vertice (from 200k to 8k or something). It more or less does the trick but it’s still largely suboptimal…
If it was possible, instead of projecting 6 plans along 6 directions, to project (“snap”) one sphere toward one central point, the result would be both more precise and poly-wise lighter… But is this possible ? I couldn’t find a way.
Hmm, after some research, what I’m trying to do seems to be called “retopology”. Any idea on how to do that while heavily simplifiing the underlying mesh ?
retopology is only done when you want to take a hi poly model such as a sculpt, and make a lower poly model with the same detail, often requiring a normal bake, and with better deformations for animating.
what you want to do is create hair cards, look at the first video Macser posted, thats a really good one.
 everything he did can be done in blender.