Hi. I wanted to assign single driver (object’s Y location) both to the bone’s (the steer’s) X location and Y location, but so to the driver’s value assigned to the steer’s X location will not correlate with the driver’s value assigned to the steer’s Y location. I mean i want driver to be having completely different values when i’m moving the steer in X axis, than when i’m moving it in Y axis. I hope you understand what i mean.
I tried to “add variable” in the driver’s graph editor. I filled the empty bars, so (as i thought) the driver will be assigned to the steer’s Y location with the completely different graph. Unfortunately the graph is the same for both variables. How can i change this?
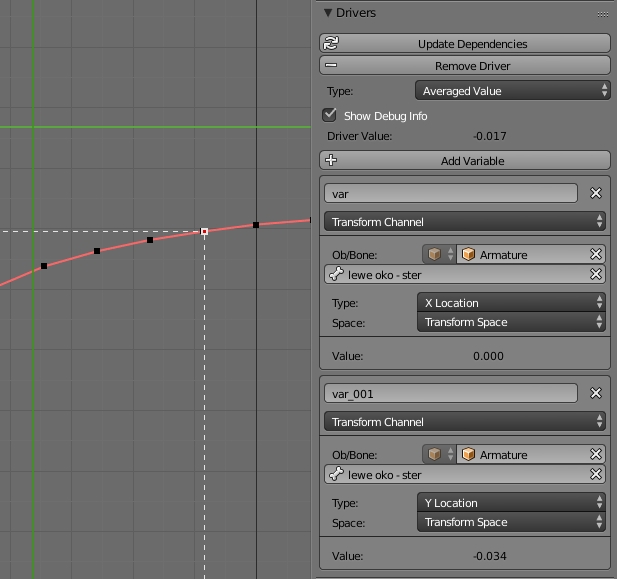
you need to create another driver for the Y value then. The variables on the right pane are the stuff that drive your X value, so adding multiple variables will average them and feed them into X location only. You need to right click on your X value (the one being driven, not the driver), click copy driver, then go just below into your Y value and click paste driver. Then, go into graph editor and modify it.
What do you mean “being driven, not the driver”? Isn’t that value marked with pink the driver?
I’ve got the object’s Y location marked with pink (the object i want to be controlled by the bone - the steer). So it could be controlled both by the bone’s X and Y axis moves (but each differently). I don’t want to involve X location of the object (so why should i paste the driver there), but the X and Y location of the steer.
No the one in pink is the driven. The driver values are not highlighted whatsoever in the UI.
I am not sure what you want to do. Do you want one value to be controlled by several values ? Then my bad, you had it right - you need to set up several variables in the driver panel, just like you did. Now, how you tell these variables to handle the target is the important part. What do you want to achieve ? (pictures always welcome)
As for the math part, don’t worry, you can do wonders with elementary operations (addition, substraction, multiplication, division) !
Well, the object of which i want its Y location being moved is the iris of the character. I want it be stuck to the eyeball (which is very irregular in certain places - that’s why i want to involve a drivers in this). The iris is also parented to the bone of which head is in the centre of the eyeball. Both rotation of the bone-parent-of-the-iris and Y location of the iris are driven (as you said) by the steer i was talking about in my original posts.
I already made the Y location of the iris being driven by the steer’s X location (it makes iris be moving sideways - on the right and left). Now i wanted iris be moving up and down too (it’s the steer’s Y location). Yet iris location can’t be driven the same way, because the eyeball has a different curvature across X and Y axises. And because Y location of the iris is already taken by the X location of the driver i’m afraid i can’t do this for the steer’s Y location. At least not with the same driven location value (but maybe with the shape key?)
Few months ago i already posted in this forum the question how to solve that irregular eyeball’s iris problem here:
Back then i thought more about making the iris be a texture. Now i made it a mesh stuck to the eyeball, because it can be shaped by the shape keys.
I think i will use a shape key which moves the iris forward and backward, like the iris’ Y location did that.
Ok thanks for the explanation but it still sounds a bit convoluted - anyhow, if you need another layer of control you can always duplicate bones, make the duplicate a child of the original and add the driver on this new bone (and remove the previous driver). OR like said above you can use an additional variable and mix the two to control the iris.
However if this is about keeping one object on top of another irregularly-shaped object, I’d suggest using shrinkwrap constraint, that snaps a bone to a mesh surface. You are planning to use these drivers as some kind of placement correction, right ?
That’s right. That shrinkwrap looks interesting. It can be helpful in the future, as i almost finished doing the thing in my own, maybe roundabout, way.