Filmic

Hi everyone.

I noted that Filmic is in version 2.79. In Compositing, how is the workflow when I work with a image sRGB? Sometimes I have to composite EXR render in a real photo (sRGB image). When I turn on Filmic, EXR is ok, but the photo became washed. May I use gamma node to correct the photo? If yes, which value? Because 2.2 or .04545 does not work…

Thanks.

Welcome to a bit of a rabbit hole here…

Technically a photo begins life as a series of values that could be modelled under a scene referred system. When you take the photo and download it as a JPEG or such, it is labelled “sRGB” due to the colour of the primary lights the encoded values are referencing, but the actual intensity curve mapping is not sRGB; it is a secret sauce camera curve that, unless you are using SLog, VLog, or some other log, is unrecoverable.

So what is a poor pixel pusher to do?

The answer is a little tricky. If you simply want the display referred output from Filmic to match the “white” values in the original JPEG, you could cheat and identify the colour space of the image as “Filmic Log Encoding”. This won’t be terribly accurate, but it should result in your values ending up close-ish to what you saw in the JPEG.

There are a few other options to try and get a closer set of intensity values that could work better with Filmic, but they are all hacks and guesses; the information you need is lost forever. I can go into them if you are interested, but I will leave it at this for now.

1 Like

Thanks, troy_s. I used a Gamma node after the photo. I tested some values and I choose 1.2. For now, it´s ok, but I hope this workflow be better in the future. In Maya, I used use a gamma node direct in the texture, making the de-gamma with a value of 0.4545, the inverse of 2.2.

This is broken logic as power functions do not transfer values into the scene referred domain. It is a bit of a misunderstanding about scene referred linear workflow.

There is no real way to improve a workflow that includes broken assets. The best we can do is massage them into something almost usable, where they must absolutely be used.

Hi guys and troy_s.

I´m bringing this tread back because I didn´t find a good workflow to work with Filmic in Composite. Besides the sRGB photo issue, I noted that some passes are effected as well (AO and Mist, for exemple). The intensity, specially of the white values are dull, when Filmic is eneable.

I´d like to hear from you, how do you guys deal with this.

Thanks in advance.

Nope!

Your idea about what “white” is needs a little exploration. There are plenty of threads here, on Blender Stack Exchange, and elsewhere on the net. I’d search for “scene referred” and “albedo” to start.

If you “didn’t find a good workflow to work with Filmic” your workflow is busted up and needs to be rethought in terms of how scene’s and energy works. In the longer term, if you begin to understand how your current mental model is broken, you’ll see much better results.

Good luck…

A few points that you need to accept:

  1. “De-gammaing” means removing the transfer function on a nonlinear image. In 99% of cases, applying a power function on an image texture isn’t going to linearise it for use in a 3D application.
  2. Understanding what an albedo value is is deadly important.
  3. Understanding that a scene’s ratios of light energy goes from zero to infinity is important.

Thanks, troy_s.
I´ll start my research. When I was a Maya user, the workflow was a bit different.

But, thanks a lot for pointing a way to me.

It will be easier to help you out if you do a small bit of research into both “scene referred” and “albedo” first.

The main thing to understand is that reflectance values are linear ratios from 0.0 to 100.0%. If you are designing physically plausible surfaces, those values will never be 0.0 (black hole) nor 1.0 (a physically impossible mirror).

Given that they are encoded linearly, and also given that most people are trying to use photographs to make their textures, it requires a bit of mental hopping to appreciate the nuance of the complexity.

If you have a single light source, and somehow manage to block out all non-diffuse light reflections in the photo via polarizing techniques, and expose properly, and use the unprocessed camera data, you have a hope of getting a decent albedo ratio out of a texture image. Sadly, online, people aren’t aiming for “data” in a majority of cases, and apply aesthetic twists to the photo.

The easiest way to think of these “aesthetic tweaks” is adjusting the data away from the linear scene reflectance values to something more nonlinear and tweaked. This forms a sort of knot / encoding, that without instructions, cannot be undone. If I have put a knot in a piece of rope that is a simple square knot for example, then I also put more knots on top of it, I can’t say “just undo as you would a square not” and expect you to untie it. Same goes for the data; it will typically end up bent.

Even if the data isn’t mangled too badly, you can also see that the range of a photo for a texture frequently covers a wide chunk of the code values in the image, including 0.0 and 1.0, which are those unlikely values. In addition to this, the “proper exposure” that a texture is taken at frequently is the wrong albedo level for an actual surface material. A good example here would be objects that reflect very little light, like asphalt. How would we photograph it? It would need to be very low albedo, but if we expose it as such, the image would have very little data. Likewise, if we over expose it to capture the data, we would need to carefully scale that image back down to the proper albedo level for asphalt.

Phew. Quite a rabbit hole, and that doesn’t even begin to cover the larger mental hurdle of understanding the difference between scene referred and display referred data ranges.

If you can, try to research your particular issue more closely, and report back with a bit more information and context, and I’m sure the folks around here can help you out.

The filmic workflow is quite simple theoretically, but can be a bit tricky practically, because of the correct albedo problem. The idea here is that you need a correct combination of albedos of all the materials in the scene and light intensity in order to get the correct light behaviour. That way you won’t get dull whites. As a matter of fact, almost all albedo textures you can think of must be darker, than you imagine, as almost the brightest thing you can render is pure white snow, which has the albedo about 0.85, which is quite gray-ish on the texture. Printer paper for example is 0.6 - 0.7. Then crank up the lights intensities. And you want actually paint out your textures in a paint program with the filmic OCIO enabled, i guess.
Troy still is not tired of explaining people the principles, though :slight_smile:
I’ve tried to explain from a user perspective. Am i correct, Troy?

So, Filmic is used in “solid” mode in 2.80? It doesn’t bother me too much, but I noticed that normal+y matcap doesn’t look right in the viewport. Changing Color Management settings doesn’t affect the viewport in solid mode. Once you render it you can change it from “filmic” to “default” and then it will look right. So I wonder if Filmic in solid mode is necessary since I thought it’s meant for HDR?

1 Like

Filmic is a view transform that maps the higher dynamic values in your scene down to the limited 0-1 output range. It does a better job of preserving the true nature of your renders than the default transform which just castrates your values outside of 0-1.

So basically, if you’re rendering out your scene, definitaly use it. If you’re using the normals matcap for some kind of screen space normals render, linear is probably the way to go ( But I’m not sure how that matcap behaves).

Edit: Reading your post again, maybe I misunderstood your question… Or maybe not. Been a long day. You dicide. Haha

I’m using Filmic and I understand why it’s default in Eevee and Cycles rendered mode. My question is about solid mode solely.

I sometimes use normal matcap to quickly grab a tangent space normalmap in ortographic view.

Yep, I completely missread your post. My bad.

That is indeed odd that filmic would affect solid view mode. Maybe a consequence of the render modes being more tightly connected in 2.80 (shadows in solid view/overlays in render view), rather than completly seperate modes.
But then, you say changing the CM settings has no effect in solid view, so a bug perhaps?

I noticed this too. it’s also not too good for Studio Lights -
Related:

corresponding Devtalk thread: https://devtalk.blender.org/t/workbench-engine-filmic/5278

Apparently it’s not an oversight: https://developer.blender.org/D3569

A “convert colour space” or un-filmic-ate" node would be very handy, for people using regular images and vids compositing with filmic.

as far as I know, the white point for filmic is somewhere around 16 for R,G and B. Low dynamic range images (png, jpg…) only reach 1, which correspends to a light gray in filmic, that explains why it looks washed out.
The proper-ish way to do it is to render your scenes in Filmic, and then when you’re using the compositor or video editor you should revert back to sRGB.
If you need Filmic (eg: mixing images with your current render), you could roughly use an RGB curves node, find the white point value (like I said, it is somewhere around RGB[16.0,16.0,16.0]) and then use a gamma node and maybe increase the saturation to reverse some of the filmic effect

How nice of them to just assume filmic for everything and forget about the edge cases.

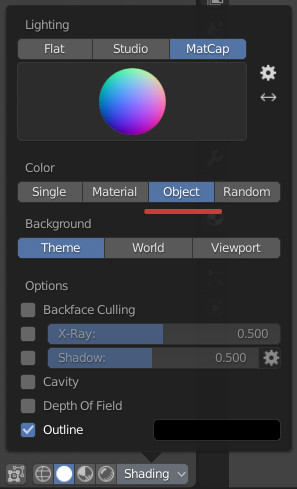
@Tvaroog, I wanted to see the problem for myself so I ran some tests. Maybe you already caught this, but if not make sure to change the color mode from the default [material] to [object] even if there is no material applied. The normals were coming out slightly darker than they should, and this was the fix. Of course, you still have to render and then change the view transform to default…

normalmatcap

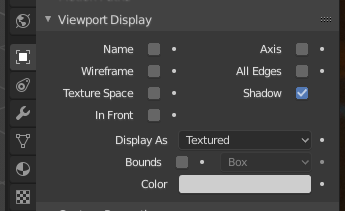
That’s because by default color in ‘Object’ tab under ‘Viewport Display’ is set to 1.0 1.0 1.0.

viewport_display_color

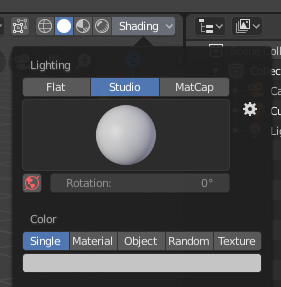
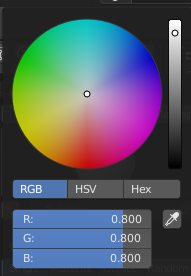
Meanwhile by default material color is 0.8 0.8 0.8. Also default color when you select “Single Color” is 0.8.

single_color single_picker

1 Like

True. My main point was “even if there is no material applied.” Just making sure you caught it, because I almost missed it thinking no material means object display color gets used. So all good. :slight_smile:

It would be nice to work out a way for people who want to composite footage in in the same pass as the 3D render - especially with the speed of Eevee. Would it be case of multiplying by 16 and then putting through a very high Gamma?