How to extend an Image from side to side softening the hard edge of image

I have an Animation of the Sun Series: see https://www.youtube.com/playlist?list=PLR0QoztQVGtiHcwhVtd9i7qfvNkVm3m6c
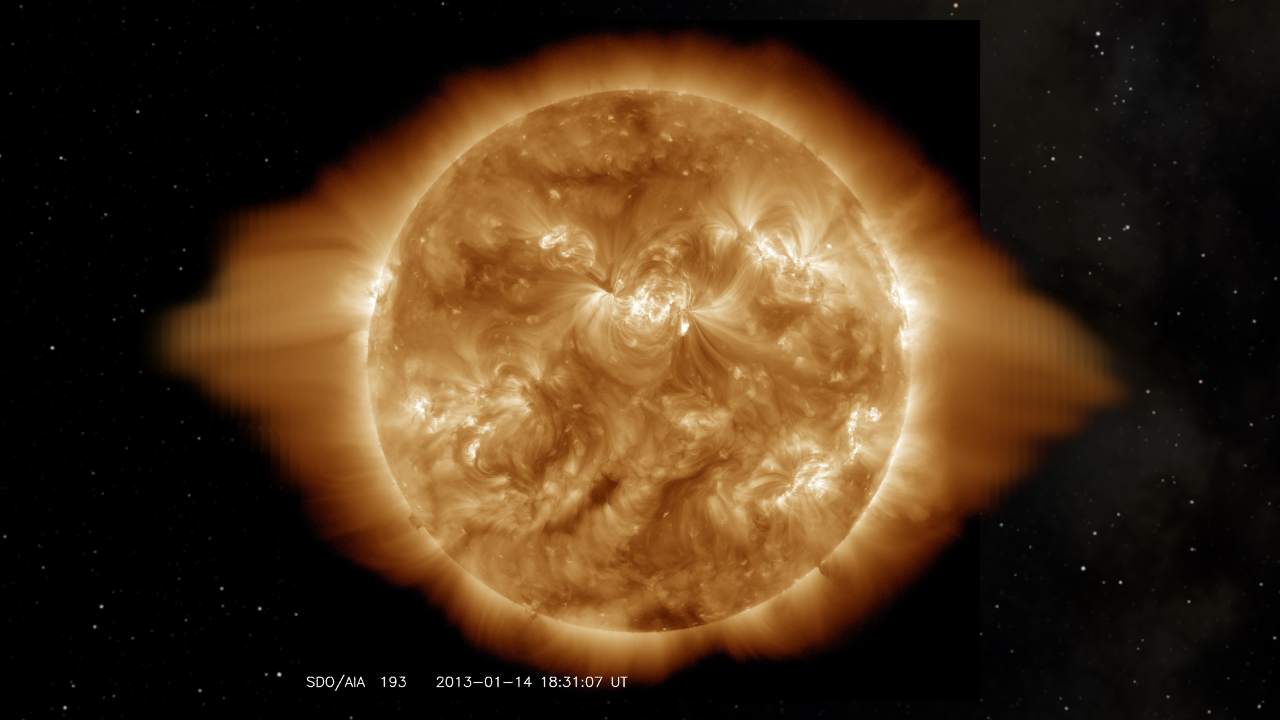
as you can see from the Image below


The Corona or Radiating Fire of the Sun has a edge on both sides sometime, sometimes they extend up and down, but not much, and the few times this did happen I fixed them by hand.

This is a NASA public domain images of the Sun in AIA 193 4096x4096 format, with an Environment image texture of the Stars as background.

What I want to do is soften the hard line so it looks more like this:


I just did a fast Smudge by hand in GIMP, and asked this same question on their Forum.

There are over 33,333 images for one Year and I have over 6 years of images that I am working with, that is over 200,000 images, so I can not do this by hand in my lifetime since I am dying of Cancer my time is limited, I am old and have Arthritis as well, so it would be a very painful way to go out, and I might not finish it, so why start, but I wanted to finish this series, and go back and do years before the series started, which is 2010, so people can view the sun over a decade, but the hard edge looks bad, and I know there is a way to fix this, but I am not good enough at blender to figure it out, my guess is that I need to write a script that takes the edges of the images and blurs it side ways in an oval shape, no idea how to do that, anyone have any ideas?

I originally did the video in 1080, now I want to render it in 2160, since the originals are larger then the 3840, it should look good at 4k, but I want to fix this issue since it will take a long time to render all these images.

Update: I also started a thread on Gimp:

This will be just as hard to wrap my brain around, it deals with using a Gimp Plugin GMIC, I have no idea how to do this, so its going to be a huge learning curve, normally this would not be an issue with me, being sick is making it hard to focus on learning new things, not looking for someone to do the work for me, just looking for more information on how to do this, in a way I can figure out how to do it.

Using Gimp and a plugin, its possible to write a CLI command, using bash I can apply it to all the images, it would have to resize the canvas, then know the location to apply the effect, my guess is that this will take time, if its faster and easier to do this in Blender is a good question, both require me learning how to do it then doing it.

Thanks

What ever solution you arrive at it wont look as good as the actual corona that is not clipped off. However you could try the Inpaint node in the compositor, it is used to fill in small holes left by making alpha channel holes in images.

Clone the corona from areas that are not clipped. With sun it is easy, just rotate around the sun center, move to place so that it aligns correctly with sun surface and blend in with mask. Elongating the equator part as you show in example is the next step, don’t have a very good idea for that in Blender compositor, because it does not have warp tools.

Thanks 3pointEdit, I am just hoping it looks better then the hard edge, I read about the Inpaint node, and not sure how to apply it to this problem, my guess is that I would have to make the image larger then the image without filling it, make the background transparent, but the effect just moves the hard edge, but maybe I just to not understand how to use this node for this purpose.

Thanks kesonmis, I do not understand what you mean by Clone, searches only came up with Texture Paining, so that is where I am stuck.

By cloning I mean using a different part of the same image to patch the missing parts. As Blender compositor does not have specialized clone tools, just transform the image (rotate and move if necessary), then mask and merge over the original.

I am beginning to think that Gimp might be the right tool to use, I will ask this question there.

Clone in the compositor just means grabbing another node noodle from the image source. You don’t have to actually duplicate the node.

Still trying to wrap my mind around the concept, without details and what actual Nodes to use, its not easy for me to understand, maybe the Aspie in me, but I only learn by knowing exactly what to do, which is why I did good in the Military, I can follow Orders without Question as long as I know exactly what to do, and the Military always made sure you did, but in the Real World, Normal People work in Abstract Concepts, because they know enough about using Nodes to think something can be done if you know how to use all the Nodes, when not all of them are even Documented, let alone have examples about how to use them, Documentation is the hardest part of the job next to examples, but Most Programmers hate Documenting their Work, so I get stuck on Abstract Concepts, I am use to Technical Orders that go Step by Step through a Process, but in this case, all I need to know is can it be done, if so, do you have clue how, and if you know can you tell me or show me in a file or URL link to an example or even Documentation I have missed, because I did look, I tired making a duplicate and then stretching it to an oval shape, putting it behind the sun, but that hard edge would not go away, and there are tools that allow me to blur the pattern into a shape, at least I did not find a way to do that, I can do it by hand a lot better then what I did, I did not do a good job of Blurring, but it was just an example, but it took a few minutes goes to do that good, point is, it would get years to do this by hand, but I could do a good job, but by hand they will look more like a Fire then a Corona.

Ink has a feature that allows you move sections of an image to animate the object, not sure what the tools name is, it was years ago, but the idea was that you defined a shape, in this case that shape is oval, then you define where to grab it from, in this case the Corona and not the Sun, the Sun does not move around a lot, maybe a few pixels over days or hours, but its mostly centered, I have to fix about 10% of the images to center them by hand, because I cannot find a way to do this with a program, the Date can not move, only the Sun, so I have tired many things to learn of ways to make this better and easier, but can not, Ink does not do what I need in this case, its not that I just need to move an object, I need to blur it, I need a way to add a node that will take the source image, at a predefined coordinate and blur it in a direction and length that is defined, such that the blur looks smooth, and not showing drag lines as seen in my hand blur, so it needs to be able to blur in a direction and length and have some type of taper effect so it is thin on the outside and looks real, the other issues is that some times in the year, the Corona Shifts the the other side and does not Plume on one side or the other, sometimes it does not leave a hard edge on either side, so it needs to only take from the image an area that can make a defined color, which is Black in this case, transparent, so it does not wash out the Stars around the Sun, so I am not asking for much, just a Blur tool, but I have no idea how to use a Blur Node to do this, as far as I know it cannot, it only blurs the object, if I mask out everything but the outside, it will blur that and I can put that as a back drop, but it also blurs the black, maybe I can use a Mask to make Black Transparent, this is what I have been trying with no success, the effect is not the same as a Smudge, not a blur, in Gimp its called a Smudge, I should edit and update that, but you can see what I want to do, how to do it is that question.

Here is a basic node setup for your image. I have cropped it to match your square original.


This is the rotated version with mask and soft edge.


And here is one with inpaint and a mask generated from the rotated version of the sun.


Of course you can load a movie or image sequence as a source instead of the single image as shown here. You could even offset the mask source movie in time to make it look different from the top and bottom of the current frame.

Thanks for the details, but I am confused or explained it wrong, just to make sure I get this right, the original has the hard edge and is named Sun-2013-01168-720.png, and I want to add the extra Corona to hide the hard edge, it looks like you used the image of what I want it to look like then cropped off the sides to make it look like the original, which is the opposite of what I need to do, so this confuses me, sorry about all the work, it looks good if that was what I needed, maybe I was not clear, but it seems you know what you are doing, so I ask for clarification, the source image should be the top most image, I think what is throwing me off is that you seem to be using the Sun-2013-01168-720-soft.png which I edited in Gimp to have the desired effect, so setting up using that image instead of the original is confusing me, but thanks for the help so far, the setup really helps, sorry if I was not clear, explaining things seems to be my down fall in life as well.

If you watch the original video, you wonder why NASA did not zoom out to get the whole Corona, instead of what they did, which is to cut it off if it gets too big, it varies throughout the year, it does not always make a Hard Edge when the Corona is larger then the camera settings, but I do not like that Hard Edge, nor would most watching it, but noting I can do about the Originals, NASA made the decision years ago to not film the entire maximum corona, why they did it was to get a closer view, since they normal only view it one frame at a time, and study it, they do not do this to make Videos, since I see so few of them, and do not see the entire years worth in one video, but at low res few see it, at 1080 on a big screen it just looks bad, and in the 4K is will look even worse, this does not seem to be an easy fix, I asked about this years ago and no one ever came up with a fix, so I had no choice but to leave it, this time around I was hoping someone could help fix it, since I have been working on this for years and never found a way to fix it, thanks for the help.

I used your blurred image and cripped it to look like the first image only because i was in a hurry and didnt scroll to the top of the page. Anyway the result will be the same as i do not use your smudged edges at all.

I guess Nasa didnt intend to document the corona with this telescope.

Thanks again, from what I see, I do not need to crop if I use the Original, and I do not want to Rotate since that is the time elapse indicator, not sure why you needed to rotate the image for one, but I like the effect you got in the 2nd setup, what I do not understand from the image is that, did you have to resize the image canvas? Or does the scale node expand it as needed?

It would be better to upload the blend file if you could please, that way I can see all your settings without having to make a lot of assumptions when recreating the setup from an image, thanks again for all the time and help, I am just having a hard time understanding this setup.

I have placed the square sun image on a larger empty image. Then I used the inpaint node to stretch the glowing corona over the empty region. I used a copy of the original image as a mask but rotated it 90degrees so that I could use the top and bottom to replace the sides.

The Top and Bottom Corona is not always present, so rotation 90 is not going to work for all the images.

The other problem I have is that no matter what I do, I still get a hard Edge.

I do not think this can be done in Blender.

I think that it can but you would need more experience with Blenders nodes to do it effectively. I would use textures mapped to a radial shape or polar mapping.
Also you can achieve good looking flame shapes from very simple Cycles materials like this #121

Thanks, Google Drive no longer works, so I could not download the blend file.