I’m currently working on a project for creating some car quad headlights, both in the real world and in Blender. I searched on here for ages about adding a Carbon Fibre finish in textures, found a few … mostly demonstrations but no 'HowTo’s.
My first question is, Can I create my own textures ? take a photo of the Carbon Fiber I have already, then create a ‘tile’ for UV mapping … but then I need to have the texture of the Carbon Fibre to be as realistic as possible. This would mean creating a bump map of the texture, is this possible ?
I was referring to the actual creation of a bump map. I know I can import any image or photo of carbon fibre and apply that, I was looking at a tutorial the other day that imported three different image files to create a blender image that was so realistic that it actually looked like a real photo ! The bump map image file is what really ‘made’ the final image, the texture of the bricks was so accurate it’s almost as if I could feel it.
So, basically, what I’m asking is … how would I go about creating a bump map image that’ll give my carbon fibre texture. Can’t remember the name of the other file, but it was various colours.
Thanks for the reply and the link Burnin … but no, maybe I’m not explaining myself correctly !
I’m not wanting to know how to apply the material, I did actually spend a little bit of time reading that thread, but a tutorial that includes about 600 different nodes isn’t for me ! Besides, most of what you’re going to find for applying textures and UV mapping is about downloading existing image files.
What I’m asking is, how do I make my own ?
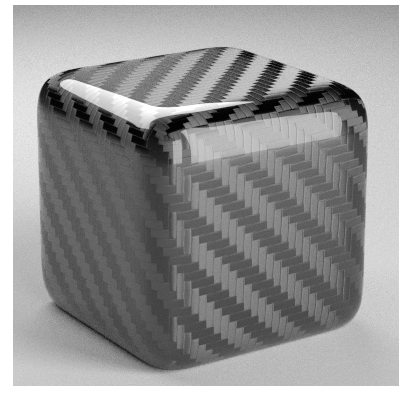
There are many types of Carbon fibre weaves and different colours. As an example, I use ‘2x2 twill weave’ in my car parts, and there’s also ‘1x1 plain weave’ that is very popular. Both give very different results.
It so happens, about half an hour ago … I found the answer, so I’m kind of answering my own question :eyebrowlift:
The fiber should use an anisotropic shader with the direction changing by 90°.
Note how the direction of the specular streaks alternate.
So if you had a checker pattern, multiply the black and white checker with 0.25 (=90°) and use that for anisotropic rotation.
Don’t forget to fresnel in a normal glossy on top to simulate the epoxy resin.
Using bump (or normal) maps depends on how far away you see it, from afar anisotropic shading may be able to handle it alone.
I prefer two bumpmaps - one for the fibrous random detail and one for the weave bumps, none of which are applied to the resin of course.
That’s brilliant Moony … that’s the effect I’m after :yes: your Nodes setup pic saved for future reference
I’m still very much at the planning and research stage at the moment, but it’s nice to see all these options are doable. Just got to find a good transparency howto now ( there happens to be one on the link you supplied ) so I’ll read that as well.
The transparency I’ve already tried, as basic as it was still didn’t look right … not enough reflection on the material. I’m basically using vacuum formed 2mm PETGuv for the headlight covers, and the interior part will be the Carbon fibre finish. Manufacturers tend to use a plastic chrome effect on aftermarket headlights, to me that looks cheap and nasty … I’m going to improve on that and use various other finishes. Customers can choose either carbon or plain colours and even colour code to thier vehicles body work.
Here’s what the prototype clear headlight cover looks like at the moment >>
 … how about: “