I was happy with my finished art in Linux mint 18.2 but when i opened it in
Window 7 its a lot darker.
To be honest I am very confused about color management. How do I get
Blender and Gimp to look close if opened in Linux mint or windows?
I have an appointment with a giclee printer on Tuesday an hours drive away that I will have to cancel, till I can get my head around this.
Without having seen the image and without being either a Linux or Windows 7 user, I’d say it sounds like a classic gamma mismatch. Your computer OS is expecting a certain gamma value baked into the image, but getting a different value. A jpeg image for example, will be in the sRGB colourspace, but - depending on your system - could have a gamma of 1.8, 2.2, or 2.4 baked into it. If you saved the image in exr, it will have a gamma of 1 - linear workflow - so you’ll have to tell your system to add the right gamma curve for your monitor. Just try and hunt down the gamma values of Linux Mint and Windows 7 and see if there’s a mismatch.
Are Linux Mint and Windows both using the same monitor?
Is the monitor calibrated and profiled?
Are Blender and Gimp on both Windows and Mint using the monitor profile?
Did you save the rendered image with ‘Save as render’ on or off? What image file format did you save to?
Did you embed a colour profile so the saved image colour space is correctly interpreted?
Ask your printer for advice on how to prepare the file for print.
Q: Are Linux Mint and Windows both using the same monitor? A: Yes. I only work in Linux mint 18.2 but booted into the windows 7 partition only to check out the image and realized that they are very dark.
Q: Is the monitor calibrated and profiled? A: No. I have just spent a hour trying to find a software solution to this using nvidia tools, LPROF, Argyll, Monica, xgamma. Ended up not finding a simple solution. Is there a software solution to calibrating my monitor thats using Linux mint 18.2? Or will I need to buy one of those hardware testers.
Q: Are Blender and Gimp on both Windows and Mint using the monitor profile? A: No.
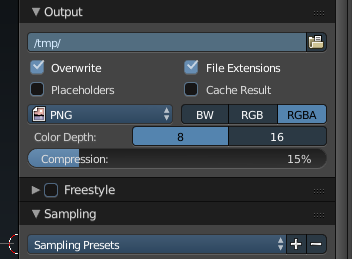
Q: Did you save the rendered image with ‘Save as render’ on or off? What image file format did you save to? A: No? I am using Cycle and have not been able to find ‘Save as render’ button. I mostly save my images in png file format.
Q: Did you embed a color profile so the saved image color space is correctly interpreted?
A: No How do I embed a color profile? Tried reading Blenders 2.79 manual on color management but doesn’t say there.
After months of hard work I’m starting to get my head around Blender and am producing some art work. Yet I admit that I have completely over looked a very important area. Mainly because I have been quite confused about the whole thing. The colors look alright but the images are a lot darker. I think the computer does not know what is fully black and what is completely white. I have multiple areas to sort out.
I think there are tools in Linux (in your desktop preferences) to help you calibrate your monitor.
One quick and dirty way (that I’m sure many people will argue against) to check, calibrate your monitor, is to make an image with a gradient from black to white and see how that image react .
If in both OS pure black and pure white values “stay at the same place” then it’s a gamma/mid-tone issue. If value are clipped you can try to tweak settings so you can see the full range.
Most importantly, you must be certain that both the originating computer and the host computer have identical (standard …) color profiles. It may well be that the image was generated “too dark!”
You must also be sure that the image has alpha properly “pre-multiplied,” since most image-viewer programs assume that this has been done. (That is to say, “R=1.0, A=0.25” will be pre-multiplied to give “R=0.25” and Alpha is then either not-there or ignored. In particular, “A” should not be applied again!)
In Blender, you can readily “sample” a pixel to see what its (R,G,B,A) values are, and compare them to a standard palette which you can readily find on a web-site. Find the closest values and visually compare them, knowing that they should be the same.
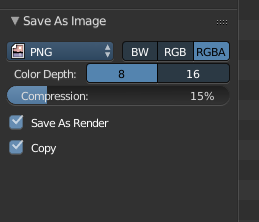
Using the Save as Render checkbox will apply the colour transform to the saved image, so it’s more likely to match the render window when viewed in Gimp.
Blender assumes sRGB colour but doesn’t assign a colour profile to the saved render, so to ensure the saved render is correctly interpreted, the first thing to do in Gimp is Image - Colour Management - Assign Color Profile. Use a reputable sRGB.
Your printer might want images supplied in a different colour space(AdobeRGB eg). If so convert to another colour space after first assigning sRGB.
The only sure way to display data the same on different hardware is by profiling, using a calibration device. Some cost more than others, but you may find the cheaper versions from the same brand are hobbled by the software supplied. The more expensive version may use the same hardware, and the software allows you to access more features. You may be able to access more of the features of a cheaper version using DisplayCAL and argyll instead of the supplied software - https://displaycal.net/
The calibration would have to be run separately for Windows and Mint.
Once you have a monitor profile you can use it in imaging software so that all your applications display data the same way. It should also help to ensure the image looks the same on the printer’s monitor as it does on yours.
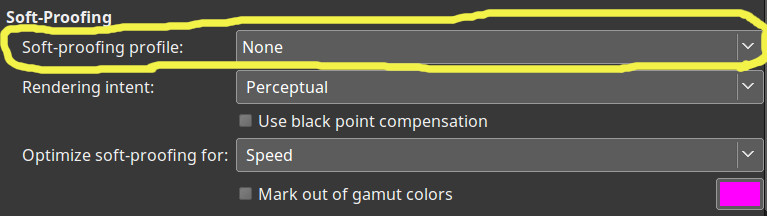
Once all that is set up, you only need the print profile for soft proofing, and to figure out a way to squeeze the data displayed on the monitor down to the even smaller print scale.
You could just eyeball it, and ask the printer to make an adjustment once you get there.
Organic, I can’t find the “Save As Render” button. I’m using Blender 2.79with cycles render. Am I doing something wrong?
Blender assumes sRGB color but doesn’t assign a color profile to the saved render, so to ensure the saved render is correctly interpreted, the first thing to do in Gimp is Image - Co lour Management - Assign Color Profile. Use a reputable sRGB.
This is completely new to me, I will assign AdobeRGB(1998) as I think this will give a larger color gammet for printing and use the sRGB for the web.
The only sure way to display data the same on different hardware is by profiling, using a calibration device.
I think you’re right this is a big part of my problem. I had better watch a tutorial on DisplayCal and buy a budget colorimeter from the list on their web site.
I feel that I am coming out of the fog. First thing I need to do is calibrate this monitor. I planned on opening a little Etsy store online but it will have to wait as things have to be done properly.
Assigning a wrong profile to an image is a sure way to get something look different. If source is created so that it looks correct in sRGB, assigning any other gamut to it does not accomplish anything else than making it look wrong. It doesn’t magically become more detailed gamut wise, it simply becomes oversaturated.
If image is created as sRGB, handle it as sRGB. If you have to move to AdobeRGB, do a gamut transform and after that massage the image to your liking for any creative intent. But to make any reasonable decisions, your monitor must be calibrated to AdobeRGB, otherwise you are like a colorblind person trying to grade for normal vision.
The ‘save as’ menu comes up when manually saving the render. Do Image - Save As Image; or F3. I’m not sure what Blender does for auto save. I guess it would apply the display transform as it is on by default.
As kesonmis says, don’t assign AdobeRGB to the saved render. First assign sRGB, then if necessary convert to another colour space. Blender assumes you want sRGB. If you assign AdobeRGB you’re telling all the applications you open the image with, to display the data the way it was not intended to be displayed.
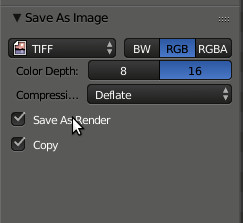
If you want more data to edit with and the intention is to print it, saving as 16bit tiff isn’t a bad choice. Though again, the printer can tell you what file format/colour space they can use.
I think at this stage to keep it simple and stick with sRGb as kesonmis has advised.I’m finally getting my head around all this now.
Looking to buy Spyder 5 express to calibrate the monitor.
I see no way around this, If I want to go forward knowing the colors are right.
Once I have calibrated the monitor. Most likely have to rework some images. Adjust colors,lighting and then re-render.
I appreciate all the advice given.
Hutzpah
Profiling is definitely the way to go if you want to have more control over how images print. You can also install a print profile for soft proofing. Either ask the printer if they can supply one for their printer/paper combination, or get one from the paper manufacturer.
When will the river of knowledge end, just to print a image!
Soft proofing is another area completely new to me. Thanks once again organic for
bring it to my attention.
I have been surfing the net and reading up on how to do it in Gimp and I think I’ve got it sussed.