I am having challenges with fingers. I have the bones in place, automatic weighting, roll is correct but when I curl the bone under on all fingers or individually, I get to a point to where the curl is extreme and the finger goes through the hand as shown in the attachment. It happens with all fingers either individually or as a whole and on both sides. The curl is fine up to a certain point as shown.
It looks like a weight painting issue, or at least that could be one of many issues. The mesh at the end of the fingers should follow the bones at the end of the fingers. The mesh looks to be about half way in the image.
That suggests to me that the hand or some other bones are influencing the mesh at the ends of the fingers and not allowing it to follow correctly.
Without a file to look at, this is all guess work.
Good luck!
I understand. Was going to send just the hand for simplicity sake. I did not connect the hand to the rest of the armature as of yet. But discovered when I removed the rest of the spine and had the bones in the hand to themselves, the problem disappeared so somehow the fingers when, curled in, deflect due to some kind of influence from the spine although I do not have any connections or weight painted areas past the hand and no bones parented past the hand to the spine.
Here is the file. I isolated the armature to focus on the problem. It appears the problem is resolved when say part of the spine is deleted. The hand is not connected to the rest of the armature as of yet.test4.blend (2.28 MB)
FOUND IT Yes it was weight painting. There was a slight amount of weight painting in the spine that was causing the problem. I am building this rig in sections. May not be the best thing to do and I may have to reset the weighting but at least found the problem with the hands.
There are unapplied transforms on the mesh. This can cause errors when auto weighting, especially if the transform that is not applied is scale. Basically this means that the armature and mesh have different Object Mode positions, rotations or scales and that is not a good thing.
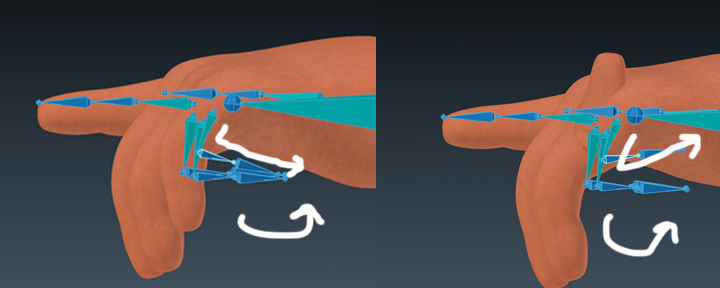
The first image shows that the mesh is scaled up and there is a 90 degree rotation. The second image shows what happens if the transforms of the mesh are cleared. (Alt G, R and S for location, rotation and scale.) Hopefully this illustrates why this is an issue. The bones in the armature are set to match the mesh, but the mesh is not in it’s default state, it’s artificially scaled and rotated. Blender borks the auto weighting.

To apply transforms, select the object (mesh) CTRL-A, Apply Rotation and Scale. (Image 3)
In Image 4 I have selected one vertex on the finger in edit mode. The vertex weights are showing that the pelvis and three spine bones are influencing the mesh at that vertex.

I would suggest applying the transforms to the mesh, deleting all vertex groups from the mesh, then reparent the mesh to the armature with automatic weights. You should get much better results to start and then you can fine to tune the weights from there.
Good luck!
p.s. I have some mesh prep and weighting videos on my channel if you are interested in more tips/tricks for skinning. (Rigify series)
Thanks DanPro. Very thorough analysis and much to look at here.