The purpose of Restore Symmetry is to reestablish symmetry in a mirrored mesh after sculpting (which does not keep perfect symmetry in all cases) or other mesh editing that disrupts symmetry. Note that this addon only works if the mesh is actually symmetrical in its topology, what it does is that it moves back every vertex on the other side that is not symmetrical to its correct location. This is useful because unlike Snap to Symmetry it always snaps to the right vertex, and unlike Symmetrize it doesn’t mess up shapekeys.
Thank you very much Cyaoeu, and thanks to Philip Lafleur!
This addon fills a serious gap into the blender modeling tools, since, as you pointed out, both Snap to Symmetry and Symmetrize are often only able to mess things up.
I have tested it with several shapekeys and it works great!
I am very astonished that there are not yet lots of replies to this thread, at least anyone who works on human and non-human characters should be interested in this addon.
To me it should be added in trunk, replacing the useless and very bad Snap-to-Simmetry command, perhaps with the add of an option to work on vertex selections only (in edit mode).
In the past, to solve the problems of broken symmetry I had to edit every single misplaced vertex one by one, by duplicating the mesh, mirroring it and using it as a base for snapping vertices, and this for almost every shape key of the mesh … a really hard work!
And from now on these fixes will be a breeze, thanks again!
Thanks! I agree it’s more useful in most cases but it also has some restrictions like needing a center loop.
I added a small update (1.0.1) that allows you to run the operator from object, edit and sculpt mode. It still uses the whole mesh (no vertex selection). It does keep your selection though, and just switches to object mode silently for the operation and either back to edit mode if you were in edit mode before or back to sculpt mode if you were in sculpt mode.
The menu is still in object mode so you’ll have to add a shortcut key (or use the spacebar search) but it should be more convenient now.
Thank you Cyaoeu,
I think this addon is so useful even as it’s now; of course any improvement and addition is welcome but I find the current restrictions more than acceptable, since the most of symmetric meshes has a center loop, character figures certainly have, and they should be manifolds with continuous normals.
I want to mention that it can be also very handy on the process of creating mirrored shape keys, as well as for their symmetrization (you can revert one side by the ‘Blend from Shape’ command afterwards).
Traceback (most recent call last):
File “C:\Users\Owners\AppData\Roaming\Blender Foundation\Blender\2.79\scripts\addons\mesh_restoresymmetry.py”, line 86, in execute
bpy.ops.object.set_object_mode(mode=‘OBJECT’) #go to object mode for bmesh operation
File “C:\Program Files\Blender Foundation\Blender\2.79\scripts\modules\bpy\ops.py”, line 189, in call
ret = op_call(self.idname_py(), None, kw)
AttributeError: Calling operator “bpy.ops.object.set_object_mode” error, could not be found
As sourvinos remarked, this is of paramount interest to people who model human(oid)s elsewhere,
and then build their scenes in Blender.
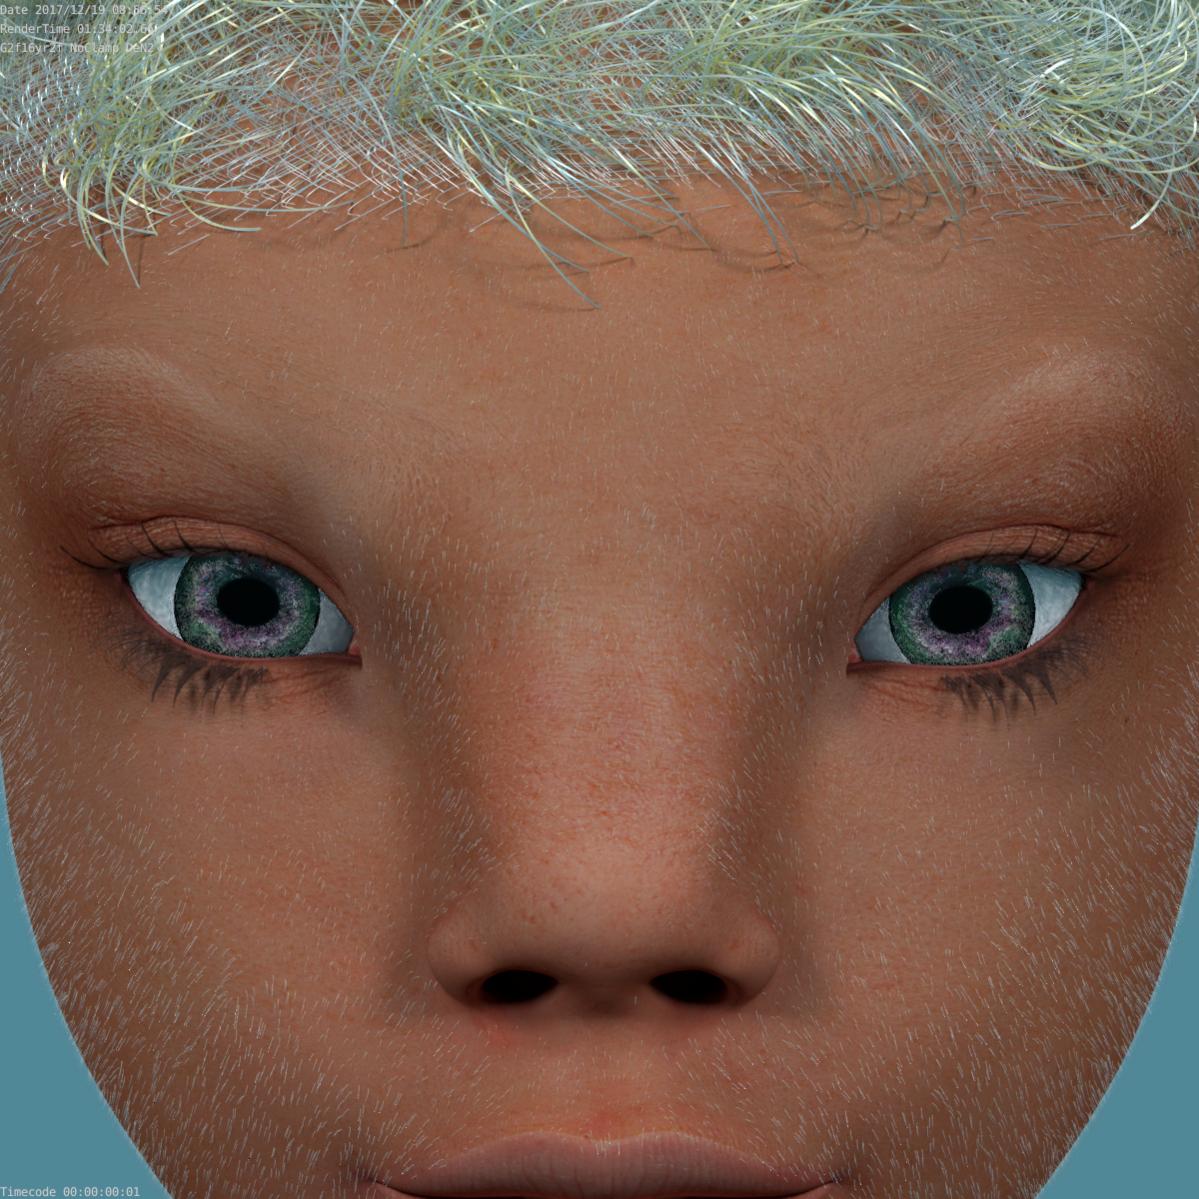
After much fussing in DAZ Studio, I exported to Blender a character
who was starting to look pretty good to me,
until I realized that her eyes were egg-shaped and not symmetrical,
problem which I fixed, and then —only then— did I realize that my sweetie’s eye sockets
were unsymmetrical, but fixing that part was much more labour-intensive,
so I was hoping to get one eye socket just right and then symmetrize,
based on the fact [I hope!] that the topology is symmetrical.
So I found and copied your version 1.02, pasted that into Blender’s Text Editor,
and pressed Run —hallelujah— no complaints, and your button showed up.
The result, however, was simply that the character acquired an X scaling of -1.
You can find a simplified .blend file of the above at http://ttelos.net/ForumFiles/G2f16yr2fNw.zip
Perhaps the problem is triggered by the fact that the eye structures are detached from the skin
(a feature common to all human and animal models, yes?)
and perhaps solving that problem would require a large amount of coding effort,
so I tried adding a Mask modifier that isolated the figure’s (continuous) skin.
That didn’t work, but perhaps modifying the code so as to accept a potentially mask-modified object
is not all that difficult?
What is crucial, when modifying a high-poly and finely tuned character,
in Blender AND something like DAZ Studio, is that vertex order must be kept intact!
It is for that reason, that a script such as what you have been improving lately, is so crucial! :yes:
Not sure what you mean by the character getting a scaling of -1. You aren’t supposed to put it in the text editor, you put it in your addons folder and enable it as an addon. I tested it on your character but it seemed fine, the symmetry of the eye socket was successfully restored. You can also pick the positive or negative side as the source to influence which side ends up as the symmetry.
That’s fantastic: congratulations!
Could you please send me the modified .blend file, somehow?
This deserves, of course, a deeper study on my part;
you’ve just given me a most excellent Christmas present.
What may I do for you, before year’s end?
You can install Restore Symmetry as an addon (like you’re supposed to) then fix your character by yourself.
It should be pretty easy, you right click this https://github.com/cyaoeu/BlenderAddons/raw/master/RestoreSymmetry/mesh_restoresymmetry.py and save it in your addons folder (C:\Users\YourUserNameHere\AppData\Roaming\Blender Foundation\Blender\2.79\scripts\addons on windows), then in Blender open the user preferences, go to add-ons, search for Restore Symmetry and enable it. Then select your character, press spacebar and search for Restore Symmetry and run it. It should fix your character.
Alright: I deleted the .py text block, placed your .py file where Blender expects to find it,
and, yes, it shows up under User Settings Add-ons as version 1.0.2;
your Mirror button shows up in the 3D View, Object mode, under Tools Transform.
My character has rotations at 0, scales at 1, normals Recalculated Outside,
and is the only selected object.
When I now hit your Mirror button, a message comes up saying Select Mirror Axis (X, Y, Z)
and I press X. As soon as that is done, the X scale for the object turns to -1,
a message comes up saying Mirror along global X, and the object is, indeed, mirrored.
Its selected outline has turned from yellow to white, and your script seems to be waiting for something
like, for instance, a carriage return, and when I do that, the latest operator panel shows:
Mirror
Constraint Axis X
Orientation Global
Proportional Editing Disable
…
Edit Grease Pencil unchecked.
If I now jump into Edit mode (without Apply Rotation and Scale),
the normals are still pointing outward.
Could this be a Mac-specific problem?
The .blend file that you successfully modified:
do you have a place on the Web to park that for a few days?
Or, perhaps you could send it to ttelos at ttelos dot net ??
Not really sure what mirror button you’re hitting…
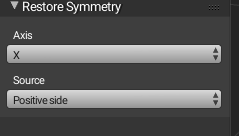
The operator looks like this in the lower left (here invoked in object mode from Object - Mirror - Restore Symmetry next to the mode selection):
It doesn’t change the object scale at all so not sure what you’re doing. Also it’s not in the t-panel at all. It sounds more like you’re doing Blender’s Mirror. Can you record a video?
Your algorithm for traversing the mesh according to topology
is totally beyond me. I recently wrote a script to symmetrize
an armature, and posted it here;
but that was facilitated by the fact that there are naming conventions for right/left bones.
I almost started coding this from scratch when I discovered it had already been done. Kudos to you and to Philip! Apart from adding support of topology mirror to the official Snap To Symmetry (which would allow it to work exactly the same as Remirror), and improving the detection of the central loop (maybe allow the user to pick it somehow?), and maybe the support of weight maps, here is a relatively straightforward improvement.
I added a mixing factor just like for Snap To Symmetry, default value 0.5, min 0, max 1, determining to what extent the source coordinates should contribute to the symmetrized result. The default value 0.5 means that, rather than overriding the target side with the source side, a 50:50 average between the left and the right side will be used, and the value 1 means the source completely overrules the target (which is how it works now). Assuming you welcome such an addition, how would I go about contributing the code to your fork?
Thanks for that feature. However I would still like it to default to 1 because the addon is supposed to restore the symmetry, meaning if you sculpt on one side (and the mirrored side fails in some vertices because the sculpting mirroring isn’t perfect) you should be able to run the operator to keep your sculpt as it was rather than mixing in the failed result (or if you don’t use x-mirroring at all even worse things would happen…)
The general assumption is that you’re (mainly) working on one side at a time and thus averaging the sides as a default behavior would be worse than just “mirroring” the side you’re working on.
If you’re fine with 1 being the default you can fork the addon on github, make your changes, commit, then submit a pull request and I can accept that to add your changes to my repository.
If you want 0.5 to be the default you can fork it and offer it as an alternative version of the addon here in this thread (or whereever you please).
1 as the default indeed makes sense for the main intended use that you describe (sculpting on one side then transferring the changes to the other side). My intended use is somewhat different - sometimes an imported will have broken symmetry to begin with, giving you no reason to favor one side over the other. And Blender can also introduce some random jitter on both sides of a mesh, e.g., when changing the rest pose of a character (Apply Modifier, Apply Pose As Rest Pose, then re-Add Modifier - this is supposed to preserve the symmetry of both the armature and the mesh, but often doesn’t). Even so, I am OK with 1 being the default in the public release; I can always set it to 0.5 locally, and those who end up using the add-on for left-right averaging most of the time (like me) are free to do the same.
Assuming identical vertex weights on each side, changing the rest pose with your method should give identical results, if it doesn’t it could be a bug. Did you report it?