So im testing out the principle shader…
I have unwrapped a plane, and added the following nodes (see picture). I needed to scale the texture, so I added a mapping node and texture cooardinate node (not sure this is right) to have control over the size of the textures.
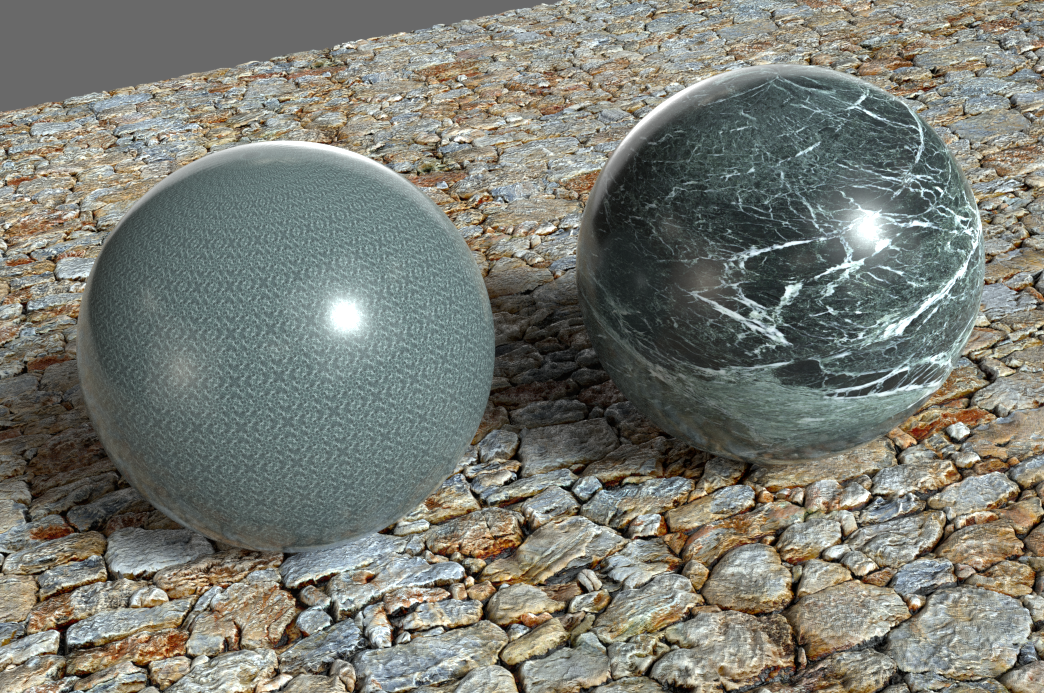
However… the cobblestone texture still looks very flat and like crap. It’s also distorting on certain places… I think that’s because of the lens settings?
Also, I was trying to a marble texture to a sphere… But the marble is very tiny and its tiling…
I cant fix this with adjusting texture size… So im guessing it has to do with UV unwrapping? I just went to edit mode and selected U(unwrap).
Please ALWAYS supply an example .blend file with any support question. All your answers are in there. And don’t forget to pack the corresponding textures.
Your UV unwrap for the sphere is wrong:
Every polygon fills the entire UV space. I guess you hit U > Reset intead of U > Unwrap. Anyway, you might want to go with a spherical unwrap, since we’re talking about a sphere…
The texture on the floor plane is distorted because you’re using a heavily scalene texture 1:1 on a quadratic object. You will need to adjust that.
The floor texture looks flat because of the fact that it is. A normal map only gives the illusion of depth and will easily be seen as that when looked upon from glancing angles. In addition to that your overall diffuse lighting does not help to accentuate the surface structure. If lighting and changing the camera angle is not enough, you might have to go with displacement, which (other than bump or normal mapping) really gives depth to the surface - but comes a the price of being costly in terms of render time.
Ah yes thats’ kinda what I thought… I will look into that unwrapping problem, ill figure it out. And regarding the lack of depth… so thats because the normal maps just give the illusion of depth… not depth itself… If i really want real depth… i need to use a displacement map…
I do actually have a displacement map for this texture… so how would i setup the nodes for this in combination with the principles shader?
And yeah, the texture is heavily scales… but I though that I could just make it smaller with the mapping node… but that’s not how it works then? How would I adjust the scale the right way?
We’re talking about the floor? Of course you can. But your problem is this:
You unwrap a quadratic plane. Then you add a highly rectangular image to it. As a result, the UVs will adapt to the aspect ratio of the image, but your plane does not - it is still quadratic. This results in a distorted texture.
So, you need to first add the texture, then unwrap.
ah that makes total sense now… i pushes the texture into a certain dimension, regardless of the dimension of the texture. So you run into problems when the aspect ratio’s differ…
Ill try out your solution, first adding the texture…then unwrapping the plane…
im still struggling with adding a displacement map to the principle shader… how do I do this the right way?
Method 1: You go the new “experimental” way.
In the render settings switch from the “Supported” feature set to “Experimental”.
Then, in the material tab, find the section called “Settings” and switch Displacement from “Bump” to “True” or “Both”.
After that connect the displacement texture to the Displacement input of the Material Output of the corresponding material.
Finally add a Subsurf modifier and check “Adaptive”.
Method 2: Oldy bust trusty.
Forget all of the above and add Subsurf and Displacement modifiers to the plane. In the Displacement modifier add your Displacement texture and make sure it’s correctly mapped. You will need an ungodly amount of subdivisions, though, for this to look good.
Ok some im trying your first method…
Im using the node setup that i have been using so far…
do i disconnect/delete the normal map that i have been using so far? (cause that might be double the effecct)
You say… connect the the displacement texture to the material output. I have made a 'image texture" node and loaded the displacement texture… I then connect the alpha (greY) output to the grey displacement input of the Material Output node…
I have added a susburf to the object and checked adaptive…
Is this the right way? Cause im not seeing the right effect yet…Im talking about the stone material, applied to sphere and backwall.
im not sure if this is how it should look like with the dis. map in place. It still looks flat.
The normal map can stay where it is. Just make sure you switch it from Tangent Space to Object Space, otherwise there can be some interference with that new displacement method.
Why would you connect the Alpha of the displacement texture to the Material Output? Chances are there is no alpha channel at all. You connect the yellow (color) output of the texture to the Material Output’s displacement connector.
I dont know why I did that… im new at this and I thought i needed to connect grey with grey…
Ok I did what you said…and know Im getting actuall depth and shapes in my material.
As you can see, the backwall is pretty dark compared to the sphere. I assume this is because theres a light on the sphere and not on the backwall? But… the material preview is showing me a similar dark material… so it seems im loosing some luminocity somewhere
secondly… the scaling of the sphere and the wall is off. Both of them are the same material, so there linked right? If I want to finetune the scaling seperately… I need to copy the material and assign that second material to the wall?