How can I use masking textures?

I found that masking textures are the way to go for painting large terrains, but I can’t find a single good tutorial video on how they work. If you type in Blender masking, you’ll see some vfx video things, a guy that just selects faces in the paint editor and calls that masking for some reason, but not actual texture masking like this: http://blog.mikepan.com/post/26950891126/procedural-terrain

The blend file on the link above doesn’t work anymore, so I can’t find any good resources on how to learn masking.

I guess that I have to make a mix shader, put one texture in one shader, the other in other second one and then somehow(?) apply another image on top of that and set it up for masking, but I have no idea on any of that apart from the mix shaders.

2 Likes

mix shader and/or color mix. Mask texture alpha channel to the grey factor socket. Factor only accepts 0-1 data, so where you want the second texture slot to show up should have color and the rest should be 0 (fully transparent). Yes, it will accept alpha values between 0-100%.

To be honest I didn’t understand almost any of that, but before you posted that I managed to do it, perhaps it’s the exact same thing you’re talking about, but I’ll dumb it down for noobs like me that want to achieve this. Also I have a new question at the end.

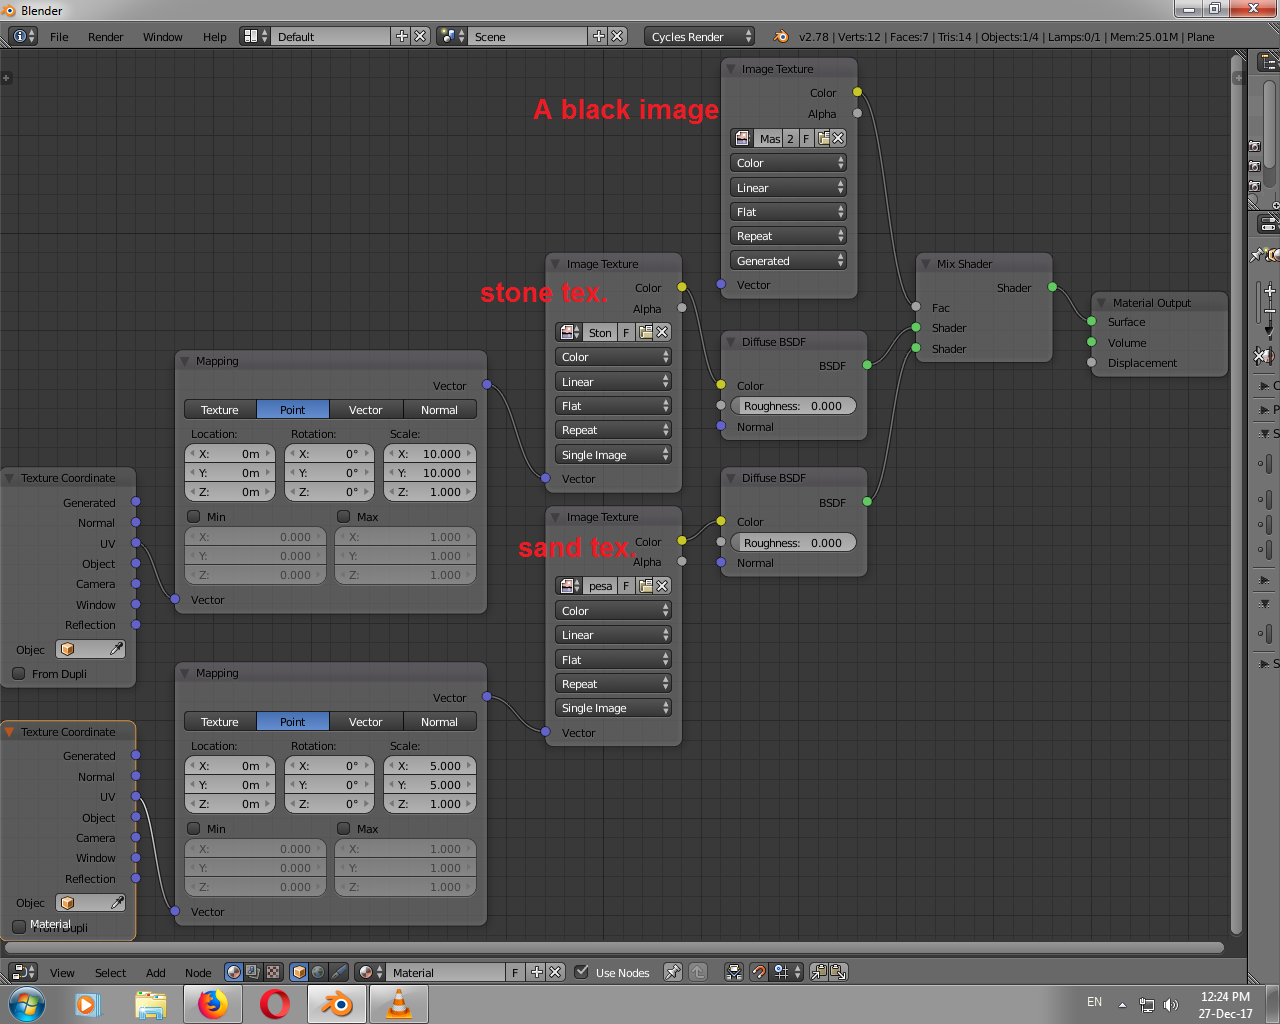
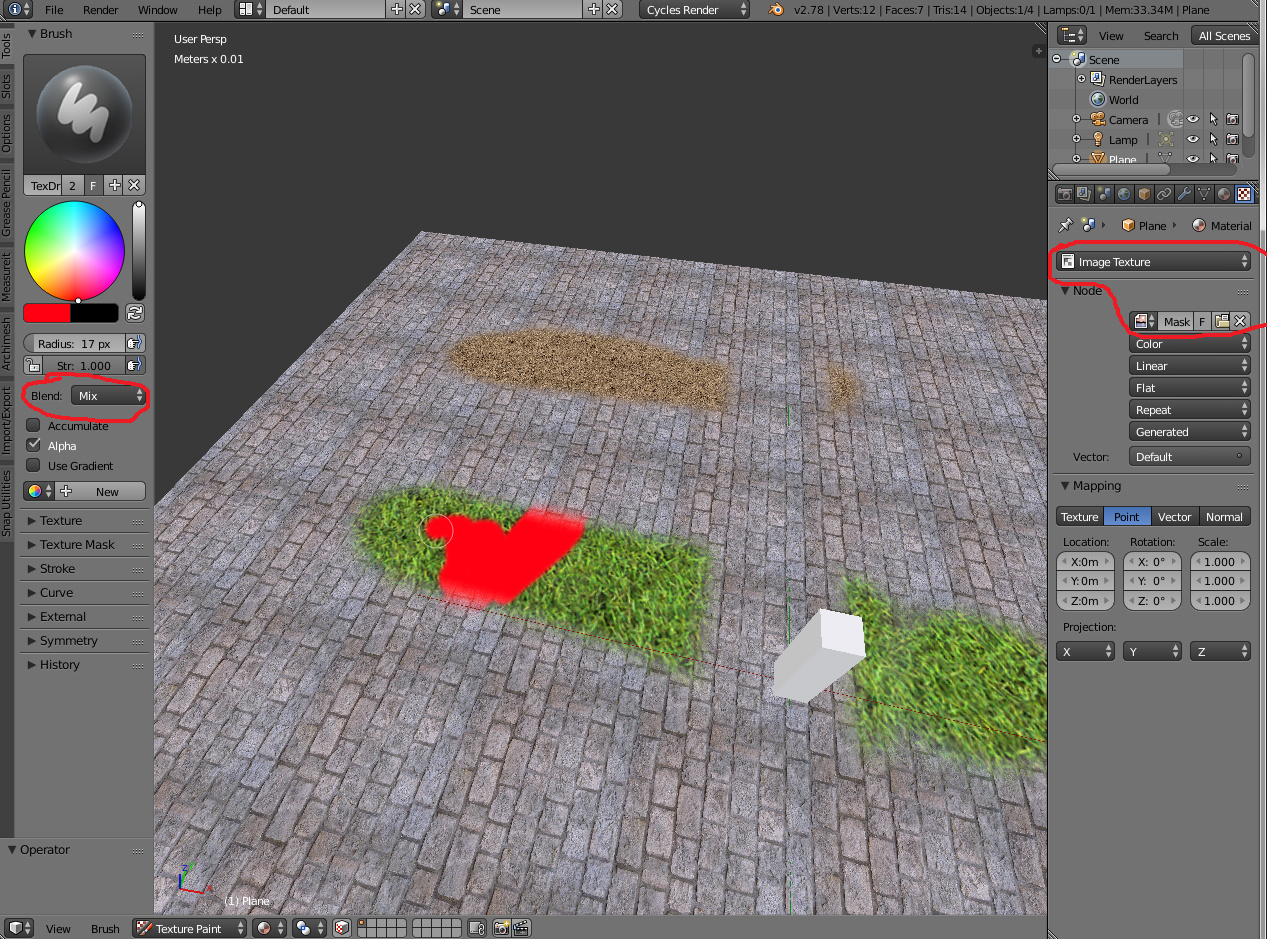
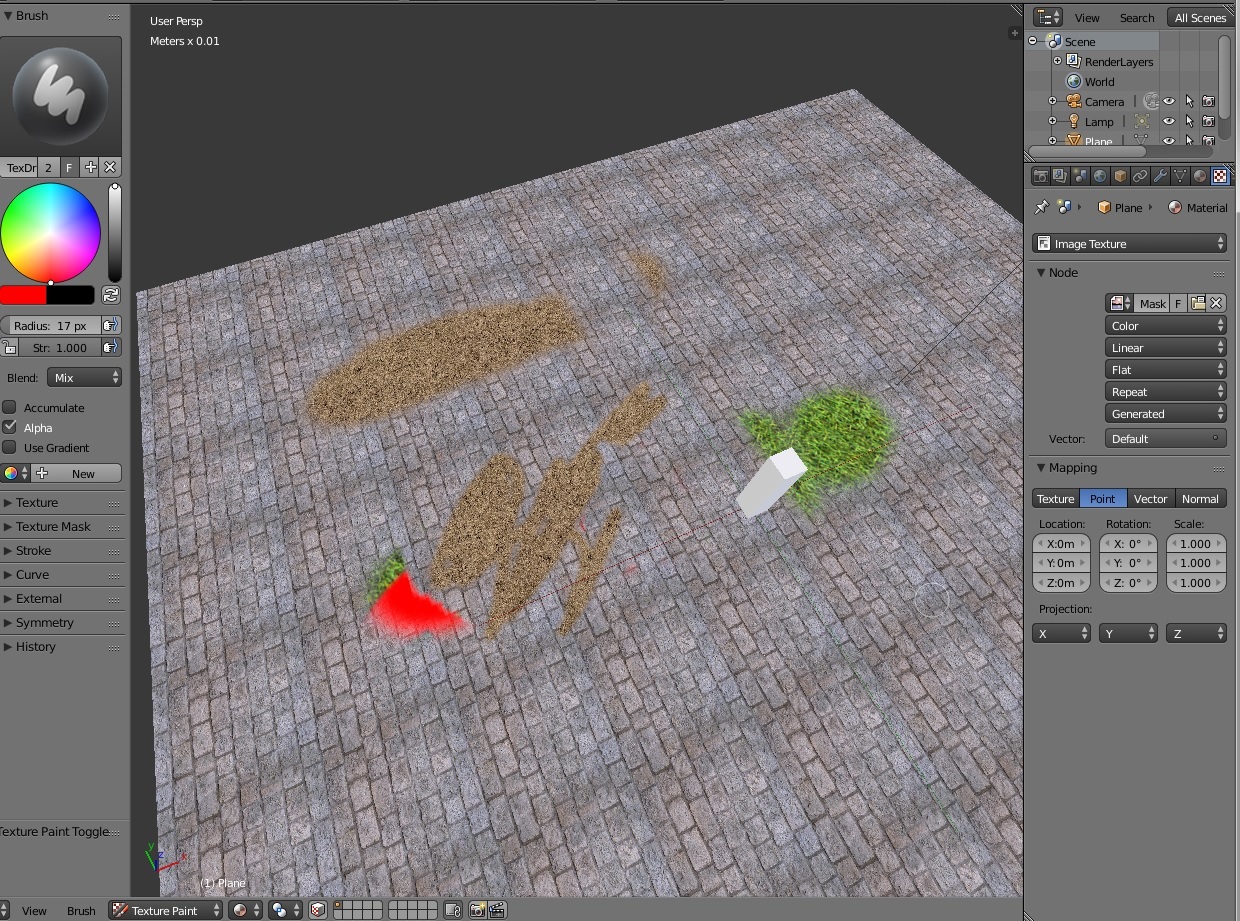
I went to the UV editor and just created a new blank image, black, set the terrain to use that new image as a usual image texture, then I went in the node editor and added two texture nodes, stone and sand (and on the left I added a “resizer” for the textures, to make them smaller/repeat more times, you can skip this part, but you’ll get way better results with it), then I connected it like this (image below) and now if I want to paint sand, I go to the UV editor and paint* pure white color on the black image, if I want the stone, I just paint black color. So I don’t paint using textures in the paint editor, I just paint with black or white, each one corresponding to a specific texture. If I choose grey, then you get a mix of those 2 textures.

*The standard paint editor (in Cycles at least) apparently doesn’t do this automatically, so just paint with the paint editor inside the UV editor section.

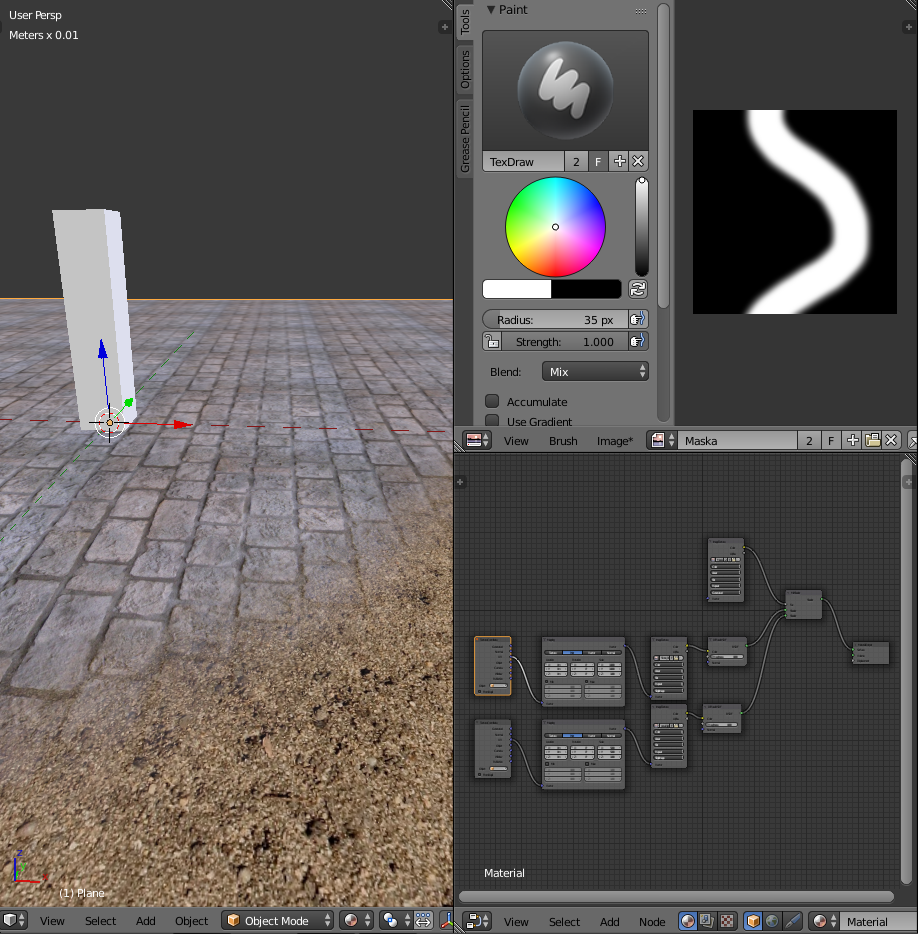
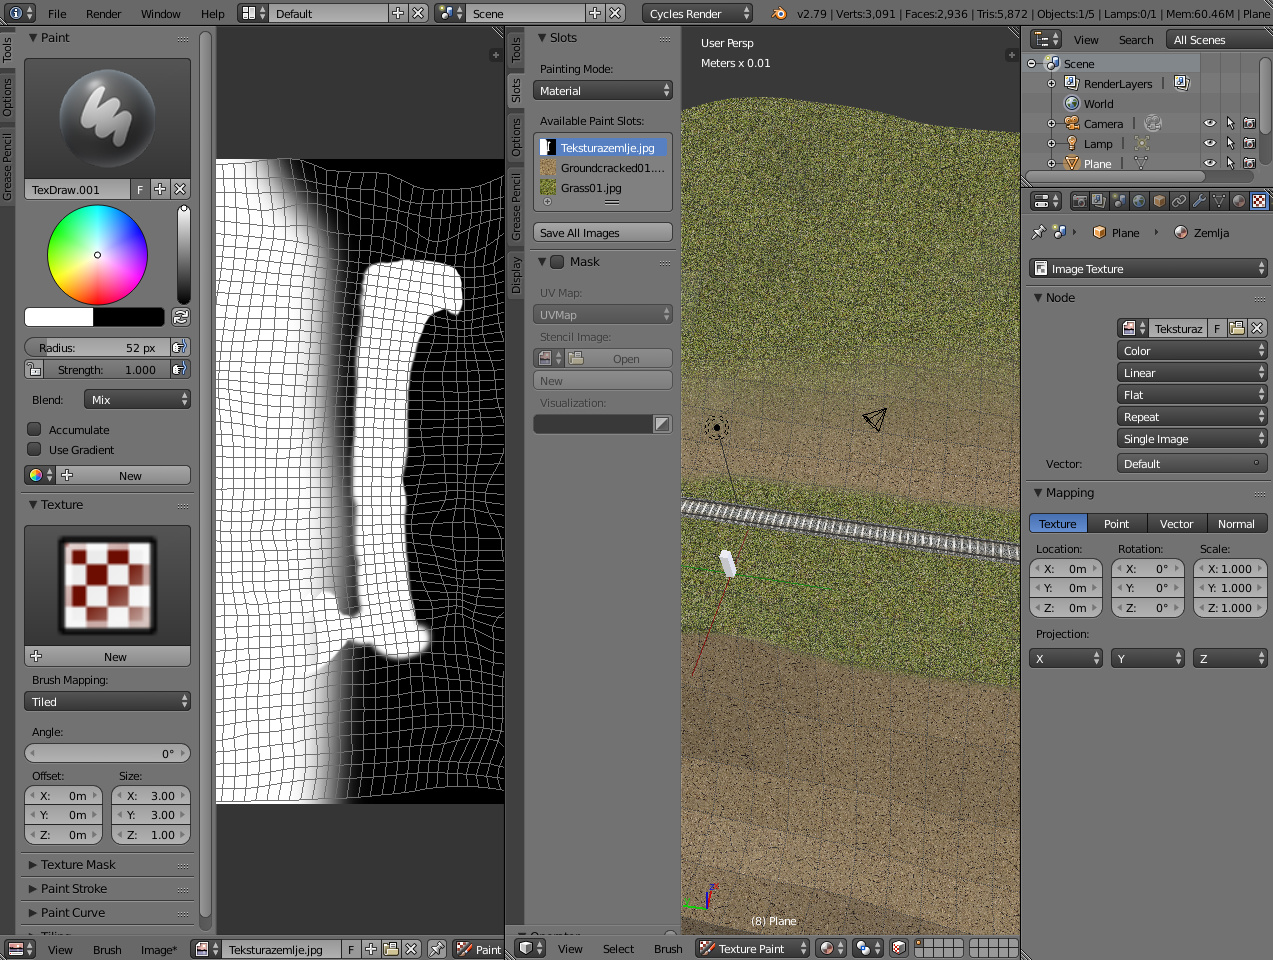
The amazing thing with this method of texturing is that you don’t need large images at all, the terrain face I painted on is large, 20 meters by 20 meters (the white object is high as a human for reference) and the black texture I’m painting on is just 256x256 pixels, which is insane! To achieve the same pixel density without using this method, you would need at least a 4k, maybe even 8k texture for a face this size, yet I got a even better result with just 256x256! The sand&stone textures aren’t really on the image, so they are HD regardless of what image size you use for the (alpha?) black image.

The nodes


(as I said, the white thing is a human, around 5’ 8’’ or 175 cm)


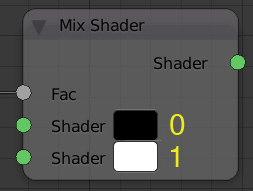
Buuuut, now I have a new question, how do I know if it’s the sand that uses the black color or white color, or does the stone use black/white? More importantly, if I want to have 3 colors and a RGB system to do this, how do I select which color is responsible for what texture?

Also, bonus question, if I want to export this to Unity, Unreal,etc, then I export the mask image (“black one”) along with the textures, right?

In the MIxRGB and MixShaders, it is a bit more clear if instead of thinking on black/white, to thing of 0s and 1s. A value of 0 (black) will output the first input, and a value of 1 (white) will be the second input, and values in between are linear interpolations of both inputs.

It’s possible to store different masks in a RGB texture; but as the Mixing nodes use only a float input for the mixing factor, any color input in the factor socket will be converted into a grayscale color, and then into a value. So you’ll need to SeparateRGB and use a Mixing node for each component.
Following down the link you posted in the first post, you get to this page, which talks about this to some extend (thought not blender related).

I don’t think exporting will be that straightforward (specially from Cycles materials)… But most game engines support this kind of mixing and if not, you can try using GLSL directly (check here).

Top slot = 0 = Black
Bottom slot = 1 = White


Hm…can you make a quick screenshot of how this separatergb thing is supposed to work? The mix node has just 2 colors input and separatergb has R, G and B outputs, so I’m lost. I guess that I create 3 separatergbs, each one has one output, 1 texture and one node for R, second G and third B, but I am not sure where to put them after that. Also, somewhere on youtube a person had a RGB curve included in all this, also for terrain texturing, where could I put that node if I wanted?

Bonus question 2: Previously I opened a similar topic about putting a satellite overlay while painting a terrain, so can I somehow add a satellite imagery texture on top of all this to use as a reference on where to paint certain textures, with the imagery remaining untouched? If not, can I use that imagery instead of the black image, will that work in the same way or will I get a mess?

This is the way I normally do it… I tend to think about the mixing as one layer over the other, using a ‘cascading overlay’ of textures/shaders.


The first mask (the Red Channel) is black for ocean and white for terrain.
In the terrain, a second mask (the Green Channel) is black for sand and white for soil… and so on.
There’s also the possibility to even add more masks, if you need more layers, or separate for example the SandShader into SandWet, SandClean, SandDirty, etc.
And note that the top mixes overwrites the other ones… So if the ocean/terrain is only zeros (black), any other mask won’t show (as if everything was flooded).

For terrains I also use a distance changer, so when the camera is far, the Satellite shader is showned, and when closer, the detailed shaders are showned… I didn’t build this distance evaluator, but with the LightPath node with some math nodes it’s easy to make one.

Bonus Answer 2: I use inkscape and sometimes Krita for that. Import the satellite image, and with basic shapes and lines I draw the different masks over the image and export the result, then some editing in Krita or even in Blender if necessary. It’s possible to use other methods… I only use this because I did FSX sceneries and having vectorial sections for the terrains materials was a need.

Am I on the right path? I got three textures to show up, one mixer is for sand or stone (sandstone), the other is for grass and sandstone, but I am not sure how to paint now, do I paint with actual colors now or do I select channels somehow and still paint in black and white? Now if I paint using green, I get grass, red - sand, blue - stone, black - also stone and white is grass, so do I just always figure what color is what or do I select channels and paint black&white?


Select the red color, brush mode to add or subtract (this is a bit important as you don’t want to overwrite the other channels), and paint the sandstone layer. With your material setup, red will be sand and the absence of red will be stone.
When finished, change the color to green and paint where the grass will be.
You can also create a color palette with the pure red, green and blue, as it will be faster to go back and forward from one channel to the other.

Remember that you can easily view what you’re doing in the viewport, by choosing the ‘Material’ shading mode. This will show the final material while you’re painting the mask but not the mask itself.

Just one more question, (how) can I paint in 3d view? I got it to work actually (with that setup above + I added a satelite layer later, although I exited without saving, so I don’t have the satellite in the pic below), I went to the texture section of the object (menu on right) and there I have a few things called “image texture”, “image texture.001”, .002,.003…, “image texture” is using the main black mask channel, .001 is using stone and so on.

At first it worked perfectly, I painted the stone on the object and everything was ok, but then I screwed something up and can’t figure out how to fix it. Logic would say that I need to select the main “image texture”, the mask one, but if I paint on that, I get this red monstruosity:


Edit: I switched back and forth between “image textures” (it, it.001, it.002) without changing anything and it started to work normally again, then I painted this sand/gravel thing (one closer to the camera), but then I exited to object mode, entered texture mode again, without touching anything and…it paints red again! (this red thing is the new red paint, not the one from the previous picture)


What am I missing, do I need to select or press something before I start painting? 3d painting is much simpler, so I’d prefer to do it that way if possible.

First: Don’t use ‘Mix’ as blend mode. just as I stated before, it’s better to use ‘Add’ and ‘Subtract’.

Second: take a closer look to the painting slots (Tool Shelf>Slots), it’s better to use ‘Image’ as painting mode, and select the mask texture as Canvas Image.

Third: Be sure to use pure colors when painting each channel… If not, you’ll be painting over the other channels even if just a little.
Add a new palette on the ‘New’ button bellow the ‘Use Gradient’ checkbox, and then a ‘±’ button will appear near the color selector which lets you add or remove colors to the palette. It’s by far faster to work.
{Red = [ 1 , 0 , 0 ], Green = [ 0 , 1 , 0 ] and Blue = [ 0 , 0 , 1 ]}

Hm, I am experiencing a weird issue where I have to click the left mouse button twice fast before painting in order to paint in full color, otherwise it paints at like 50% opacity, but this happens only after I spend some time doing this and out of a sudden, a mouse problem or is this a common thing? The nodes and everything remained as it was before on the object itself.

Another question, is it possible to make parts of the mask channel fully transparent? I tried painting with the “erase alpha” blend mode and looking at the UV editor, it looks like it did erase parts of the mask image, but everything looks the same.

Erasing parts of the mask would make it easier to see the satelite overlay and I suppose that’s the only way to have a part of the terrain, a beach for example, textured, and to have the rest of the terrain remain in satelite imagery.

If that’s not possible, do I instead of that make the satelite imagery a paintable “texture” as well and paint the entire mask with it first and then continue with the rest?

This thread is incredibly helpful. Exact answer to what I need to do. This is why I love this community.

Thanks

-emo

Decided to try this again and I managed to get it working when painting black/white masks in the UV editor, however no matter what I press, no matter what slot I choose, I can’t get it to work in the 3d brush. For a few moments it did work normally and then it just stopped, even though I didn’t change any settings.

Sometimes what I paint in the UV editor didn’t show up in the render view, although it did show up after saving/reloading the image in uv editor, however even that doesn’t help.


*brush “tool settings” are the same, so I didn’t want to take a screenshot of that, instead here’s the “slot” section in the brush and the image texture section on the right part, that’s the base black/white image. Also, I tried putting texture coordinates, it changed the size and all that, but it did nothing to help with the brush.

Also, is there another good program I can use in addition with Blender that can do this masking stuff? Doesn’t matter if it’s free or not.

I…solved it? I guess that this is a bug, I hit tab, which led me to edit mode, there I pressed A to select all faces, then I pressed tab again to go back to texture paint mode and it worked! Then I went back to edit more and deselected everything and again back to texture mod and…it didn’t work, so apparently you need to select faces you want to paint on in edit mode and only then can you paint them texture mod or what?

well… in your last screen shot, one can clearly see that you have ‘Face Selection Masking’ turned on… So it’s not a bug!

Oh. I felt dumb being a amateur and now I feel even dumber since I actually knew about that face selection option, but haven’t used it in ages, so I totally forgot about it…

Anyway, now everything works perfect, too bad that there are very little tutorials on how to do this stuff, if you are making a large terrain, than this is a must, the only alternative is to have a very large texture and paint on it directly, but on large terrains, even 4k+ textures look extremely low res, so hopefully this alpha method gets popularized at some point.

1 Like

The struggle is real.

Masking everything in Substance Painter beforehand I find to be much more intuitive and a lot less stressful/repeative. All the masking is in substance painter’s ‘layer stack’ (think photoshop layer panel) then when you export to blender poof it’s all contained in the texture image, no more dealing with masking in the cycles nodes.

True… But just for the process of doing it. The problem still stands, as the final texture needs to be huge in order to keep large and small scale details… The only thing that you can really do with SP is to save the masks (not the combined textures!) and recreate everything back in Blender…

Does anyone by any chance know how to import these masks to either Unity, Unreal or Cryengine? Importing them to these engines is 90% of the reason why I even wanted to learn them in the first place, so it would be awesome if I could import it. I asked on Unity forums, but no answer for now.

I only found this for unity, but I can’t understand it completely, it seems like it works with 2 images somehow and I am not sure how I’d import all three images I need for this (alpha, grass and gravel) https://docs.unity3d.com/Manual/StandardShaderMaterialParameterDetail.html