Help needed in improving modelling skills

I was wondering if I could get some help with some problems I’ve having in trying to make a model.

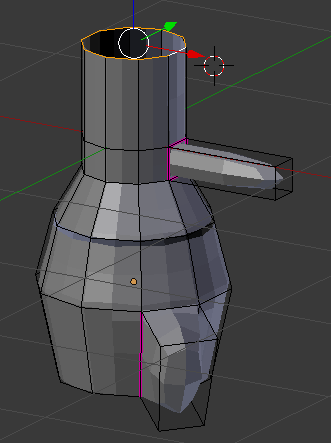
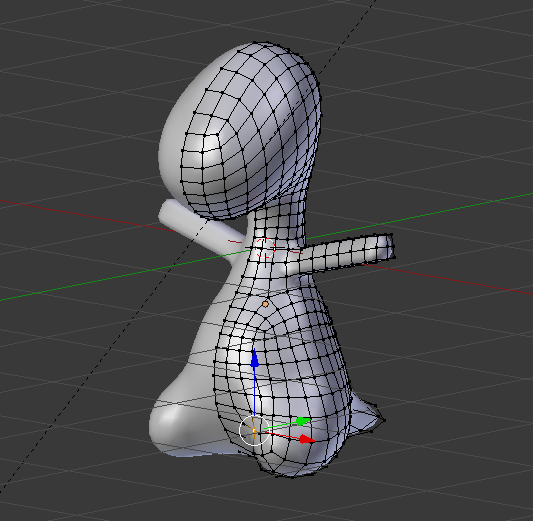
Anyways, I originally started off with a model, that after spending some time working on it, I managed to gradually shape it into the form I desired, as shown below.
[ATTACH=CONFIG]511106[/ATTACH]


However, there remained a number of issues with the model that I couldn’t seem to fix:

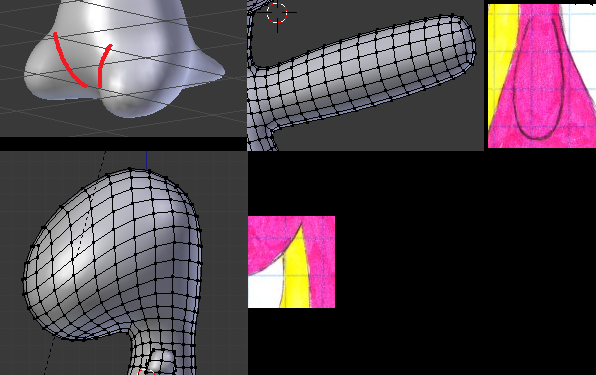
  • As shown in the upper-left screenshot highlighted with red lines, there’s suppose to be a sharp crease to help define the feet from the model’s belly.
  • The arms aren’t the right shape, there supposed to be more rounded as shown in the two screenshots in the upper-right.
  • Much like the feet, there’s suppose to be a sharp crease under the model’s chin area, as shown in the two bottom screenshots, that is intended to help separate the aforementioned chin area of the model’s head from the neck.

Unfortunately, I couldn’t figure out how to make these alternations without wrecking the mesh altogether or spending an eternity trying to reshape the problems areas of the mesh. Further complicating things, was the fact that I applied the Surface Modifier in order to give my model more vertices, so that I would have greater control over shaping the mesh. As a result of this, I couldn’t go back and make the changes when the mesh was in a simpler shape. I also didn’t save an earlier version of the Blend file before the Surface Modifier was applied.

I then decided to try and start all over again from scratch, figuring it would be faster that way, rather than trying to salvage the old model, but unfortunately, things haven’t gone as smoothly as I hoped they would.


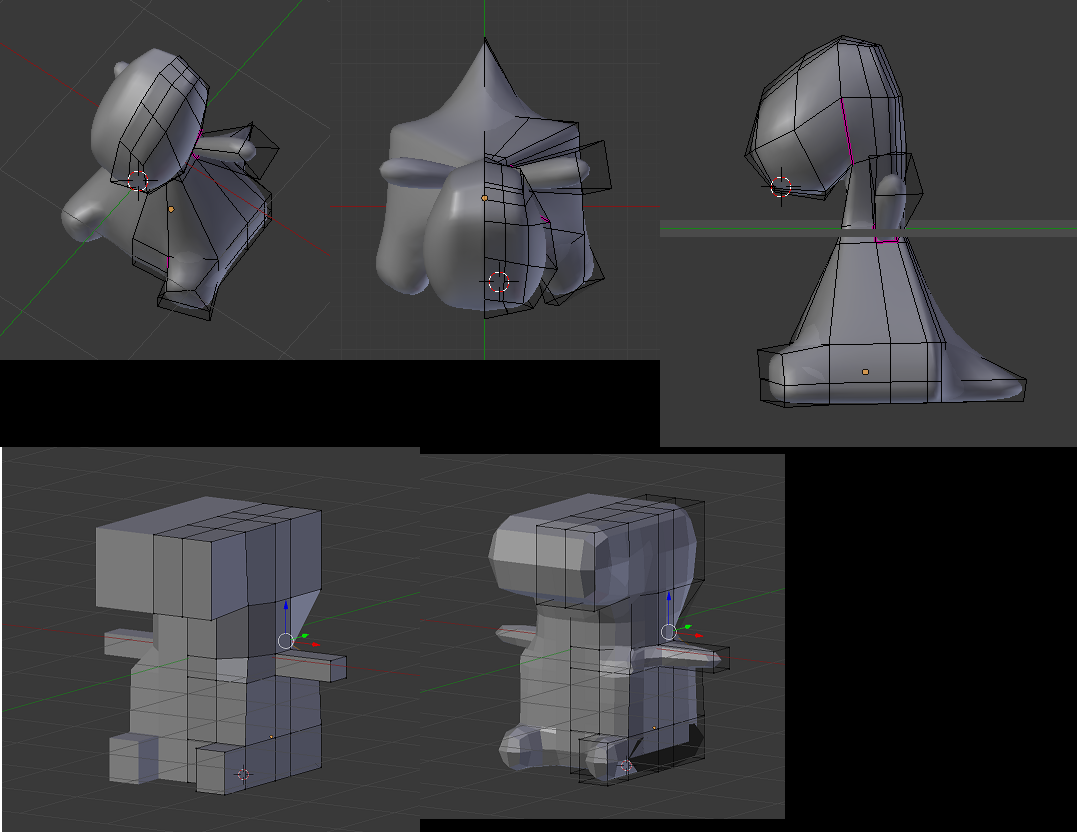
Things start off simply enough, but once I start adding loop cuts and begin trying to manipulate vertices into their desired shape, things quickly get out of hand and the whole thing becomes a giant mess. As shown in the above screenshots, one big problem that I have is that I don’t know how to re-shape a cube-shaped object into a rounder shape that then can be sub-divided into the desired even more rounded mesh. I also ended up placing the arms far too back on the model, due to a drawing mistake I made on the reference image I drew. Not helping matters is that its been a couple of months since I created the original model and now I no longer remember how I initially created and shaped it.

As a result of these aforementioned issues, I was hoping I could get some help into how I can better craft this model. In particular, how to re-shape a cube/square mesh into a more rounded one.

Any help with this matter would be greatly appreciated.

The reason we use quadrilaterals to model instead of triangles or n-gons is because they’re directional. The edge and face loops create many flows on the model and they’re put in place to fulfil various requirements: form, deformation (new forms by moving vertices), defining texture areas, and the structure may also need to control subdivision surfaces. That makes the model structure readable.

Your model structure is not following the forms. There are few simple rules to follow when planning the structure:

  • curved/rounded forms need more geometry than flat ones
  • edges follow the form, edge loops go along sharp form changes

Also with subdivision surfaces:

  • a hard edge is defined when edge loops are close to each other. Two loops are sometimes enough, but preferably a loop on each side
  • a hard corner is defined by having vertices close each other. Two vertices are sometimes enough, but preferably three


One example of the crotch area. The flow is similar to a human model where the loops go diagonally from the crotch to the iliac crest, part of the pelvic bone you can feel on the side. Supported from each side, the crease can be adjusted by moving the loops together. The poles (vertices with 3, 5, or more than 5) might not be in optimal places, depending on the model purpose.

I realize that the edge loops do not follow the form of my model, I noticed that the formation of the loops around the belly & feet meant that it would be pretty much impossible to re-shape the topology to get the creases I wanted around the inner part of the foot, under the chin area, and around the arms. It was because of this that I decided to start all over again, but the problem I’m having is that I can’t figure out how to go about starting the model and then refining it.


Earlier, I tried to see if I could build the model up from a low-vertex circle, but things haven’t progressed very well and so I continue to remain stuck at Step #1.

It would appear that I obviously lack the knowledge of the techniques necessary to convert a simple object like a box into a much more complex mesh with good topology.

With this for example, I have absolutely no idea how you shape that the edge loops like that, particularly, how one makes the edge lines curve, as I was under the impression that line edges were only perfectly straight.

I just have no idea at this point about what I can do to rectify this situation.

Nothing to worry there, edges are straight. That is the result of showing the wireframe (object properties -> display: wire, draw all edges) and optimal display enabled on the subdivision surface modifier. It shows the original mesh but with subdivisions applied, which showcases the flow a bit better but is not used while modeling.

What you’re shown so far to me looks like you’re trying to model forms instead of structures to get to the forms.

There are two ways of controlling subdivisions on hard edges, edge creasing and perimeter loops. Forget edge creasing for now. The structure needs to follow the forms to be able to use either effectively, but creasing might still need help from perimeter loops to fix the shading. Perimeter loops are a bit harder, but teaches to factor those in and to read the topology.

You already have most of the forms so one way would be to build another structure on top, making the new geometry adhere to the existing forms, so you’re only building another structure and don’t have to remake the forms. The technique is called retopology.

If you want to learn modeling in general, for me that meant watching a lot of tutorials. And by watching I mean no TV, just tutorials, without following in Blender. I tried to look what others do and why, what kind of tools they use, and then imitate the workflow when I did open Blender myself. That meant some back and forth to recheck things I had forgotten, but most importantly I wasn’t learning steps and wasn’t relying on one tutorial source, both of which are really bad.

If you want to do that, could search for suitable tutorials. I haven’t watched these but they’re both more complicated than what you’re doing and should give some ideas. If they don’t look informative, skip them and find better ones
https://www.youtube.com/playlist?list=PLyelx0TsmSpf-8xZfjZveokSsIwj0F3lo
https://www.youtube.com/playlist?list=PLvgIVNDU-Dxjb3eukDF5W0l0-6ShO9OiM

Modeling in general is about turning an existing design into a usable 3D model. You have to interpret the forms, know what kind of structures hold those forms, and then use a subset of the tools you know to build it. How you combine those creates a workflow. There are many tools but you don’t have to know all of them, you’ll learn more as you model and adjust your workflows.

The subset of tools could be

  • basic translate tools, move, rotate, scale
  • edge slide (GG, g twice)
  • extrude (E), inset (i)
  • cutting existing faces with new edges: loop cut (Ctrl+R), vertex connect path (J), knife (K)
  • bevel edges (ctrl+B)
  • creating new edges and faces with fill (F)
  • delete (X)
  • dissolve (from the menu X, or ctrl+X)
  • W -> remove doubles to merge overlapping vertices in the selection
  • creating circles from existing group of vertices with looptools addon: circle, or with To Sphere (alt+shift+S, 1). The two give different results

At first it’ll be about thinking how to get from one structure to another but as you get better interpreting forms and know more about structures, you’ll start preparing the model structure for another before you get there in the workflow. It also means you can look at a design and start by trying the problematic parts first before starting to model it as a whole. Also a sign that you’re getting better at modeling because you can smell the problems further away.

I wish @JA12 was around when I was learning how to model. Always concise and helpful.

Since you are making a soft rounded character I would also suggest the proportional edit tool (toggle with Alt-O, mouse-wheel to change the influence area.) It surprises me how much I use the ‘To Sphere’ tool once I discovered it.