Matching triangles and quads?

Hi Everyone,

Very happy to join the community, been ages since I had “serious” online presence anywhere :slight_smile:
Hope I stick around.
Also a “thank you” shout-out to Blender for making awesome free software and Andrew Price for making digestible introduction to it.

To the matter I am trying to deal at hand.

Did some tutorials, managed to get baseline understanding (I hope) of 3d modeling rules and now am trying to recreate my living room so I can crash-test interior design for my fiance.
Due to that fact I keep myself strict with measurements, so we can try placing around furniture later and make sure everything will fit properly.

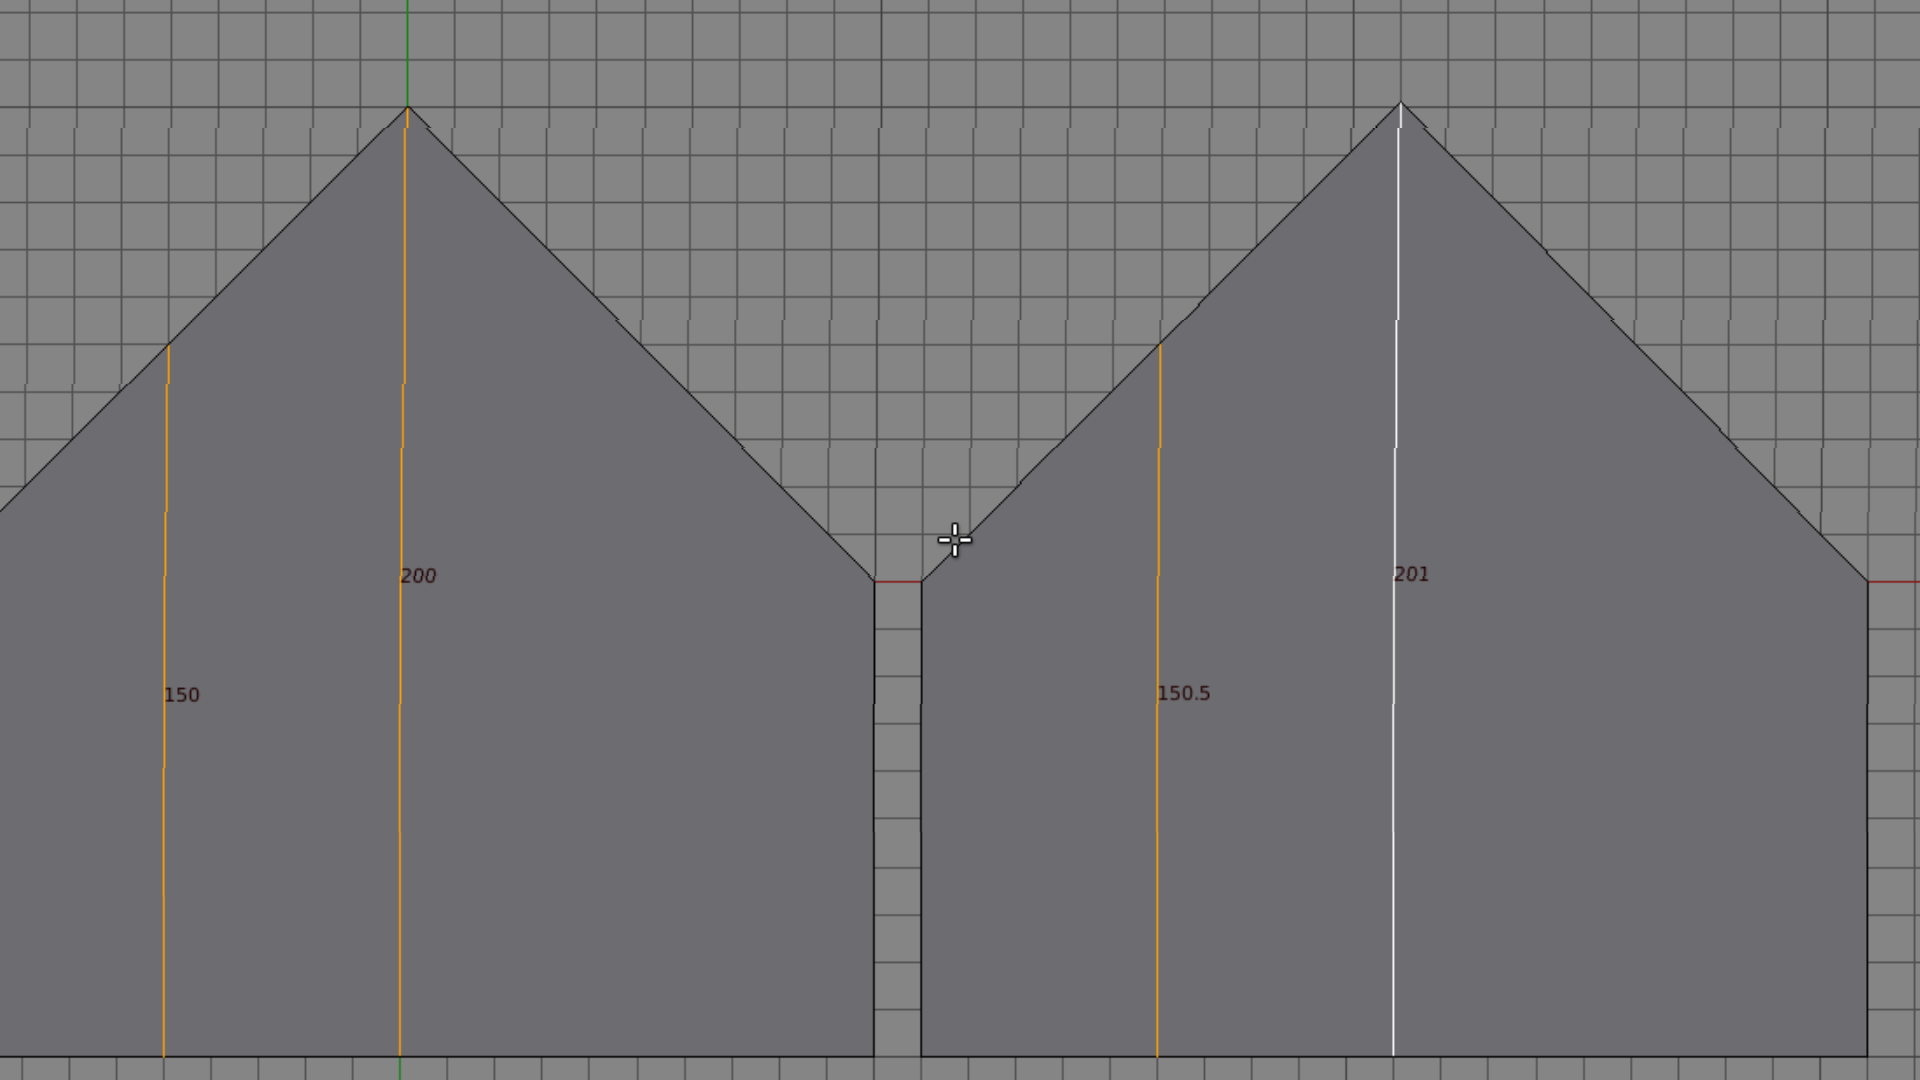
What became my major problem is a quite exotic geometry of the room, see below:


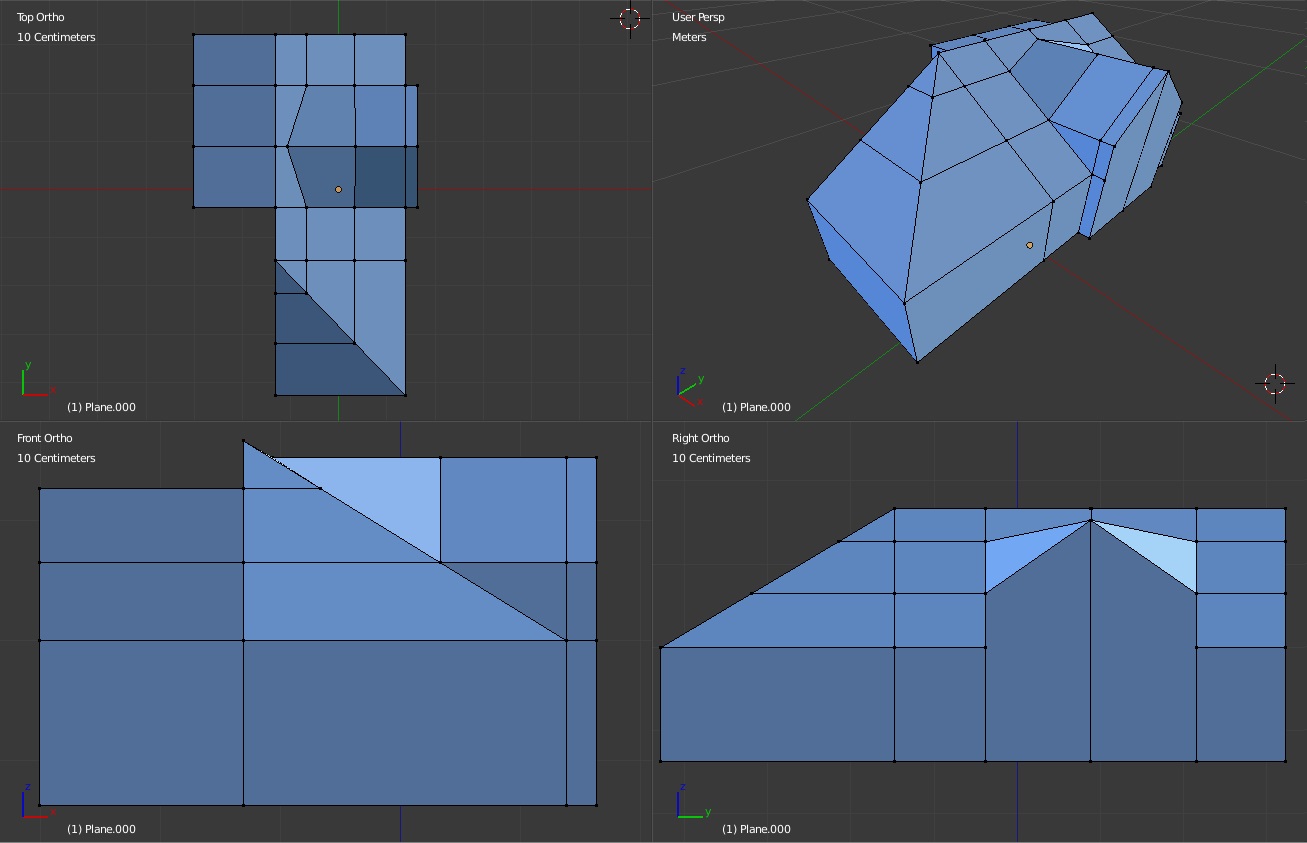
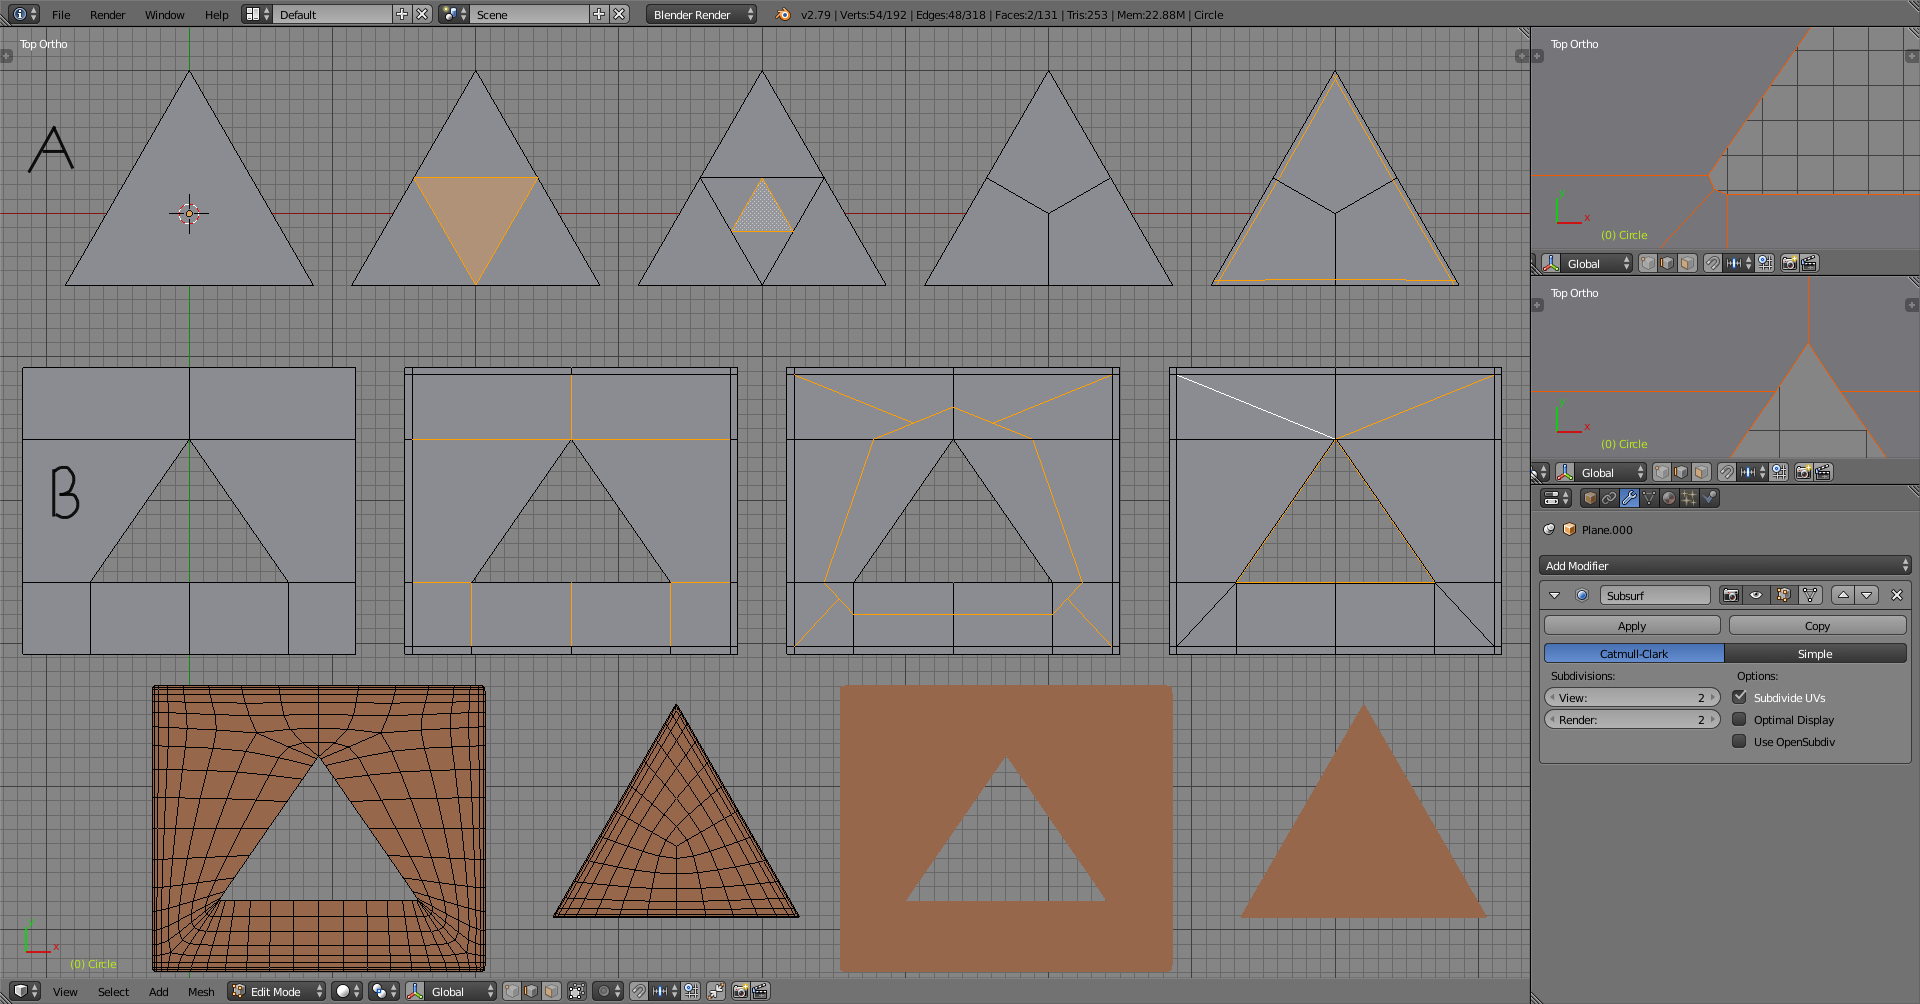
I did a lot of brain bending and google-fu but cannot find a way to properly match triangular and square geometry.
Loop cuts get placed weird and sub-surf modifier is a big no-no in current state (or I don’t have an idea how to get it to work properly).
Due to measurements being important to me I feel like finding a “cheat way” to complete the room is also a bad approach.
E.g. flattening meet points of ceiling surfaces to forcibly “square” them.

Tried to re-create the room with archimesh as well but I couldn’t find a proper way to build a room with walls of different heights (137cm a low wall around the room, 264cm general room heigh at the entrance and 304cm at the heighest).

Any help appreciated, I feel like I jumped into deep waters from the get go after modeling an anvil but am determined to see this thing through.
Attached .blend file I have at the moment if someone would feel so nice to look at my child-play :slight_smile:

Attachments

living room.blend (469 KB)

Unapplied object scale, ctrl+A -> scale to apply. There are holes in the mesh, select all, W -> remove doubles with increased merge distance to merge.

Your working scale, as in the dimensions in the viewport, is small. When converted to metric, Blender unit = 1 meter with the unit scale of 1. But as the BU is a none unit, you can decide what it means. If you decide that it means centimeters, you can do a free transform on vertices and easily get it as close as couple of millimeters. If you switch to metric after you’re done, you can easily scale everything 100 times smaller, apply object scale, and your object and mesh is in real world scale.

Polygonal modeling is approximation of curves and surfaces (straight edges and flat polygons), Blender also uses floating point numbers that get floating point errors, which means it’s not a CAD and can’t achieve absolute precision easily. But since we’re not making surgical instruments, we can decide what kind of accuracy is enough and be mindful about it, without obsessing about absolute precision.

For example, if your free transforms are within few millimeters or even 1cm for the ridge of the roof/ceiling, that should be accurate enough, considering that the measurement error is on a long stretch, and there’s less error on the slope of the roof/ceiling. Also you probably don’t want to put wooden furniture so close that it’s millimeters away from the slope of the ceiling (one item or multiple stacked). They can absorb moisture and change dimensions and if the grain is vertical, it could reach it.


Measurement error of 1cm on top of the ceiling is half that at the midpoint of the slope.

I didn’t take those into account in this but

here are few ways to make the cut:

  • estimating
  • using snapping. Because of the limitations with the snapping tools, using projection to get it at the right height
  • making a 2D surface for measurements, which you already had, and using knife projection to make the cut with it

Few notable shortcuts

  • GG to edge slide
  • ctrl+F -> grid fill
  • shift+S for snap menu
  • F fills, vertex connect path J and knife K cut existing surfaces
  • P to separate geometry to another object
  • alt+D to extend vertex in the mouse cursor direction

Also flipped normals inside and enabled backface culling, which enables you to see inside from any view angle. ctrl+shift+N to flip normals.

Attachments

livingroom_ja12.blend (89.6 KB)

JA12 does it again with a stellar reply!

[TABLE=“width: 500”]

Dude… whoa
You are a gentleman and a scholar.
Thank you so much for your response, I will proceed now to rewatch your video on loop to properly ingest all the pointers that it contains.
Didn’t expect help of such quality, like for real.
Thanks!
[ATTACH=CONFIG]520698[/ATTACH]

[/TABLE]
[TABLE=“width: 500”]

[/TABLE]

indeed. he helped me on multiple occasions as well…
he puts so much quality in his replies that i kinda feel
bad for taking up his time :frowning:

Ok, I minced through that and I think I absorbed as much knowledge as I could.
Again, very thankful for elaborate explanation :slight_smile:

If I may bother you with an extra question JA12.
My initial plan was to create whole thing as a single mesh and use proximity loops with sub-surf modifier to get the natural feel of a real interior.
I know that Archimesh is better from the get-go but I couldn’t replicate weird curves I have on my ceiling.

So my question to put it briefly would be [and let’s assume Archimesh was not invented yet :)] :

  1. What approach would you suggest to handle parts of the mesh (ceiling) that end up as triangular geometry so that sub-surf modifier and proximity loops (loop cuts) work well?
  2. Alternative, is there a better way of using sub-serf modifier and ensuring it doesn’t produce “holes” in projects where walls and ceiling would be separate objects/meshes in Blender?

Not a great plan. Most houses aren’t built by carving into a single solid, they use many parts and materials. Modeling them that way makes the structure of each part simpler, which is less geometry and easier to construct and texture.

Subdivision surfaces, SubSurf or Sub-D [surfaces] in short, also SDS but rarely, is used to get a refined approximation of curved surfaces with much less control geometry. But if you don’t have curved surfaces or very few compared to the whole surface area, it doesn’t make sense to use it, as it would create a lot of unnecessary geometry you still have to control. If you want rounded corners, bevel modifier would do just fine.

These are too vague so I’ll just pull an answer out of my hat. Aww, a wabbit. Wrong hat…


Even when a shape (2D) is a triangle, it can be described with quads and have edge flow directional to each side
A:

  • triangle
  • subdivided
  • middle triangle subdivided again
  • middle triangle selected and X -> edge collapse
  • support loops

Same for a triangle hole, B:

  • hypothetical starting point
  • support loops for the sides, edges around the triangle selected
  • and subdivided with corner vertex option
  • new loop slided next to the existing triangle, original triangle edges deleted and top two diagonals dissolved, leaving 3 vertices on each corner

Dissolving the edges at the top will make n-gons, 5-gons to be exact, but the needed support geometry is in place and subdivision surfaces turn the n-gons into quads.

Orange: subdivision result with and without wires

It’s very different to get images to understand the description and a .blend to work with to find the solution and answer, compared to nothing at all. If you are unsure

  • which questions need support files? Easy: all of them. Visual problems are solved visually, and the forum is about visual arts.
  • If it’s a common problem? It’s not. And even if it were, there are at least 9 other possible causes for it
  • if you’re doing a good job explaining something? Read what you said as someone else’s question and if you would need more to work with, so would anyone else. There are indicators, like something being weird or using quotation marks to describe something. You don’t want to rely on someone else’s imagination to get your message through, especially when it’s about “holes”.