Rigging Tricks

I like rigging. I thought I’d start a thread where I can post various tricks that I discover.

I think that rigging is very modular. I find various techniques, basic tools, and try to add them to my list of things I can do. It’s like building something mechanical. You know what gears do, you know what screws do, you know what belts do, then you think about what you can put together out of all of the basic machines you have. The basic machines themselves are very abstract.

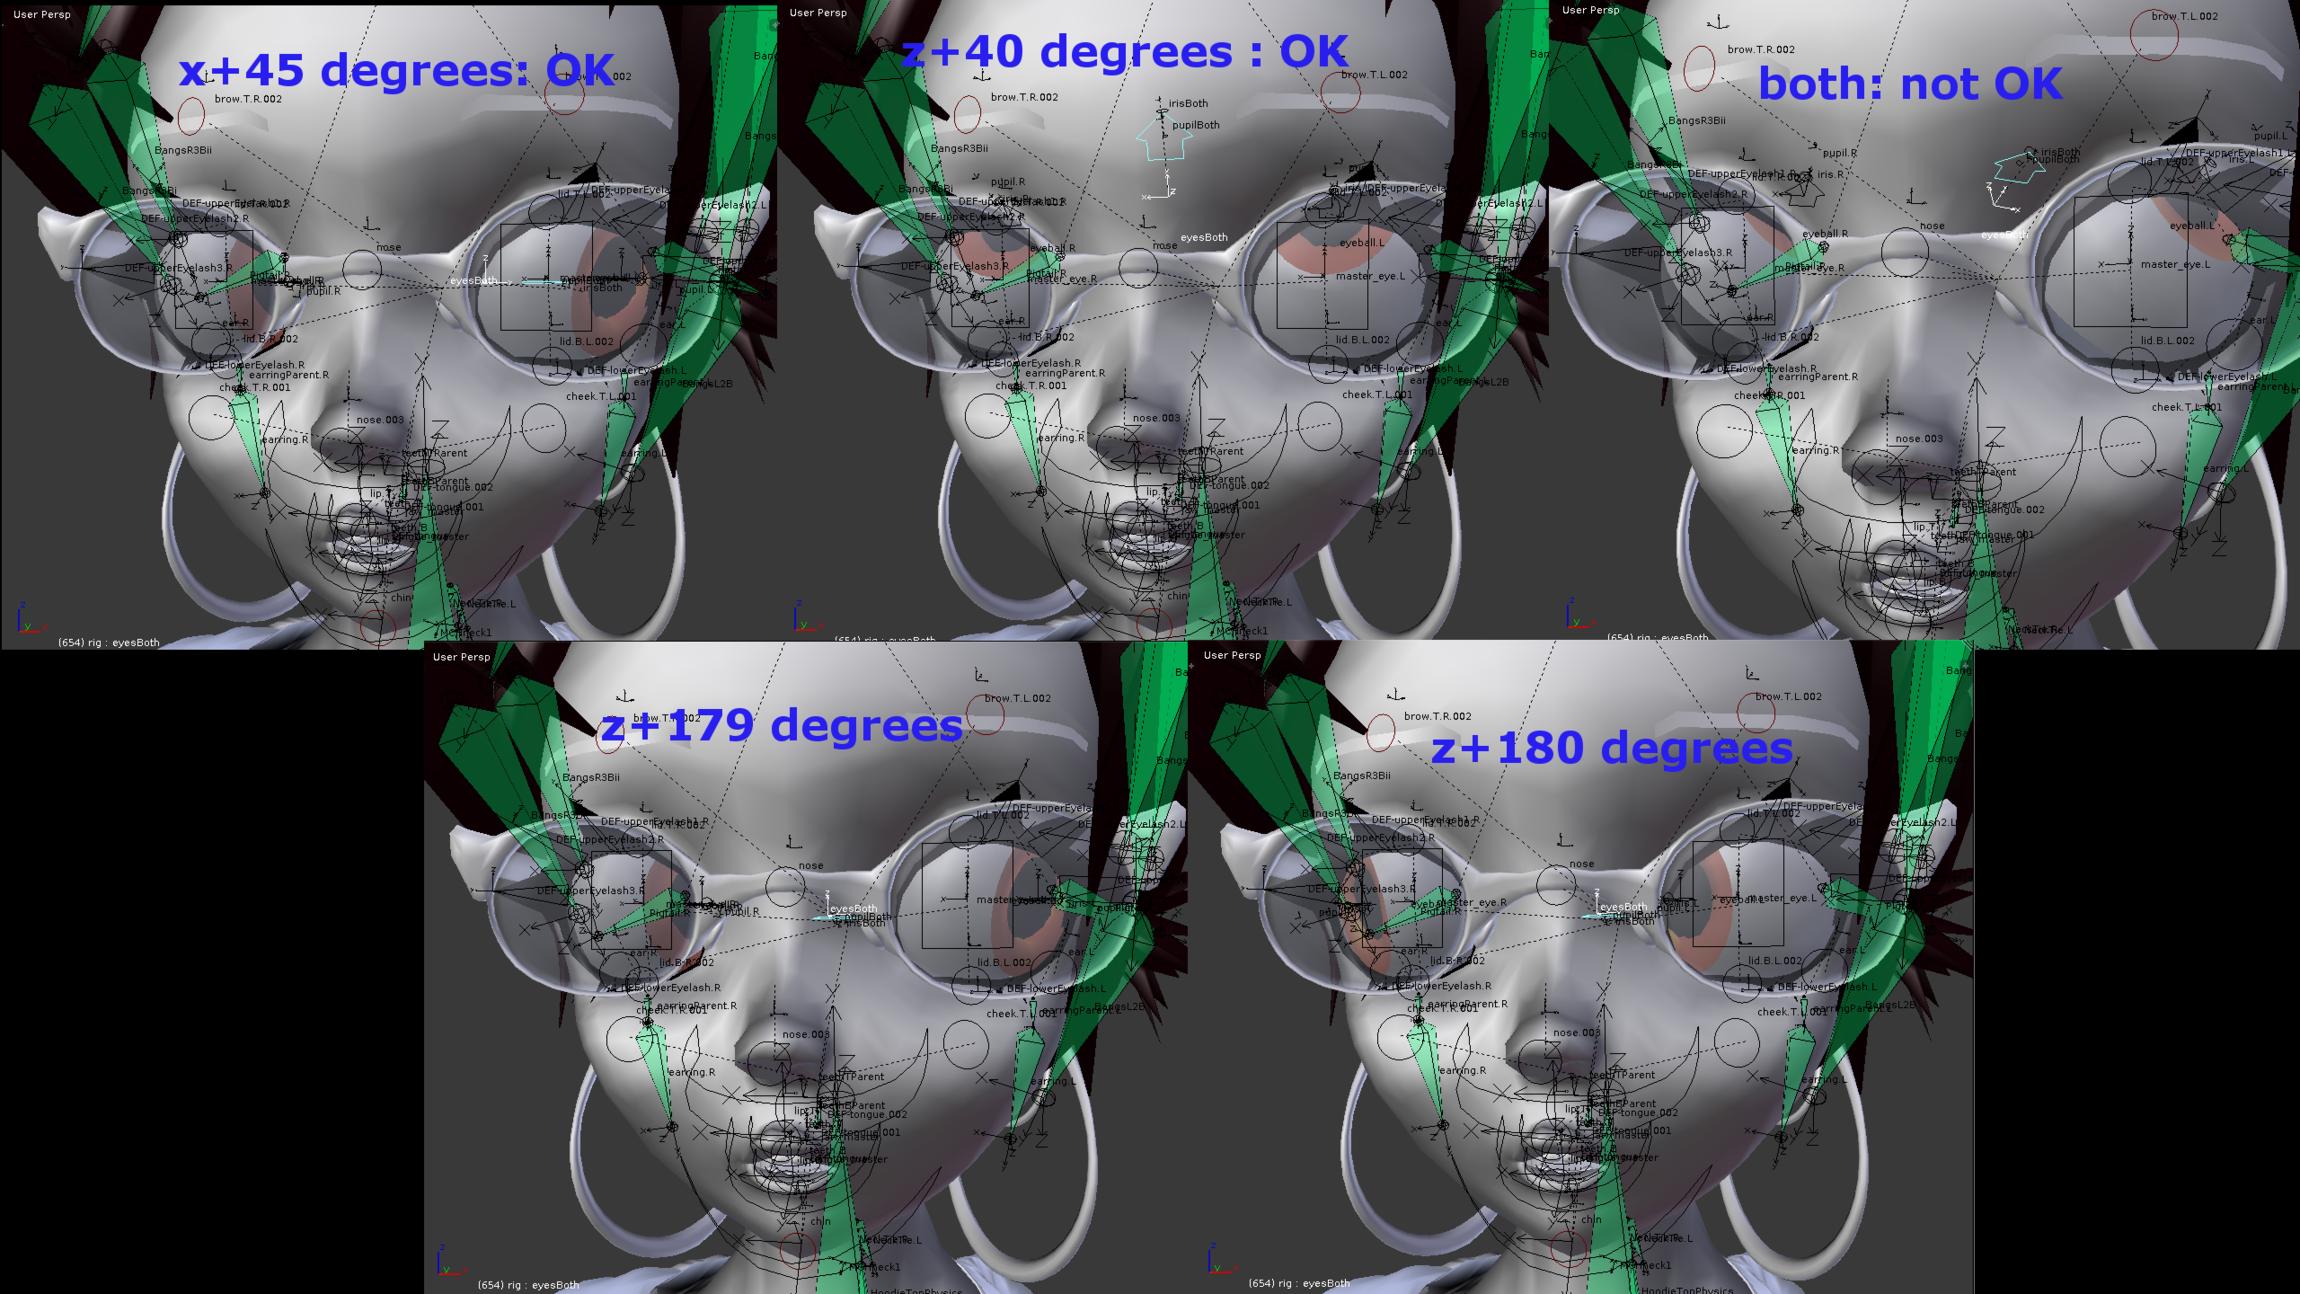
So one of the things Blender does is that it has a relatively smart IK algorithm. It looks at the existing angles and says, “Okay, I think you want me to do some angle restrictions on this structure like so-and-so.” That reduces twitch and reduces the amount of work you have to do.

Rather than basing these IK angles on the default pose, it looks at the current pose. Again, that’s smart, it lets animators tweak these values.


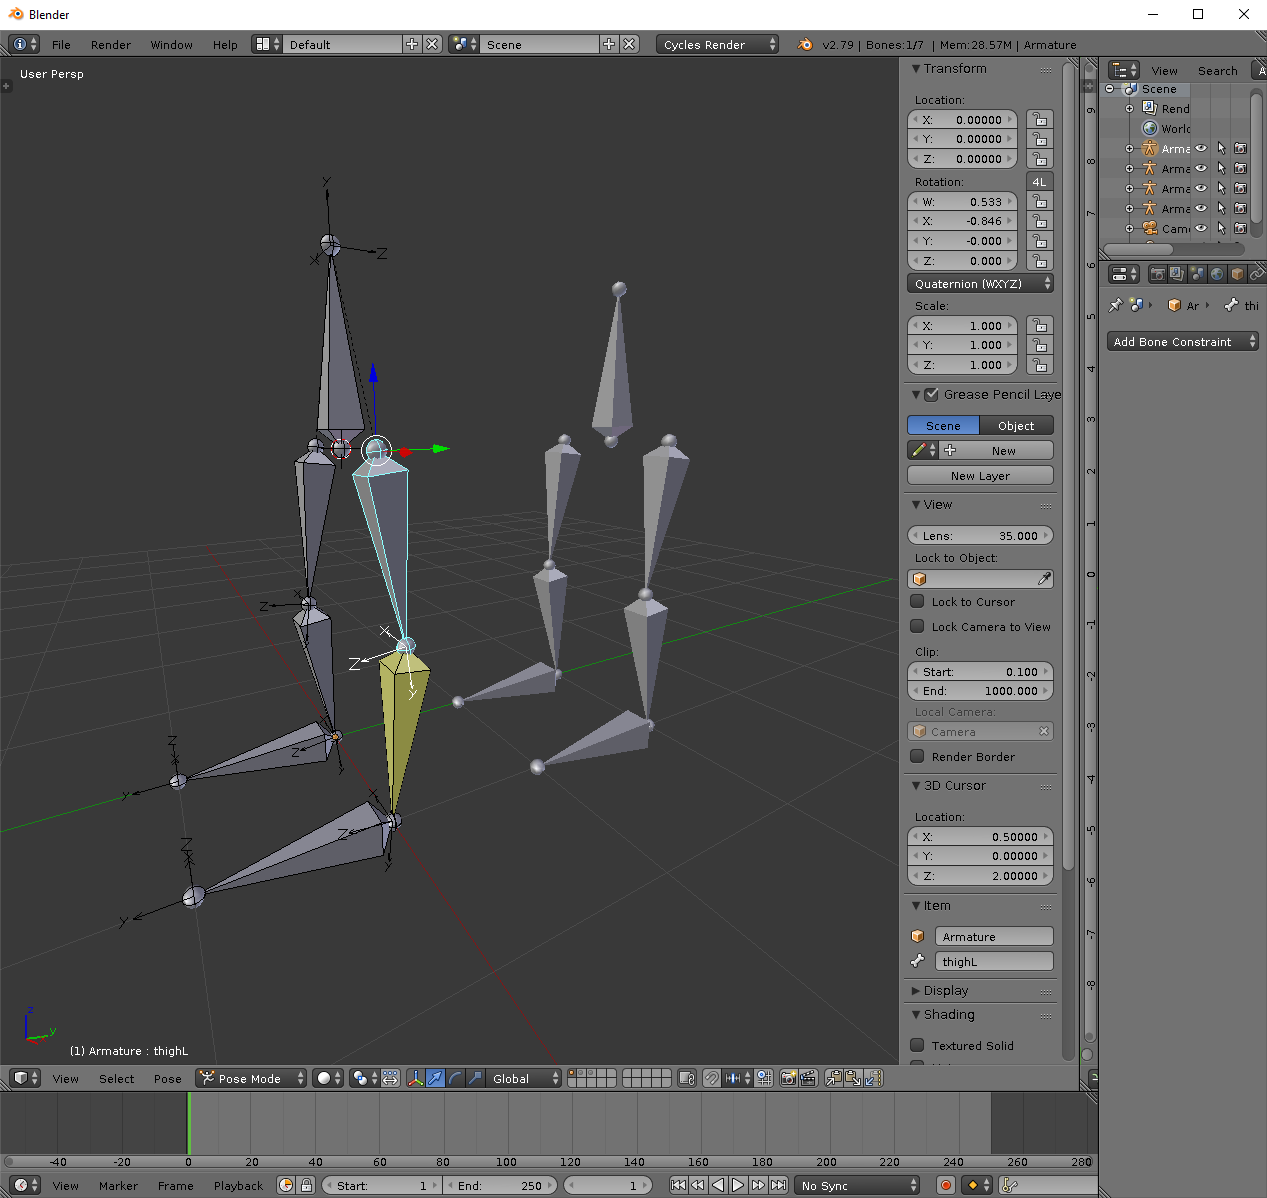
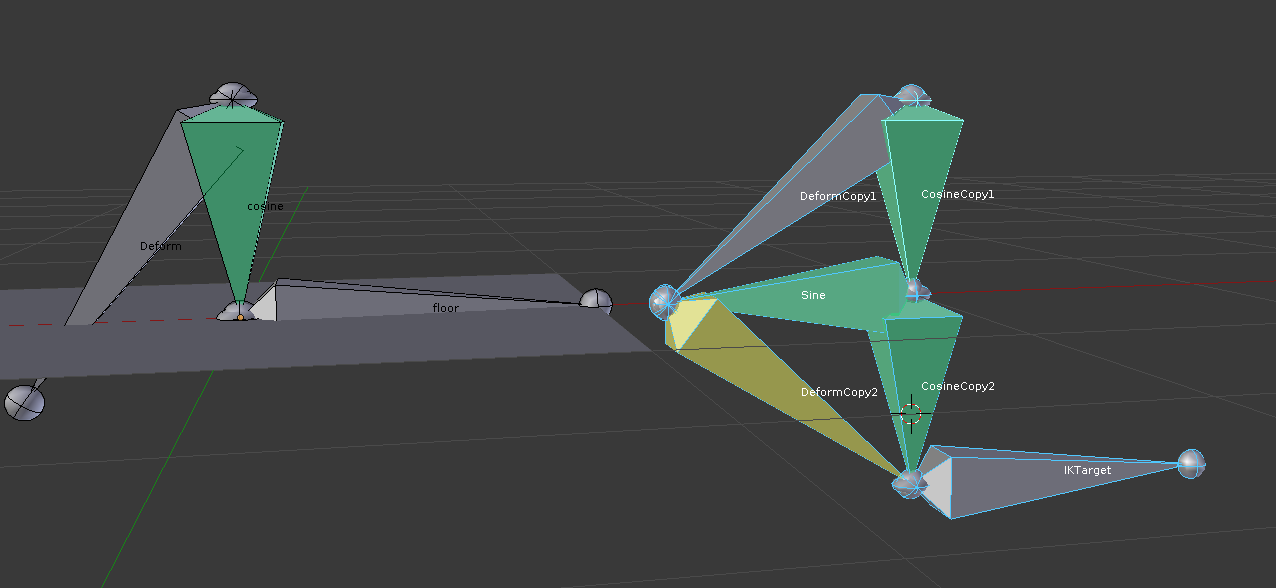
Just to demo, here are two identical skeletons, abstractions of IK legs. The rear skeleton is in it’s default pose. The left thigh of the front skeleton has been rotated, and you can see that the IK is reinterpreting the knee as a more chicken-walker kind of knee thanks to that rotation. That’s kind of handy.

But the only way to get the IK to reinterpret the angles is via manual transformation. You can’t use constraints to set the angle.


Here I’ve got another almost identical copy of the skeleton, and I’m trying to copy the rotation of the posed chickenwalker thigh to my new armature via a constraint, but it doesn’t do anything. Bones in IK chains don’t handle constraints very well.

Why is this a problem? Actually posing the thigh to turn into a chicken walker is kind of tough. The animator doesn’t get smooth feedback saying they’re getting close to the IK action they want, because there’s a threshold effect. And what if the rigger wants to spare the animator the trouble of posing the thigh? What if they want to control the IK behavior, mathematically, based on the parameters of other bones? Then this fancy IK behavior is useless to them.

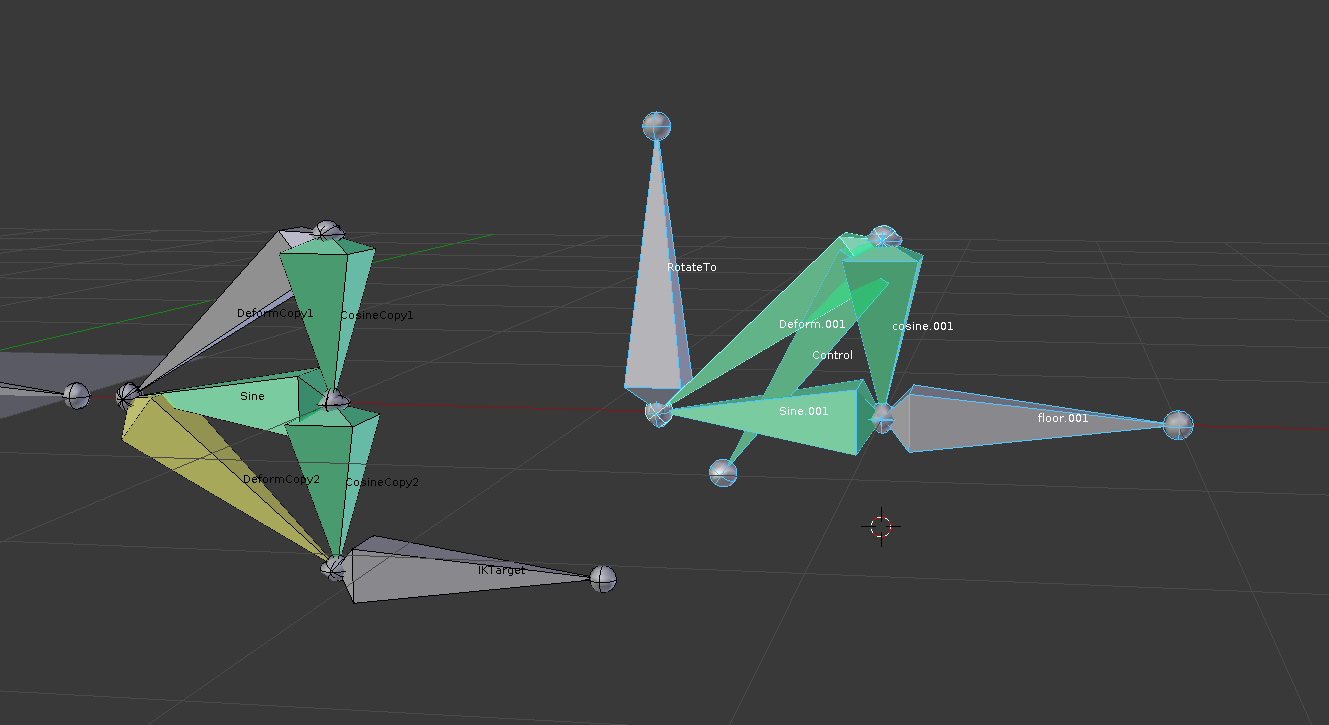
But here’s something you can do.


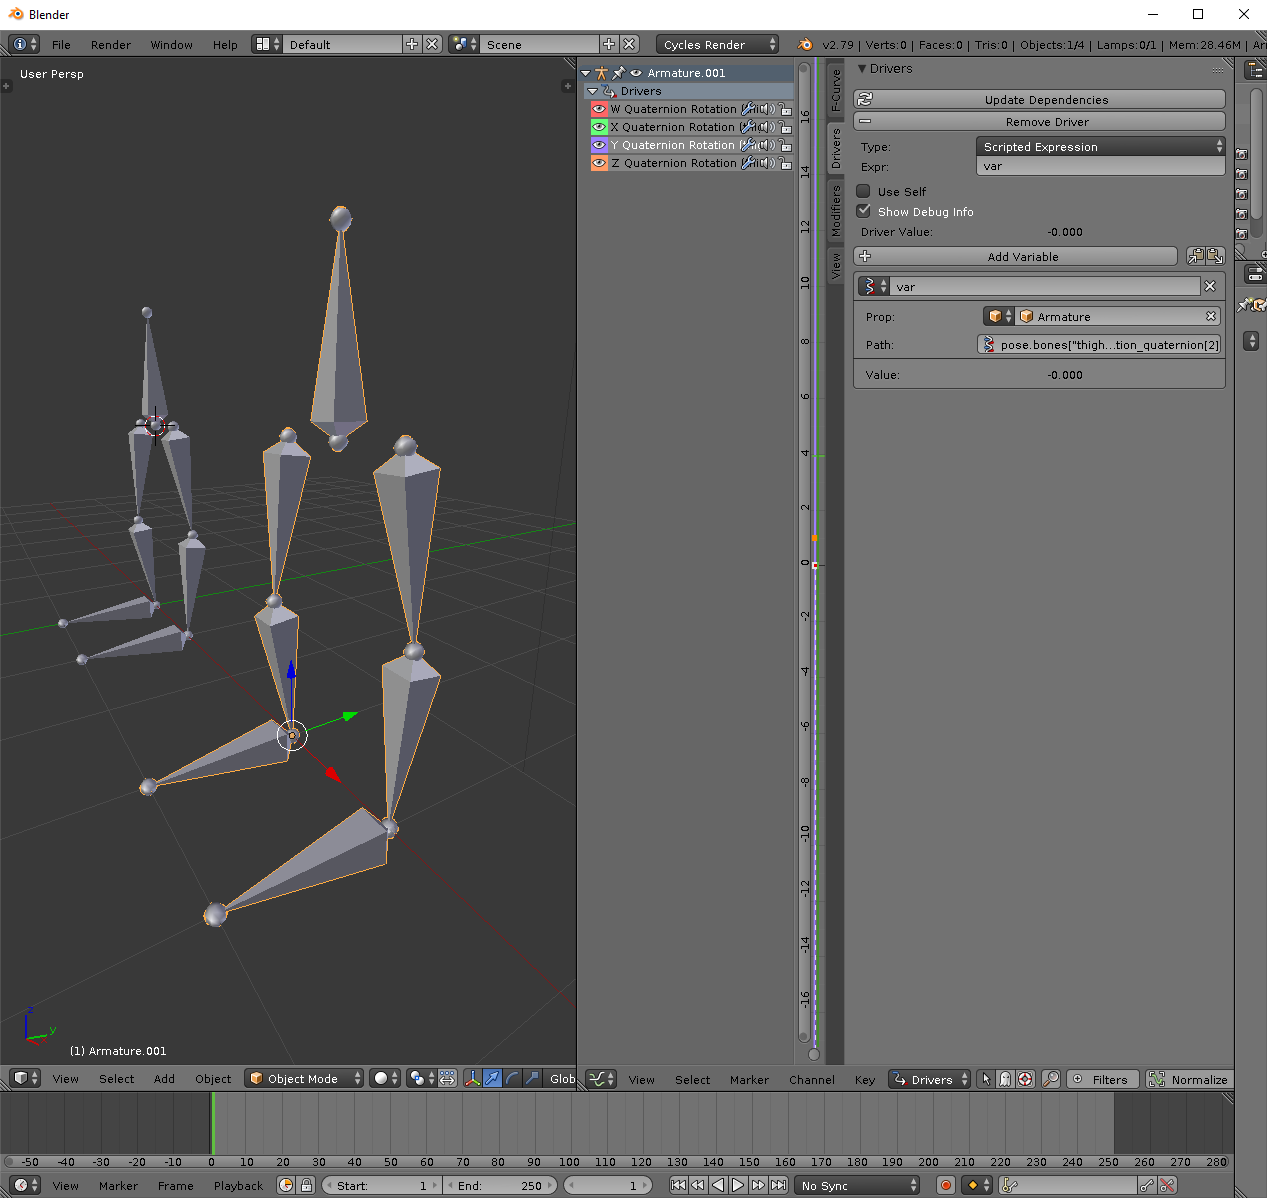
Rather than using a constraint to copy rotation, you can use a driver to drive the transformation. Because you’re driving the raw transformation, you can shove some manipulation in early, before the IK decides what its base angles are. Here, I’m driving it from raw copied path data, but you can drive it from transform channel data of individual bones, including in the same armature.

3 Likes

Good information here, thanks for starting this thread.

I think that whoever invented limit angle constraints said, “I’m sure I’ll come up with something better in a week, but this is easy to code, so I’ll just put it in.” And here we are.

There are a ton of problems with limit angle constraints:

  1. They’re based on Euler angles and so two-dimensional limits describe a rectangle on the surface of a sphere, when usually you’d want something a bit more round. Asymmetric three dimensional limits can twitch as one Euler angle is twisted into a different Euler angle.

  2. There’s a deadzone of control where the animator receives no feedback about their actions. More, this deadzone creates a discontinuity where the bone will flip from one angle to a completely different angle.

  3. They screw up interpolation, because if you go past the angle limit, the effective f-curve slope immediately, sharply flattens.

Demonstration of 1 and 2:


I kept saying to myself, I wish there was some way that I could just describe a shape to which to limit my bone… Like, if there were some kind of computer program that would let you draw 3-dimensional shapes… Man, that’d be so cool if something like that existed.


You can create angle limits of any shape you want with a shrinkwrapped bone as demonstrated on the left eye (only, for contrast with the right).

The mesh is weighted to a parent-- in this case, the face bone. A control or mechanism bone applies the rotational input. Its child is then shrinkwrapped to the mesh. Finally, the deforming bone does a damped track of the shrinkwrapped bone. You may want to separate these to different armatures. It’s working fine for me in a single armature, but I’m not sure how well Blender handles intra-armature dependencies in general.

Here, I’m using this very simply, to change the shape of my angle limits to something more circular. It could as easily be elliptical, rectangular, hexagonal, anything you want.

This eliminates the discontinuity, which is almost always a good thing— as the bone rotates behind the head, the shrinkwrap bone smoothly travels back across the valid angles. Yes, an animator should be smart enough to know not to point an eye at the back of a character’s head :slight_smile: But this can simplify certain automated tasks, like object tracking.

But the really amazing thing this does is it lets you control response curves– how the rotational input maps to the rotational output. If the mesh is a sphere, there is a 1:1 correlation. But imagine a parabola pointed away from the eye. As the eye swings outward, its input translates into less and less ouput as the shrinkwrap finds the closest mesh, which is at a nearer angle.

And this particular mapping can be tuned in a fully 3D manner, much more intuitively and complexly than with any code. Point your clavicle at a mesh that describes a sphere above the shoulder and a parabola below it, and the clavicle naturally responds strongly to rotation toward the head but weakly to rotation toward the body. Give the mesh a rim and see natural pop-and-lock motion from linear f-curves; make a manifold mesh to control the behavior at the opposite side of rotation.

Nor does the parent have to be the obvious parent. Parent the mesh to something else to limit a relationship between your deformer and anything you’d like.

Edit: I just realized. The other problem that’s been bugging me for a while are the fact that floor constraints suck. I think if you put a boolean on a mesh used for angle limits like this you could make a better floor. Including a floor with an arbitrary mesh, like a proxy for your body, to prevent clipping automatically.

1 Like

Made a quick demo and proof of concept for mesh-based angle-limits, in 1, 2 and 3 dimensions, along with an improved floor constraint system using boolean modifiers to limit these angle-limiting meshes.

Indeed, Blender doesn’t handle the intra-armature dependencies well, and it requires the use of multiple armature objects for Blender to be able to recognize what I want to do (but not multiple armature modifiers.) That does make it a bit more painful than it ought to be.

floorTest.blend (235 KB)

I wanted to make a handle-controlled spline IK that respected tilt, but couldn’t find anything about it online, so since I have something working, I thought I might as well explain it.

So first, hooks don’t affect curve tilt. This seems like an oversight to me, but whatever. In order to get hooks to affect curve tilt, you can align an axis of your hook controllers with the tangent of your curve and then create a driver for tilt from rotation in that (local space) axis.

But then, spline IK doesn’t respect the tilt of the curve it follows either. In order to get the IK bones to respect this tilt, properly interpolated according to curve settings, I created an offset string of vertices, individually vertex grouped. When this string of vertices is run through a curve modifier, targeting the same curve as the IK spline, the curve’s tilt twists the vertices around the curve. Since these vertices have individual vertex groups, the bones in the spline IK can target these individual vertices with a locked track constraint.

In order to get the string of vertices to stretch along the full length of the curve, the same way the spline IK bones do, enable “stretch” and “bounds clamping” on the curve (properties/data/shape.)

As usual with spline IK, it’s necessary that the control handles be in a different armature than the spline IK. I’m a little disappointed that Blender doesn’t handle intra-armature dependencies. I wonder if there are any add-ons that will split an armature into multiple armatures on the basis of dependencies like this. (Although it would be much nicer, for organizational purposes, for Blender to do so at runtime.)

Spline IK with tilt proof-of-concept: splineDemo.blend (90.1 KB)

1 Like

Some really creative concepts here, thank you for sharing these!

Thank you!

I’ve had some problems with automatic pole targets, especially dealing with strong deforms. I’m no longer even making pole targets. The dependency issues with shrinkwrapping bones to meshes are just too painful to deal with, and for curved meshes, there can be some snapping, but I’m using it a few places (eye angle limits, because they can be defined by a flat mesh, and avoid dependency issues, and because “limit rotation” creates a rather weird shape, not at all circular.)

Lately I’ve been working on how to actually make a “rotate-to-floor” bone. This is pretty easy to do in Python, but remarkably difficult using only constraints, and it’s an obvious empty spot in Blender’s constraint toolbox.

To do this, you need the intersection of a plane (the floor) with a sphere (the length of the bone.) The issue is that “floor” moves a bone in a line perpendicular to the plane, while “limit distance” moves a bone in a line running through the center of the limit distance. Every time you use the floor, it pulls away from the surface of the sphere, and every time you use the limit distance, it pulls away from the plane. (Except in the trivial case where the center of the sphere lies on the plane.)

But this is basically a trig problem, and you can use bones to solve trig problems.

What we want is a right triangle where the cosine is the distance from the floor and the hypotenuse is the length of the bone. That’s two lengths and one angle, enough to solve for the entire triangle. We have the cosine-- what we need is the sine. We can do that with an IK structure, which allows us to “double” our triangle, from which we can then bisect it and create a right triangle, giving us the sine.

With the length of this sine, we can now limit distance from the tail of “cosine” bone that stretches to the floor rather than from the deform bone itself. Since the tail of the cosine bone actually lies on the floor, limiting distance from it will push the bone in a direction along the plane of the floor itself. (Although I’m not strictly limiting distance, which would require a driver-- instead, I’m copying scale then tracking, locked world Z, the control bone.)

There’s a singularity where the control bone points perpendicular to the floor. But otherwise, no matter how you rotate the control bone, the deform tracks it, then rotates the minimum distance so that its tail lies on the floor.

I’m still working on how to integrate this fully so that it works well when the control bone cannot actually reach the floor. It behaves strangely in that situation :slight_smile: But for now, it’s a working “plane-sphere intersection” setup.

The complexity of a lot of structures is making me wish for constraints nodes. Wouldn’t it be amazing to have, say, a “rocker bone node group” that you could just drop onto a single bone and set a few parameters? Rather than all these bones that, in reality, have to exist in the same exact location as each other, making them difficult to manage.

1 Like

Looks like a really interesting problem, I’d have to read through it a couple more times to understand your solution - the whole layered armature approach of blender is something I wasn’t familiar with before, switching from another package. Doing all of this within a rig is currently exceeding my abilities.

Also, being having the option to use deformers on bones is a new concept for me, opening new possibilities in theory, but I agree, I had heaps of issues with dependencies this far.

I’m mostly interested in replicating a facial rig/deformer system we use at work, but there are so many walls I run into.

For example I tried to replicate a setup where I’d parent an empty to 3 deforming vertices and use that as a live hook deformer, but because of the dependencies it didn’t work, it doesn’t pick up the local transforms unless un-parented.

Constrain nodes would sure solve a lot of things, may be a solution to consciously control dependency order as well.

When I was talking about deforms, I just tend to divide my bones into two types for talking about it: there are bones that actually move meshes, and then there are bones that only move other bones. Deform and control respectively.

I think people coming from other packages don’t end up with the same words (and mine are scraped together, I’m not a professional.) The fact that you don’t need to create crazy mechanical bone structures in some other software packages makes some people think that “controls” are empties, not bones. Really, it doesn’t matter. Anything with an orientation works. Which is everything except a single vertex.

But you can use things like mesh deformers on bones if you want. Copy location from a vertex group, damped track a vertex group, and locked track a vertex group and you’re acquiring orientation from a mesh, and there are tons of tools for meshes. (You can add some stretch-to in there if you want as well, but it’s a little tricky, and you have to keep in mind that axes don’t stay orthogonal once you start mesh deforming.)

I find myself making a lot of non-rendering proxy crap. For example, to automatically keep fingers from clipping through flesh, I’d give them shrinkwraps (well, I’d give parents of IK targets some shrinkwraps to get the right offset) but of course that’s self-dependent if the fingers are the same mesh. So I duplicate my mesh and armature to have something to shrinkwrap to. Which is okay, if the animation is complete. (Otherwise, you need to make a bunch of drivers or a bunch of constraints to keep the armatures doing the same thing. Edit: Actually, I could link animation data. Didn’t even know I could do that until recently when I discovered it troubleshooting for somebody who did it accidentally :slight_smile: I end up learning a lot just from examining the way people screw up their blends, lol.)

You could try something like that with your vertex-parented hook probably. I’d be interesting in seeing it in action.

I’m still adapting to the terminology, by deformers I mean mesh deformers like shape keys, hook modifiers, simple deform etc. I still have to get used to blender.

at first glance that sounds like something that could be exploited as well

haha, same here - as with your finger example I was immediately thinking about a setup with multiple driver meshes where the mesh could deform based on vert groups to mimic skin interaction, than thinking about production scenarios where it would be required for it to penetrate a surface, cases where simulation and effects would come in post anim, and so on. This is probably why I’m making slow progress :).

With the vertex hook workflow I’m a but stuck to be honest - in maya there’s an easy way of making cluster defomers (equivalent of hooks) to follow mesh transforms and defomations, and also to create them based on the size of the proportinal edit. It’s a handy way of baking non linear deformations into shape keys and set them up as a series of in-betweens ar os correctives, making the rig faster and more streamlined.

I was trying this addon but since it wasn’t very reliable I wanted to try a workflow from scratch. My attention is divided across some other things right now (multiple shape key export/import, setting up relationships based on naming and updating them based on either naming or current value) but this would be an essential part of the best facial workflow I have worked with this far.

The root of my problem is this - I create a mesh and an empty, parent the mesh to 3 vertices to follow surface deformation, and would like to use a hook deformer which ideally would be the same empty but dependencies said no. Could be another object, but the parnted empty doesn’t inherit the transforms, there’s nothing to copy -

hook

here’s the same thing with the parented same empty as the hook deformer -
hook2

There’s probably something wrong with my basic approach, I need to look more into how blender works at it’s core.

Anyway, sorry to bring this up in your thread, just really wanted to pick your brains on this one.

1 Like

Not totally sure I get you.

Didi you say that right? If you want to deform a vert-parented mesh, just vert parent the empty to mesh’s parents, no dependency issues. Mesh1->Mesh2, Mesh1->Empty->Mesh2, no problem.

Or did you mean you want the empty-- the hook target-- to follow the mesh? So that you can, for example, keep it in sync with an armature deform? That’s a good job for a proxy mesh like I was talking about:

Non-rendering triangle is parented to armature, empty is parented to triangle, sphere is parented to armature and then hooked to empty.

I don’t use hooks (except for with curves) so I don’t know what they’re good for, don’t know if that’s what you want.

When I look at the add-on vid (well the first 10 seconds of the add-on vid, I’m kinda ADD), I see something different, which are vertex-group limited hooks without any falloff:

The internal (xray, wire) spheres, along with the vertex weight proximity and vertex weight edit curves, are just shown so you can have an idea that you can replicate hook falloff procedurally like this-- you don’t have to manually weight paint, you can recreate the falloff used by these modifiers in weights. In production, you’d write these modifiers when you were happy with them. Or maybe not, non-destructive is always good.

(Note that this isn’t quite the exact falloff. Exact falloff would have a sphere of radius n centered on the hook, with the exact type of curve used for falloff rather than me showing off my custom smooth :slight_smile: Vertex weight proximity should really have a “volume” mode in addition to vertex/edge/face modes, but so long as it doesn’t, this is me faking it.)

I’m not sure how different that is in practice from my first option, if at all. Note that if you have overlapping hooks, the order of the hook modifiers matters.

Now, there’s one other thing worth mentioning, which is that you might be stuck on hooks, and you should look into warp modifiers. A warp modifier is really cool because it’s like a hook with a from-to. That makes it really easy to combine with an armature by parenting its from and its to to bones:

This is a cool structure that you should play with. I didn’t realize it when I started writing, but it’s a good structure for muscle deformation too (think a tattoo sliding over scapula kind of stuff). The from-empty is bone parented. The to-empty gets its own parent bone, but at default has the exact same transform as the from-empty.

Not at all. Blender’s my replacement for video games (turns out, way better.) And I learn a lot from dealing with other people’s problems.

I’ve read a little bit regarding Maya (well a rigging book I borrowed from interlibrary loan turned out to be about Maya), and it sounds really cool, especially for the stuff I’m into. If you have a capture of good facial deformation you can do with this technique, I’d love to see it. I’ve been working on my own facial deformation, and I’m not there yet, so dealing with this stuff might be a way for me to learn some new tricks.

1 Like

yes, sorry about that - essentially what I want it to have a hook modifier or something equivalent able to deform a vert groupto follow the surface of a deforming mesh.

For a practical example, I have a shape key based facial rig, only bones for the jaw and the eyeballs, with a corrective shape key of an opening jaw. I’d like to have weighted deformation controllers on the surface of the mesh to be able to control the shape of the lips. Same with eyelids, the whole face essentially. They’d need to follow the armature plus “stick” to the surface of the mesh, and be able to deform a vert group at the same time.

The pipeline I’m tying to recreate is similar the one I use at work, it’s a heavily shape keys based system -

Only thing where I’d deviate from that is the sticky lips and the corneal bulge. Using a system like this in blender would allow me to transfer a setup from one character to the other in a very short amount of time.

Thank you for your tips, I’ll play with your suggestions.

I tried your solution and it’s definitely something that’d come in handy - but for my case furter complicating things is the mesh being deformed by shape keys - so if I’d need to keep the hook (or a second armature, I’m not picky) on the top of the deforming mesh surface any solution I tried had either parent loops or the strange dependency problem.

I still have to try the warp modifier.

Looking at your time stamp, Gollum isn’t being deformed by vert groups. The whole thing with what they’re talking about in mesh sliding over ribs-- for that matter, the facial wrinkles they show-- are just not compatible with vertex group based animation, unless we’re talking about dynamically generated vert groups. (Or unless you instead warp UV, which isn’t any simpler of a problem.)

If your goal is to fit good hook animation into a shapekey+armature game engine, I don’t think it’s going to happen without baking every single frame to shapekey or expanding your engine to support hooks as well.

If I misunderstood that, you can use proxies to deform from shapekeys as well as armatures. Make a proxy, animate it however you want (sk+armature if you want), parent the empty to it, surface deform the rendering mesh from it, then hook your rendering mesh to the empty. Either of those hook methods I described will keep the hook (apparently) glued to your rendering mesh.

If your goal is to combine shapekeys you’ve made with a bit of post-SK control, and you need it readable in your SK+armature-only engine, don’t use hooks (they won’t translate well), but make some tunable bones: control + duplicated control-parented deform bones with inverse copy local location children will let you keyframe (or drive from shapekey) the pivot point.

I’m not sure, I’ve never done it, but if you want to make these control bones follow your shapekeys automatically, you could try what I was talking about with mesh (or surface) deforming bones: track non-rendering meshes that represent your bone’s basis vectors, that are themselves mesh or surface deformed by a proxy for the rendering mesh. (Linked animation data, or animate the rendering mesh by surface/mesh deforming from the proxy followed by post-proxy armature, rather than animating the rendering mesh directly.)

If I wanted to make Gollum in a game engine, I’d forget about vertex deformation for the ribs and the jowls, which are never going to look good with limited vert counts, and instead do dynamic bump mapping. If I had a supercomputer and worked for Pixar, I don’t think I could create a procedural system in Blender to do those wrinkles that was actually time-efficient or better compared to doing all of his expressions in The Hobbit by hand. It would take me a year to do either. And it wouldn’t be very reusable, because a lot of the work would be tuning the system to his particular face.

The tissue system mentioned is not relevant for the face, sorry about not clarifying that - the time stamp shows the channel box on the left in maya with many shape keys (in setups like these more than 1000, before them even being split. All the facial shapes are hand sculpted.

In addition to that animators have controls on the surface of the mesh, further refining the shape of the smile for example. These are the one’s I’m trying to create.

I’m not looking to get this into a game engine, that’d be way to heavy, it’d stay in a vfx pipeline. (basically I’m trying to shift my daily workflow towards blender, but it’d need to be conform with our pipeline at the company)

That’s what I want I think. I didn’t think of proxy geo because the surface deform is way to unreliable and I have no way of matching vertex positions based on UV space in blender, but I think that could be a workable approach.

The trick is (with re-using the same topology) to keep attention to the loop placement (keep the same loops on the lipline, eyelids etc.) across multiple models. Once you did lets say 5 very specific humanoid shape key setups a’la Gollum which are not re-usable on their own, you can mix them via shape keys, 20% of each, that’d give you a very generic face which works great as an archetype.

After that a cheap solution is putting in a new character as a corrective shape key, or if you have a tad more time conforming the archetype via mesh deformers, adjust it to fit the new character, surface deform, and bake /re-assemble all the shape keys. It’s a great way to quickly transfer shape key based facial setups across characters.

Another issue being that in maya shape keys are “live”, until the source mesh still exists it can be modified and it’d update the shape key. Once you delete it it only exists in the mesh data like in blender.

The idea with control + duplicated control-parented deform bones with inverse copy local location children definitely exceeds my current blender knowledge. But that’s the interesting part I guess when learning a new software, the challenge. :slight_smile:

Thank you again for all your help!

I tried the proxy solution but I’m getting double transforms. (empty parented to one sphere with a shape key, another sphere es being meshdeformed to it and is using the empty as a hook -

hook3

I feel like I’m messy-ing up your thread though, in hindsight I should have made a separate on for this problem.

Yeah, I see. Sorry for leading you down the wrong path. I had a few beers last night :slight_smile:

Was just playing with it some. I can see the usefulness.

So here’s the best thing I’ve come up with:

Proxy (in x-ray wire) has a shapekey and an armature deform. Axis empties are vertex parented to it. Cube empties are parented to axis empties. Rendering mesh gets surface deform from proxy, then warp modifiers from/to axis empties/cube empties.

I’m not totally certain that a warp deform is the same as a hook deform. It looks similar enough. As before, order of warp modifiers matters if they end up overlapping. If they overlap enough, the warp modifiers can pull the mesh away from the empty controllers.

[Too complicated gravy: This is solvable with a chain of proxies, but that’s overkill IMO. (Would be doable with an addon/script that manages all that behind the scenes, automatically. Addon video does show each controller moving the other controllers.) Maybe could even rig it backwards and forwards ( https://blender.stackexchange.com/questions/109508/maintain-equal-rotation-on-multiple-objects/143308#143308 ) for proper warp interaction between controllers, but that’s even more complicated.]

You animate the proxy’s armature (not in object mode, surface deform ignores object transformation) and from the sphere empties.

Mesh deform would probably work instead of surface deform, but honestly, I’ve never had cause to try the mesh deform. For identical meshes, surface deform always works for me. Most I need to do is add a triangulate modifier to the target. (Vs mesh deform, where I’d need to make meshes watertight and wait for a good enough bind.)

You can deform via UV, but it’s no good for animating. Bake undeformed position to image once, bake and subtract deformed position every frame, then apply as displacement to a different mesh. Too unwieldy to use as a general deformation technique, but might be a good way to transfer generic-ish shapekeys. Dunno, might be something doable with dynamic paint as well, I haven’t really used that. (Makes me wonder what it would be like to use a displacement-image based facial “shapekey” and animate/tweak it with a UV warp.)

Thanks, that makes sense.

This totally worked! I guess since the warp deform is based on differences in origin I didn’t get any double transforms. Thanks heaps, I owe you one (or two actually, the corrective shape thing worked out great as well)! I even have a second origin, can easily create skin sliding and the like…

clustah

Maya has an option to match vert posditions based on UV space, exploiting that I saw a couple of the best surface bind solutions in the industry. Would be great to add an option for that for example in the data transfer modifier. I think there were some rightclickselect requests for that already - but in the meantime I guess if the mesh is just a copy the one’s we have should work just fine.

Apearently I really want to go on a hike now (according to my wife) but I’ll definitely play with this some more. Eventually this needs to become an addon, just need to figure out how to streamline adding weights based on a case dependent custom falloff radius (like proportinal edit, set a radius, click once, that add the controller)… OK, getting too excited :smiley:

Anyhow, thanks again for all your help!

Absolutely, seems like a no-brainer to use UV as a mapping technique for data transfer. (As well as adding fields for “worldpos” to vertex data transfers. The shit we have to go through to transfer shapekeys…) Of course you’d have problems with overlapping UVs, but Blender could just tell you to fix the overlap similar to how it does when trying to bind a deformer that isn’t right.

Honestly, if I had money, I’d be using Maya. (Well, I don’t know right now what’s wrong with Maya, so that’s not totally fair.) It sounds like a great application. While I love Blender, I’m always a little surprised at the professionals that are using Blender despite the Maya toolset and the fact that Maya is such a standard.

But Blender has made a hell of a lot of progress over the years, and it’s not impossible to match Maya eventually.

Vertex weight proximity. ->Vertex weight edit/mix, but that’s optional.

1 Like

I’m using it for 15 years now all day every day at work, but I’m doing a lot of freelance on the side as well. The main thing against it for me was the subscription model and price. Things are adding up so quickly, Maya, Houdini, Mari, Nuke, Zbrush… not made for my budget either.

Also, maya does have some problems, I saw single production rigs taking over 40 minutes to load in, same time to save an anim scene. Crashes are very frequent, obviously with saving times that long no one would use autosave. I could go on for days - I’m sure Blender isn’t perfect but at least there is an option to start a dialogue regarding those problems.

Plus, I like an occasional challenge, playing with new tools. :slight_smile:

What kind of witchery is this? That one sure open’s up a whole new set of possibilities. Just the other day I found out that shape keys and weights aren’t lost when combining/separating objects, and now this. You Sir would need to make tutorials, seriously.