I have been pretty in depth with modeling for quite some time, but the texture and material side of most programs always gets me. I have tried to watch many tutorials, but they are confusing me more than helping.
I am creating a game with a developer friend of mine and doing all the GFX. I started out using node editor with cycles engine and made some really great materials when I rendered, but I found out I would need to uv unwrap them to say export to Unity or Godot.
Here are my questions.
If I export to a game engine like Unity or Godot how is a timeline or what is the best approach.
Materials I can apply easy using Node Editor and adding a image, but that cannot be exported out along with the model to use in a game engine right? If it is possible how I am not technically unwrapping the image.
I have heard the term baking so would I essentially bake the material or texture on to allow this option.
Do I even need a texture or certain maps such as normal map etc?
If not do I still have to uv unwrap the model to follow the steps.
I think for me a workflow or timeline would be absolutely amazing. The game will have a series of tunnels and pipes so I would be mainly unwrapping or doing materials to cylinders. So many options, but I am so confused!! If I can get by without unmapping and just getting a basic material on to the model to import into a game engine would be ideal as it does not need to be super high in texture.
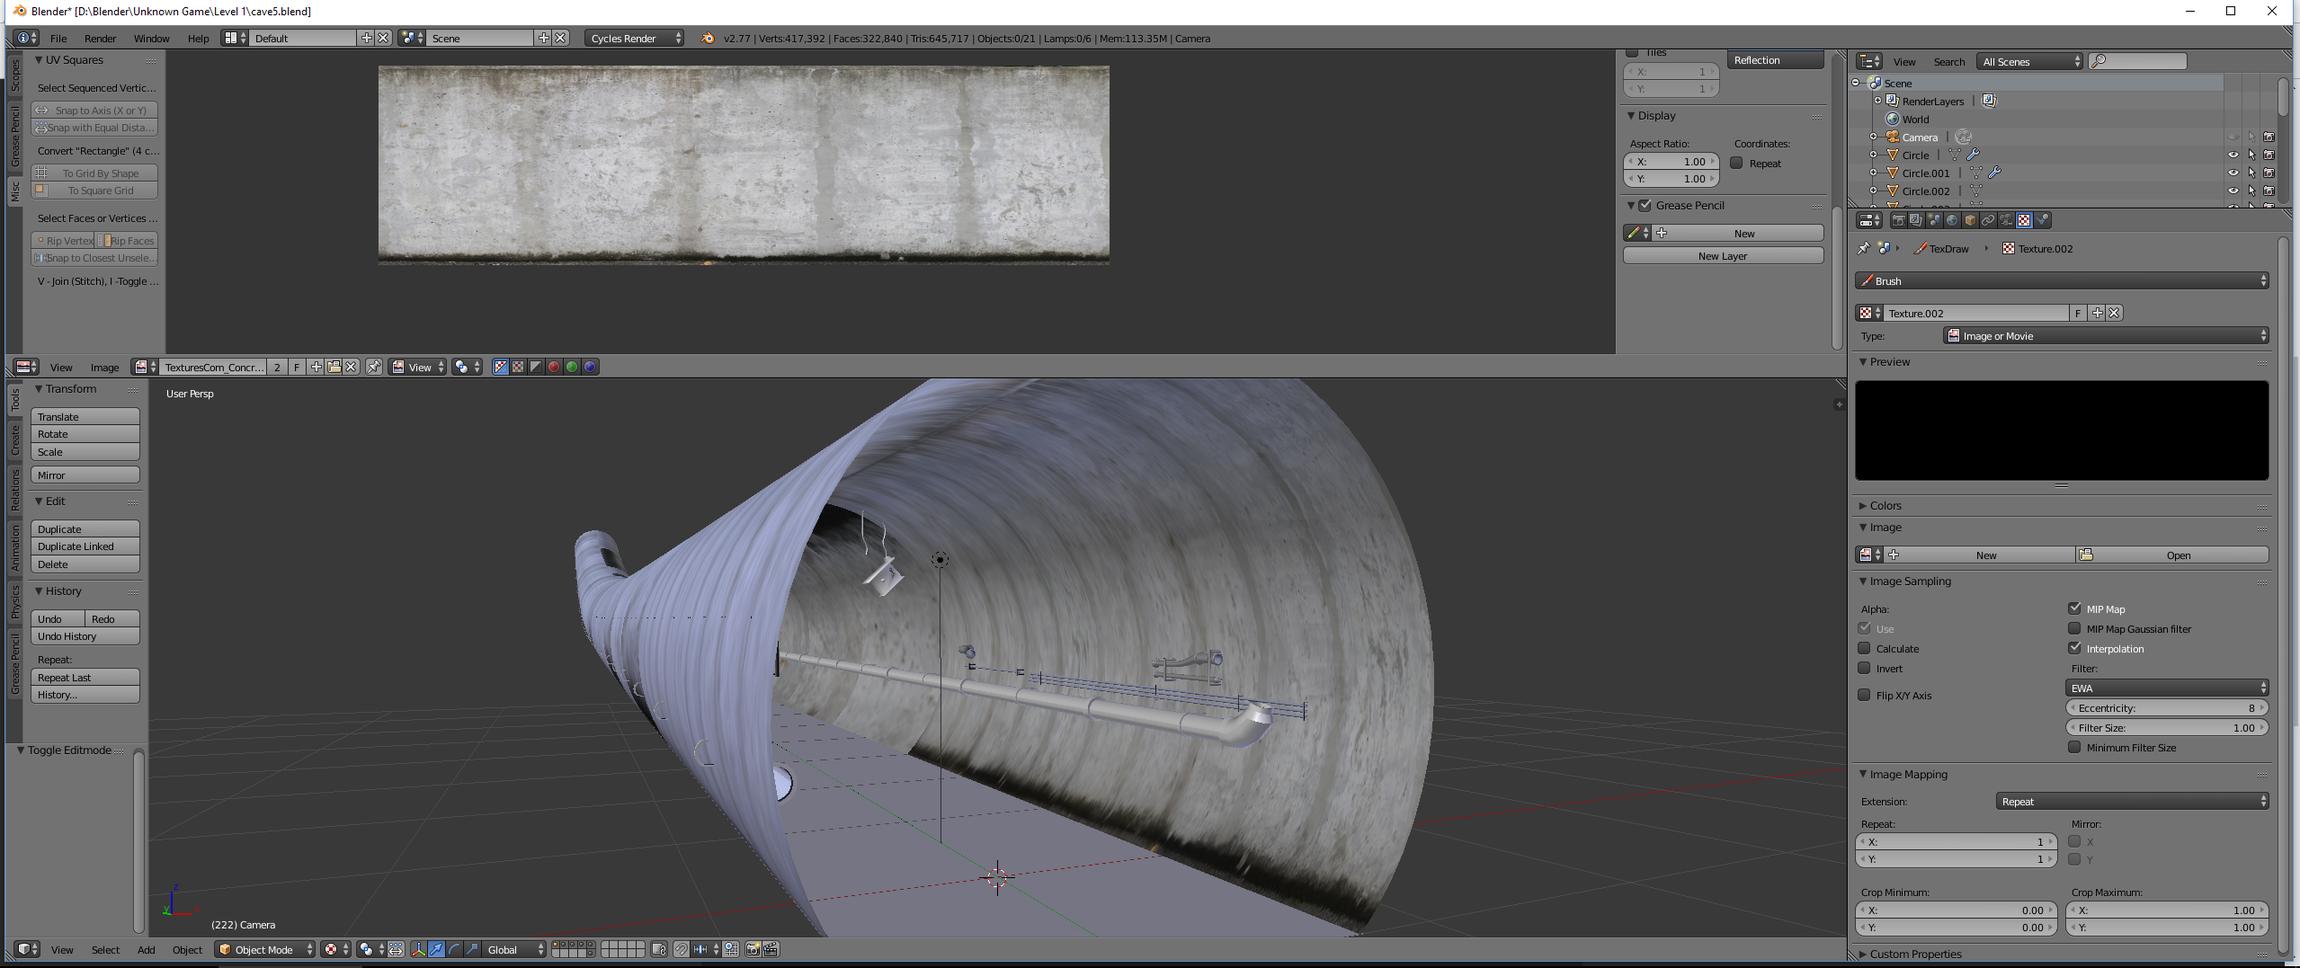
Example 1 is the image tunnel I am trying to unwrap. For now it is just the big tunnel not any of the items inside. I am viewing “texture” which is why it has the image applied
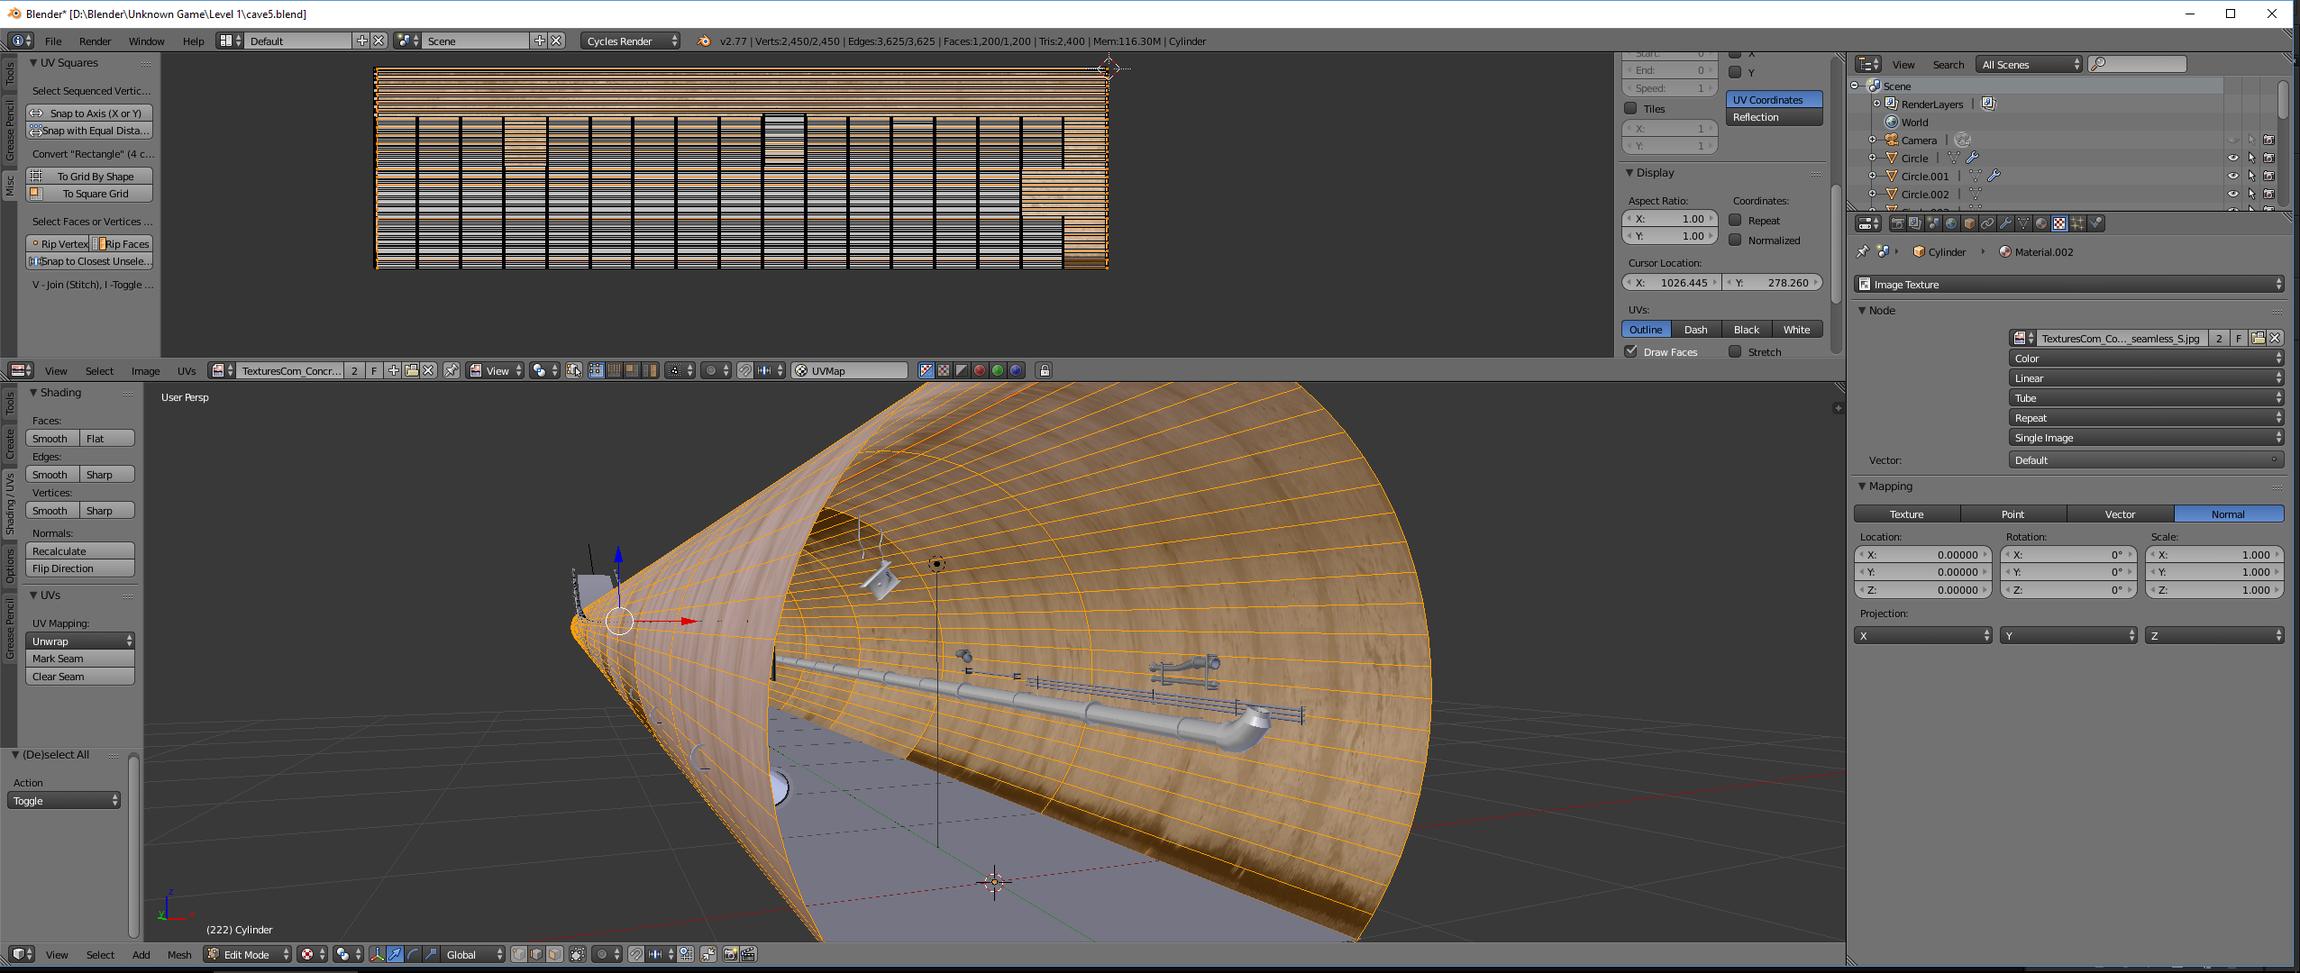
In Image two you can see I am in edit mode and unwrapped the tunnel. The only way I could get the first couple sections to look “kind of” correct is take the entire UV and strech it across the top. All the rest of the pieces of the tunnel are the tiny rectangles you see. I have one seam that goes across the top of the cylinder.
No. Cycles materials and Blender render node materials don’t export.
No. It still won’t export materials. Baking in this context means preparing a texture map for to be used in another material system, such as one in Unity, so you can prepare materials there
Depends on the style, material, lighting, and viewing distance. Textures create variation, otherwise everything would have simple colors and would have uniform reflections, smooth surfaces. Either you use external application, or prepare materials and textures in the target application
Get comfortable with UV’s
In Blender terminology:
You have objects which consist of object data (mesh in this example), UV maps are part of object data as they’re a 2D representation of the 3D mesh coordinates, materials are assigned to mesh faces, and materials have various properties. You can think it as a hierarchy where object as at the top and everything else goes inside each other. That’s also where the order of things in the properties editor comes from, for the most part.
Material properties relate to real life material properties: what the color is, how much it reflects, is it metallic reflection or not, how uneven the surface is. These have terms like albedo/diffuse, roughness, metalness, normal/bump/displacement. When you have an image that is prepared for controlling those specific material properties, they’re called texture maps, usually with the name of the property it controls: albedo map, roughness map, metalness map, normal map.
How those will look depend on the lighting and what gets reflected.
Those are true to every material system and every application with polygon models. The interfaces change, the names change especially if they’re using a different material system. A node based material system can be more loose in what goes where, like in Cycles. That’s where principled shader comes in, providing one node with many connection points for texture maps.
Whichever application or means you use to prepare texture maps, you do it to help defining those materials in the target material system, such as one in Unity. Getting materials exported means using an exchange file format which defines a material property and its value and/or the corresponding texture map that controls each. It’s then the importing application that tries to interpret those definitions, but it might ignore any or all of it for whatever reason.
Thank you JA12! Your explanation definitely helped me understand this more. So long story short I definitely need to work with UV Mapping for any game assets in Unity or Godot.
So how would this workflow look.
Currently this is what I am doing
Create Object Modeling
Mark Seams to try and Unwrap
Press U and Unwrap model.
Go to Node Editor
Add a Diffuse BSDF, Image Texture, Mapping, and Texture Coordinates
Change to Object Mode and View Texture which does allow me to see it now
Now I’m stuck. I have seen videos that they save out the UVMap then import it in again making a new material or texture, to baking etc.
If I want to say take even the most basic “box” and go from start to finish with say a wood texture what are your thoughts on my workflow above and where am I missing steps.
As always thank you. I have been able to grasp so many other aspects of 3d graphics, but UV Mapping gets me everytime.
You’re mixing things a bit…
There’s no ‘saving an uvmap and import it again’. UV coordinates are part of the vertices themselfs; they provide a coordinate system for texturing, just like vertices coordinates provide information for drawing triangles in the screen.
How each software draws the mesh triangles might be very similar from one to another. But how it colors them might differ. In this sense, materials don’t work the same and in some cases, a material for one engine cannot be translated to another. The common ground here is the old texturing workflow (at least all softwares use it some way or another).
This means that a triangle has a corresponded set of coordinates in a UV coordinate system, and the engines will use this to get colors from the textures. What each engine does with the color retrieved from the texture is far beyond the scope of this thread, so you need to understand the engine you’re working with.
About baking… Some engines can produce other colors and values (not stored in textures) at the render runtime… Things like Global illumination, procedural textures, etc; are typically calculated by the engine… These products are normally not interchangeable from engine to engine, and therefore they must be stored into textures that other engines can read. This process is what is called Baking, and it doesn’t mean that you’re converting one material definition to another; you’re just saving into a texture something that one engine can produce alone that others can’t.
As the others have mentioned, you’re mixing things. There’s no need for creating a material in Blender if you’re making a asset for game engine.
Let’s say you want to export a cube to Unreal Engine or Unity.
1 - First you model - ok
2 - Than, you unwrap it - ok
3 - And here you have some options, you can either export the layout (Only) of the UVs you just created in Blender to Photoshop and paint it there (In photoshop you add the textures) oooor you can paint it in Blender/Substance Painter/Mari, etc. Keep in mind however that you if creating in photoshop you obviously won’t see the effects of the bump and reflection map this is why people use Substance Painter to paint their models.
4 - As long as you have the textures ready, in this step you create the materials in the software in want.
Modeling stage supports the pipeline http://www.upcomingvfxmovies.com/wp-content/uploads/2014/03/3d_production_timelines.jpeg and you can cut time and work from UV unwrapping and texturing stages. Linked duplicates (shared object data), instancing, and constructing objects with mirror and array modifiers can do that if you unwrap while modeling. If you know the object needs to be unwrapped later, you can still add seams while constructing the models.
A box has 6 sides and you could decide which of those you want to be unique. If all of the sides are the same, one way to construct it is to delete all but one side, and make linked duplicate objects for the others. Those share object data so you only have to unwrap one, but can still edit all of them, and rotate the objects instead of rotating the UV’s.
You could unwrap, add the same material to them, and bring in a wood texture map̣. Ideally that wouldn’t have any shadows on it. You could adjust the UV’s directly in the UV/image editor to map the texture like you want it, paying attention to the detail size compared to object size, if you use UV’s. Could also use other coordinates because you’re basically texturing a plane.
Another way is to keep the UV’s where they are, take a snapshot of those UV’s, and paint over that image in an external application. UV/image editor, UV -> export UV layout. The actual coordinates stay in Blender, but you can now place the details where the UV’s are and save that without the UV guide layer. The position of the details then match the UV positions in Blender.
If the model then has all its texturing done, you could join the separate sides of the box and remove doubles to connect them. But that doesn’t mean it’s ready for a game engine. Next step would be to prepare another UV map for baking, use as much of the image area as possible, consolidating multiple assets on the same image if it’s not populated enough. You could do the latter by using Texture Atlas addon for example. Pay attention to pixels/size ratio. If you decide that you need 1024 pixels for every meter to get the detail level you want, the UV islands need to cover enough pixels on a new image you bake onto. The textures you used also needs to have at least as much texture pixels so that they don’t get blurry.
Then it’s on for baking. Haven’t used Unity but looking at this, https://docs.unity3d.com/Manual/StandardShaderMaterialParameters.html
you would combine color textures in the material and connect those to diffuse or emission, and bake diffuse color or emission to get the albedo map.
There might be a way to change the default behaviour in Unity but its manual says
albedo map contains colors, including metal colors, and the image alpha channel is used for transparency. You would combine the colors in the material and bake those, but Cycles doesn’t bake alpha. If you used transparent shader to get it in Cycles, you could bake whatever controls the mix shader value for it and combine with the albedo map image afterwards
Metalness. How metallic the surface is. In Cycles metallic materials only use the glossy shader. If you have bare metal parts, you would bake a texture map that indicates which of them are metallic and which aren’t. In Cycles that could be the mixing factor with whatever and just glossy.
Smoothness. This one is glossy roughness inverted. Unity manual says you could use metalness map alpha or albedo alpha for the source, so would again need to combine those. Not with albedo alpha if you’re already using it for transparency.
What channel? Images have either 3 or 4 channels. RGB(A). Each channel is basically a greyscale image, describing how much red/green/blue and how transparent. Because many of the material properties also work with amounts, you can use just one of the image channels to control it. White is 1, black is 0, so they can describe values within that range. They can also work as a mask map, controlling how to mix two other properties/shaders/whatever.
Texturing applications can speed up the workflow. Substance painter for example mixes full materials and lets you control the properties of each and paint with them. Once done, it can bake the separate texture maps out.
Thanks guys that definitely gave me a lot to think about. I will continue to go through some basic tutorials and learn my way with UV coordinates properly in order to get the textures etc set for game assets.