Hmm, works for me. Did you select the yellow bone of the hand and drag both influence sliders to 1.0? Once that’s done, choose the other bone (Hand IK.L or Hand IK.R; hit “Draw names” to see them) and move that bone.
@Mike_S: Good idea! I was kind of worried about doing that because I thought "Well, what if I move the base and the eyes get messed up? But now that I think about it, when is anybody going to be moving the base during an animation?
Glad you like it.
@Felix_Kütt: I’d be happy to have it hosted on blenderheads! Were you wanting to put it there, or do you want me to?
BTW, the site looks great.
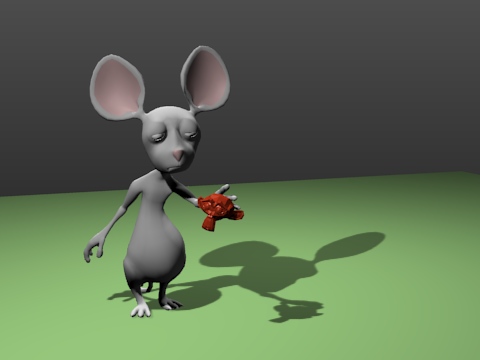
@sketchy: For some cases, that would probably be best, but my thought was that mice usually drag their tails on the ground (I probably should have made it so you could switch from IK to FK). I thought the best way to do that would be an IK system. I know the current method isn’t very good, so if anybody has suggestions on that I’d be glad to hear them!
Is animation your day job? or are you in school for it? … or neither ?
That animation is really top quality.
I started to rough out some additions to it, starting with something for him to actually touch.
The only “animation” I added, and compared to yours, I use that term very loosely, is a very primitive “turn-around”, a passable-primitive head-scratch, and the rudiments of a head-shake.
The Sign and Suzanne have actions added to the NLA editor as well as two additonal actions for the Mouse, (the original “Surprise” action I called SurpriseOrig.
When I was trying to coordinate the Mouse, Suzanne and sign, somehow I messed up the timing on the original action. Even rendered at 10fps, it’s still too fast for some reason.
@Felix_Kütt: Glad to see it there. I was actually kind of hoping someone might want to put the rig somewhere more permanent, so I’m glad to see that happened.
@Aligorith: Thank you! Hope it’s useful in the challenges.
That’s a pretty cool animation, too! I didn’t know you could mix actions in the NLA like that. I’m going to read the BSoD animation tutorial and hopefully figure that out. Maybe when I’ve learned about that I can figure out why the original action is fast, too.
I’ve been considering making an updated version of the rig at some point, perhaps with the new stride bone options. If I can figure out the NLA stuff, perhaps I could even include some default actions to include with the rig to speed up the animation process.
Bugman_2000 also contacted me about this rig being on the DVD of his new character animation book! That made me pretty happy.
I was just hoping someone could answer this question for me? I’ve been playing around with rigging for a while now, and I feel that I know enough by now to rig a proper body, but lately I’ve noticed that people don’t use the default bones that come with blender, but actually create their own bones, that look like objects.
I’m asking you this question after running into this thread on the Blender Forum called “Mouse Rig”…
Could someone maybe shine a bit of light on that, or maybe send me a few links/tutorials which could show me how it works, and what the benefits and use of it is?
Create an object, say a cube for now, optionally color it.
Select the armature, change to Pose mode, select a bone, then in the Editing (F9) buttons panel, in the Armature Bones panel / Selected Bones there is an OB: field (beside the Hinge, Deform, Multi Buttons. Type the name of your object there. That’s it ! (With 2.43, there is also a button under the Armature Panel/ Display options (“Draw Shapes” that you need to turn on.
To adjust the size/shape of the bone, you can either edit the bone itself in EDIT mode, or the edit the object in EDIT mode.
The advantage is that it makes it easier to quickly find the bones you want. Color coding the right/left side of the armature is helpful too. Another useful tool is “Bone Layers”. (Select a bone in Pose Mode, press “m” to move it to a layer, (with 2.43, press SH-M to select the active bone layer(s).) With 2.42a there is no keyboard shortcut to set the active bone layers. You have to click on the visiiblity buttons in the Editing Buttons / Armature Panel / Display Options panel.
Thank so much for clearing that out for me! I believe it will help me a LOT in the future! At the moment I’ve been rigging my characters with just a whole row of bones next to the face and all over the body for different shapes, and keep on having to look up by name which bone does what! Very much appreciated! Oh, and thanks for the link! Just scanned through and it seems like it can come in very handy as a reference, due to it being simple yet very effective!
Take a look at the Ludwig character (link in my “Best of Blender thread”) for a nice face control system, it uses a second armature, with the face controls off to the side of the character.
Also in my B.o.B. thread, I have links to all of the best character rigs that have been posted here.
Thanks SOOO much! I feel that most of the times I learn the most by looking at others work, and in this case there are plenty! I’m going to dive into these immediately! Thanks once again!

 Properly better than my “AnimationMentor” rig.