After a lot of testing and frustratoin, I think I solved all the problems I had with softbodies for clothes. The only missing part is to tweak them to look more like made of fabrics.
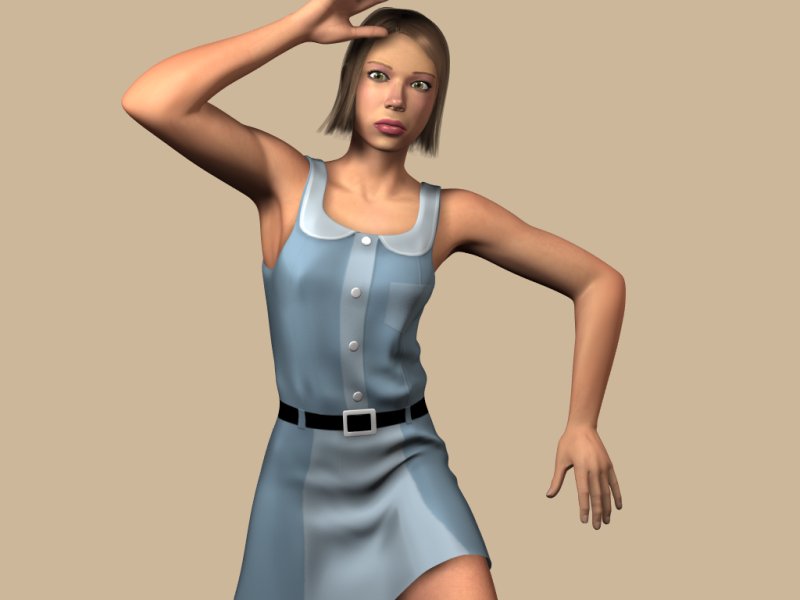
I was trying to make a decent animation but I just can’t, so I will use a few still images. Nothing spectacular, but as you can see, at least there is no skin showing through the clothes, and there is none in the animation which leads to these poses. The strange poses show how this works well even with the added complication of muscle simulation of the shoulders using driven shape keys.

Here are two variations of the last image, using different weights:
In the first parts I will try to cover the basics of modeling of clothes, with good topology in mind before getting into the rigging and setting up of softbodies.
Part 1, modeling
Time: about an hour.
Skills: Modeling, good vertex pushing skills.
I will start with a simple dress model, but the principles apply to many kinds of garments. You’ll even find this silly if you are a good modeler.
In a previous tutorial I wrote once, I suggested to make garments out the body mesh, but I don’t anymore. Creating them from scratch is faster and the topology gets well done from the start.
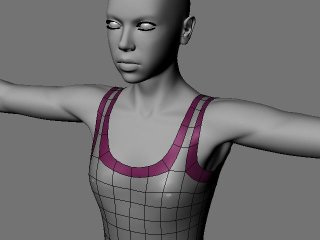
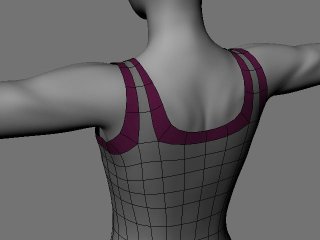
I think good topolgy is important for softbodies and the results are better than using triangulated meshes as it is done in other programs. As you can see, the purple faces make clean rings around the arms and the neck, this seems to distribute the stress better.
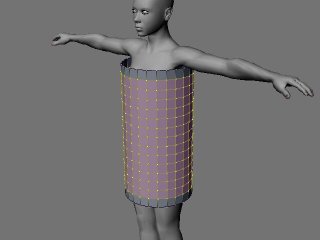
On a model without these rings, the sides of the dress hang to the sides like this when a softbody is applied:

So, to have something to begin with, snap the cursor to the center of the body and create a cylinder with open ends and an even number of faces from the top view. In this case it has 24 sides. You might have to rotate it so two edges are aligned with the symmetry axis.

Add all these parallel rings by multiple loopcutting (ctrl R and mouse wheel).
Scale those rings one by one to roughly conform to the body, sometimes scaling around the cursor and constraining on X and Y as needed.

Here is a rough form.

Now we need to start using the mirror modifier. Depending on which side you prefer to work on, delete the vertices from one side, leaving the ones at the seam. Then add a mirror modifier.

Now do some vertex pushing to refine the shape. This is obviously still a low poly version, so you can’t really make this dress fit very well.

Notice how the vertices under the armpit are slightly curved.

Select two edges, one on the front side and one on the back where the straps will be extruded.


Extrude a few times, adjusting the polygons to form the straps and weld the two faces at both ends.


Alt right click on an edge on the arm opening to select the inner edge loop. Press E and, without moving the mouse, press enter.

Press S and scale the selected inside vertices.

Model the arm opening. Now you have a clean face ring from which you can easily extrude a sleeve if you want to.

Now apply the mirror modifier, but don’t enable X-axis mirror just yet. Select the edge of the neck opening.

Extrude and scale, just as you did for the shoulders.

Now do enable X-mirror, model the collar and fix the strap.

You can of course make any variation that doesn’t have the arm and neck openings aligned, by extruding a row of edges instead of single edges.
An additional step which I always do even if it might be useless (but doesn’t harm), is to apply the XSort button to all objects involved. In my early experiments the “clothes” would go through the body even if deflection was activated for both objects and they were in the same layer. After a lot of frustratring tries, deflection started working for no reason, I realized I had done a lot of operations which changed the vertex order of the body mesh, so I tried XSort to somehow order all the vertices and since then deflection seems to work all the time.
This is obviously a low poly first step, which will not create interesting or realistic folds, and covers only the basics for the upper body, but you can make it as polygon heavy as you want depending on the desired effect.
Well this is part 1, still a lot to cover…
 (and very nice charcaters as always)


