Softbody clothes that work (warning, lots of images)

After a lot of testing and frustratoin, I think I solved all the problems I had with softbodies for clothes. The only missing part is to tweak them to look more like made of fabrics.

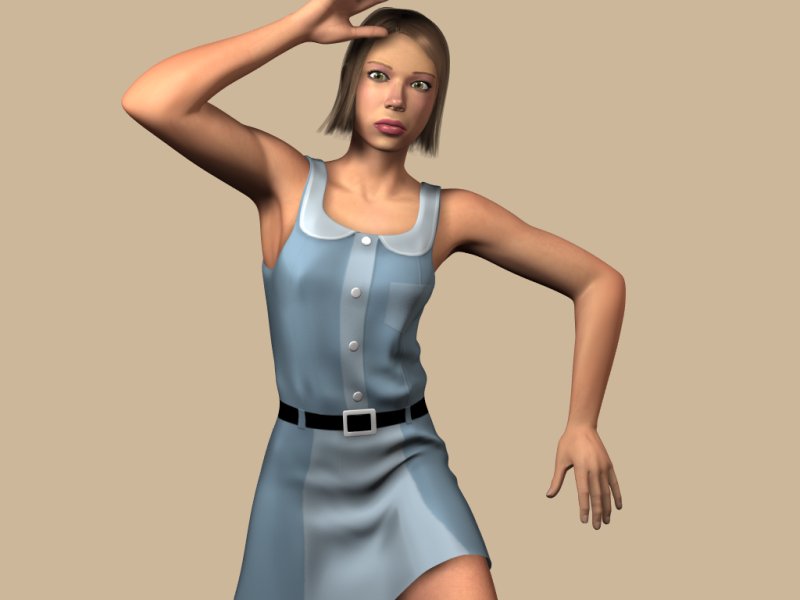
I was trying to make a decent animation but I just can’t, so I will use a few still images. Nothing spectacular, but as you can see, at least there is no skin showing through the clothes, and there is none in the animation which leads to these poses. The strange poses show how this works well even with the added complication of muscle simulation of the shoulders using driven shape keys.


Here are two variations of the last image, using different weights:

In the first parts I will try to cover the basics of modeling of clothes, with good topology in mind before getting into the rigging and setting up of softbodies.

Part 1, modeling

Time: about an hour.
Skills: Modeling, good vertex pushing skills.

I will start with a simple dress model, but the principles apply to many kinds of garments. You’ll even find this silly if you are a good modeler.

In a previous tutorial I wrote once, I suggested to make garments out the body mesh, but I don’t anymore. Creating them from scratch is faster and the topology gets well done from the start.

I think good topolgy is important for softbodies and the results are better than using triangulated meshes as it is done in other programs. As you can see, the purple faces make clean rings around the arms and the neck, this seems to distribute the stress better.
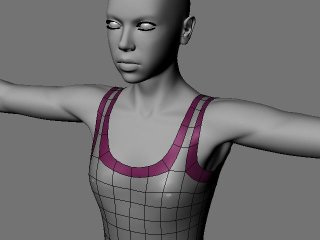
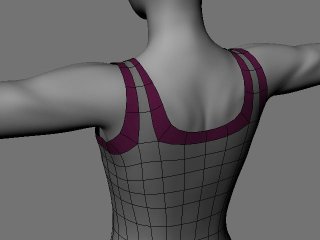

On a model without these rings, the sides of the dress hang to the sides like this when a softbody is applied:
http://uploader.polorix.net//files/173/vestido002.jpg

So, to have something to begin with, snap the cursor to the center of the body and create a cylinder with open ends and an even number of faces from the top view. In this case it has 24 sides. You might have to rotate it so two edges are aligned with the symmetry axis.
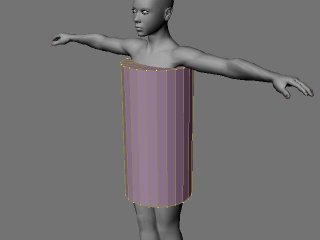
Add all these parallel rings by multiple loopcutting (ctrl R and mouse wheel).
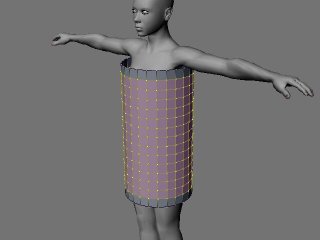
Scale those rings one by one to roughly conform to the body, sometimes scaling around the cursor and constraining on X and Y as needed.

http://uploader.polorix.net//files/173/vestido005.jpg

Here is a rough form.
http://uploader.polorix.net//files/173/vestido009.jpg

Now we need to start using the mirror modifier. Depending on which side you prefer to work on, delete the vertices from one side, leaving the ones at the seam. Then add a mirror modifier.
http://uploader.polorix.net//files/173/vestido011.jpg

Now do some vertex pushing to refine the shape. This is obviously still a low poly version, so you can’t really make this dress fit very well.
http://uploader.polorix.net//files/173/vestido013.jpg

Notice how the vertices under the armpit are slightly curved.
http://uploader.polorix.net//files/173/vestido015.jpg

Select two edges, one on the front side and one on the back where the straps will be extruded.
http://uploader.polorix.net//files/173/vestido016.jpg
http://uploader.polorix.net//files/173/vestido017.jpg

Extrude a few times, adjusting the polygons to form the straps and weld the two faces at both ends.
http://uploader.polorix.net//files/173/vestido018.jpg
http://uploader.polorix.net//files/173/vestido019.jpg

Alt right click on an edge on the arm opening to select the inner edge loop. Press E and, without moving the mouse, press enter.
http://uploader.polorix.net//files/173/vestido020.jpg

Press S and scale the selected inside vertices.
http://uploader.polorix.net//files/173/vestido022.jpg

Model the arm opening. Now you have a clean face ring from which you can easily extrude a sleeve if you want to.
http://uploader.polorix.net//files/173/vestido024.jpg

Now apply the mirror modifier, but don’t enable X-axis mirror just yet. Select the edge of the neck opening.
http://uploader.polorix.net//files/173/vestido025.jpg
Extrude and scale, just as you did for the shoulders.
http://uploader.polorix.net//files/173/vestido026.jpg

Now do enable X-mirror, model the collar and fix the strap.
http://uploader.polorix.net//files/173/vestido028.jpg

You can of course make any variation that doesn’t have the arm and neck openings aligned, by extruding a row of edges instead of single edges.

An additional step which I always do even if it might be useless (but doesn’t harm), is to apply the XSort button to all objects involved. In my early experiments the “clothes” would go through the body even if deflection was activated for both objects and they were in the same layer. After a lot of frustratring tries, deflection started working for no reason, I realized I had done a lot of operations which changed the vertex order of the body mesh, so I tried XSort to somehow order all the vertices and since then deflection seems to work all the time.

This is obviously a low poly first step, which will not create interesting or realistic folds, and covers only the basics for the upper body, but you can make it as polygon heavy as you want depending on the desired effect.

Well this is part 1, still a lot to cover…
Hey ! Nice of you to share your experiments about clothes :slight_smile: (and very nice charcaters as always)

What you say about the ring make sense AFTER you exposed it. Clothes react the way they do because of how the material they are made of (silk, cotton, felt) but also because of the way they are sewn… mmmh got to think about this… (I am building a cape for my characters, so of course, I am also thinking about clothes physic)

From my own experience, if you want your clothe to fold randomly, you have to add some randomness to the mesh by yourself first… clothes mesh isn’t uniform in real life. Small imperfections and irregularities change the whole system itself.

When I’ve tried to do a cape, at first, I thought the seams and crease where far too symetric to be real. Then I pushed some vertex… to avoid having a perfect plane… and more realistic crease appeared…

Clothes and softbodies are truly fascinating eh?

Being a good modeller, I appreciate your tutorial but can’t effectively use it. In addition, please realize that a dress is very simple from a softbody point of view, rather than say, a pair of pants. . . with buttons and whatnot, and easy to animate without softbodies. Sharing soft settings would be nice, too.
I’m not trying to bash, sorry. :slight_smile: It’s just that people who are seriously attempting to find a good technique for softbody clothing (like myself) have already gone through steps like this.

Great tutorial!

I’ve got a clothes modelling technique (using sculpt) that makes a messy mesh but is much faster. That said, my technique doesn’t work well with softbodies.

Looking forward to part 2!

Koba

Very Cool, I’d love to see the animation, however incomplete. I look forward to the rest of this tut as well. The rings explanation is excellent. You always have such great work.

About pants, wouldn’t this still apply and then using goals, rigging, etc. for non-softbody type parts.

Great. You should write a tutorial for this…

Sorry guys… Don’t be impatient, I know that was simple. But using Koba’s words, a messy mesh is not a good starting point and a few people might need some modeling reference.

I promise to go straight to softbodies in my next update and leave some other advice for later. Not that I am an expert, I still have to learn to tweak all the settings. What is important for now is to make it work.

Oh yes, since the mesh needs to be polygon heavy anyway if you want nice results, it is fun to sculpt it to give it shape and erase the symmetry.

Crooking a few loops can also help to fold the way you like, although not with much control.

Great tutorial…I learned again something today…thanks…

Thanks ecgilboy and everybody.

I have not made extensive tests with softbody settings, so I am not an expert. I am only trying to make it work as much as possible. I have used Blender’s defaults and the values from Bjornmose’s models and examples:
http://mosebjorn.altervista.org/newsb/

For more information about the settings refer to:
http://wiki.blender.org/index.php/Manual/Soft_Bodies

All the buttons I will refer to here are in the “Physics Buttons” panel which you can make appear in your buttons window, either by pressing F7 twice or by clicking this little icon http://uploader.polorix.net//files/173/icon.png on the header when the panel is in object mode.

If you have tried softbodies for clothes, you have most likely experienced one or more of these problems:

  • Deflection does not work.

  • Deflection works but the clothes don’t move in coordination with the body.

  • Deflection works and the clothes stay in place but the body underneath is showing through the clothes
    None of those problems can be solved by adjusting softbody settings only. Although some tweaking of these values can reduce the chance of bad results, there is no magic value that will work if you don’t take a few other previous steps.

  • Rig the clothes. You will have to rig the clothes even if you plan to use softbodies. Using pure deflection works for making a cloth fall on a ball, but the clothing object has to move and rotate as the body does.

You can manually weight paint your model, but there is a script included in Blender which can do this job for you. It is the “Bone Weight Copy” script. It will project the weight assignments in your body mesh to the clothes and the result is usually very good, so good that you might not have to do any hand adjustments at all.

Select your clothes, shift select the body and run the script. Depending on the polygon count of both models and the quality setting that you choose, it can take several minutes to finish. Sometimes some influences appear where they shouldn’t, but normally deleting groups which have nothing to do with the model fixes that. You can also run the “Clean meshes” script afterwards to remove groups which have no influences, like fingers or feet on a dress.

Then of course, add an armature modifier to the clothes using the body’s armature.

You might have to do some adjustments to tweak how the bones affect the way the softbody behaves.

  • You have to assign a deflection property for both the clothes and the body. Set the “inner” distance value for the clothes according to the size of your model. If this value is too high, the clothes will appear to be too separated from the body, if it is too low, it
    will intersect it more easily. A value between 0.1 and 0.2 works well for me, the scale of my model is about 10 cm per Blender unit.

You need to make sure that both objects are in a common layer. Maybe this is the most common oversight which prevents deflection to work. They must exist in the same layer although they can also exist in different layers if you want to edit them separatedly.

  • Assign a softbody property to the clothes by clicking on the “Soft Body” button. The defaults should work and bake fast, although they are not optimal for clothes, the softbody is too bouncy. A mass of 1.0 is maybe also too high.

  • Assign goal influences. “Goal” defines how much the softbody simulation will affect certain areas. Vertices in a vertex group designed as goal will be less influenced by the softbody simulation the higher their assigned weight.

For some simple garments, you might not need it at all, but starts to be needed as it gets more complicated.

Create a vertex group, named “goal” for example and select it as goal in the goal menu.

This serves two pourposes:[list]

  • It helps the softbody stay in place. As you can see in this image, the softbody has a hard time with the long sleeves when there is no goal assigned.
    http://uploader.polorix.net//files/173/goal03.jpg

Adding goal influences near the elbows and at the end of the sleeves makes a difference.
http://uploader.polorix.net//files/173/goal05.jpg

  • It keeps the form of modeled details which the softbody simulation would otherwise distort. Softbodies don’t keep those details and the baking time increases if the mesh is too complex, so assign a goal to parts such as collars.

This jacket for example has total goal influence at the collar to always keep its original shape.
http://uploader.polorix.net//files/173/goal01.jpg

This model is supposed to have a belt around the waist, so goal is used to keep the vertices around it more fixed than the rest.
http://uploader.polorix.net//files/173/goal02.jpg

If your model has details which can be faked by using normal or bump maps, fake them. In my examples the belt and the pockets use a normal map.

Loose parts which undergo no deformation, like buckles and buttons, don’t even need to be part of the softbody object. They can be independent objects parented to vertices in the clothing or body mesh.

  • After deflection problems, the most common problem is keeping the sking from showing through the clothes. This can be solved by doing some changes to the body mesh or making proxy objects.

Proxy objects are simple shapes that resemble the forms of the body and are rigged using the body’s armature. They should be thicker than the body as the softbodies tend to stick too much and cause intersections with the deflecting object underneath.

I personally have not used proxy objects because using the body mesh works with acceptable results. To prevent intersections I add a shape key to my mesh, select all the vertices and use alt+S to thicken its shape. I then set this shape key to be active when baking and to 0 when rendering.

If there are still some parts showing through, you still can reduce those parts until they don’t cross with the clothes.

  • If you use the body, depending on the average size of the polygon of the clothes, you can disable the displaying of subsurf to reduce the baking time. I ususally keep the subsurf level for rendering only. If the clothes have a high polygon count, they will start to conform to the blocky contours of the unsubdivided body, in this case turning subdivision on will cause a long long baking.

  • Activate “Self Collision” in the softbody collision tab. I have not played with these values enough.
    More information here:
    http://www.blender.org/development/release-logs/blender-243/softbody-enhancements/

  • Bake!

One note before hitting the “Bake” button, the default value for “Interval” is 10, but to make both models move in coordination, I have had to lower this value to 1.
[/list]

See also AnyMation’s threads for other nice results:
http://blenderartists.org/forum/showthread.php?t=96625
http://blenderartists.org/forum/showthread.php?t=96773

Thanks very much for this, you’re a real master at this sort of thing. Planning to do any sort of animations?

***** <- 5 stars
excellent work!
—sigh— !
finally some experianced users got the point that it’s all the art of fakin.

may be i’am still alive when computers can do all thoose calculations needed to do really nice cloth ( or other stuff i can think of ) in reasonable CPU times. Humm i was 18 when my hands touched the first 'puter … it was a Z80 machine 16 kByte RAM … history…

Anyway 'em weather guys nowadays use a 2000 or more high performance CPU cluster to simulate the very thin gas skin of a slighly deformed dirt ball 2/3 coverd with a very funny substance called ‘water’ by some of the self titleing ‘inteligent’ events on its surface.
What for ? … get a 3 days approximate weather forecast …
—sigh— !!!

So, this is what we can do now … deal with it … or wait for … hum … for what …?
BM

You heard the man, learn to fake!

So here is yet another little trick for faking. The softbody end result is not at all convincing if you look at it from a close distance. It looks like a paper thin object floating in the air.
http://uploader.polorix.net//files/173/detail2.jpg

So, to fake thickness in a way that will not compromise the simulation. I extrude the inner edgeloop of the ends of sleeves or any other opening, move to the inside and reduce the loop to make a concave shape which will make the intersection with the body not so obvious.
http://uploader.polorix.net//files/173/detail3.jpg

The new vertices are of course given a 100% goal influence so they will not be expensive in simulation time.
http://uploader.polorix.net//files/173/detail1.jpg

Oh, and I always forget to mention:
The armature modifier must always precede the softbody modifier.

Now, I hope to finish some cool image or animation to make my 500th post.

Jorge, thank you for this amazing tutorial! (also, thanks for those on your site - I have re-read them severl times, even the parts that I don’t understand ;o)) … too bad you removed that lovely female model from your site - it was great reference!

Good job. :spin: I’ll try it when I have the time. Thanks Toloban!

tolobán
Many Many Thanks. Excellent
I got a new idea for my Froggies to put cloth.

Hi Toloban,
Your tutorial is very good. However I found that all dress you modelling and apply softbody are over the knee and not long dress. Because I have try to create long skirt and make my character sitting on her feet, the dress does not move realisticaly and it’s very difficult to animate. Hope you got a solution

Wow…exactly the tut ive been looking for

Great stuff, I knew it would come down to faking it, i just wasn’t sure exactly how.

Im gonna try this out soon i hope

(@rwy^

I think a better way to be able to do this sorta thing would be a python module that lets you create the pattern of the clothing item as flat polygons, specify stiches, i.e. selecting the two sections of cloth that go together, set fabric to have particular stretchiness(for instance elastic waist bands) and then the module could turn it into a 3d object that can then be scaled and placed on the model.

This would allow more realistic complicated clothing to be created quickly and easily. Thanks,

David

This is me, neablo.
Very impressive what you have achieved again, really nice work.
I had no time to read the whole thread yet, I am still busy with my school exams
but what I have read and seen so far, you have mastered to clothe your models perfectly!
As you said, there’s still texture and material work to do but I think that’s no problem for you :slight_smile:

Looking forward to your first pixar-quality shortfilm! :wink:

Awsome stuff! How long did u spend mucking around with softbodies trying to find the perfect result? Great job.