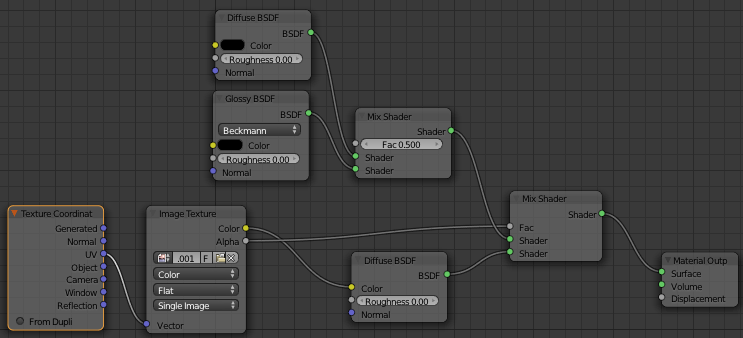
I have v. 2.65 for Mac. When I want to apply a texture to a sphere it tiles it. Also, I am trying to get a glossy (reflective) look to the sphere. What I see now is a tiled image texture and no gloss.
Below are my node settings and what I see on the UV and 3D views:

Is this the effect you’re going for? Here’s a link to the image in case blender artists shrinks my image too much.
http://www.slogobox.com/blenderfoo/foo-ox.jpg

Also can you tell me how you unwrapped the sphere into the perfect rectangle? I’d like to know how you did that.
I selected the sphere, got into edit mode, selected all vertices, pressed “u” on the keyboard, and selected “sphere projection” from the list. Those steps resulted in the projection you see.
Thanks for your reply that looks like what I am going for. I will take a closer look and try to replicate the results.
Nice, I feel like I have tried that before and it didn’t work, but it works perfect, thanks. Let me know if you have any problems with the nodes or u want the blend file. Cheers.
I have successfully replicated the gloss/reflection, but I am still plagued by the tiling of the image texture. I might be making a simple mistake, as I am not very familiar with working with textures.
Are you using cycles or blender internal? Also show a current screenshot of the unwrapped mesh in the uv editor, with the image showing.

Well I think there is a “correct” way to do it by setting the mode from tiling to clipping, but I can Never find it. My way around it is a bit of a hack but it works. Right now your OX logo fills more or less the entire image. You need to either scale down the shapes so that there is plenty of empty transparent space around the logo, or you need to increase the canvas size (probably easier) If anyone knows the correct way to do this, just disregard my post and do it that way. Then just scale the parts of your mesh (in uv editor) you want to show the logo, and you can scale the other parts (that don’t show it) way down so they fit inside the image. In my earlier screenshot they go outside the bounds a little bit, but since there is the buffer you never see it. Hope that makes sense. And I really would to find the right solution. This will work though.

Just add a Vector Mapping node on the noodle in between the UV Coordinates and the Image Texture. Activate Min and Max (0, 1 on the 3 axes). No repeat any more…
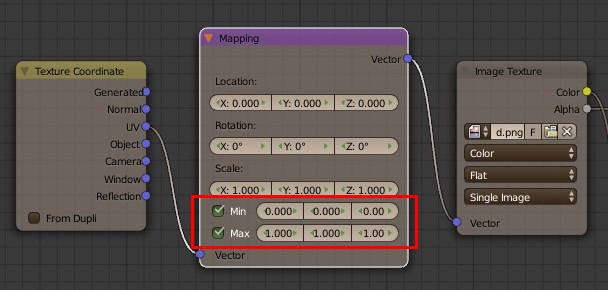
And there’s the right way…
Thanks for the help blenderallday and Kaluura!