I currently have 3 scenes in my blend file. The file contains a lot of animation for all 3 scenes. I currently have scene 1 (cycles) and scene 2 (volumetric lighting) working perfectly together. I had to reduce scene 2 in the mix node to only show about .2 or .02 I can’t remember. I only mention that because it reinforces that what I want to do in scene 3 cannot be done in scene 2 because it isn’t fully mixing the scene.
Cycles - My main rendering scene
Blender Render - For volumetric lighting
Blender Render - For a view outside of a window (animated)
So when I try to add the 3rd scene via the compositor it looks washed out with white light. I can’t find a way to blend scene 3 and scene 1 without it looking really bad. I have a blend file for the project that I can provide. I’ve been working on this for several days and I’m starting to get really frustrated. Please help!
I forgot to mention that I attempted to use layers for the blender render but I got the exact same result. When I put that layer into the compositor and used either mix or add nodes it would cause the rest of the scene to be washed out and white.
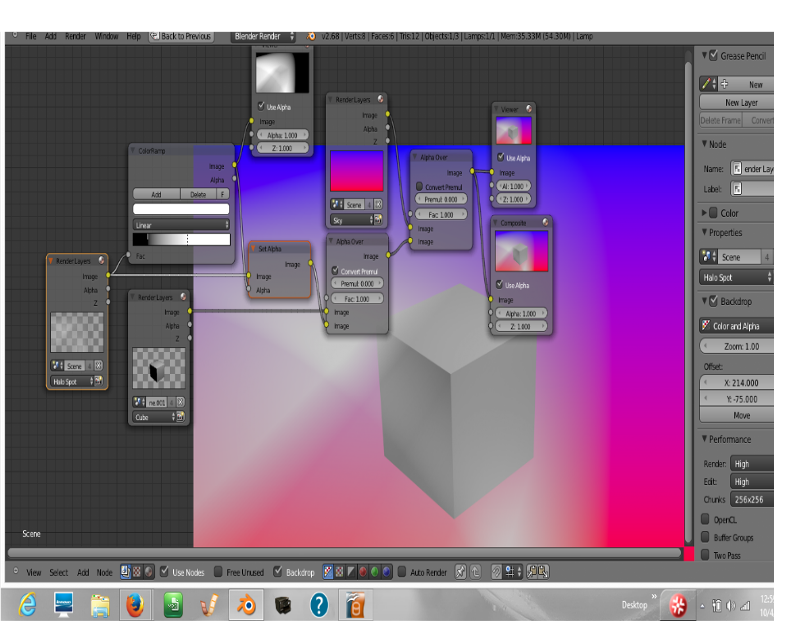
Did you disable the “Sky” check box on the “Layer” tab in the “Render Layers” properties panel? It used to be that the sky would render with a zero alpha setting but if you want a sky now then you have to put it on it’s own render layer (for compositing purposes) else you get a fully opaque layer (with “Sky” enabled) even if you have the “RGBA” button enabled on the “Output” tab of the “Render” properties panel.
You might also try setting an alpha channel that you can control for your halo spot via a color ramp and a set alpha node. Simply pipe the “Image” output of the render layer into the “Fac” channel of a color ramp, then pipe the color ramp’s image output into the “Alpha” socket of a set alpha node along with the render layer’s image socket in the image input socket of the set alpha node. You control transparency of the halo lamp with the sliders on the color ramp.
The image I’m posting has the halo spot on one scene, the cube on another scene, and the sky on a third scene and you can see that it’s all working just fine. I also included the .blend in case you need to explore some of the settings.
I’ll bet that there is indeed a “sky color” going on. To find out, look at one of the renders by itself and use the eyedropper-tool in the render output page (as well as tools such as Histogram) to measure what those supposed-to-be-dark pixels actually contain, as well as their alpha-values. For example, a black area might easily be "(R, G, B, A) = (0, 0, 0, 1). In other words, “perfectly black, and perfectly solid.” Oops.