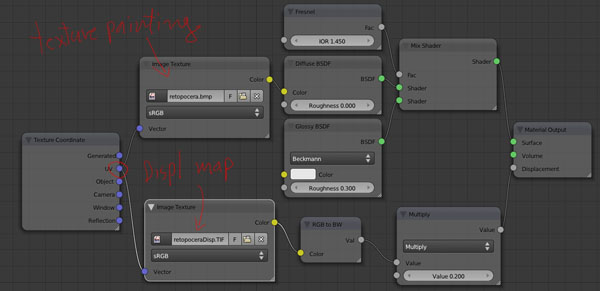
Looking to your setup I see you are driving the strength of the bumpmap with an “Add” node. I think this is not correct. The correct way would be using a “Multiply” node and use values from 1.0 and above to create more bump effect, or values from 1.0 to 0.0 to decrease bumpiness. I reason this way: Imagine in the bump map you have two pixels with values .2 and .6 (think of them as two mountains). With an Add node using .1 you changes them to values .3 and .7 but these new mountains are the same difference between them in size than before: .4
Using instead Math node for example with value 1.5 you change them to .3 and .9 so now the mountains are higher and the amount between them also is bigger: .6 as expected to be.
Bao stop this LOL, and LOL, I made a mistake, sorry, it’s on the background planes after all, and it worked.
It can happen to anyone. I use multiply on the main figure. Multiply always!
The more important mistake is that I don’t use light path node for stopping noise coming from close to emitters plains (defuse ray or reflection ray) . I didn’t know this, I just painted them black and made them invisible.
A second wrong thing: I use a jpg for environment lighting, OK, I didn’t have a hdr. But linear color profile should be used, this makes the difference, more than using just hdr, I could say.
These all for the second render, the third is correct as Bao suggests. (and all other friends from cycles testing threads topic)
Great work, perfect material and render setup for me it look awesome, congratulations man!
Great job man, the render was very realistic!
great work. the terracotta statue is my favourite very dynamic
Could you explain that bit about “Texture project from camera”
okay for marble sculpture is perfect but for real skin
how i can use cycle
coul’d you show me some node setup?
@marcolorenz ,
have you tried experimental builds with volume shader? For the moment it reacts with environment light only. Not with direct emitters. Lot of possible nodes setups, you can participate on blender tests topic. We’re waiting for something greater then BI sss.
Waiting for hair as well. Patience marcolorenz , patience. LOL
The nodes set up I used on the last one is for fast presentations only, the terracotta-like is retopo and unwrapped. It’s important for me, to have a real preview under GI environment as I sculpt.
Thanks Michalis.
I knew you could do something like that but couldn’t figure it out.
Andrew Price has a nice tutorial on camera mapping. It’s a different use but looks like it would work the same.
@Sonofwitz
There always the 2.5 d trick, to construct UVs via projection. A cinema trick, works fine in some cases.
But to import a ~500 K mesh from sculptris and go for UVs, this isn’t a good idea, we’re in the middle of sculpting and we need some fast nice previews, right?
So, for stills, use the renderer instead. It’s like masking the object and overlaying a texture in Ps. But the renderer method is even better as you can also have bumps or any other trick.
On the terracotta, cycles setup is a bit different.
The displacement map is used for bumps and it’s baked on the 4th subdivision level. Another displ map (baked on the cage retopo mesh) has been used on the displace modifier.