Adaptative Border Region Render Addon (request)

Hi there!

Am I in the right place?! Not sure…

I found a need to a new addon but I have no python knowledge.

I divide my renders in multiple layers with transparent background to save render time and then I composite all together. And it works! It saves me time.

However, it bugs me to watch Cycles wasting time rendering empty tiles.
So, I did a little test. In the top image I did the standard rendering and in the bottom image I used the border region render so Cycles only renders the objects in the layer.


As you can see, the render time drops to half and the final image is exactly the same. This method is already unpractical to do in a multiple layer still image, furthermore in an animation.

This is a great waste of render time!

So, my idea is some kind of addon that detects the objects saw by the camera in a render layer in each frame and adapts a border region so Cycles only renders what is needed.

Is this hard to do?
I’m sure I’m not the only one bugged with this behavior!

Thank you all!

Really? No one agrees this would be a helpful addon?

I’m not sure I understand exactly what you mean.
In my experience, cycles actually takes a lot less time rendering empty tiles, where only the background is visible - it does it so fast that I think it basically skips any calculations in that tile. It’s also a lot faster if there’s very little visible geometry in a certain tile, and the rest is background.

However, if you’re suggesting to force cycles to completely ignore geometry that’s outside the camera borders, and not perform any calculations taking that geometry into account, I can see few problems with that.
First of all, I don’t think that’s possible through an addon - that functionality is deep inside the core of the renderer.
Second of all, since cycles computes light bouncing off objects, it needs to “know” where objects are and calculate lighting in relation to those objects, otherwise the lighting would not look right. This would become immediately apparent in animations, when an object would go off-screen. The light bounced from that object would suddenly not show on the surrounding objects and we’d immediately see that something’s wrong.

Like I said, I might have misunderstood what you’re trying to say.

Cheers!

I think the image itself is misleading.

The black part it’s not a background, it’s alpha. The only object in that scene it’s the sphere. Yes, cycles renders the empty/alpha space really quick but as you can see, in this particular case, it took only half the time to render only the sphere.

In the viewport, if you press shift+B, you can define a red border and cycles will only render what’s inside of it. That’s what I done in the second image. What I’m proposing is something that identifies (in the image example) the sphere and automatically set the border around the object so cycles skips the empty pixels.

I will do some testing with more objects in different layers to check if cycles can take into account light bounces from elements outside the border render.

Thank you for your reply Mem!

Ok… here’s the new test.

One sphere on layer 1 - Glossy+Refraction mix
One sphere on layer 2 - Emission
One plane on layer 3 - Emission

Here’s the viewport: Top image the scene. Bottom image the border region in red.


And here’s the results:

Top image - Full render - 01:10

Bottom image - Border region render - 00:32


As you can see, both images are the same. Even with border region cycles takes in account the whole scene. You can see the reflection of the emission sphere and the plane refracting through.

Once again render time has dropped to half. Of course if you have objects scattered across the scene this wont help, but in this cases when you have one object (or a tight group) per layer it can save you a lot of time. Especially on an animation.

Hello Utopia780,
Blender stores the coordinates of the render border (which you can add with shift-b) in the properties scene.render.border_max_x, scene.render.border_min_x, … .
The good thing about this is you can access them very easily but unfortunately you cannot add animation curves to them.
I wrote a little script which offers a way around this. It is just for animating the border coordinates, so the user has to set the border first.


import bpy
from bpy.props import FloatProperty, PointerProperty, BoolProperty


def change_border(scn):
    rnd = scn.render
    anim = scn.anim_border

    if scn.anim_border.use_anim_border:
        rnd.border_min_x = anim.min_x
        rnd.border_max_x = anim.max_x
        rnd.border_min_y = anim.min_y
        rnd.border_max_y = anim.max_y


class AnimBorderProps(bpy.types.PropertyGroup):
    use_anim_border = BoolProperty(
        default=False)
    min_x = FloatProperty(
        name="Min X",
        min=0, max=1, default=0)
    max_x = FloatProperty(
        name="Max X",
        min=0, max=1, default=1)
    min_y = FloatProperty(
        name="Min Y",
        min=0, max=1, default=0)
    max_y = FloatProperty(
        name="Max Y",
        min=0, max=1, default=1)


class AnimBorderKeyframe(bpy.types.Operator):
    bl_idname = "scene.set_border_keyframe"
    bl_label = "Set Border Keyframe"

    @classmethod
    def poll(cls, context):
        return context.scene.anim_border and context.scene.render.use_border

    def execute(self, context):
        scn = context.scene
        rnd = scn.render
        anim = scn.anim_border

        anim.min_x = rnd.border_min_x
        anim.max_x = rnd.border_max_x
        anim.min_y = rnd.border_min_y
        anim.max_y = rnd.border_max_y

        scn.keyframe_insert(data_path="anim_border.min_x")
        scn.keyframe_insert(data_path="anim_border.max_x")
        scn.keyframe_insert(data_path="anim_border.min_y")
        scn.keyframe_insert(data_path="anim_border.max_y")

        return {'FINISHED'}


class AnimBorderPanel(bpy.types.Panel):
    bl_label = "Animated Border"
    bl_space_type = 'PROPERTIES'
    bl_region_type = 'WINDOW'
    bl_context = "render"

    def draw_header(self, context):
        self.layout.prop(context.scene.anim_border, "use_anim_border", text="")

    def draw(self, context):
        layout = self.layout
        rnd = context.scene.render
        anim = context.scene.anim_border

        row = layout.row()
        row.prop(rnd, "use_border")

        sub = layout.column(align=True)
        sub.scale_y = 2
        sub.active = rnd.use_border and anim.use_anim_border

        # top row
        row = sub.row(align=True)
        row.label(text="")  # empty
        row.prop(anim, "max_y")
        row.label(text="")  # empty

        # middle row with operator
        row = sub.row(align=True)
        row.prop(anim, "min_x")
        row.operator("scene.set_border_keyframe")
        row.prop(anim, "max_x")

        # bottom row
        row = sub.row(align=True)
        row.label(text="")
        row.prop(anim, "min_y")
        row.label(text="")


def register():
    bpy.utils.register_module(__name__)

    bpy.types.Scene.anim_border = PointerProperty(type=AnimBorderProps)

    # change the border before render and if frame changes
    bpy.app.handlers.render_pre.append(change_border)
    bpy.app.handlers.frame_change_pre.append(change_border)


def unregister():
    bpy.utils.unregister_module(__name__)

    del bpy.types.Scene.anim_border

    bpy.app.handlers.render_pre.remove(change_border)
    bpy.app.handlers.frame_change_pre.remove(change_border)


if __name__ == "__main__":
    register()


You have to copy the text and paste it in blenders text editor. Then press the little button labeled “Run Script” (or alt-p).

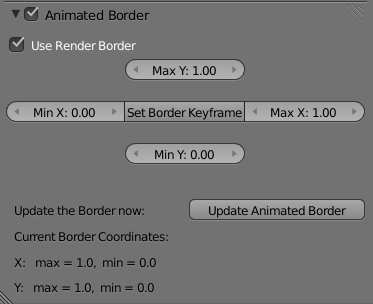
It adds a new panel to the render tab:

You can now animate the border coordinates individually but for convenience there is an operator (“Set Border Keyframe”, in the middle of the panel) which will set a keyframe for all 4 coordinates. Animating the border works now like this:

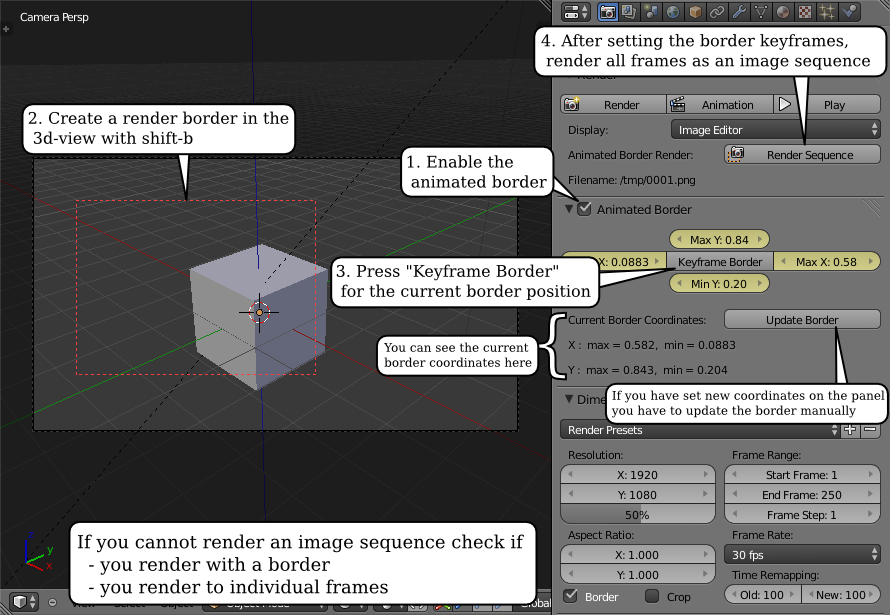
  1. Activate the animated border with the check-box in the header.
  2. Go to camera view
  3. Draw with shift-b a border
  4. Press “Set Border Keyframe”
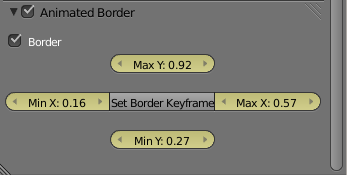
    → the properties around the button will turn yellow
  5. Change the frame, draw a new border and press “Set Border Keyframes” again

If you hit alt-a the border should start moving to the positions you have set.

Note that blenders animation replay may be slower.

Hey hey Markus!!

This is great man!!
I knew it was possible!

I’m doing a simple scene to test your script… with Suzanne!
Later I post it here…

It’s very easy to animate! Thank you for the button!

Now it was excellent if someone could find a way to animate it automatically… around the object in the layer.
Your script makes it very easy to work with one layer. But it’s unpractical to use with multiple layers.

Well… we can always render all frames from each layer separately to RGBA png or exr and in the end composite the images together.

Thanks Markus!

Wow, I never thought that such a simple scene could benefit from setting a border.
While doing some tests myself I also noticed some glitches. I rewrote the script a bit but rendering isn’t working right. Changing the border while rendering an animation lags one frame behind.

Here is the updated version:


import bpy
from bpy.props import FloatProperty, PointerProperty, BoolProperty


def change_border(scn):
    """Change the border of the given scene"""
    rnd = scn.render
    if rnd.use_border:
        anim = scn.anim_border

        rnd.border_min_x = anim.min_x
        rnd.border_max_x = anim.max_x
        rnd.border_min_y = anim.min_y
        rnd.border_max_y = anim.max_y


def add_handler():
    """Add change_border to the handlers if not already"""
    # change the border after frame change
    frame_change = bpy.app.handlers.frame_change_post
    if change_border not in frame_change:
        frame_change.append(change_border)

    # change the border before render
    # NOTE: This handler isn't working right
    #render = bpy.app.handlers.render_pre
    #if change_border not in render:
        #render.append(change_border)


def remove_handler():
    """Remove change_border from the handlers"""
    try:
        bpy.app.handlers.frame_change_post(change_border)
    except ValueError:
        pass

    #try:
        #bpy.app.handlers.render_pre.remove(change_border)
    #except ValueError:
        #pass

class AnimBorderProps(bpy.types.PropertyGroup):
    def update_handler(self, context):
        """Update bpy.app.handlers to animate the render border"""
        if self.use_anim_border:
            add_handler()
        else:
            remove_handler()

    use_anim_border = BoolProperty(
        default=False,
        update=update_handler)
    min_x = FloatProperty(
        name="Min X",
        min=0, max=1, default=0)
    max_x = FloatProperty(
        name="Max X",
        min=0, max=1, default=1)
    min_y = FloatProperty(
        name="Min Y",
        min=0, max=1, default=0)
    max_y = FloatProperty(
        name="Max Y",
        min=0, max=1, default=1)


class AnimBorderKeyframe(bpy.types.Operator):
    bl_idname = "scene.anim_border_set"
    bl_label = "Set Border Keyframe"

    @classmethod
    def poll(cls, context):
        scn = context.scene
        return scn.anim_border.use_anim_border and scn.render.use_border

    def execute(self, context):
        scn = context.scene
        rnd = scn.render
        anim = scn.anim_border

        anim.min_x = rnd.border_min_x
        anim.max_x = rnd.border_max_x
        anim.min_y = rnd.border_min_y
        anim.max_y = rnd.border_max_y

        scn.keyframe_insert(data_path="anim_border.min_x")
        scn.keyframe_insert(data_path="anim_border.max_x")
        scn.keyframe_insert(data_path="anim_border.min_y")
        scn.keyframe_insert(data_path="anim_border.max_y")

        return {'FINISHED'}


class UpdateAnimBorder(bpy.types.Operator):
    bl_idname = "scene.anim_border_update"
    bl_label = "Update Animated Border"

    @classmethod
    def poll(cls, context):
        scn = context.scene
        return scn.anim_border.use_anim_border and scn.render.use_border

    def execute(self, context):
        change_border(context.scene)
        return {'FINISHED'}


class AnimBorderPanel(bpy.types.Panel):
    bl_label = "Animated Border"
    bl_space_type = 'PROPERTIES'
    bl_region_type = 'WINDOW'
    bl_context = "render"

    def draw_header(self, context):
        self.layout.prop(context.scene.anim_border, "use_anim_border", text="")

    def draw(self, context):
        layout = self.layout
        rnd = context.scene.render
        anim = context.scene.anim_border

        layout.prop(rnd, "use_border", text="Use Render Border")

        sub = layout.column(align=True)
        sub.scale_y = 2
        sub.active = rnd.use_border and anim.use_anim_border

        # top row
        row = sub.row(align=True)
        row.label(text="")  # empty
        row.prop(anim, "max_y")
        row.label(text="")  # empty

        # middle row with operator
        row = sub.row(align=True)
        row.prop(anim, "min_x")
        row.operator("scene.anim_border_set")
        row.prop(anim, "max_x")

        # bottom row
        row = sub.row(align=True)
        row.label(text="")
        row.prop(anim, "min_y")
        row.label(text="")

        layout.separator()

        row = layout.row()
        row.label(text="Update the Border now:")
        row.operator("scene.anim_border_update")

        # Info:
        layout.label(text="Current Border Coordinates:")
        tx = "X:   max = {:.3},  min = {:.3}"
        ty = "Y:   max = {:.3},  min = {:.3}"
        layout.label(text=tx.format(rnd.border_max_x, rnd.border_min_x))
        layout.label(text=ty.format(rnd.border_max_y, rnd.border_min_y))


def register():
    bpy.utils.register_module(__name__)

    bpy.types.Scene.anim_border = PointerProperty(type=AnimBorderProps)
    if bpy.context.scene.anim_border.use_anim_border:
        add_handler()


def unregister():
    bpy.utils.unregister_module(__name__)

    del bpy.types.Scene.anim_border
    remove_handler()


if __name__ == "__main__":
    register()


The panel shows now some info about the render border. The button “Update Animated Border” is just for debugging, the border should be updated on every frame change automatically.

Yes all scenes with transparent background benefit from skipping empty tiles.

I noticed you started a new post about this. Thank you for having all this trouble! I would do it myself but I don’t understand python…

So, what is the diference about this new code? Only the panel?

Cheers!

Yes, I made some adjustments to the panel.

I also noticed a problem with the old version: when changing the frame the border in the 3dview was updated before the frame was changed. This lead to an incorrect border for that frame but I fixed it. (The function change_border at the beginning of the script is execute with the frame_change_post handler now instead of the frame_change_pre handler. So the border is set after the frame is changed -> correct border for that frame).

Unfortunately that doesn’t work for rendering. So the border will be updated after the frame was rendered, the border for the previous frame is used.
I you want a correct border I suggest you go to the graph editor and move all key-frames one frame to the left (Shortcut: “G”, “X”, “-1”)

Hello again,
I extended the script a bit. You can install it now as an add-on over blender’s preference window.
I also added a new operator which renders the animation (with correct border) as an image sequence.

The addon: animated_render_border.py.zip (2.82 KB)

Be careful: Unfortunately you cannot stop the sequence render except if you crash blender!
Make sure you saved everything before starting
Render only a few frames for testing before you render everything
Disable “Overwrite” on the Output panel in the render settings if you don’t want to render everything again after you crashed blender

Overview over the panels:


If you prefer rendering over the command line (like me) you can do that with


blender --background render_border.blend --python animated_render_border.py -- -s

if a copy of the script (“ animated_render_border.py”) is in the same directory as your blend file (“render_border.blend”).
(You have to write that into the console window of your OS, not blender’s console or text editor.)

-b [path_to_file.blend] will load the file in the background, --python [path_to_script.py] will load the script. Every option after the lonely “–” is processed by the script:
-h/–help prints a little help text
-s/–sequence will render the image sequence.
You have to set the start frame, end frame and the render path (and of course the border) in the blend file before rendering.
Advantage: you can crash blender by pressing Ctrl-C in the console window twice.

If you noticed errors or have suggestions post them here.

Markus

Hello Markus.

Sorry for the late reply but I’ve been very busy.
The addon is working well. Except after rendering the border animation data seems to be lost. After rendering the border don’t move any more.

Is there any difference between using the Render Sequence button and the default Animation button?

Cheers!

Hello Utopia,

the reason for the new “Render Sequence” button is that the “Animation” button doesn’t work correct with the animated border. Especially with fast changing borders there are problems when rendering animations. (Blender evaluates the animation data for the border after rendering the frame, so the border will be one frame behind)
If you want exact results, use the “Render Sequence” button. Then the border is adjusted before the frame is rendered.

Changing the border in the 3d view works with a handler function. The handler is added when you click the little checkbox in the panel header.
Sometimes the handler won’t be added automatically if you load a new file or reopen blender. Just click the checkbox twice (disable, enable again) to add the handler again.
If this isn’t working have a look at the fcurve editor, there should be four curves named “anim_border.min_x”, “anim_border.max_x”,… This is the border animation data.
There also might be some message in the command line.

Hope that helps you.

Thank you Markus. I will check that.
About placing the border automatically… no luck with that?

Cheers!

No, I have no idea how to do that.

That’s an amazing script Markus! And real time saver.

I am surprised that no one have commented besides you both.

I had the same question in my mind because of the observations similar to Utopia780
The script seems to work great and really improving render times.
My only request is if it is possible to link render border dimensions to animated object in the scene (for example a plane or the rendered object itself) and to take its 2D view bounding box as parameters for the border with some offset.
Thank you for the script!
I hope my idea is easy to implement.

Hi Syziph!

I also find strange that no one else has interest in this functionality.

About the automated placement of the border, Markus don’t know how to do it and no one else has take the challenge…

But I had an idea… I will ask Blendernation for help. Maybe they can post a help request. Maybe someone can program that part…
The script is great but non-animation ready… and that’s a shame…

I do, just had never seen this thread, but i think it should be automatically done by blender… i mean, if it know that a tile is 100% alpha, then it should just dismiss it, moslty this would be great for those of us who render on CPU since we use small tiles, and thus blender could really speedup cycle’s rendering by just dismissing empty tiles.

Although you guys found a nice setup, for complex animations it’s not really all that useful to have to animate the border by hand.

any ways, great job, maybe brecht can point out how cycles evaluates each tile so your addon can become trunk and feature of cycles. :smiley:

cheers!

I agree with you electronicpulse. It should be automatic and default Cycles behavior.
I ask this to Brecht but he told me that this is how Cycles works and there’s no plans to change it…

Python is something I don’t understand and Markus don’t know how to automate this function. So I’m hopping someone else would take this quest…

Cycles can’t really know that a tile is 100% “alpha”, there could be fine geometry there that isn’t hit with every ray starting from a given pixel. You could set a treshold criterion after how many “missed” rays a tile should be considered empty, but that would complicate code (and probably would make it a bit slower).

As for how to compute this border automatically, you can transform all the vertices (or bounding volume vertices) into screen space by multiplying them with the camera projection matrix and then compute the bounding rectangle from those.
Unfortunately, Blender doesn’t seem to expose that matrix through the Python API, so you’d have to compute it yourself.