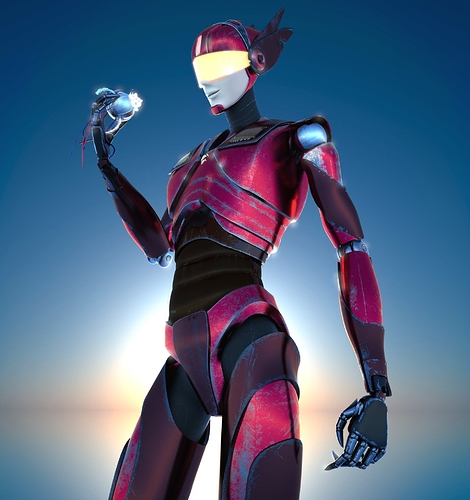
I would be interested in seeing a profile angle of just the upper body and head keeping the same vertical rectangular image shape so the rule of thirds will bring better composition and focus to the right hand holding the electronic parts and the striking profile of the head with the ear wings (see third image from the top). So ear hold would be top right third intersection and hand would be bottom left third intersection. Hope that makes sense. Composition should always be thought about even when displaying models such as this. Of course there are times when displaying the whole model is necessary such as a turn table animation.
it makes perfect sence! I think it is a great idea…though I would like to keep the posture and camera view for now… more interested in what I could do with picture as it is, just using the means of Photoshop))) Thank you so much, DerekG1080 
hey, i’m glad to see you kept working on it!
and i have a few suggestions.
first of, my results:
and the blend file: http://www.pasteall.org/blend/36580.
now, for what i did: first of i noticed that the saturation of the midtones was off the charts (it literaly goes out of bounds of the vectorscope). so i used color correction node to reduce it. than i felt (and you may certainly disagree) that the overall level of the midtones was too high, so i lowered it (using color balance node).
the next major point for me was that i felt the abdomen needs to be grayish, and not bluish as it is now (although this too is a matter of taste. in a naturalistic scene, that blue tint would probably have been wrong, but this is not a naturalistic scene). so i used a combination of a mask and a color key node to isolate the abdomen, and then a color correction node to make it less blue. this bluishness is apparent in other areas of the robot, but cleanly isolating them from the background will take some more work (if you used id mask, you can isolate them very easily), so i stopped there.
btw, i realy like the grunge and scratches you added.
Oris! Thank you so much again! I have looked into to .blend file you have sent. This is one hell of a professional way to work with Blender. Those are functions I have not even heard about! You are right about prominent blue shade. It originates from the aperture and shutter speed have set in Mawell render in combination with 5 a.m. physical sky and dark textures of the model. I tried to compensate latter with the former and ended up with balzing blue all over the place. I see you’ve not just decreased middtones but also added some warmth to them, which overall created a much more natural look. I’ve renrended the piece again (only mask for black resin parts this time) and used this png as a mask in your node setup. Here is the result. Could you tell me what should I tweak to get a lighter resin shade now and isn’t this more natural result a bit dark in general? It looks like my pic was taken with a flash and yours - whithout 
i like that, nice scratches.
i’m glad i can help out! 
also, people usually seem to ignore the capabilities (i’m tempted to use yoda-ish “power of the dark side” metaphore here) of the compositor, so kudos that you are taking the time to delve into it as well.
btw, i didn’t change the overall midtones warmth. the color correction node you refer to is affecting only the isolated abdomen. the settings used are lowering the blue and green, so that the levels of all three color channels are about equal, which means a gray color. if you’ll connect that color balance node directly to the viewer and check what happens to the vectorscope or the red-green-blue mode of the waveform monitor (in the uv/image editor), you will see this effect more clearly.
to lighten up the resin, use the value slider of the last color balance node, in the lift and gamma controls. you can try raising the lift value control from 1 to 1.05 for example (the lift control has dramatic effects on the image), and the gamma value control from 1 to 1.1. (as an aside, i used the gamma controls in that node because the blue channel of the resin reached all the way to the midtones, whereas the other channels were contained in the shadows region). but don’t overdue it, because raising the shadows to much will make things look flat.
did that help?
Now, you just need to apply this HDR-ish effect:
It worked great for my scenes. It gives my scenes depth and even liven up my boring scenes.

