Hi, In 3ds Max there is a align tool, which allows to align objects/meshes to align to other objects/meshes.
Hereby the alignment can be done on one, two or all 3 axis, either in local or global space or view (viewport/camera-Z).
For all translations (Grab(Move)/Rotate/Scale) and on a diversity of settings:
Minimum (Bottom), Maximum (Top), Center (middle), Pivot, BoundingBox,… w/e,
for both target and reference object.
You see where this is going: What does Blender have to offer to align objects to an other object? (I understand work arounds exist i.e. vertices aligning by scaling to 0)
To be sure: I think I ain’t looking for aligning the cursor (which often falls short of aligning objects, since it can’t be -steered- towars an exact location on an object as far as I know), but if I am wrong in this hypothesis, I will be happy to learn otherwise!
Ah perfect! Thanks that is exactly what I was looking for.
Wasn’t aware that there is an add ons menu where we can turn on and off such great add ons.
I’ll try this out!
For others who search for 3ds Max like align fucntionality (and perhaps other solutions):
Blender => 2.57b offers the align add-on and others solutions but need to be enabled as follow;
1] File > User Preferences (or Ctrl+Alt+U) > Add-Ons > here are the add-ons.
2] Check the checkbox behind 3D: Align Tools
3] And close the -User Preferences-window, you do not need to save! (else you might overwrite your default scene.
The Align tool is listed in the tools shelf (Press T in any 3D window to show Tools shelf).
To use the tool:
1] Select Object (A) you want to align (move/scale/rotate)
2] (Shift) Select the object (B) you want to align to (use as reference)
3] Press the corresponding buttons in the Tool shelf to align the first selected object (A).
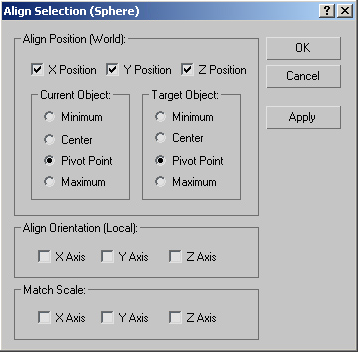
Ok I checked this add-on out. Although it’s a good working tool, the functionality is still quite limited (hence just aligning by copying data from the pivot point) What I kinda was hoping for is a solution which offerse more advanced controls, like the attachment shows is possible in 3ds Max. As the image (attachment) shows, it is possble to choose what part of the current object to align with what part of the target object. Which makes it a very efficient tool to align and hence used heavily in 3ds Max. I expect there are no substitue solutions around somewhere which already go a step further (or offer the functionality the formentioned Blender add-on doesn’t offer yet)?
I’ve been looking around for a good solution to align objects within Blender, and so far the Blender Snap and the Align Tool AddOn are too limited IME. So I took the liberty to create this concept. I have no phyton experience (yet), but nevertheless this might be not the limiting factor to accomplish this solution. http://img823.imageshack.us/img823/3282/blenderalignconcept00.pngimg823.imageshack.us img823 3282 blenderalignconcept00.png Above image shows the concept. (only concept image so far, for feedback) 1] What do other Blender users think of this? 2] Are the main dev’s open to integrate such a solution?
I found all this on a tutorial by Neal Hirsig entitled ‘snap and align tools’. To find it, google ‘blender learning units’.
Then navigate to Learning unit 5 and finally ‘snap and align tools’
I will try to summarize the process here: When you want an object to snap to the face of a rotated plane… Say you want a cube to align to some terrain. Select your cube. Tab into edit mode. Select a vertice of the face you want to be able to snap to the terrain. Push Shift S to align the 3d cursor to selected. Tab out of edit mode. With the cube still selected, push the ‘Origin’ button on the left side of the screen. Choose ‘Origin to 3d Cursor.’ Now the object will snap according to where you placed the origin. Next, turn on the magnet snapping at the bottom of the screen. Choose ‘face’ next to the magnet. Then, 2 fields over, click the button with a ball with a stick coming out of it. That button will allow the cube to snap it’s face to whatever angle the terrain happens to be. You will then be able to snap objects face to face. The trick to aligning anything in Blender is to always snap the 3d cursor to the places you want it to be by push Shift S after selecting the desired vert. Tab out of edit mode and then set the object’s origin to the 3d cursor. To align the 3d cursor to the center of a face, simply select the face, push Shift S ‘cursor to selection’. Really really, some of the greatest tutorials I have found are from Neal Hirsig in his Blender Learning Units
@mattwattsart:
Thank you very much for the link to this great resource. And ofcourse thanks for the summarization.
I did check the suggested tutorial/video. But it didn’t help me any further with this specific objective. Nevertheless it is interesting.
@GodOfBigThings:
Thanks for the reply! The image is made with an image editor. (Not in Blender itself).
What I miss in the current snap functionality, is control of details. I can restrict the snap tool to axis (i.e. Z), but I have a hard time not letting the object rotate. Also most snap functionality seem to behave based on a rough setting, just paying attention to the one setting, but not the rest. Leaving for instance the XY axis open to free placement, when trying to place a coffemug model on a table top (face).
Although this might often be desired, there are several situations where it isn’t.
My suggested solution does lack all complexity of Blender’s current alignment (especially in sub object level (vertices/edges/faces/…)), but does offer some basics which can come in very handy and are relatively easy to understand and use.
(plus makes Blender just a little more attractive to 3ds Max / Maya users)
1 or 2 examples:
Object to align: Object1
Object to reference to: Object2
Example 1:
Place Object1’s bounding box Minimum X on Maximum Z of Object2; while aligning on the local Y rotation.
Example 2: Align Object1’s PivotPoint on Z axis to Object2’s maximum; while Object1’s X minimum aligns to center of object2; and align the Y axis scale of object1.
Although this might be possible in Blender, I doubt about how efficient this can be accomplished and how proficient you need to be accomplishing such -complex- alignments. Especially if you have a lot to align.
Although some images would have helped, I’ll still try to answer them depending on what I understand.
Leaving for instance the XY axis open to free placement, when trying to place a coffemug model on a table top (face).
Here I place Suzanne on a quadrilateral.
The “snapping target” is dependent on solely where you put the mouse on screen. And so my mouse here must be on the plane and therefore I cannot use the right window (side view) for snapping.
Also, I set the element to be snapped as “active”, and you can also see that Suzanne’s bottom most vertex is active. (It is a lighter yellow, it’s the vertex you last selected) . So it snaps the active vertex to the quad.
Lock the transformation to the z axis and Suzanne will not move sideways on the quad.
If there was subsurf on here, Suzanne’s surface would have been above this vertex. In that case you would have had to snap the plane to some vertex on Suzanne , and so the snapping target is “vertex”.
It helps to zoom in here so you clearly see your snapping target.
Example 1:
Place Object1’s bounding box Minimum X on Maximum Z of Object2; while aligning on the local Y rotation.
This is where you might miss your previous software.
This will need you to manually rotate first (either the mesh or the object) and do the same as above. But I think it is still quick, only requiring a few keystrokes.
If I take the example of putting Suzanne (facing positive Z) on a cube, it will be also be tricky to ensure the ear is in the middle of the upper face of the cube.
A workaround involves quite a bit of changing the object origin and snapping to cursor, and is unfeasible if the location of the object’s origin is important. (There’s a workaround for this too though :))
Example 2: Align Object1’s PivotPoint on Z axis to Object2’s maximum; while Object1’s X minimum aligns to center of object2; and align the Y axis scale of object1.
Assuming pivotpoint=object origin, since you can set the pivot point to other things like the 3d cursor.
Again will need three steps, and has to be done in object mode. The last scaling step will also be difficult if the object origins/centers don’t share the same Y location. (Your requirement still allows any Y location)
So I guess you were right that it will be a pain if you have to do a LOT of this, but if it’s only a one time job it should still be relatively quick.
What do you model, usually, that requires repeated application of these operations?
Thanks for your extensive attempt to help out, splendid.
You do point out an interesting point:
The snap/align solution needs to pay attention to bounding boxes (maximum/minimum/center) as well as the 3d cursor (just 1 point in space, thus all the same, hence center).
(I did indeed refer to object origin as pivot point, and no these can’t be moved/changed, a work around might be possible by placing an empty or such, to snap back the object origin after manipulating the alignment, but this brings new problems with it.)
However I have a question for you about the first monkey alignment example: does the monkey alignment cause any rotations?
(as the original example, an coffee mug was choosen, to refer to the logic expectations that the mug can’t be rotated, due to it’s nature of contents being spilled)
About wherefor:
It’s handy and required for many types of modeling/animation: Machine parts (a.o. gears) and Architectural models. But for the majority just very handy to work swiftly through many alignments on complex scene’s.
As you noted yourself, it’s not so much a hassle as long as it just is about 1 or 2 little alignments in most situations. But on a repetitive scale it’s really a pain in the ass to have to do more handling and re-aligning then absolutely necessary.
Doesn’t say my suggested solution is what we look for, but it does shows some qualities over the existing workflow. A meet in the middle, best of both worlds is likely to be best IMO.
Do you understand my above suggested solution (can you see any benefits or problems with such an solution (see image)?
(You’ve already pointed out 1 important contribution: it should take into account both object origin’s and 3d Cursor)
It doesn’t. In that example I was snapping while grabbing the object. So no rotation takes place, only the z position changes.
On another note, if you accidentally spill the coffee, you can enable “Align rotation with snapping target”. It appears in object mode when you select “Face” as snapping target. So the coffee mug will align itself to the table perfectly.
It only aligns rotation of the object’s Z axis with the face normal though so if your coffee mug mesh isn’t aligned with its local Z axis, it won be useful.
a work around might be possible by placing an empty or such, to snap back the object origin after manipulating the alignment, but this brings new problems with it.
If you are referring to the workaround needed to in the second example to put Suzanne’s ear in the middle of top face of the cube, then a workaround would be: Snap cursor to active vertex, set origin to cursor, and then snap “median” to face.
If Blender had something like “snap to cursor” as a snapping target, then it would simply be snap cursor to face, snap active vertex to cursor. I think the 3d cursor and grid as snapping targets (currently it is “snap to increments of grid” and not grid positions themselves) would make a lot of things simpler.
About your proposal:
I think it will be handy in the situations you mentioned, especially if the 3d cursor and the grid are available as snapping targets.
If you look at something like how the looptools addon works, where the settings remain the same after each operation, you would have to do it only once and then snap, snap, snap, snap, snap for all the other objects).
This might help explain the problem / solution a bit further for so far it is still not clear what the proposed benefit will bring.
Thanks for your info help so far. I dove into the solution (/tool) for some time, but lack some skills to do this myself atm.
I hope someone is interested and sees the benefits of this advanced alignment tool -solution and understands how this will affect the workflow of many.
Either way, more feedback / suggestions are welcome, the more this subject is thought through the better (and more likely there) will be the solution.


