I apologize in advance that I am relatively new to blender and I don’t know the correct terminology, so I will try and explain this as well as possible.
Is it possible to create an object that functions as a mask, so that when I render, anything behind the object shows up transparent?
I am creating an animation of a circular saw for a game, and I would only like the top half of the saw to show, so it looks like it is halfway through the ground.
If your objects are created via Blender in 3D then there’s no need to create a mask, Blender can do it for you. e.g. Saw is on scene layer 1, Ground is on layer 2, place scene lighting on layer 3. Go to the “Render Layers” tab in the render buttons (F10). Label the default render layer “Saw” via the text field that reads “1 RenderLayer” by clicking teh field and typing the new name. Notice there are two rows of square buttons on this tab. The row above the text field is Labeled “Scene:”. Be sure that layers 1, 2, & 3 are enabled in this row. These are simply visibility flags that tell Blender that if an object resides on any of these layers which are set visible, they should be included in the render in some manner.
The row below the text field is labeled “Layer”. These are the flags that tell Blender “How” the objects on the visible scene layers should be used during the render on this particular render layer. For the saw layer you will need to enable the first layer and also the third layer because layer one contains the saw and layer 3 contains the scene lighting. Now, just below the “Layer:” buttons you’ll see two more rows of buttons. These buttons represent distinctly different attributes of the render which must necessarially be rendered seperately before being recombined into a final, unified render. They are listed (as you read them from left to right) in their logical rendering order which is also the order in which they must necessarially be recombined within Blender’s internal render engine in order to compute a proper composite within a single image render. That said, these buttons allow you to mix, match, include and omitt any of their attributes on a per render layer basis in order to later be used in the compositor. This allows artists to recombine these diced up attributes from multiple images, via post render actions in the compositor, resulting in image compositions which defy Blender’s natural render order in order to produce otherwise unobtainable iamge results.
On the first row you’ll need to enable, at a minimum, the button labeled “Solid” because your saw is a solid object, “Ztra” if you have any transparent parts to the saw such as a retractible plastic guard, and the last button which is labeled “AllZ”. Here’s what AllZ does: when any object which resides on anyother render layer occludes (hides) any object from the view of the camera on this AllZ enabled render layer, this results in Blender binarrially deleting these now occluded object parts rendering to the layer. This results in zero image data ina any area which was occluded.
Now create a second render layer and Name it “Ground”. Enable the attributes you need for this layer also and AllZ for thsi layer also. This isn’t actually necessary if the ground will never occlude the saw but it will result in slimmer image files (less image data equals less disk cache space and may result in considerably less write time).
One final tip: on the “Output” tab enable “Save Buffers” button , then enable the Full Sample button that appears as a result. The reason is that with OSA renders will result in a semitransparrent seam between the two images if you have AllZ enabled for both render layers. FSA was developed specifically to overcome these types of render artifacts. Setting the previously Labeled “OSA” butons to level 5 is generally sufficient for mors renders. FSA takes longer to renedr but there’s no comparrison between the quality of Blender composites which use FSA v.s. OSA. It’s that good.
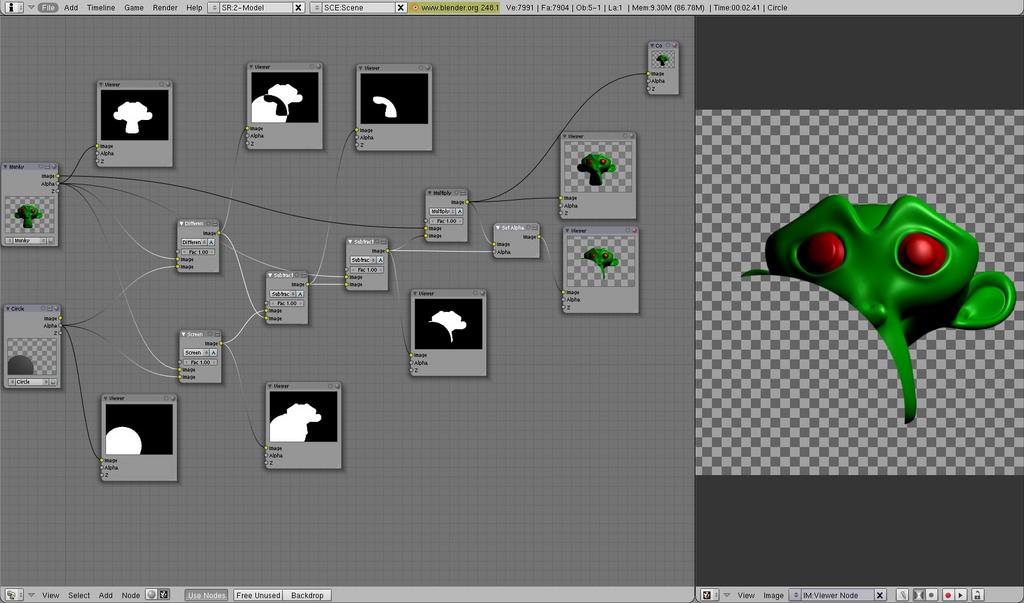
If you’re simply wanting to manipulate previously rendered images which contain alpha channels you can see how it’s done in the following image via the highlighted (selected) nodes. This setup properly animates: