Hi. So I’m new to animating characters in blender and so have been going through a rather steep learning curve over the last couple days. I am currently working on making a some concept shots for a mock live-acted trailer of Full Metal Alchemist. If you know about this series you will probably guess that which character will be CGI. Alphonse Elric, a living suit of armor. The model for Alphose is done and most of the rigging is in place. However I’m having problems with keeping the segments of armor from intersecting. To avoid the bones from deforming the armor I have parented the individual plates to empties that are then parented to the individual bones. Also to make matters more complicated, beneath the armor is a “leather” suit to fill in the gaps. This in turn IS deformed by the bones and so at times also passes through the armor mesh when it is animated. I have been looking around online for tutorials and as of yet have not found anything about how to fix this. If you can clue me in or give me ideas I will forever be in your debt. I also plan to post the blend file for those that would prefer to take a look at it.
Not sure why you’d use empties, but here’s how I’d do it (see attachment for reference):
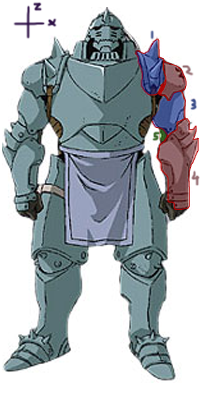
- Create 4 bones, one for each of the numbered parts (except 5).
- Parent the Mesh to the Armature, don’t create any Vertex Groups yet.
- Select the vertices of a single ‘segment’ (#1-4) in Edit Mode.
- In Weight Paint Mode, select the bone associated with that segment and press ‘F’ (toggle Mask).
- Set your Weight to ‘1’ and paint just a little bit (this creates the Vertex Group).
- Press Ctrl+K to fill the entire Mask area so that the segment is fully bound to the Bone.
- Repeat for segments 2-4.
The armor pieces are now rigid and won’t deform. You can then set constraints or lock properties on each bone to prevent any weird deformation. I.e.: Lock the ‘Pos’ on all.
As for the leather (segment 5), I would just create an extra bone there and paint the middle part of the leather a little. Then you can just deform that as you go. You could also automate that by using Drivers. (i.e.: When Segment 4 rotates in a negative Y-direction, push the leather-bone in a positive X-direction.
I think that if you do it like this and set some constraints you’d never/ hardly ever have weird intersections.
If you already have a similar setup to mine I’m sorry for the long post. =P
Good luck!
PS: After typing this I realized segments 1 and 2 could be seen as one as well. Sorry!
Attachments
Wow. Sounds like I was way off. I modeled every piece of armor as a separate mesh. Will that cause me problems? As for the bone set up, I think I see how that might work. The only doubt I have is about the shoulder pads and the shoulder spikes. Do you think the pad will ride properly on top of the arm plates when he lifts his arms to the side? Also I wonder if the spikes will work out. I guess I’ll give it a try.
No, that’s fine for rigid parts. You can just parent each part to the relevant bone (either ‘real’ parenting or a ‘Parent To’ constraint).
Best wishes,
Matthew
Hmm, I’ve only seen one episode of FMA quite some time ago, so I’m not sure on this. Do the spikes and shoulder pad have to move individually? If not, you can just parent them both to the same bone (so you have one bone for segments 1 and 2). If it then doesn’t slide properly over the arm you could use a Copy Rotation constraint at an Influence of +/- 0.1. That way, when you rotate the arm, the shoulder pad will rotate a bit with it.
In this case I’d also double-check the pivot points of the arm- and shoulder-bones.
They do move individually. However, thanks to your advice, I think I have figured out how to get this to work. Turned out that one of my problems was weight painting. The shoulder pad was the hardest part. I really wanted it to be somewhat automated when I rotated the arm. Using a control bone and a copyu rotation constraint I think I’ve got it covered. Thanks to everyone for the good advice!