animation tools, huh?
the first thing that comes to my mind is shape key projection. i know it’s not strictly an animation tool, but it’d greatly reduce the amount of work needed. In order to achieve that, i sometimes have to use DAZ studio to project morphs unto clothes (even on non-Genesis characters) and then export them as objs into blender. if there was a modifier/addon for that in blender, it’d be awesome! I started some research on the topic a while back, but then i got overrun by a lot of other stuff.
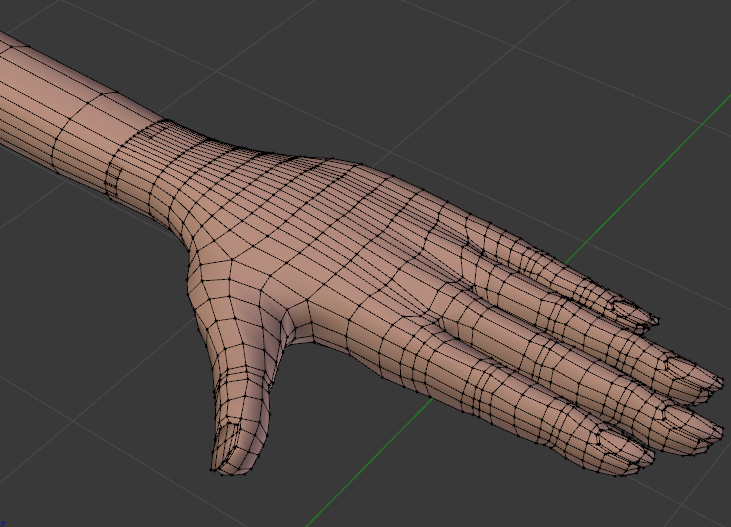
for me, shape keys are a very important part of animation and my entire workflow is structured around shape keys. Anything that breaks shape keys is my enemy. it would also be great if one could replace parts of a mesh with another mesh and have them stitched seamlessly all without editing the mesh itself. how? modifiers! if a modifier could graft a mesh unto another, i could easily replace an ear or a foot without worrying about breaking the shape keys of the mesh. Basically, a modifier like that will need to accomplish 2 major tasks: joining meshes (like the boolean modifier) and stitching the vertices (just like the mirror modifier).
These are definitely out of the context of addons, but they’re still related to animations.
@khalibloo
In Maya there is a modifier called the Wrap modifier, I’m not sure how it works under the hood but in practice it allows you to stick cloths on to rigged characters and is really useful.
It works with shape keys as well so you can stick a mans suit on bishop and then use the gender slider on bishop and it will become a woman’s trouser suit. I Would love something like this, no idea how to implement it though.
I think maybe if each vertex had a bone peranted to it and the target object was skinned to that armature you would get the same effect, but don’t know how taxing that would be on the computer.
The grafting problem is another feature I would love to see in Blender, I don’t think Maya has something like that. I often find myself in a situation were I break up a character into Head, body and hands, simply so that I can manage the shape keys. I personally don’t care about sticking them back together, a good rig can have multiple mesh’s “not sure what the performance hit of that is”. But the feature I would like to see is a modifier that “Bridges” two objects together, preferably with different numbers of verts. So that you don’t get a seam. I normally just hide the seam with costume design ie sleeves and collars
This is often what I have to deal with, I know I could model the hand better and merge the verts but they are normally separate objects that are full of shape keys.
@MCHammond
I say it again: helpful and very needed script. Magic funktionality - mode FLOAT, BOOL, ENUM, INT… This script must go to blender addons!
Maybe some of “guru” coders help us with some tricks? (Andrew Price as UI expert?)
I changed Quarternion to Euler and PAE rotations sliders was working. But I think, it needs Ouaternion rotations too, sorry it is work for you.
As you know, Rigify use Quaternion rotation mode and Rigify is standard part of Blender and a lot of people use it. As basic rig or the base for custom rigs. Your PAE would to join it. PAE would be next level of Rigify for animators ( for riggers too). Very powerful Rigify rig and PAE as extension. For instance fingers. PAE helps us to animate this ones without zoom in to the character. Own custom sliders, bools… etc. Your work is very good! PAE is more powerful as standard Blender Custom properties. This part of Blender needs to be expanded. ( standard of other 3D aplications is PAE functionality)
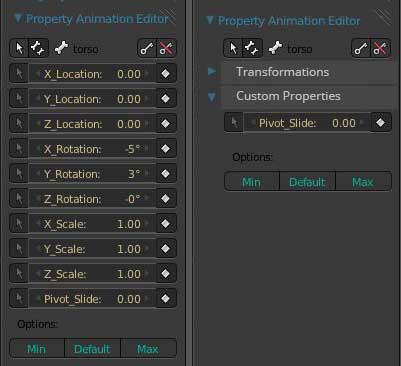
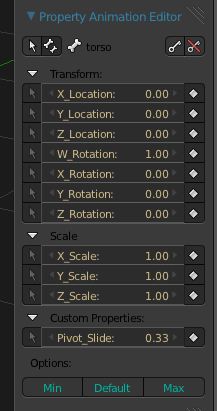
My steps (image 01):
add metarig - generate ( rigify butons) - run PAE.py + custom_UI.py - Pose Mode - select torso bone (image 01) - Auto propagate - update list - PAE numbers = everything is 0 except scale (1) and pivot scale (0.33) - rotate torso a little bit and hit “default” button. Every numbers (PAE) are changed to 0.
Yes, problem is - Default for scale is 0 (PAE). Custom UI worked properly - read scale from rig as 1.
I was very happy to have Maya channels in Blender…
Additional notes:
05. It is not necessary to use headlines - Location, Rotation, Scale, Custom Properties. We see exact text in sliders area. But it is only my opinion. I want more compact work area. More sliders, less repeated words…
Another idea for a future - Use headlines, but as shelf - open + close like subfolder within PAE (image 02).
@McHammond,
wow! one big reason for me to consider maya. make human’s cloth-fitting could be a good starting point. at least, it projects the shape keys reasonably well and fast too. it’s also in python, so it could be ported with relative ease. it works by storing deltas of cloth vertices. DAZ studio goes a bit further by adding a smooth modifier with collision detection (which is basically like blender’s shrinkwrap modifier).
breaking up a character works sometimes, but i like to go maximum re-usability. for example my cerebella has an alternate costume. if i’d modeled her specifically for her main costume, i’d have a lot of work to do when fitting new costumes. by maintaining a similar topology across characters, i also get to re-use lots of shape keys.
however, the most frequent reason that keeps me from breaking up meshes is catmull-clark subdivision. my characters are usually medium-poly so they rely heavily on subdivision. if the mesh is broken up, subdividing it will further exaggerate the seams
i’ll take a look at the boolean modifier when i get a chance. maybe i could use it as template. but that’s gonna be a really long time from now
@krokodil
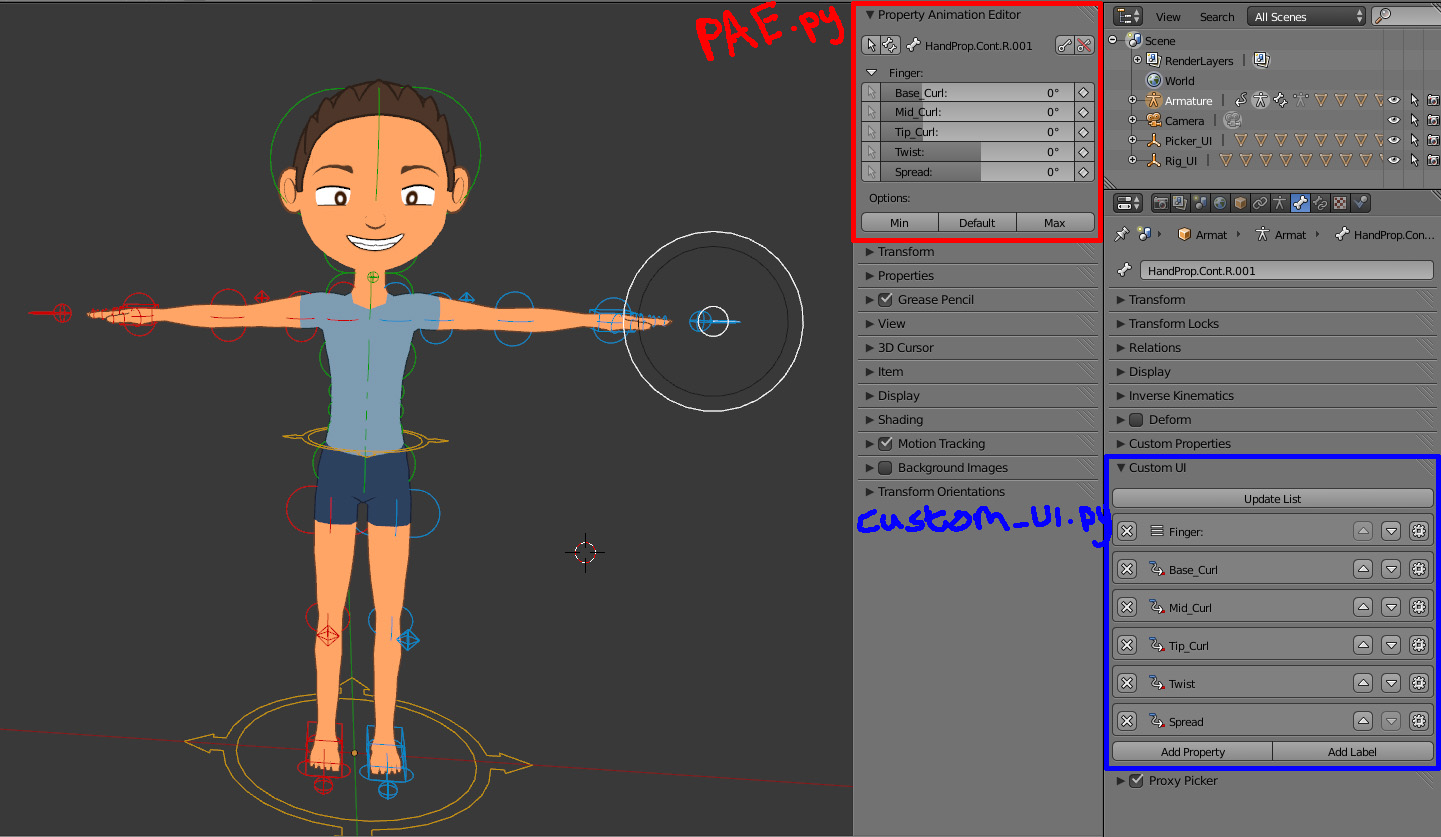
I have done some experimentation and managed to cover most of the issues/suggestions you had. PAE.py custome_ui.py
You still need to run them from the text editor, its not setup as an add-on yet.
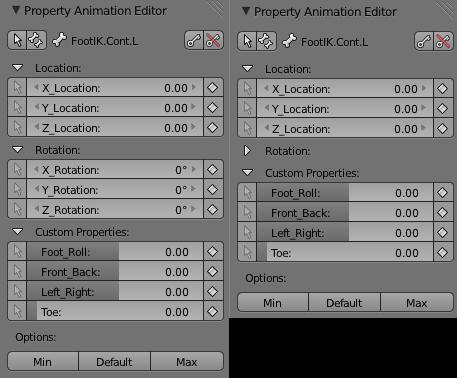
Here is a pic of the more compact PAE:
At the moment the expand buttons are reset to true when you select another bone so I don’t see them being much use at the moment, I will look at how to save that information.
When creating the UI it should now automatically set the default, min and max values of custom properties, it now also uses the current value as the default “for rigs that don’t use 0 as rest pose” and it also works with Quarternion’s.
Changing the way rotation sliders work “Radians to Degrees” is a bit more “deep” so I might leave that way till the rewrite.
What are your thoughts on Quarternion rotations? I don’t use them for animation, but I can understand the attraction.
@khalibloo
Hmm, might look in to that if its already in python, do you have a link to it? Its one of my favorite deformers, at AM I used it to stick eyelashes and mustaches on Bishop :P. but its actually really powerful for customizing a rig, I used it for not just cloths, I created new faces and feet for Bishop too. They could be simply wrapped on and they would follow his face perfectly.
The way I deal with the seams is to have the parts on separate render layers with a falloff at the joins so that they can be placed on top of each other and blend perfectly, its not ideal though you still get seams in reflections .
make human was written in python. if you downloaded yours from svn, you’ll have access to all of the python files. makehuman/apps/mh2proxy.py should give you a great introduction to how their clothes (or proxies) are handled. it might also be worth a look at the makeclothes script.
a while back, i tried to tackle shape key projection with modifiers. i tried using a smooth modifier with heavy smoothing (to essentially shrink the character) and then a solidify modifier to envelope all the clothes. i then used the resulting mesh as a deformation cage. this should have worked in theory, but for some reason, it wouldn’t bind all the vertices of the clothes. it was a long time ago, and maybe i missed something.
another theory i have is… an inverted mesh deform modifier. one that doesn’t need the victim mesh to be inside the cage mesh, but rather, the exact opposite. this would allow the character to directly deform the clothes.
not sure if any of these ideas would work well with rigid parts of the clothes (like buttons), though.
@MCHammond
You are absolutely crazy man! Blender community must be very happy to have you. Congratulation!
I will be tested it. Nice work, thank you.
Quick look - everythig is working properly! Custom UI respects mode ( Quaternion or Euler), respects locked channels, organization of sliders is very compact!!! And the distance between slides is VERY small. Crazy work. :-)… It is possible to create own labels, joining sliders to sigle or different label ( e.g. Transforms)… + context sensitive selection…
Nice, nice, nice…
If you lock channel in Properties/Transform (N) after Auto Propagate, you must lock chanell in Custom UI by hand. Update list does not work. But it is not fundamental problem. Basic functionality is very best!
It is very quick and easy to do new custom slider for special aspect of animation.
As you have seen in your Pixar video - Presto demonstation - they animated brows via sliders like PAE.
Viewport is clean without additional shapes and “noise” helpers.
I have no problem with “radians”, “Radians” are good also. Sometime I switch the rotations to Euler ( Radians), sometime to Quaternions.
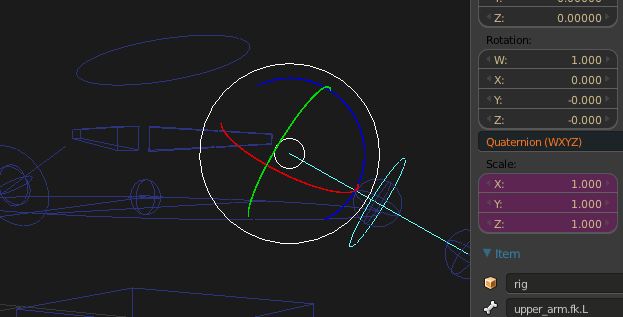
Why Quaternions? This one is good for character animation. The base advantage of Quaternions is “gimbal lock” = shouders are not spontaneous - unwanted - flipping during animation - self motion - out of animator will (3 axis of rotations like shoulders).
Some bones of Rigify rig have Quaternions rotation, some Euler. If you will select several bones, you will see:
Everything as simple hinge joint ( 1 axis of rotation) can be resolved by Euler rotation. For complex joints like shoulders or hips joints (3 axis) is better Quaternions.
Note - I think not shoulder bone (collar-bone) but shoulder joint - here is starts upper arm. (Rigify has shoulder as Euler, upper arms as Quaternion).
But Quaternions (4values) are slighlty slower since there is one more value than eulerAngles (3values).
Euler Angles are simple and intuitive and good for decomposing rotations into indiviual degrees of freedom but have disadvantages like Gimbal lock effect. ( self-motion problem ).
@khalibloo
Playing around with your idea of displacing the main mesh and using it as a cage for the mesh deform modifier I have produced a workflow that accomplishes the desired effect. Its not perfect, the further a part of the cloths is from the main mesh the larger you have to make the cage and the less accurate the resulting deformation will be. You mesh also has to have no holes as its used as a cage for the mesh deform modifier.
@rontarrant
The “alike” animation blog, released a tool that allows you to create an onion skinning like effect.
Sadly its not been updated to work with the latest version of Blender and the link on there Blog is died: Article. But I’m hopeful that an update will be made soon.
Onion skinning or ghosting are difficult tools to pull of because they are massive performance hogs, but you can generate the effect easily. Using the NLA you can create the effect:
And here is the file so you can play about and see it working, it will scale up to a full rig but it terms of performance it will be the equivalent of having 9 rigs on screen at once Ball_jump.Blend
@krokodil
Thanks for the encouragement, I will look into locking properties more. Locking a property in Blender is a bit of an issue, when rigging a character like an elbow you lock the x and z axis leaving the y axis for animation. The issue is that the animator can still animate and key the x and z axis even though the rigger has locked them this can potentially brake a rig :(. With the tool I created the idea is to prevent that type of thing from happening by allowing the rigger to control exactly what the animator can play with.
My fear with Quaternions is that you can only meaningfully manipulate them in the viewport, Euler rotations can be manipulated in the view port, as a slider or in the grapheditor. I am always hesitant to use them for an animation in case 40 hours in I want to tweak them in the graph editor or want to do some fine adjustment. I always struggle to get my head around Quaternions in the graph editor, I end up mashing the keyboard and/or posing them frame by frame
ah, bravo! that was amazing!
In my failed tests, i used Laila, a full blown humanoid character. i assumed that since the solidify modifier had filled rims, there would be no holes. i still don’t understand why it didn’t work then, but this milestone warrants a fresh set of experiments. if it works out, maybe the process could even be automated.
i’ll need to take care of some other projects before i get to it though… so anyone’s welcome to start working on it.
sorry for hijacking your thread, though i still think shape keys are on topic
I agree, Quaternion mode is a little bit not user friendly. But I respect Rigify options and I am using Quaternion mode. The
most of the time Quaternion mode works correctly. But some time if I have problem with Quaternion mode, I am switching to
Euler. That is all (switching is animatable).
If you want to rotate the character torso around 360 degrees (salto or millwheel), it is necessary to animate 2 parameters - rotation_axis_Y + rotation_W.
It is more complicated as Euler. Better and easier is switching to Euler mode.
Example is here: Look at Graph_Editor.
Blender Locking problem:
01 -Blender “Transform area -location, rotation, scale” - Properties (N)
PLUS
we can lock rotation_x, corresponding part of widgets disappears (3Dview) - we can not rotate object (bone) in 3D viewport in the direction X.
MINUS
we can set keyframes to locked part
we can move slider of this one
automatic keyframe insertion is working
we can not make slider not selectable - we can make corresponding bone non selectable in Outliner - but for all movement. Not for rotation_X only.
keyable and non keyable optioms is solved via Keying sets.
result:
“LOCK” button is locking wigdets (movement) in 3Dvieport only. This part of Blender needs serious development.
02 - PAE
PLUS
we can lock rotation X (Y,Z) - PAE slider is turned to grey and does not work.
we can make slider non selectable
we can make slider non keyable
“Custom_UI” respects Blender locked sliders.
(everything very easy and very quick like in the best 3D packages)
MINUS
If we push lock button (PAE), corresponding part of widget (3Dview) not disappears (x_rotation). We can animate bone in the viewport. It is necessary to “lock” x_rotation in Blender Transform area also.
we can set keyframes to locked part ( Blender “Transform area” does not respect PAE locking).
we can move slider of this one ( Blender “Transform area”)
we can set keyframe ( Blender “Transform area”)
automatic keyframe insertion is working ( Blender “Transform area”)
-“Custom_UI” respects Blender locked sliders, after “Auto Propagate” not ( new locked sliders are not respected ).
result:
PAE “locking” ( non selectable, non keyable) is for PAE sliders only at present. Blender widgets and Transform sliders are working independently. PAE needs connection with Blender.
Solution:
01 - parallel locking parameters in PAE and Blender Transform area at the same time (manually). There will be problem If we forget to lock both slider in PAE and Blender.
02 - bilateral python connection between PAE nad Blender parameters.
I looked into writing something similar to PSL-Snapshot a while ago, but being so new to Blender Python, I’m afraid it got the best of me and set it aside. It’s good to know the concept and approach I had in mind was at least do-able.
As far as the armature thing goes, I tried it and for the type of thing I was trying to do at the time, it wasn’t quite up to it, but thanks for mentioning it anyway.
If a rig has already been setup to work with the PEA then it will continue to work without it.
custom_ui.py is used to create the cusom UI’s, it does this by creating string data blocks that hold the information regarding each property. You can create this string data blocks yourself without the custom_ui.py although that’s prone to error.
Here are what the interface of the scripts look like:
I would love to see the “PSL_SnapShot” working correct, but unfortunately does not work for me. When I press “Do it in all keyframes” does not work properly. When I use “make snapshot” only occurs the formation of a copy just in frame number 1 - Also when I change the position of the object and apply the “make snapshot” the new object is not formed at the current position, but in the old position / frame. Am I doing something wrong or the Addon is not working properly.
MCHammond Great addon. I believe he will be a big leap for animation.
Excuse me @uruburei, I am not programmer. “PSL_SnapShot” works for me ok. Windows 7, 64 bit, Blender 2.71.
Perhaps some of the clever coders can solve your problem.
Well, got distracted for a couple years, but lately decided I would look at this old experiment using FlexAlpha14. So while working on a walk cycle I was thinking to myself ‘gee, if only I could select the spine with one click’. And stumbled upon this thread.
PROXY PICKER
It apparently can select the whole spine chain - and I would guess with a bit of fiddling sections of it (for instance Just the spine and not the hips or neck/head).
The hands need some simplification. It doesn’t have to look as ugly as animschool picker.
Why a window looking thing in later versions with the blue border and the ‘x’ to close? I prefer the look of v0.2, envisioning sticking it under the outliner and saving some screen real estate, which that window border (v0.4?) eats up.
PAE
It looks like a godsend.
Finally found how to select multiple handles in graph editor - CTRL B enable tool, then shift to deselect, repeat, very cumbersome. FFS is there a better way to do this? Would a nice button toggle select mode help, perhaps with a circle deselect/select?