Hi, Thanks for reading my Anime style aura tutorial.
I have been teaching myself how to create various different types of anime style aura for a few weeks. It has been slow progress for 2 reasons, firstly, baking fire/smoke sims takes a long time, and learning involves, lots of tweaking and re-baking. Secondly, there are not that many tutorials on the subject. And being relatively knew to this sort of thing meant a lot of trial and error.
That being said, I have managed to created a few different aura’s that can all be tweaked in different ways to create different effects. So think of this as a sort of starter guide that you can use to get the basics of a few of the ways I have discovered to make auras, then you can change them to suit your needs. In all of these effects I and using Eevee in Blender 2.8 and have bloom turned on.
Since I am still learning, if anyone has any suggestions or improvements to these methods, please do share it here, as it helps everyone to learn.
Fire aura
This one is the most resource intensive, if you don’t have a great rig then be prepared to make a lot of coffee as you wait for baking and rendering. Turning on high quality and more divisions will increase baking and rendering times, but will give better results.
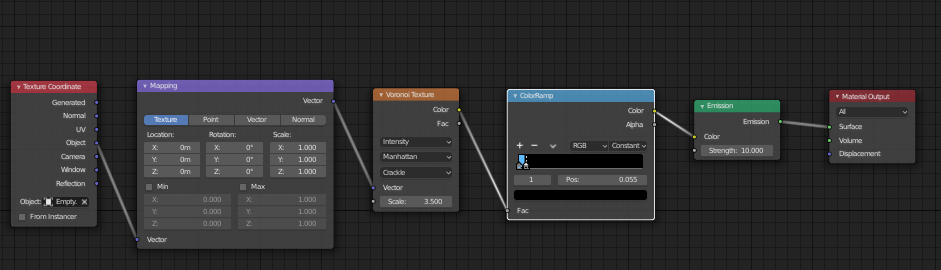
All you have to do for this one is to select the mesh you want to emit the aura, and use quick smoke on it. Then use these settings on the domain and emitter, and this material on the domain.
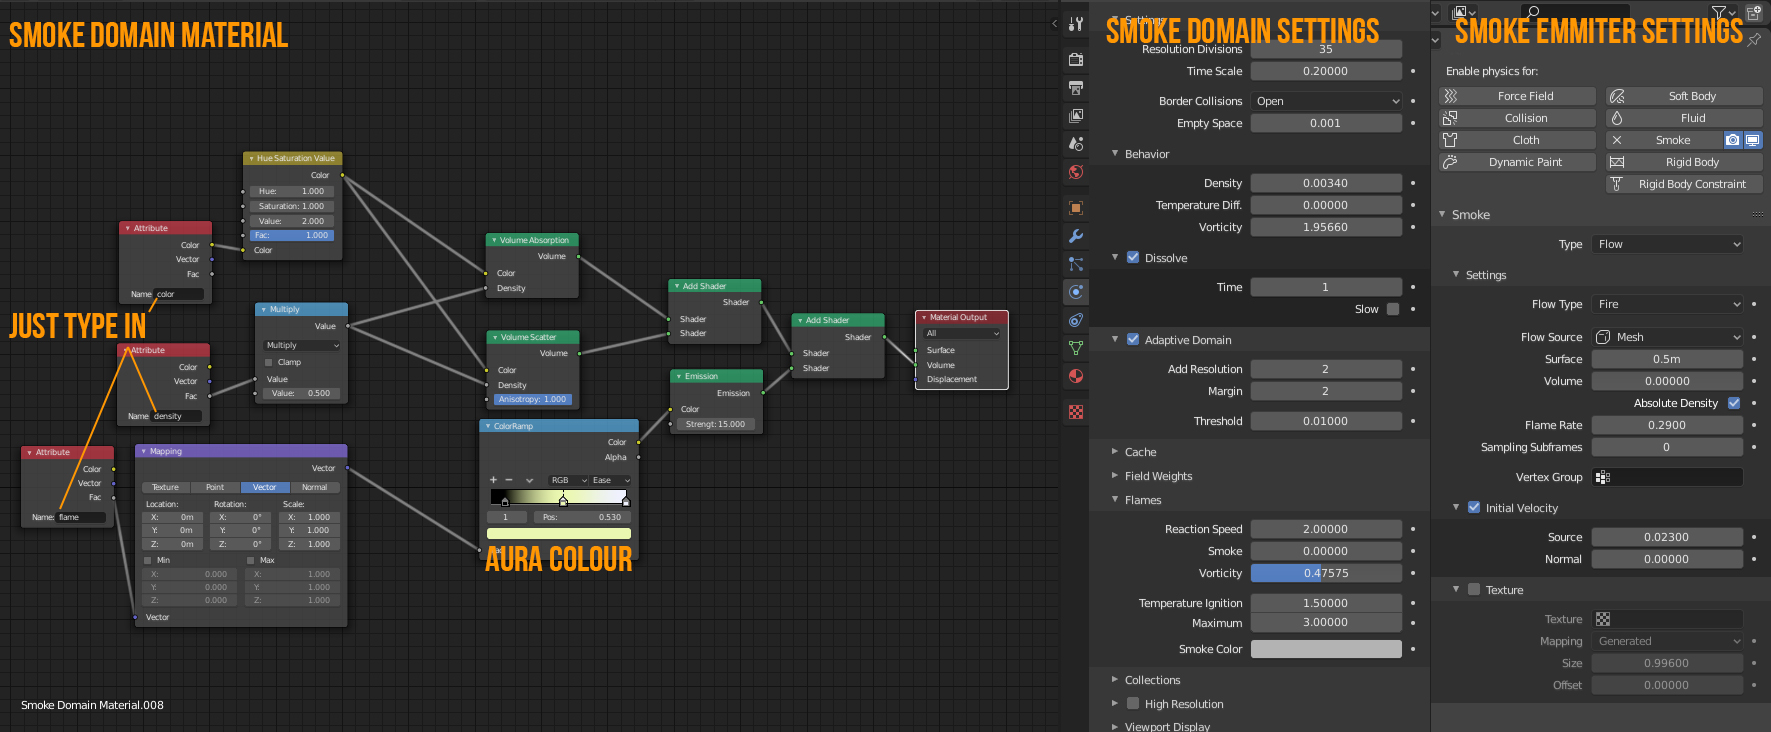
You can change the color or add a texture to the smoke to change the effects. If you want to change the direction of the aura, then you can use a wind force or turbulence generator to push it in the direction you want, however if you do this you’ll also effect the emitted particles direction unless you turn down its reaction to wind.
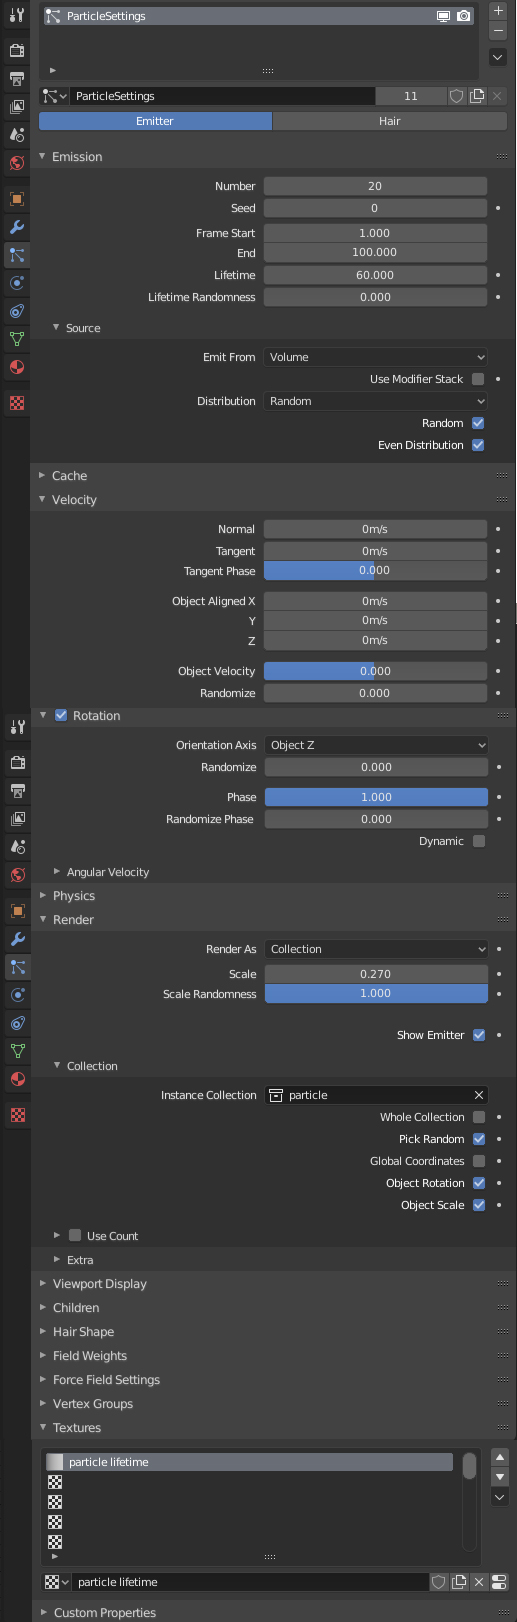
For the rising Particle, just set the mesh you want the particle to emanate from and use the following particle settings.
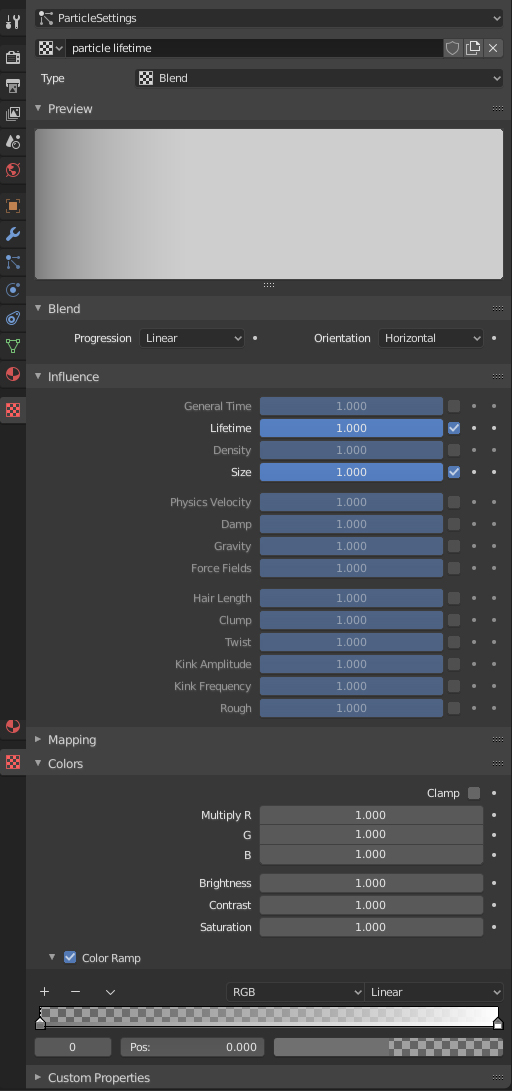
Use this texture on the particle influence to have it fade out and scale over time.
Then you’ll need to create the particle/s that you want to use. In this case its just a plane/s with the following material.

To make the particle appear to be shimmering, I use the following driver in the materials z rotation mapping #frame*.03.
To make the area effect on the floor, just add a plane with the following material.

That’s it for this one.
Electricity aura
I learned this one from a great tutorial on YouTube by Marius Oberholster. Here is a link to the tutorial

He has a good channel for some anime type Blender goodness.
But I’ll give a brief overview.
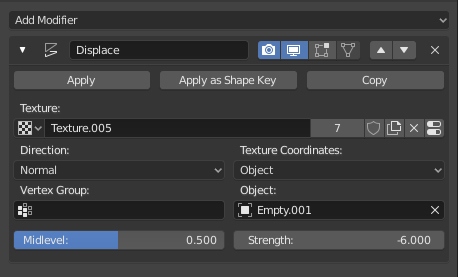
Duplicate the mesh you want to surround in electricity, and add a displacement modifier and this material.
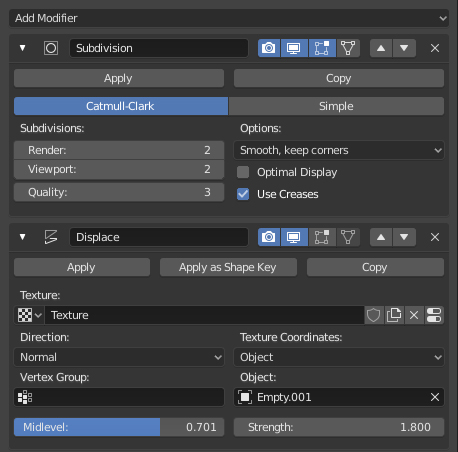
Add an empty to the scene and animate it to move upwards for the length of the scene. Set this as the object location for the displacement modifier, and set this texture to the modifier also.

Place a sphere at each foot and add a displacement modifier with the following settings and use the same empty as before as the coordinates.

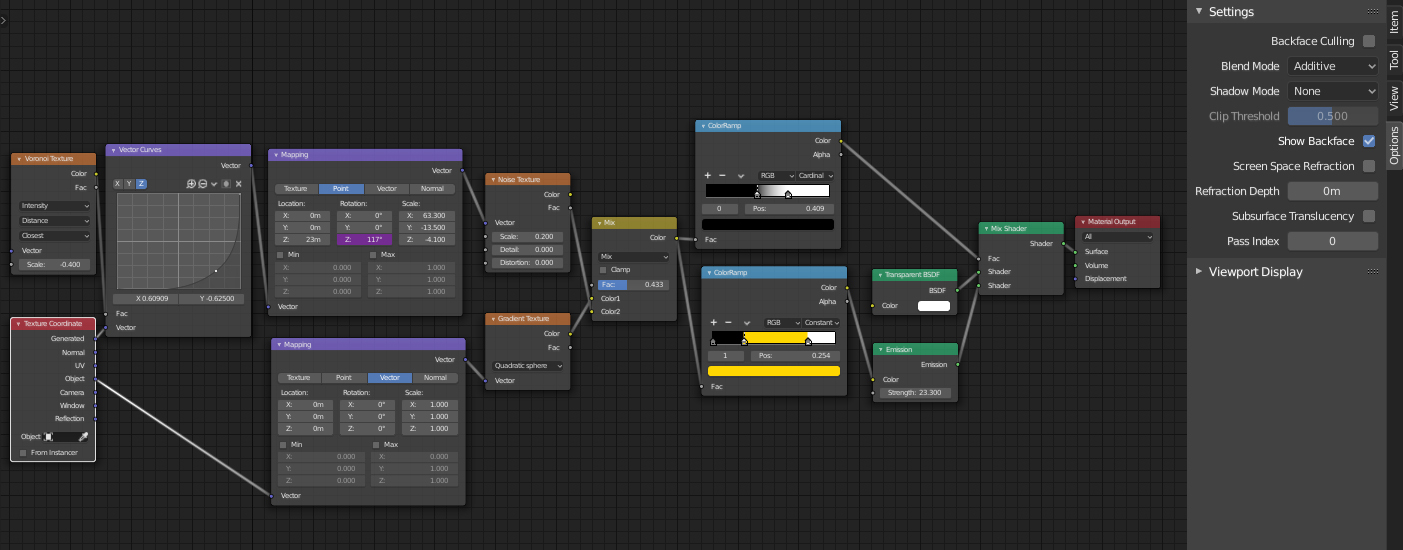
Energy aura
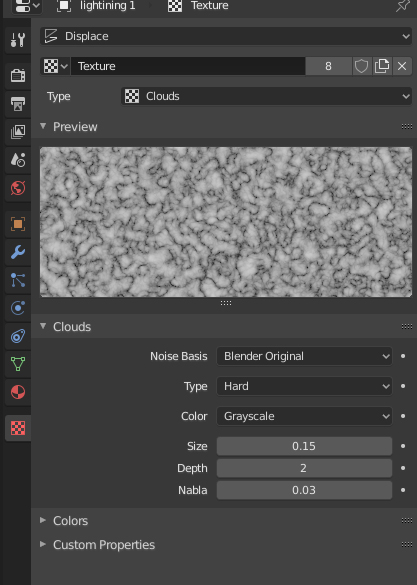
This one is the easiest. Just place 2 spheres and size them like this.

Then add a displacement modifier to each.
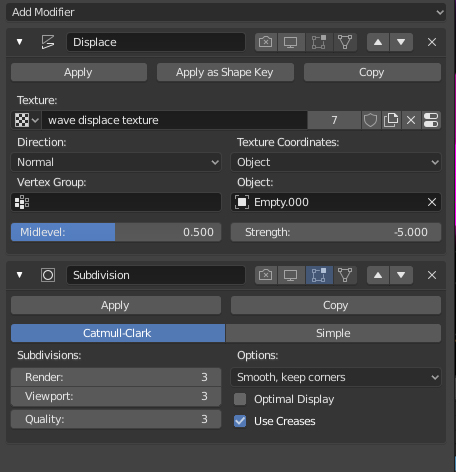
Add an empty to the scene, animate however you want to achieve different motion effects, but I used upwards in this example. Use the empty and the textures location coordinate in the displace modifier. I used the following texture, but different ones will achieve different results.
Then you need 2 different materials on the spheres, as follows.
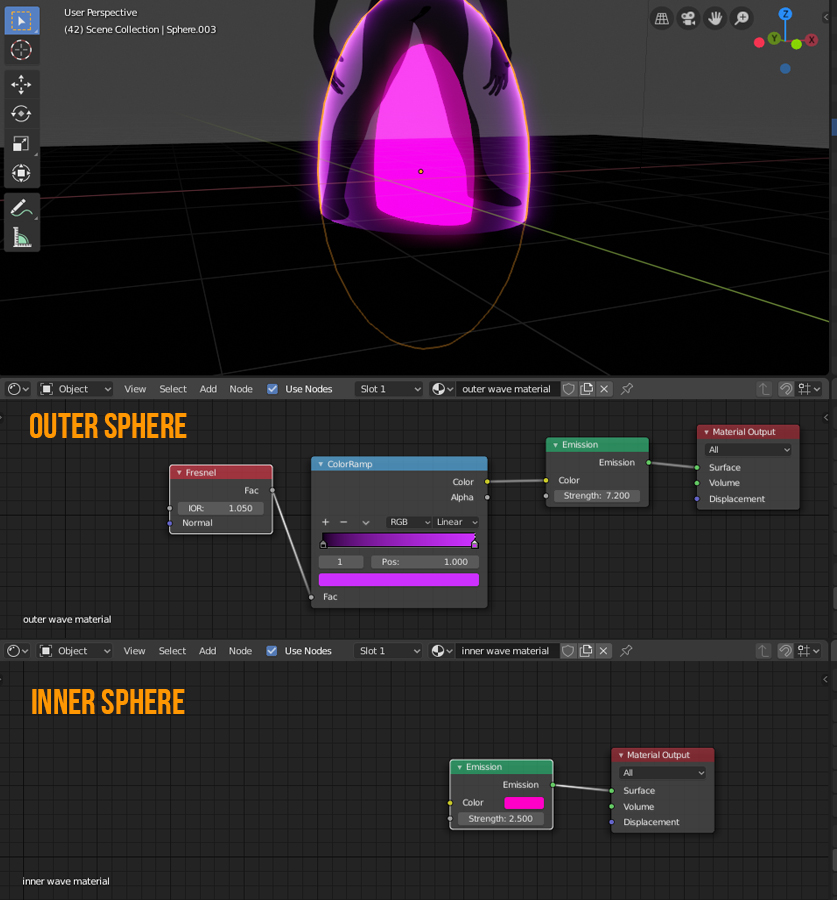
On the outer sphere you don’t have to use the Fresnel input node unless you want to recreate this effect exactly, you can get different effects with different inputs.
I added some subdivisions to both spheres after the displacement to round out the edges of the effect to create more of a stringy look. Again you don’t have to do this if you want the edges to be jagged.
You can add more spheres if you want to layer the look more, you can use more modifiers on each to create many many different types. This is the most simple and effective method and the most versatile for anime auras here.
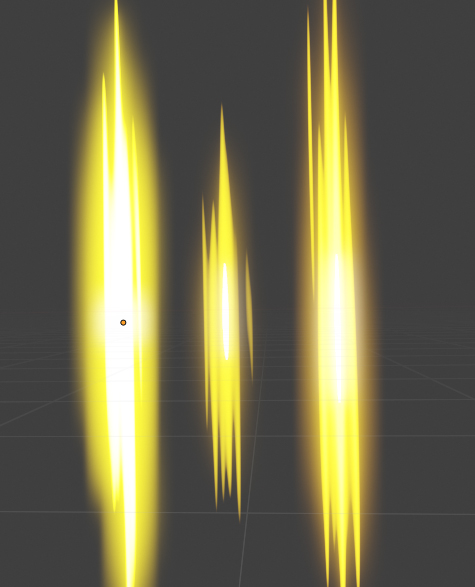
DBZ aura
So for this one, I wanted to try to recreate the generic DBZ style power up. I wanted to make it as CPU friendly as I could, and I wanted to make it as easy to animate as possible.
So this a dynamic paint aura, which will take care of most of the of the shape of the auras animation for us.
To do this one, you need to select the mesh you want to add the aura to, duplicate and then size it up, I used the solidify modifier to do this.
You’ll need to make this invisible in the render however you want. Then create a plane which will intersect the duplicate at the center. Add the following material to the intersecting plane.
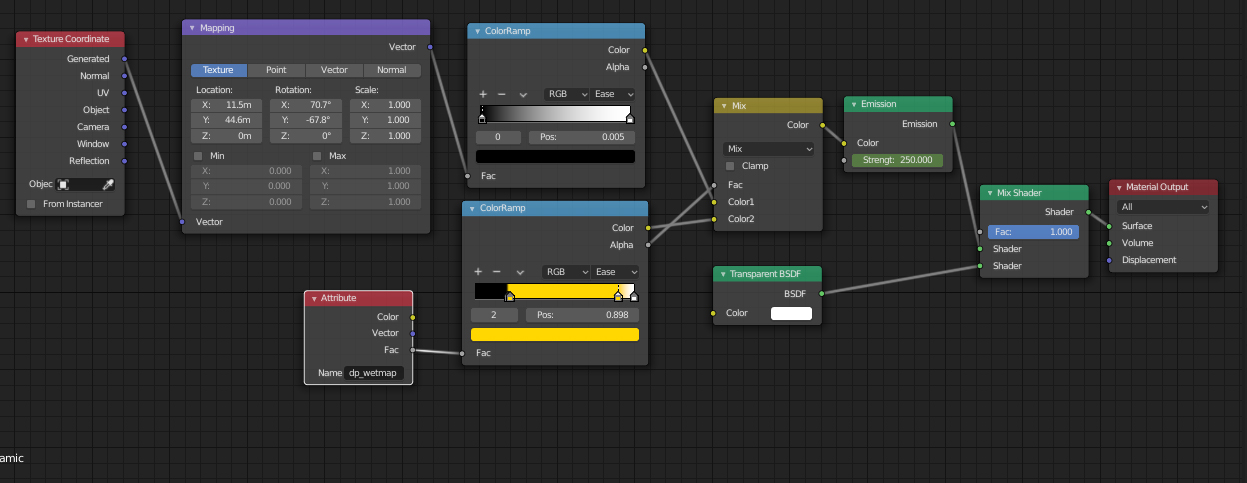
Subdivide the plane a lot to suit your needs, as we will now be adding 2 displacement modifiers to create the movement of the aura.
Then you will need to add 2 weight maps, one to control the horizontal movement, put this on both sides of the plane.
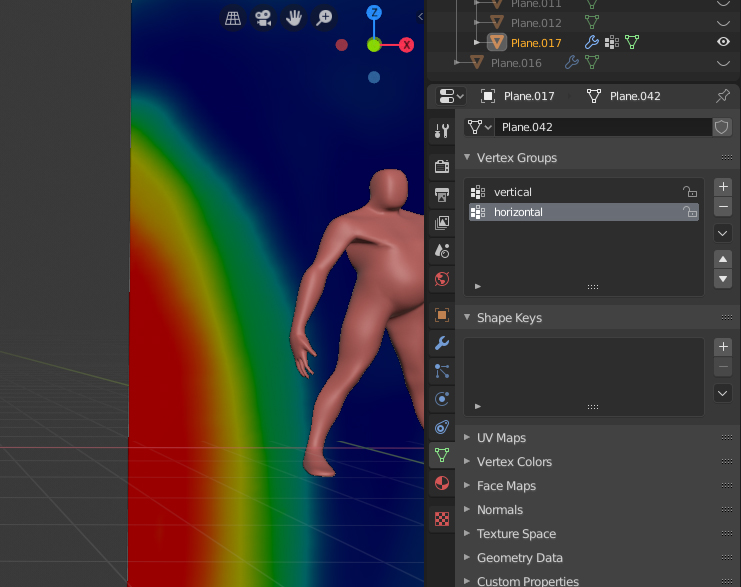
. And the other the vertical of the displacement,
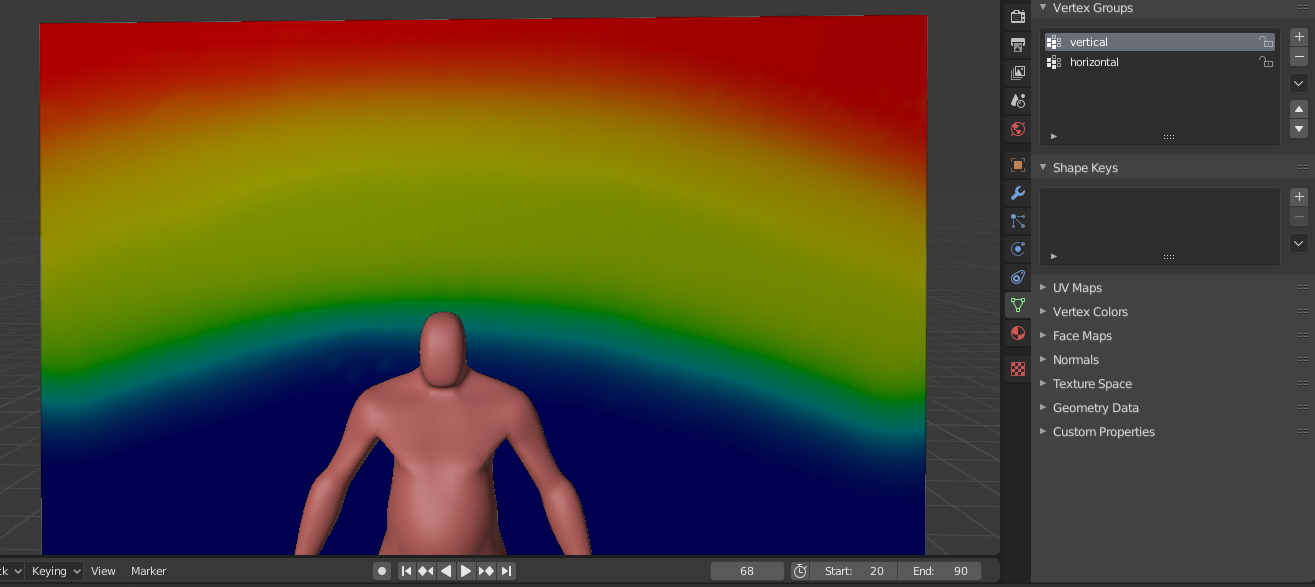
so set the displacement modifier as shown.

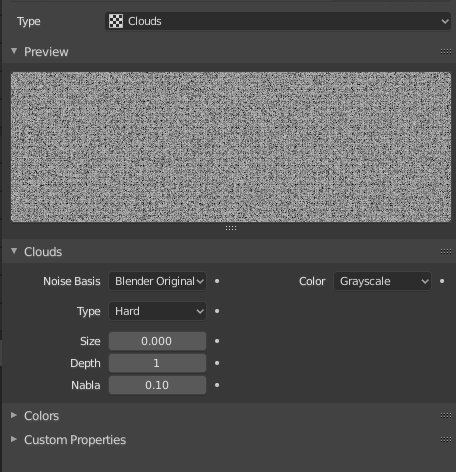
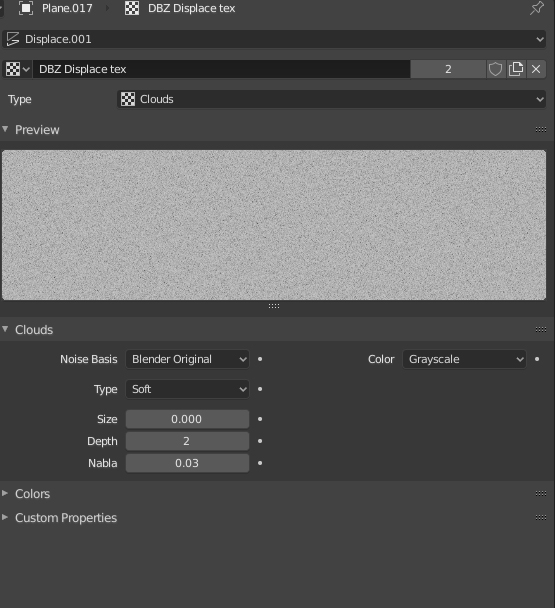
Use the following texture for the displacement texture. You can change the texture to create different effects.
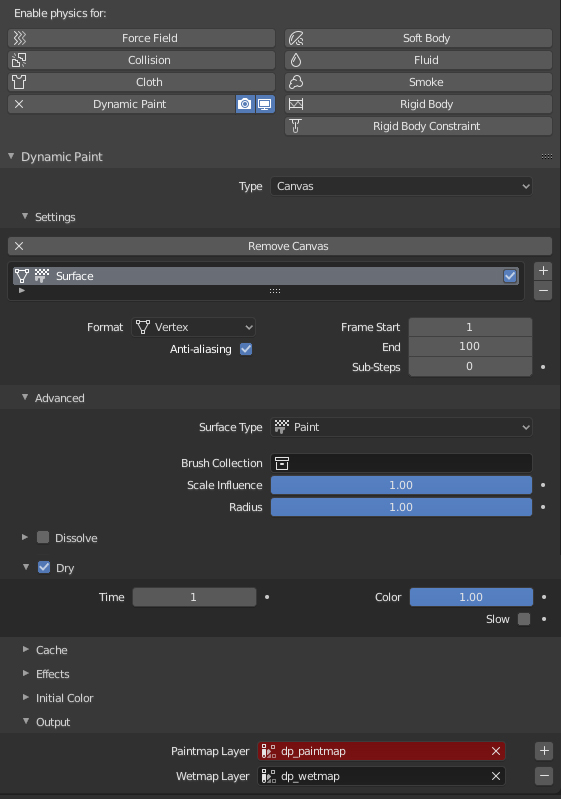
Set the invisible duplicated mesh to be a Brush in the Dynamic paint settings like this:

And set the intersecting plane as the Dynamic paint canvas with the following settings.
If you want to move the character around the scene, just parent the Plane to the invisible duplicate mesh, and the invisible duplicate mesh to the original. You can also constrain it with the track to modifier to make it face the camera at all times. If you need to bend the plane you can animate it with shape keys, but for he most part a DBZ aura sits outside the silhouette, so IDK if you`ll really need to do this when animating.
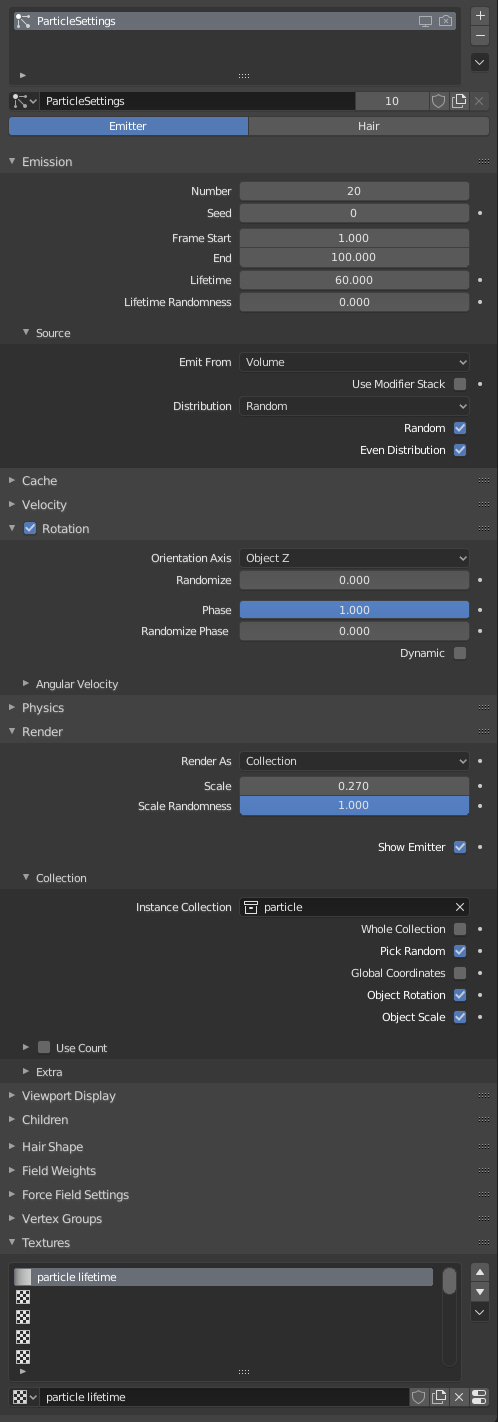
The rising particles are emitted from a small plane mesh just in front of the character. using the following settings
with this influence texture
The particle itself is just a plane like this
with this material
Bonus Easy Manipulate Electric field
This one is interesting, but ultimately I think there are probably better ways to do this. But i’ll share anyways.
So set up 2 ico spheres with a plane between them as shown.
Loop divide the plane 10 or so times to add some geometry. Then add 3 vertex weight maps to the plane and paint them as shown, and name them left, right and whatever.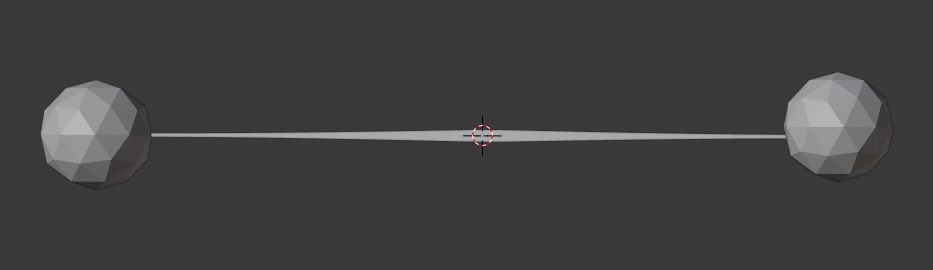

Add 2 shrink wrap modifiers to the plane, in the first modifier use the right vertex group and the right ico sphere for the shrink wrap. Then do the same for the left. Add a displacement modifier and use the 3rd vertex group to control, so the displacement is greater in the middle.

Add the following texture to the displacement.
Now when in object mode, if you move the ico spheres the electricity will move with them. How it moves with them, depends upon how you weighted the shrink wrapping maps. In this case it will create a curve.
Bonus Sword Electric
This one is really simple, just wrap a curve or path around the object you want to add the effect to,
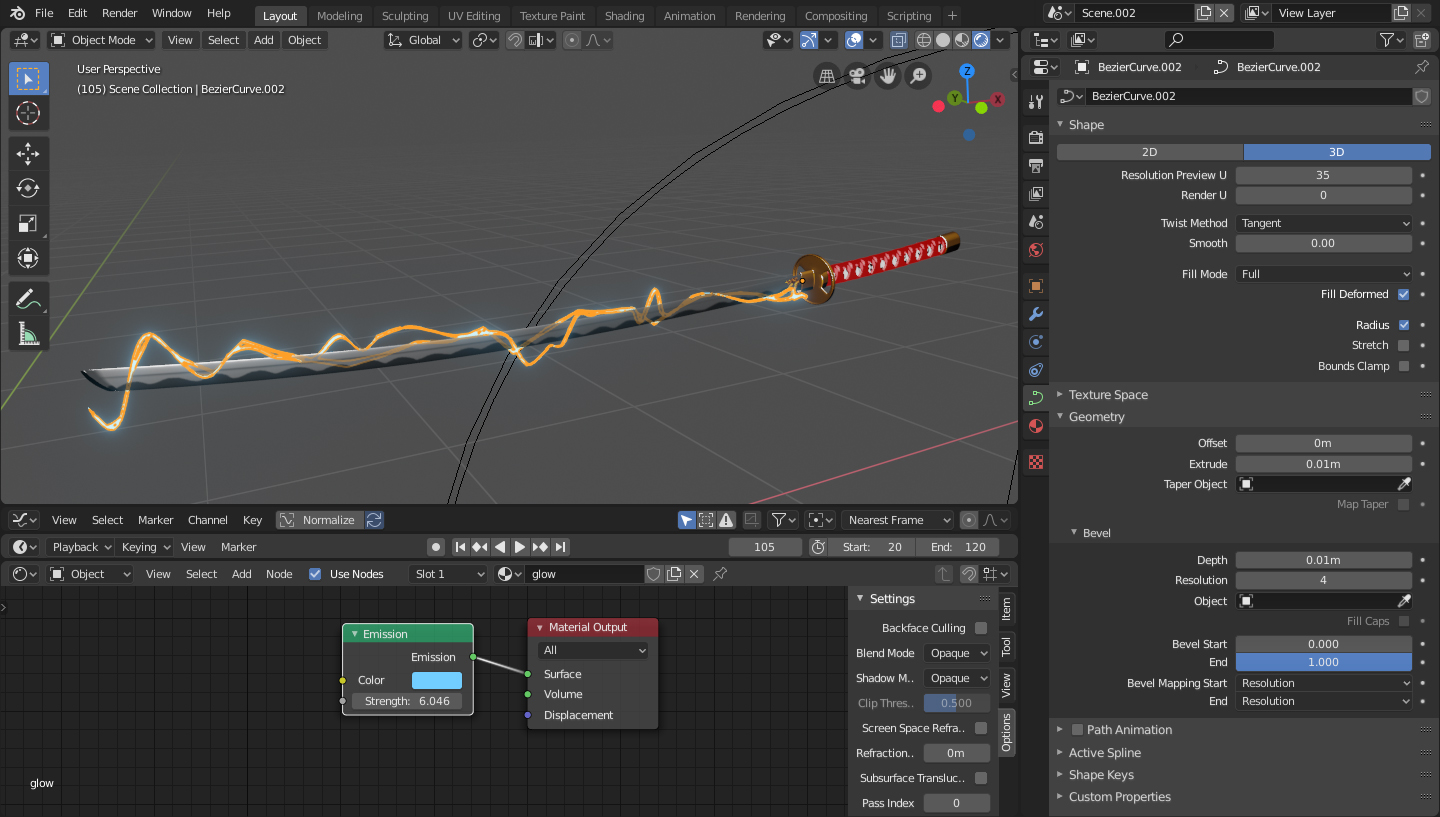
and add a wave modifier
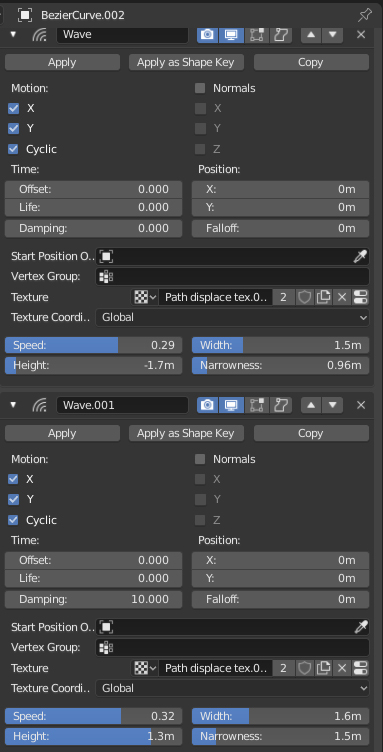
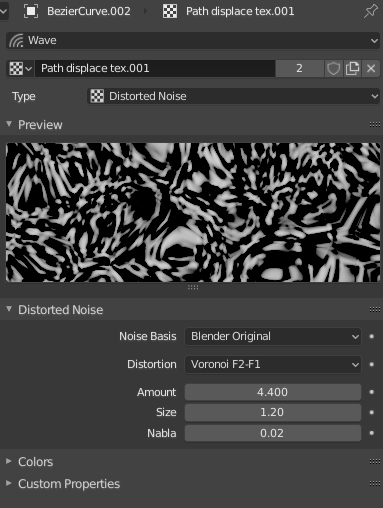
with this texture.
And add a glow material.
Done.
Thanks for reading. If you have any questions or anything to add please feel free.