Floor is cement floor with either tiles or wood over slab.
Floor from wall currently is broken and follow exterior of wall, but it is allready fixed for 1.3.8 (waiting for 2d dimension progress to push) and slab from wall and floor from wall does work as expected.
Slab from wall auto-adjust offset to fit wall outside
Floor from wall auto-adjust offset to fit wall inside
Both slab and floor now expose “offset” parameter.
stephen_leger I am having fun setting all my presets the way I want them. But I just cannot understand how to do my own materials. I go to the material file downloaded and change them there. So how does the add a set of archipack material work? maybe it is just simple and I just cant see it. How do I create my own set of materials?
Just so you know I spend hours playing with this new addon and ready for my next construction project proposal to come up to impress my clients.
Material presets only store name of materials for each object parts, you’ll have to store the material into a library so archipack is able to reload when needed.
1 Create an archipack object.
2 Choose the material you want to change, make it unique and change the name of the material according.
3 Use material lib vx addon to save your new material into the library.
4 Create a material preset with relevant name.
Note that the “save material” bug in matlib vx addon - and some dxf importer too are fixed in blender 2.79a. So if you’re not able to save as expected, download and use 2.79a.
Also note that presets are exportable / importable so you’re able to share across computers / users (file->export->archipack preset APK)
APK files are regular .zip of your preset folder (with .apk extension).
In order to share materials, you have to share material library too.
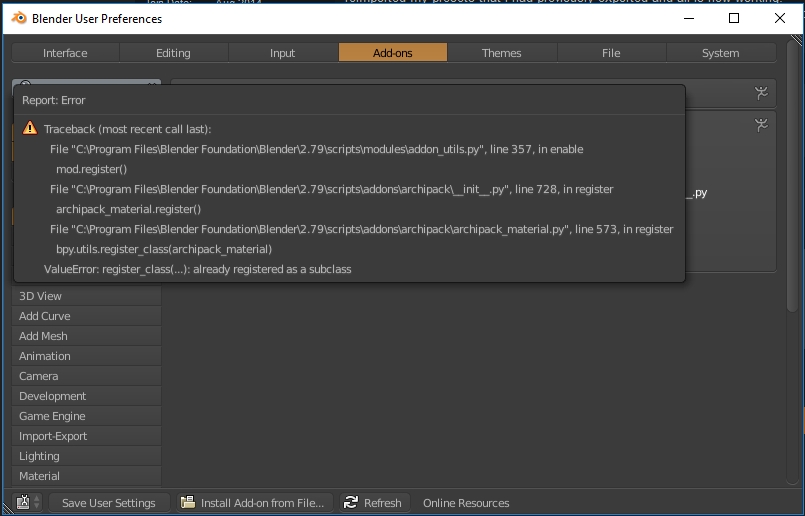
stephen_leger I need help. I messed something up. All windows have lost their glass material I tried reinstalling archipack, then I tried doing a search and deleting all archipack folders and files, I tried reinstalling blender and still the presets I did keep coming back and all the windows only show up with one white material. Can you or anyone tell me where the presets I did are hidden so I can delete them and start anew? Thanks in advance
Ensure you have archipack default material library, and setup the right path for the library into addon preferences.
Also set the render to cycles.
Also see the setup actions into addon preferences (render thumbs). see setup in documentation as reference.
Once setup, use addon updater in the addon preferences to upgrade / downgrade.
Presets are stored into %USER%\AppData\Roaming\Blender Foundation\Blender\2.79\scripts\presets
Don’t delete your presets, should only be an issue with material library setup.
Once material library set up, reload your presets and see if the glass still white, and if so select an archipack material, then resave your preset (material set name is stored into preset).
Also keep in mind that archipack will use the first material with right name found, starting from scene and then trying from library folder, so if you first created a window without material library path, you have to restart blender.
stephen_leger Yes I got it working again. I am actually on linux mint I am almost certain that my problems started when I switched to a unstable version of blender. I switched back to the stable version and deleted the preset folder. Reinstalled the addon and reimported my presets that I had previously exported and all is now working.
Your addon works great I just got too curious with blender… THANKS again for your time.
Hi,
Havent checked in dev branch recently, but usually it happen when reloading the addon.
As side note, as far as i know, lastest master is 2.8 branch and archipack is broken as boolean support is currently limited and opengl (bgl) is likely to be rewritten, so have to wait a bit until something more stable comes out.
Is there any tutorial / documentation on exactly how to use the cutters? I am getting nowhere fast trying to use them. Also, when moving the markers, can you select more than one so you can shift a group at the same time? I have spent a frustrating amount of time attempting things by trial and error and not getting far. Not helped by the number of crashes I am suffering using Archipack. Blender is normally pretty stable for me but when using the addon, it crashes with alarming regularity.
I’m aware of stability issues, and currently trying to narrow down those pretty random issues, so expect an improved stability build with upcomming 1.3.8.
If you know a reliable way to make it crash feel free to report in the tracker.
I had seen that but it wasn’t clear on certain things. Like can you select multiple points? If so, how?
Also, regarding walls, if my “house” has 2 floors, how do i draw new walls on the second floor? Even if I have it selected with the cursor at the base of the second floor, when I start drawing, it draws at ground level and I have to reposition.
Hi,
With the cutter in manipulate mode, drag an area with your mouse like you’ll do with “border select”, then hover a selected handle (blue one are selected) the handle becomes yellow, press left mouse and drag&drop. See floor cutter video at 0:20, i’m moving all points of the cutter at once.
For multiple floors, draw each one at level 0, then use reference point to move the level in a 3d space.
Take a look at the end (5 min 30 +) of 2d to 3d tutorial video as reference for the workflow.
I have a problem.
I’ve tried today to add windows objects to my project but when I press “window” or “draw” buttons, the preset window open itself but it’s empty and now I can’t add any window at all.
What could be the problem?
Hi Marcatore,
Look like your presets are missing. (Either first install or another user ?)
In 1.3.5+
You have to complete “setup actions” in User preferences -> Add-ons -> archipack, press “render thumbs” once and confirm.
Before 1.3.5,
Use render preset thumbs button in Archipack Tools tab (left panel of 3d view)
On first install, this action copy presets from addon folder into user profile folder.
After first install, this action render all presets thumbs so you are able to change material library and refresh all your thumbs.
@marcatore,
In 1.3.8+ i rollback to old behaviour, working “out of the box”, without this additional setup phase.
Reading default from “factory” read-only folder, writing to user profile folder (user defined override factory presets).
Now “render preset thumbs” only does re-render all thumbs when you change your material library.
Also posted video of progress in interactive multi-dimensions lines in 1.3.8_dev, using “DimensionProvider” concept so archipack objects does provide “measurable” points you select with a single click.
Once bound to a measurable, dimension auto-update when you manipulate provider.