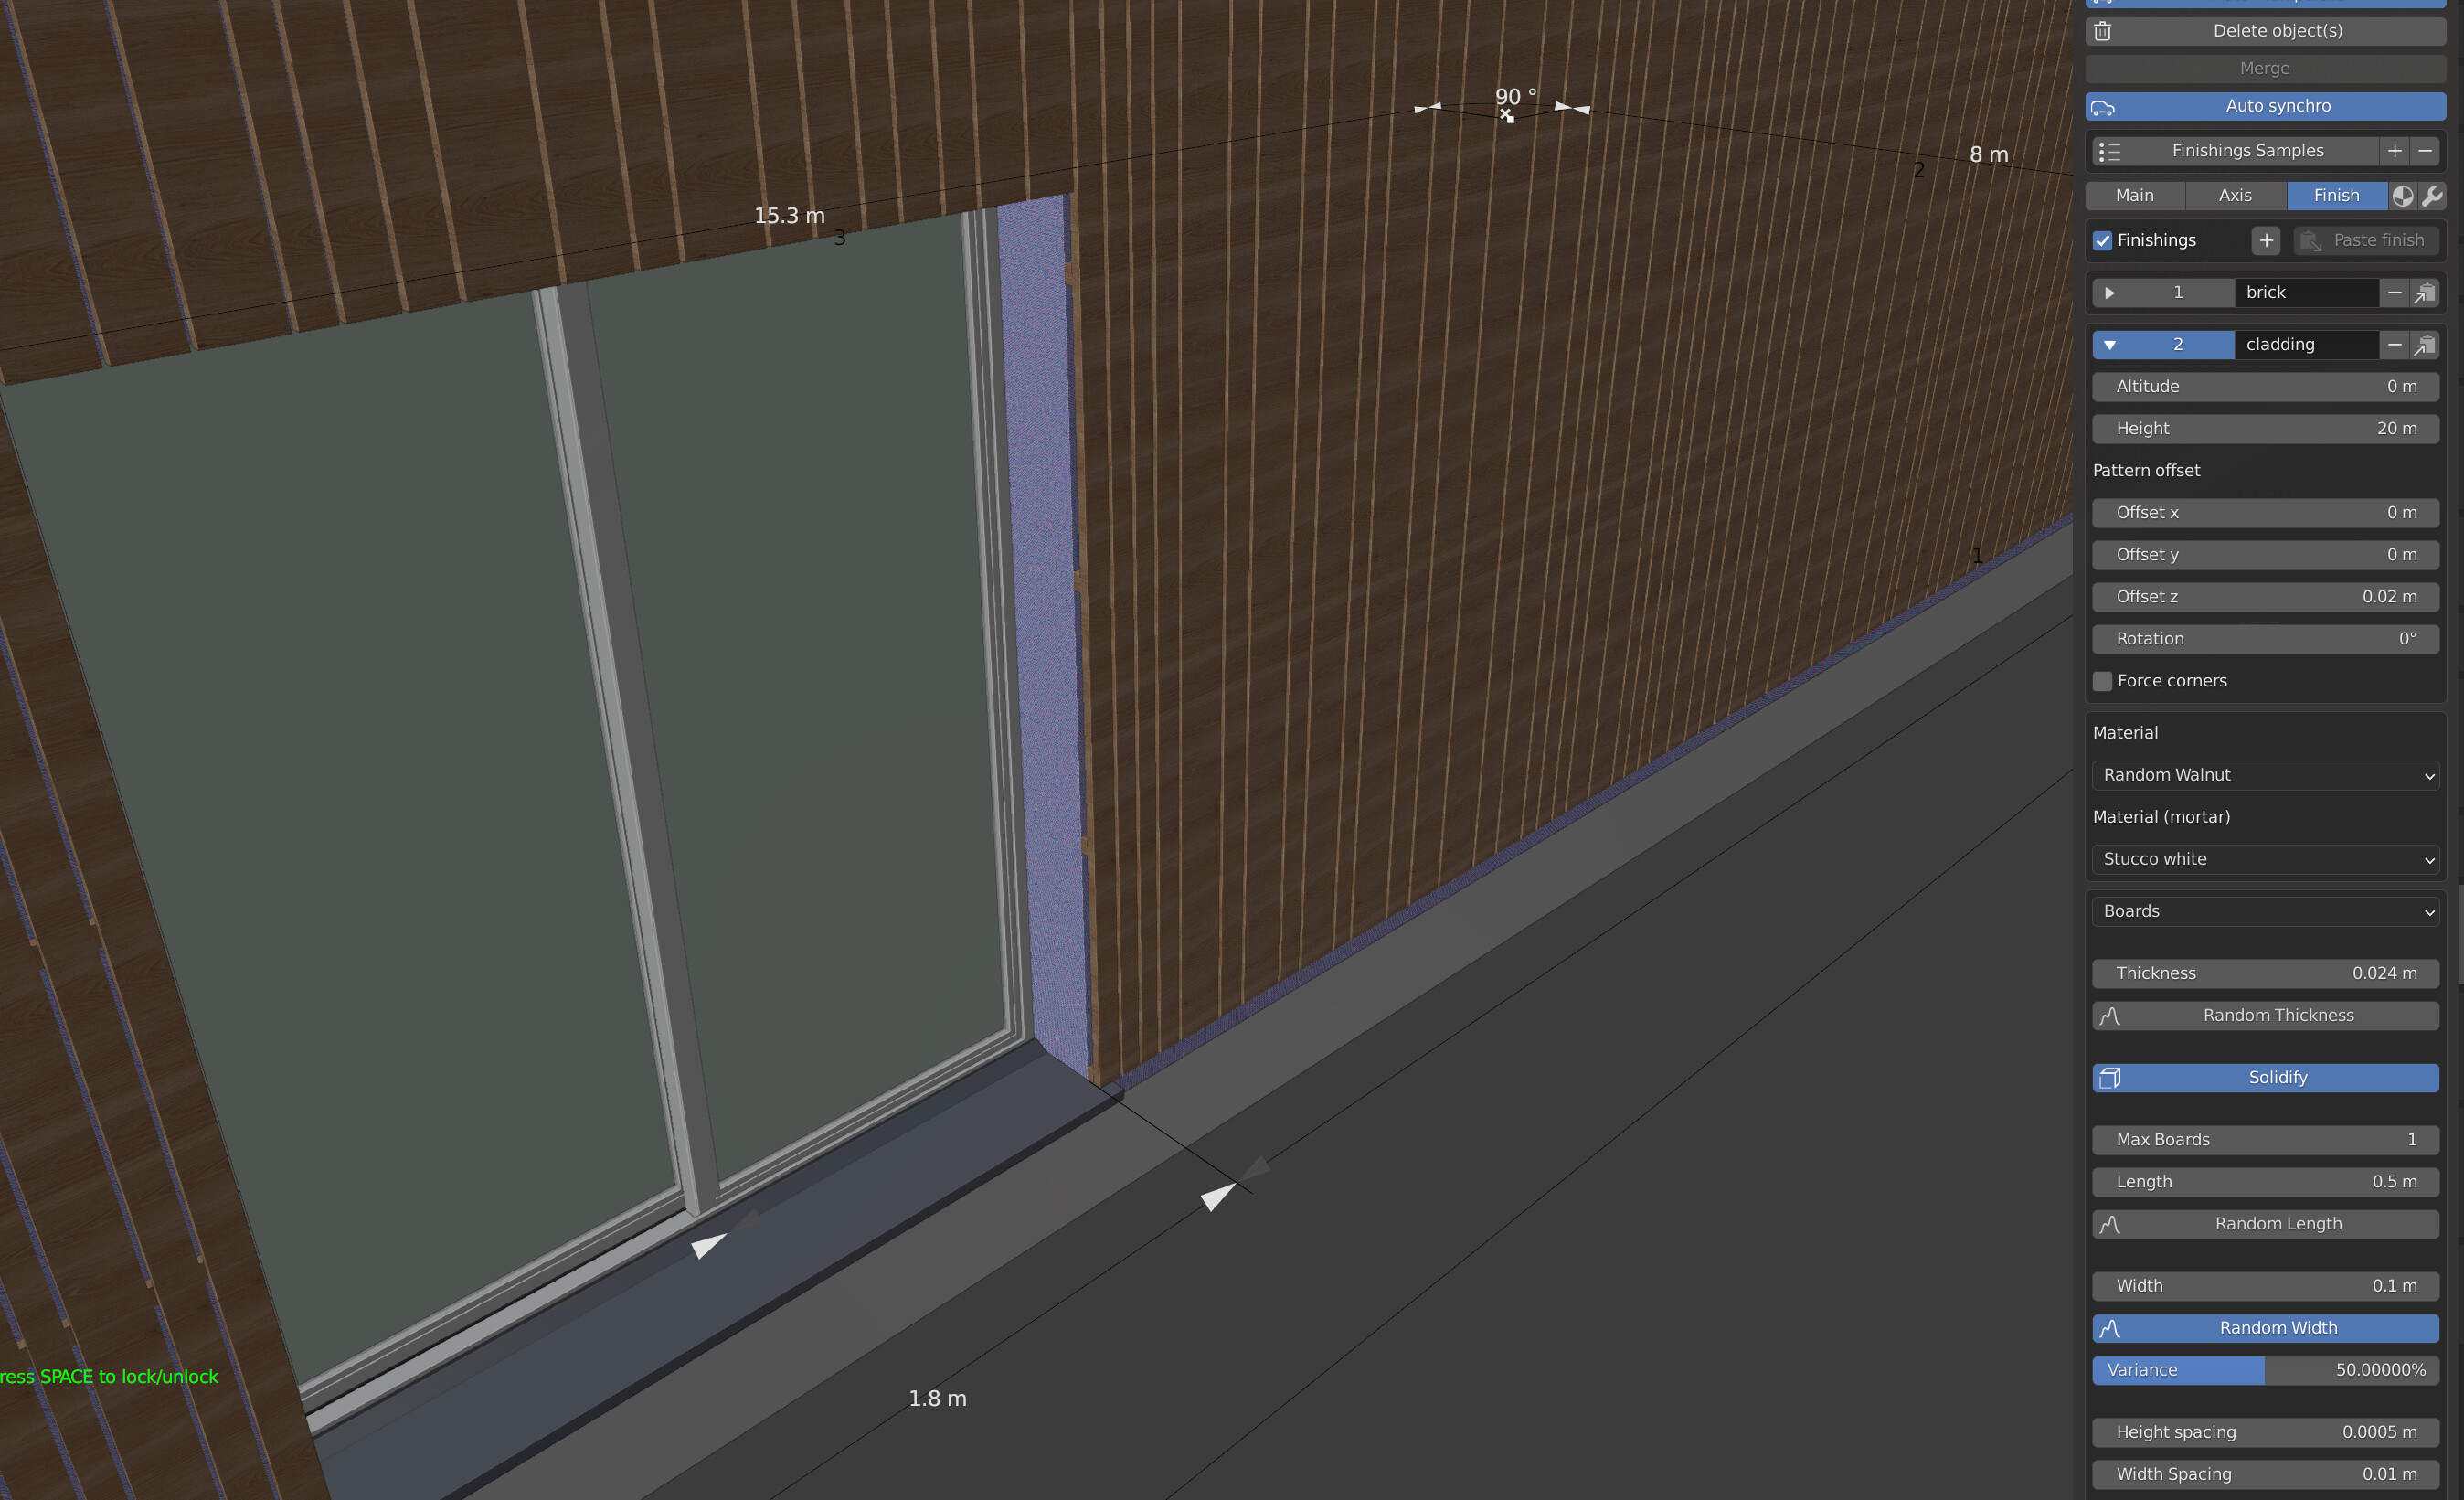
And one more question. Is it possible to wrap window/door opening sides with chosen finishing? Or You do it manually?
Tahnk You for answers
Looks like a bug in the bevel code.
Boolean occurs after finishings (to be able to cut in front of openings) so there is no simple way to add it on openings side other way than by hand.
You may alter the material index of hole’s side in the window parameters.
Thank You for Info…I will try the material index method on opening sides. Cheers
Hi Stephen,
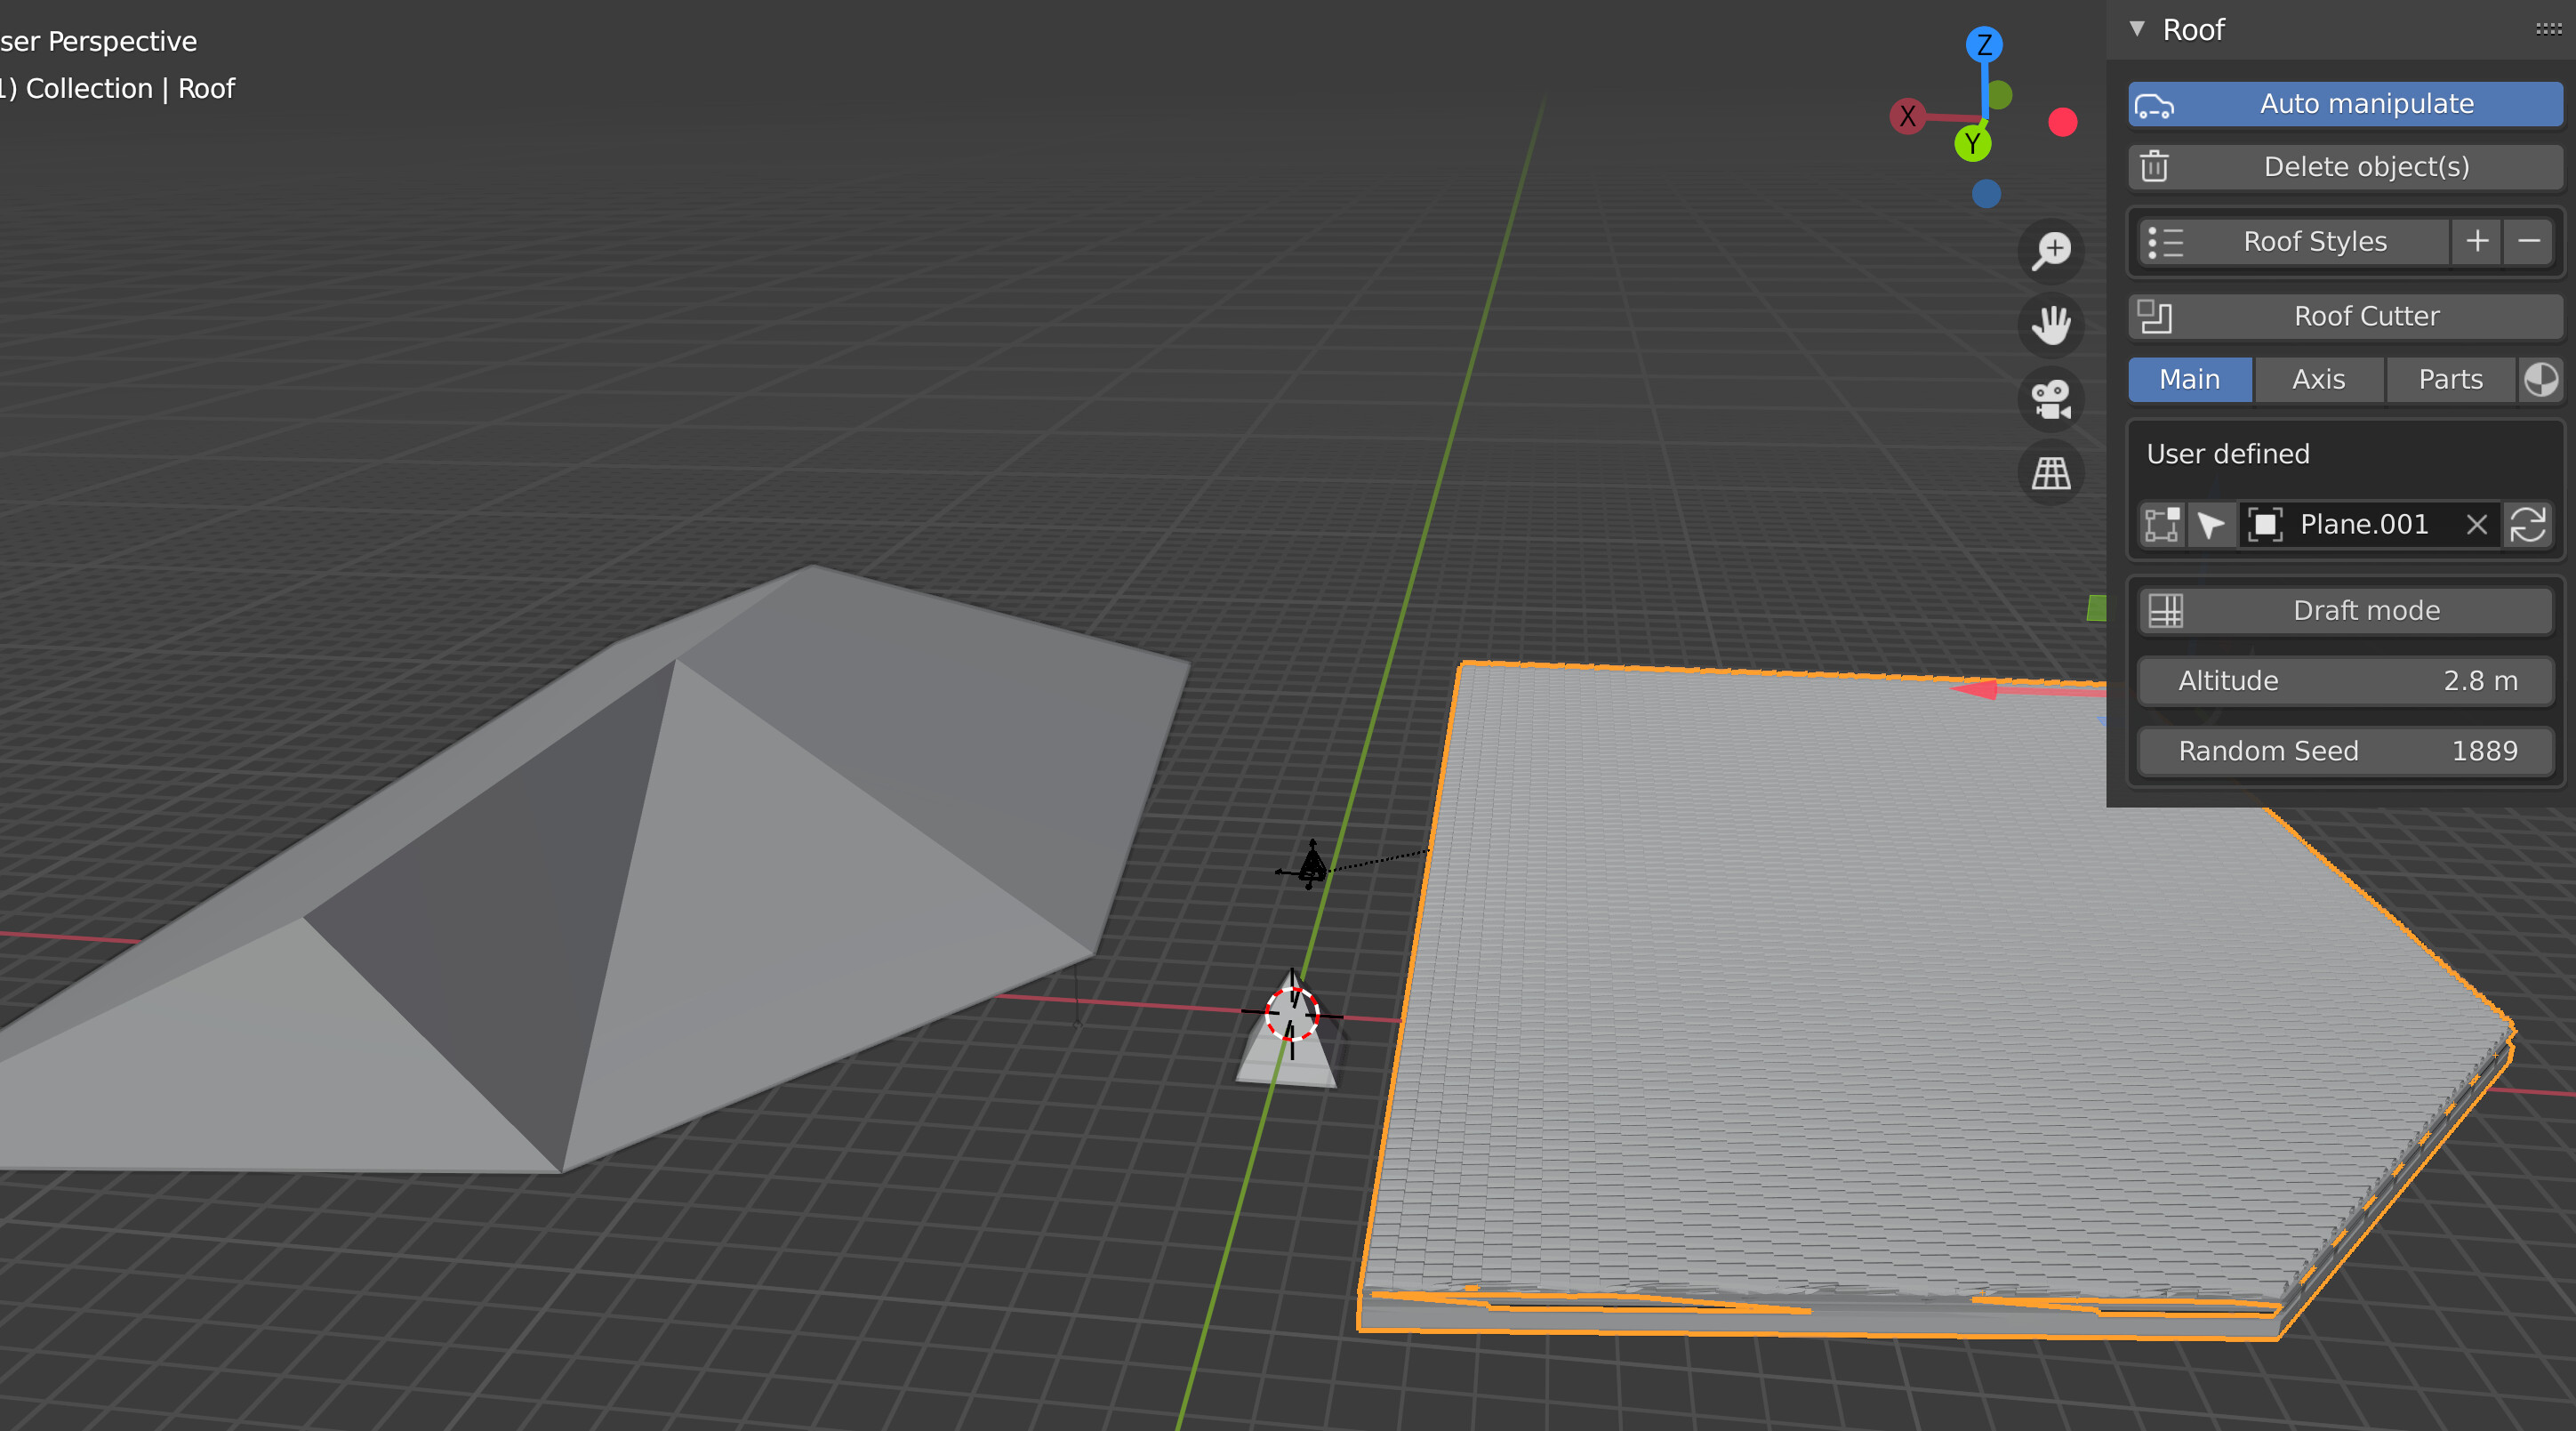
I’m having this experience with user defined roofs, where a shape like the one on the left in the attached image, when used as input for a user defined roof, produces a flattened out roof like the one on the right. I thought it might be some incompatibility between Archipack 2.3.3 and Blender 2.92, but I’m reproducing the same issue in Blender 2.91.
Not clear if it’s something to do with the model or with the roof settings. Are there gotchas (maybe in the modelling) one needs to be aware of when working with User defined roofs?
Hi Dada,
I guess there are polygons under your shape, and there is probably a flipped normal issue so the top polygons are filtered out and the roof only use the bottom one as input.
Yes the normals for the roof shape were indeed flipped. Flipping them back solved it. I also found using the roof draft option, with a custom curve as input as a safer approach to avoid such mesh issues, though having a custom mesh probably gives better control. Thank you Stephen.
Looks like archipack is working again as expected under today’s 2.93 (at least under linux)
Hi Martin,
I’m unable to repro your bevel issue, i guess you should try with lower values as bevel with high values may result in weired shapes.
Could you share your file through mail to [email protected] or any web transfer service ?
Hi, I will send You email …thank You
Hi,
Released archipack 2.3.4 today,
this version is a hotfix for blender 2.91+ boolean performance issues and many small bugfixes.
As usual either auto update using addon updater, or request a dowload link through e-mail using official website. Setup over old version and restart blender.
You’ll recieve a download link for the addon right in the mailbox in use for your gumroad / patreon account.
Feel free to contact the support if for some reason it doesn’t work for you.
1 Like
Hi,
If you encounter performance issue with projects created in 2.91+ with 2.3.3 release, you may copy paste this script in the blender’s script editor, and then run it once, so boolean modifier solver will be set to “fast”. May freeze blender for a while, but once done performance will be back as expected.
import bpy
for o in bpy.context.scene.objects:
    if hasattr(o, "modifiers"):
        for m in o.modifiers:
            if m.type == 'BOOLEAN':
                m.solver = 'FAST'
Anyone know the best method of creating multiple floors?
All the examples I’m seeing is just one. And maybe they make some stairs, but they don’t go anywhere.
Are there stairs boolean objects? I can see how that could be complicated for sure, but not impossible. And a Lot of this stuff is complicated. I finally broke down and bought it, even though I’m not into architecture. I mostly just wanted it to learn it, and I plan on modeling my own house.
Yeah, I can make one floor, then make another floor the proper distance away by just changing the location of the 3D cursor, but that’s not live.
Ideally I’d want to make one, but tie the next to that. If you are working on design changes for something that can be important. Or at Least, create a parent object for the next floor so you can move the entire thing as one object.
I would love to find a tutorial of someone making an entire house so I can see what they are doing. I mean, Really there are interior walls and exterior walls. The interior wall of each room is a separate piece, split by the floor. But the exterior is a single piece, unless you split if by material or shape for a design change.
I’m not looking for all the answers in a reply here, but if someone could point me in the direction of some help for that I would much appreciate it. I couldn’t find anything specific to that.
I haven’t made more than a few walls yet, so really I will want to follow along with some things, but will probably do it on my own things. I find if you follow along exactly, you don’t learn any issues you encounter, unless the person doing the tutorial records those, and shows you how to fix them (I do love those). So I’m modeling my house. I was doing it in just regular blender, but doing that and knowing engineering CAD software is Incredibly painful.
CAD transforms helps a ton, which I just found. (I didn’t pay for that yet, sorry. Personal budget issues, and I wanted Archipack).
For multiple level building setup, take a look at Project structure using reference point video, it implements “paper / model spaces” concept.
For stairs take a look at floor cutter video, cut the slab so floors will also be cut.
You probably will find answer to most questions in the archipack youtube chanel
1 Like
Since 2.3.4, I don’t have the manipulators to move openings when selecting a wall :
EDIT : I did a backup to 2.3.3 and same thing. Using Blender 2.92 Windows 10 x64.
EDIT 2 : it came back for some reason ![]() .
.
EDIT 3 : see screenshot :

I let you a file where I used a cube to set dimensions of my references and for some reason, if the cube is here, openings are added at the 3D cursor. I have to delete or make the cube not visible.
bug.blend (1.1 MB)
Window / door draw tools expect a wall, so when wall’s are enclosed into (or pretty close) to another object, the ray cast to find a wall may simply fail.
Looks like the opening was not properly detected by the wall, you may try to select the wall and in wall’s parameters, tools, use auto-boolean.
I tried but no chance. It’s the first time it happens to me.
Here’s a gif :
Thank you Stephen. I had been watching a few. I’ll just have to queue up all of them so I don’t miss anything.
I hadn’t seen the reference point video. It’s really cool how you’ve designed that. I do have a question regarding it though. I was asking about if the 3D view locations could be “live” attached to the wall height of the layer below. I think I have an idea for a workaround to get that to work still. One reason I would want that is because I might not know some of the heights of things.
For instance, my house has 8 foot (hopefully close to exact) ceilings upstairs, more like 7ft 2in in the basement. (and yes, I hate that we use the imperial measuring system) I know the floor thickness on the first floor because I can measure the joists easily enough. For the top floor though, the only way for me to know is to compare the height to the stairs.
Is it best practice to put the origin point at the base of the wall/surface of the floor, then have the slab go negative? Or do find it best to find the total building level height, including the floor?
For the stairs, thank you for the cutter video. That doesn’t clear up walls for me quite yet, but I’ll probably have better questions once I actually try and make it. I was more wondering if there was a best practice way to do the stair walls and ceiling. If I don’t see a good method once I finish all the videos I’ll post back. The answer might just be hiding in one of the videos that I’m not expecting.
Never ever edit origin, nor scale of archipack’s objects. Wall’s origin altitude is inside finite level 0, so usually with some floor’s thinkness the wall bottom lie a bit under 0 and slab is under that.
THANK YOU. Incredibly useful tip.
I heard you moving levels up 3 meters, so wasn’t sure where the floors were. Obviously industrial buildings are different. But in the US, homes are generally 8ft or 10ft from floor to ceiling. Then the next level up is based on the joist widths. So you get odd numbers like 8ft 8inches or so.
For me, I’ll have to just measure the distance to the top of the stairs to determine the distance of the next floor up, since I’ll be measuring an actual house rather than planning a new one.