I’m trying to attach the cube mesh to a cylinder (with a triangular fan base) where the cylinder is a bit smaller than the cube. I have tried sub-dividing the surface of the cube and then moving the vertices, however I can’t get them to line up properly. Any help would be appreciated.
What doe you mean by attach ? Just join the two objects or merge them into one continuous mesh surface ?
No screenshots or blend file supplied so we can only guess which of the infinite possible scenes you have. ie we don’t know if the objects have any rotation etc
Therefore, very generally look into:
Boolean modifier
Snap cube to cylinder surface (magnet snapping tools on 3d view header), delete the cylinder end faces and fill the gap with faces
Ctrl+J joins selected objects into a single object so you can edit both at the same time.
@Richard, thanks for the reply
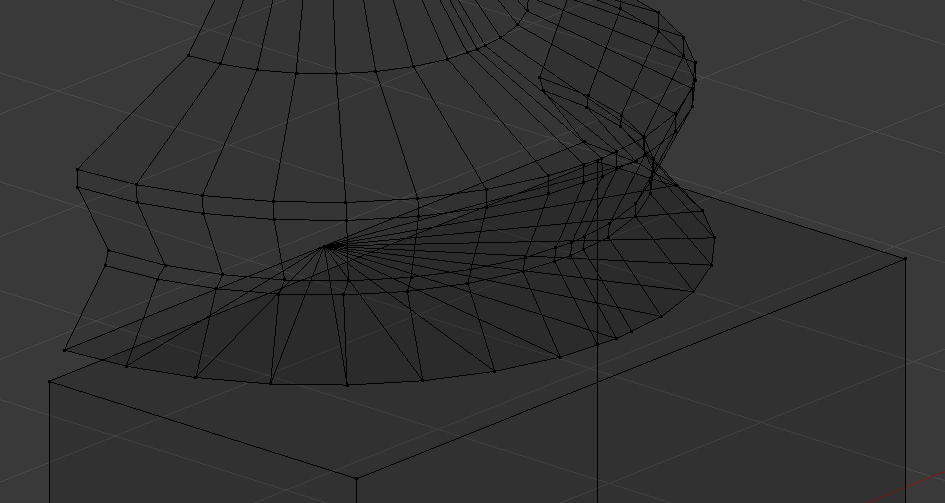
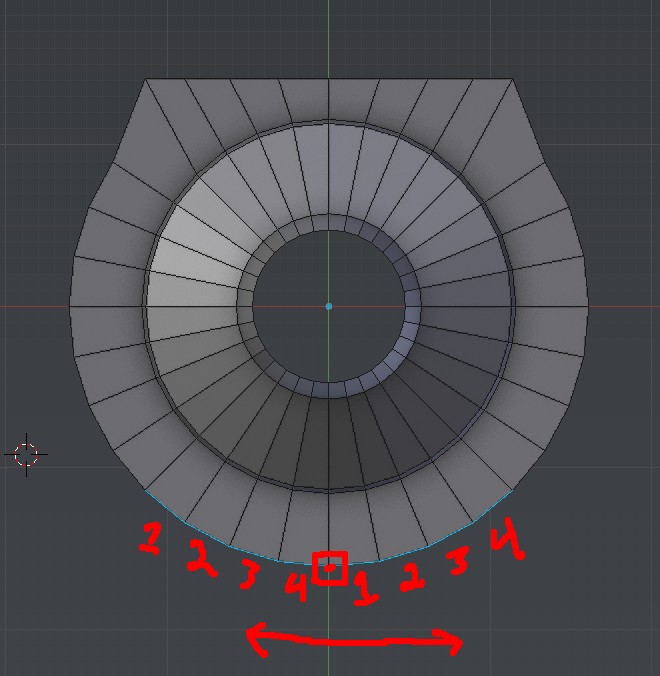
Ok, here are the screenshots (I am using a mirror modifier that isn’t shown on the x-axis). The cube and the circle are part of the same mesh. I have tried the magnet snapper by selecting all of the triangular faces on the bottom and then pressing the magnet and selecting ‘face’, however it doesn’t seem to help.

Are you just wanting the cube to sit on the cylinder? If so, you can turn on snapping (the magnet) and set to face snapping (in the drop-down box next to the magnet). It might move the box off of where you want it, but moving it constraining the z-axis can get it back in place.
I think I get what you’re trying to do. If you want to make it a single mesh, do this…
Delete your bottom tris and the cube. You won’t need them. Then edge select the base of your lamp looking thingy…
Hit E to activate extrude, then immediately hit S to scale it out like so…

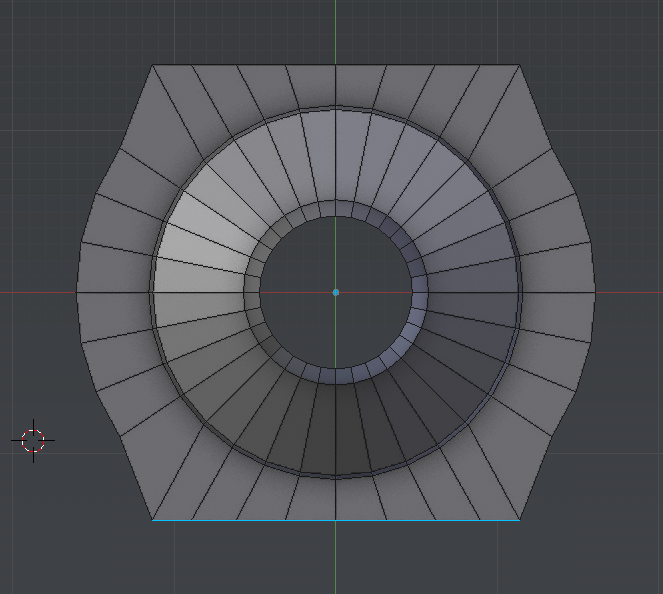
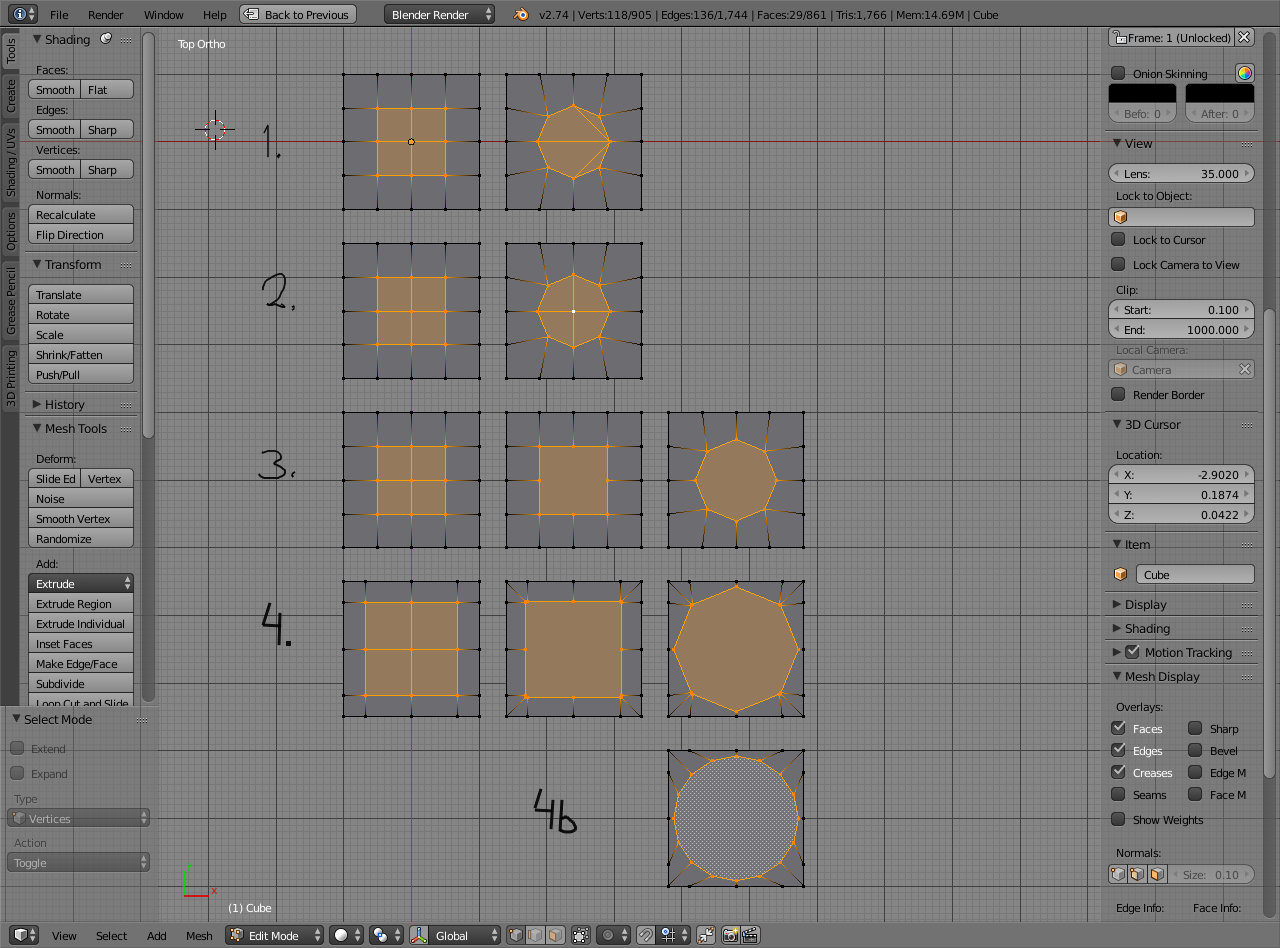
Now what you’re gonna do is flatten your circle into a square, which is actually a helluva lot easier than what I’m about to make it sound like.
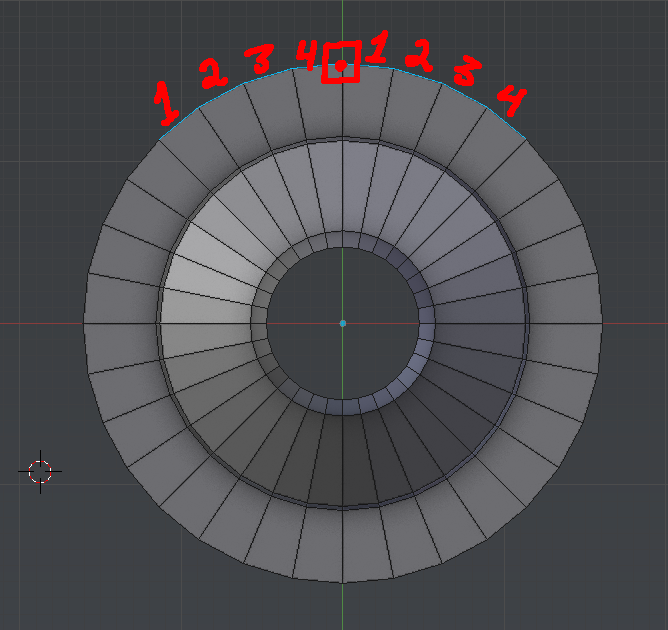
Let’s assume you made your mesh out of the default 32 sided cylinders Blender throws out at you. To make an even square that isn’t all cockeyed on you, you’ll have to select the proper amount of edges necessary. You do this by dividing the number of faces of your cylinder by four, then selecting those amounts of edges for each side, starting from the topmost, leftmost, rightmost, and bottommost verts. Since you’ve got a 32 sided cylinder, you’ll need to select 8, for from the left and right of your centermost vert. Like so…
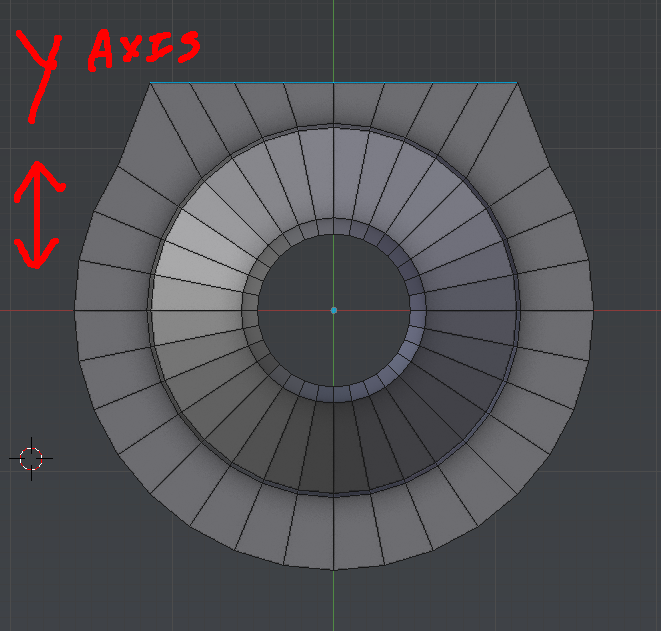
Then hit S to activate scale, hit Y to constrain it to that axis, and hit numpad 0 to even out all your verts into a nice little row.
Now do the same thing on the bottom. Select your 8 edges, 4 to the left and right of your center vert…
Hit S to activate scale, Y to constrain it to that axis, and numpad 0 to even them out.
Now select all your edges on the left and right side…
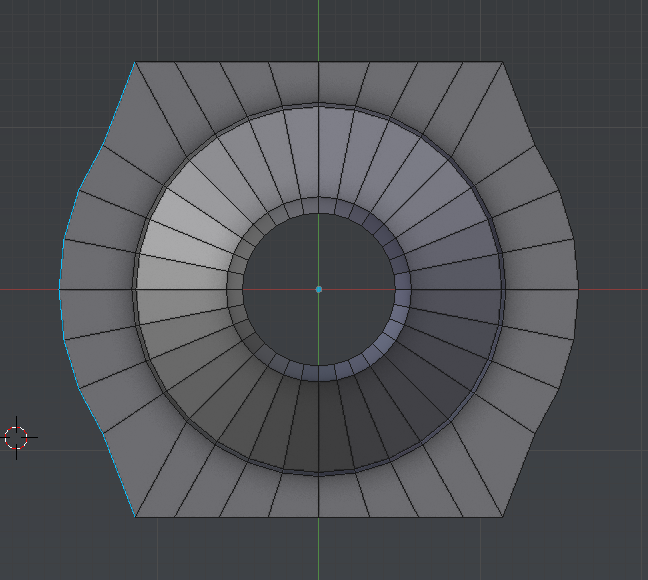
Hit S to scale, but this time hit X to constrain it to the X (left-right) axis. Hit numpad 0, and…
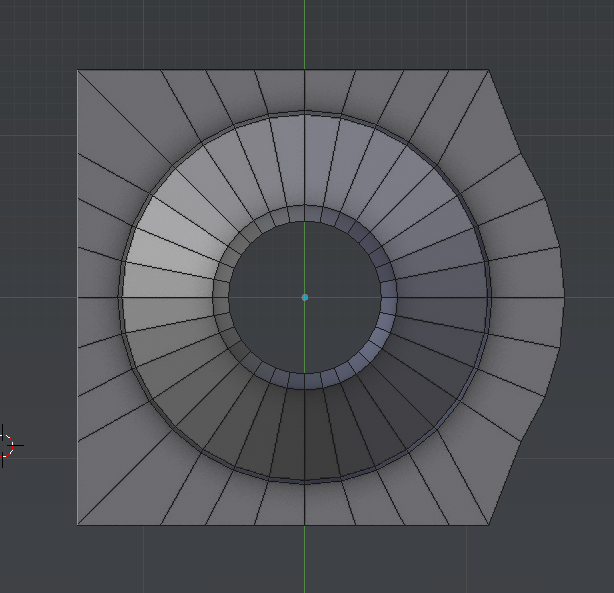
Now we’re getting square. Do the same thing on the right side. Select your edges, hit S, X, then numpad 0, and…
Voila. A square base.
Next, select the edges of your once circle now square, hit E to extrude, Z to constrain it on the depth axis, and pull it down.

If you want to fill in the bottom, hit E to extrude (you’re probably seeing a pattern forming by this point), S to scale, pull it in a good ways, hit alt+m, and tell it to collapse at center.

Normally I don’t like doing anything that makes a bunch of tris, but…eh, you’re still a learning. Worry about that stuff later.
And there you go.
It’s better to eliminate bad practice early rather than getting used to it and then trying to undo what you’ve learned later down the line. This said, I don’t think there’s a real problem here, all that simply needs to be done; delete the triangle fan, select the bottom-most edge, extrude in about 50%, then merge at center. Simply turn the triangles into quads. This minimises the ‘triangle fan’ on most models.
If you need them as connected geometry,
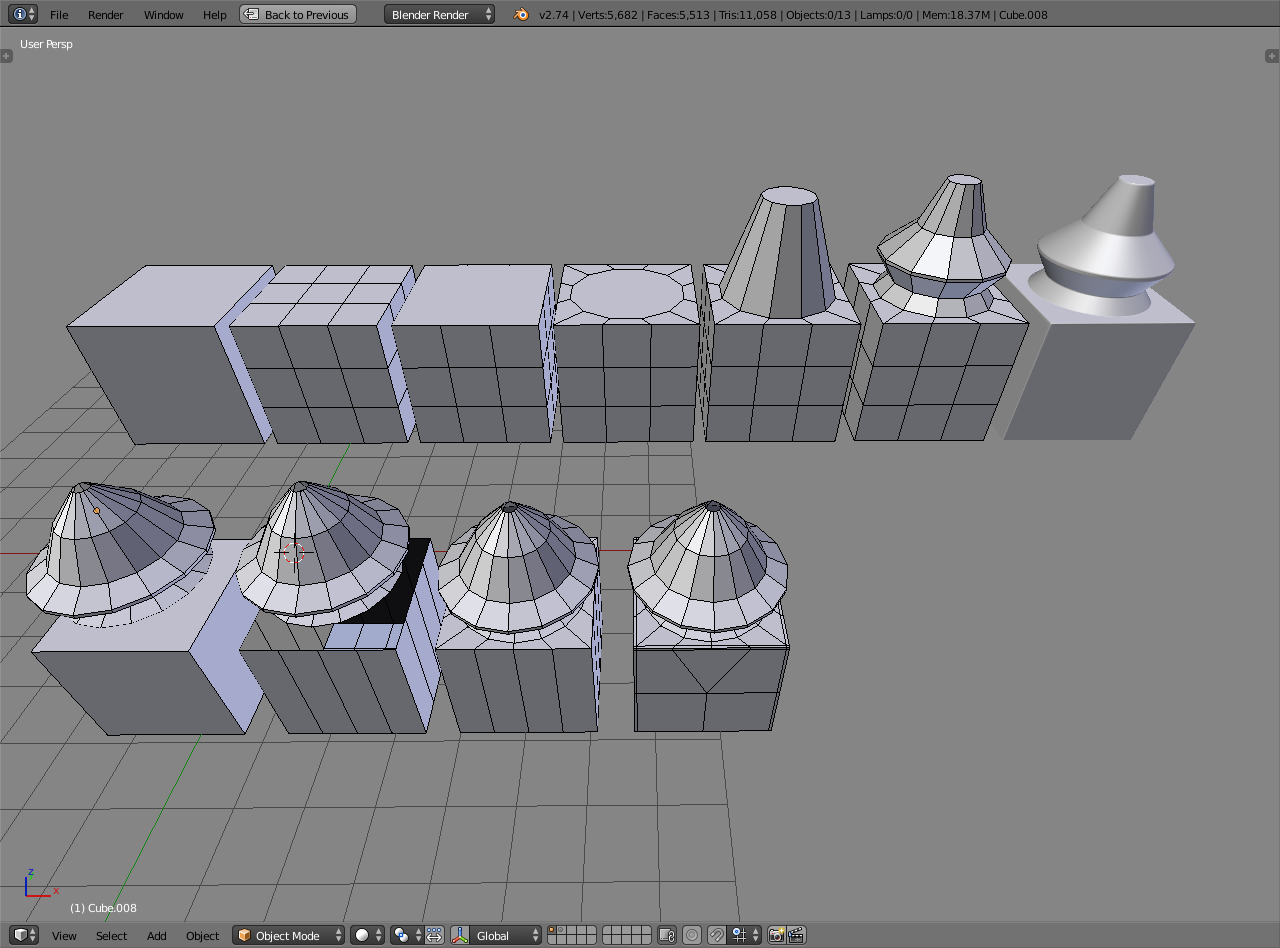
Top row:
- Cube
- subdivided
- top faces turned into an n-gon
- inset, and turned into a circle with looptools addon: circle
- extruded up, scaled
- added loop cuts and formed the top
- (additionally mesh is made suitable for subdivision surface)
Bottom row:
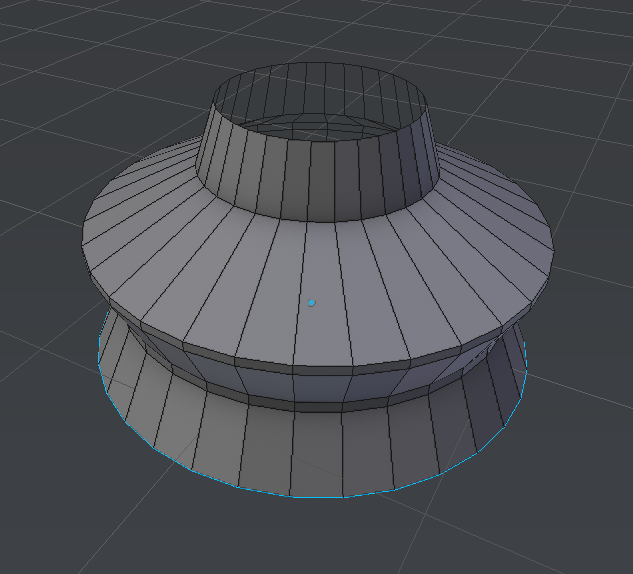
- The top and a cube as separate objects
- top face removed from the cube, don’t actually need the bottom ones either. Subdivided vertically
- top moved with vertex snapping to align with the cube vertices on top, objects joined (ctrl+J), edge loops selected from both and W -> bridge edge loops which closes the gap
- bevel on hard edges, loop reduction in case the squared off part doesn’t need as many faces later
This is very true. Though collapsing to tris isn’t really a bad habit unless you use it way too often. To me, it’s more something you grow out of the better you get.
You are now officially my most favorite person ever of all time. Being able to make circles in my geometry with a press of a button is something I’ve wanted to have for a long, long, LONG time now. Up until now, I’ve done it by hand, because I didn’t think I had any other choice.
Why is this not in Blender by default? It’s too damn handy.
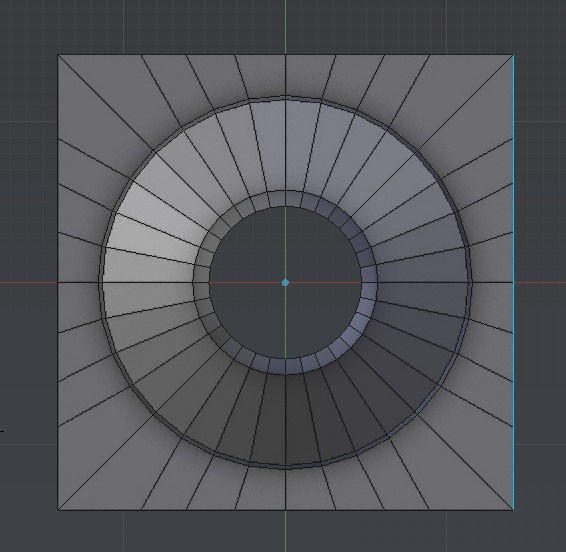
It is possible to create circles with to sphere too, but it can give a different result than looptools circle
- This is what happens with default median pivot. Selecting vertices and then alt+shift+S, 1, enter
- Would need to change the pivot for the selected elements and there is one vertex in the center and others should go around it, so could use that center vertex by using active element pivot (alt+period) and then to sphere
- or, turn that to an n-gon so the median pivot makes sense and then to sphere
- but looptools: circle works better/faster in cases like this, where the vertices has to be moved on a circle and the space between should be equal. With to sphere they’re moved on a circle but the spacing is not equal
4b. where as with looptools: circle they are
Edit:
Of course there are suitable variations of that. Also, object scale affects many tools and both of those aren’t exceptional. If object scale is non-uniform, you get skewed results.
Results from making a circular shape n-gon with to sphere and looptools:circle. The object scale is non-uniform so they’re not circular at all. Would need to apply object scale first (object mode, ctrl+A -> scale) and then go back to editing.
You deserve a beer, sir.
I played around with both the loop tools and to sphere tools in different circumstances, and it seems each has its pros and cons. I took it one extra step and tried to make holes in my geometry along a curved surface, and the results were decent, but not quite as good as I’d like. You could still see a few dimples on the surface when I turned on subsurfing.
Making circular holes in complex geometry is my biggest bugbear when it comes to modeling. I can do it, but it takes me for-freaking-ever to tweak everything until it starts looking good. I think I might fire up a post about it, because right now, I’m kinda hijacking this guy’s thread.
Wow, thanks guys for all of the responses.
@JA12, The Loop Tools add-on has been fantastic. My only issue is that I can’t get the faces to merge into one n-gon. E.g. in part 3 of your diagram where the four squares turn into one. I’m using alt-M however I’m guessing thats the wrong type of merge.
Could do the selection and pressing F should turn it into an n-gon. Another option is to dissolve the vertex in the middle (X -> dissolve vertices). Third option is to keep the quad faces and make them circular with looptools:circle. Could also do that with to sphere by deselecting the middle vertex, or by using it as the pivot point.
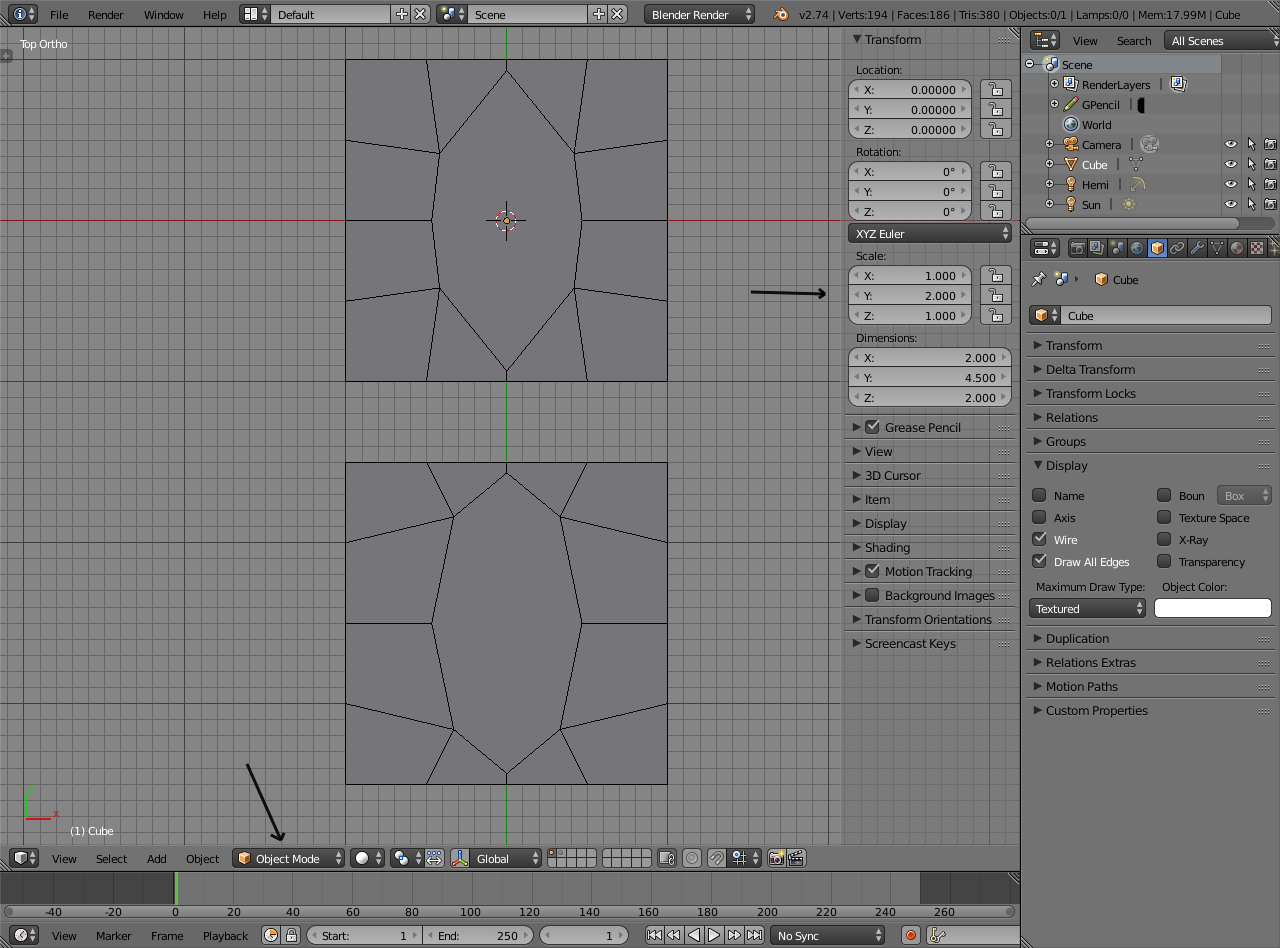
Ok, I think this is my last question and then I’ve finished my first project.

I was wondering to why I can’t loop cut the selected face as shown in the image above. Everything else can be cut so I don’t think that it is because of the mirror modifier.
The reason I ask is because I am trying to give it better topology so that I don’t have to use creases in order to get sharper edges. Also I am curious as to what I’m doing wrong 
Here’s the file:
TrophyBlenderFile.blend (137 KB)
Whew. Man. You went all kinds of crazy on this thing. You have coplanar faces, and all other kinds of weirdness. I’m not exactly sure how you managed to do it, but I bet it would’ve been entertaining to watch.
Good thing it’s easy to fix. First off, for the sake of simplicity, turn off all your modifiers. Next, while in edit mode, hit A to select your entire mesh, hit space, and start typing “remove” until you see “remove doubles”. Hit Enter. You’ll see it cleans up around 170 verts.
Next, for the sake of it, hit space, and type “make normals consistent”.
Now, along the smaller side of your base, the one that’s running along the X axis, run 3 edge loops by hitting CTRL+R (in case you don’t know), and scrolling the mousewheel up until you have three lines running through the base. For the side of the base running parallel to Y, run 7 loops through. Next. Hit K, and start connecting them one at a time. See how all the loops end right at the ngon? That’s a good thing, cuz next…
Hit K to activate the Knife Tool. Hover the mouse over a vert, it’ll snap into place, and you’ll see a slight red circle surrounding the green dot. That means it’s locked to that vert, and will make a cut from it without making any extra verts. Hit LMB, then move the mouse down to it’s corresponding vert along the base. Hit LMB, and you’ll see a line connecting those two verts. Hit space to drop the Knife Tool.
Do that for each part until you end up with nothing but quads again.

There’s also a few other places where you have ngons that can be easily fixed with a couple of vertex welds and an edge dissolve. I’ll post up where and how when I have a little more time tonight.
Okay, I’m back with more time. I was going to show you how to make a diamond quad at the base of your handle, but realized the way you did it was kinda weird. It’d be better to do it with insets.
What I did was deleted your handles entirely, dissolved all the unnecessary edges, and basically rebuilt the trophy back to its original shape. Then I grabbed two faces, inset it to the size I wanted (with a bit of playing with scaling here and there since it didn’t seem to want to inset evenly), deleted the faces in the center. Then I switched to edge mode, hit alt+rmb to select the loop, then hit E to extrude, and Y to constrain it to the Y axis. Since there was a slight curve, I went ahead and evened it out using the scale technique I described above. Hit S to scale, Y to contrain it to that axis, and numpad 0 to snap all the verts in your edge loop together.
After that, I switched to a left ortho view, hit E to extrude out a bit, R to rotate it, and G to adjust to taste. Sometimes I’d go back to an earlier loop by hitting alt+rmb to select a loop.
Remember, you’re subsurfing. You don’t have to define your geometry in exacting detail to get a curve just right. Only worry about the basic shape. You can always add more loop cuts in later to further define it.
Once I got near the end, and started closing in back on the body of the trophy, I did the same thing I did above to another two set of faces. I hit I to activate inset, got it into the shape I wanted, then deleted the two inner faces. Then I selected the loops on the end of the handle and the trophy by holding down shift+alt+rmb, hit spacebar, and typed “bridge” to bring up Bridge Edge Loops. Once I was done with that, I tweaked it to taste, and…
Also, I merged your corners together so it’d make more of a gentle curve by selecting the verts to the left and right of the corner vert, then the corner vert last, hitting alt+m to bring up my merge menu, and selected To Last along those corners to get better geometry flow.
This is pretty digest, but you should be able to see what I did from the .blend file.
Ok I’m going to go ahead and mark this as solved, I’m really happy with the result:

I also wanted to thank all the people who contributed to this thread, it really helped.
@Renzatic, thank you for the step-by-step walkthrough around n-gons and my weird modelling, I’ve been able to go back and use the advice to fix some of my earlier projects.
@JA12, thank you for the detailed descriptions about parts of blender that I hand’t even thought of. Also your other posts on the forums and other parts of modelling have been very useful.
I’m now going to start looking through materials.
Once again thanks guys ![]()
BlenderTrophy2.blend (611 KB)
How did u turn them into a n-gon?