Alright, I finished this quick little thing yesterday. I don’t know if this shows the full extent of my skills, but what it does show is that I really don’t know that much about Blender despite having messed around with it for years. I never took the time to learn, I just kind of did little things with it.
So, here it is. I should probably get a better shot of the guy, but there isn’t much to see:
You are right about it showing the limit of your Blender skills, but it also shows something else. You included some originality and creativity in your scene. No amount of technical talent can cover for a lack of creativity. Nice job:)
This is just a little thing I came up with in order to show the bit of skill I have with Blender. I might build on it, but I don’t know if I want to go on to something else. I might use this thread to show my progress over the next few days or weeks.
it seems you know how to bevel… (or ‘extrude’ in blender). try going extrude-crazy. start with a box, and see if you can make a tentacle, or a tree branch, or something like that. If it looks bad, don’t worry, delete it and start it again. or just move it to another layer if you want to go back to it later. That kind of thing is a good exercise that gets you used to using basic tools like extrude, scale, etc, and you can actually make some pretty cool things with it.
I agree with dma88 also possibly add subsurf modifier to make it look round trust me you can basically make everything with it but the only problem is it increases the faces. If you don’t know how to subsurf there’s this little tutorial I made on subsurf and materials and other things(I will attach it if you don’t have word contact me if you do wanna see it. the link is: http://www.savefile.com/files/1539549 sorry but i still didn’t edit it so if it’s not quite Beginner friendly then contact me(If you want to go through it that is). Hope this tutorial helps.Please don’t hesitate to tell me any problems you have with this tutorial or anything else.(I will try to help you but i am not an expert)
I like the original thinking. You should make a background for your scene, and possibly change the perspective (just to try it, I’m not sure if it would actually look better). Its just that the perspective camera view + orthographic tetris… I don’t know. Since this is 3D, you could always try to do 3D tetris.
I did use subsurf on the guy, so I’m not a total beginner, I guess. School has been cutting into my time to learn more blender stuff, so I’m going to try to work on something else this weekend and I’ll see what comes out.
I started sing Blender about a year ago (and was my first 3D program, I used to just use photoshop). When I was making things I found that I was learning something new and before I finished that model I was experimenting with the new thing I found. So after this vicious circle continued for months, it led to a huge array of unfinished stuff.
However, given that I’ve only been using blender for about… I dunno 14 months, I’d say my progress is worthy enough to claim that this is a good approach
If you see something cool. experiment… wanna know what a button does… go ruin your model because of it… It’s only when you’re happy and/or comfortable with the tools you are using that you’ll actually create something worth keeping and labelling as your own work.
Oh and join contests and always raise the bar a little too high for yourself Welcome to Blender
Sorry if I shouldn’t be bumping such an old thread, but I’ve made a bit of progress since the last render I showed you guys.
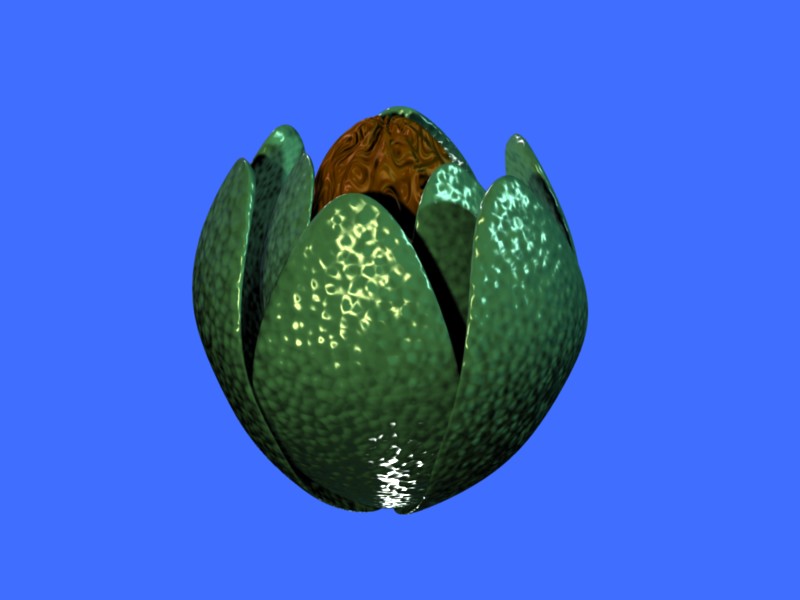
I think I’m going to try to expand on this, but I don’t know when. I spent hours just tweaking with the shading and bump mapping, trying to get it right, but I can’t seem to figure out how to make it look perfect. Anyway, here it is, two shots with slightly different lighting:
Now that I look at the thumbnails, I think I went overboard with the bump mapping, but it looked nice from the render. I might tone it down and post the results if you guys want me to.
That would look like a nice avocado peel material if it were less shiny.
Chris_N has a good suggestion about experimentation. Just use Save As to start a new named file when you start your experiments, in case it doesn’t work, you can toss it and not loose the earlier work.
I thought I wasn’t going to get any replies. Thanks.
I meant for it to look shiny and kind of wet, I liked it that way. The thing is, I still don’t know too much; Today I tried doing the missile in the newbie project thread, but I failed and I couldn’t even make that seam. That’s one thing I want to learn to do: Make seams in my meshes to make them look nicer rather than flat. I still have no idea how people make those cool-looking ships and robots, but it seems to be only a few steps away. I’ve learned a lot about the curves and I might require a bit of review, but so far it’s been a bit of a breeze learning, and I really really enjoy it. I just need that bit of knowledge that will allow me to explode so that my creativity can pour into my modeling.
I’m going to experiment a bit more with modeling, but if anyone has any good suggestions for stuff like beginning actual modeling and setting up lighting, that’d be great. I think I know enough to get started with that. I just need to experiment with meshes and curves and such a bit more. I’m still not that great at lighting, too.
Ah yes, I remembered that after I had posted my message. When I do that, a lot of the time the rendered result looks weird. I don’t know how to fix it, but I’ll post an example unless you know what I’m talking about.
Anyway, I saw a tutorial a month or so ago that taught an alternative way, but I like edge-creasing except for the weird visual result. How do I fix that?
A common cause of weird visual results is normals pointing the wrong way. To fix it, select all vertices (in edit mode, type a) and then type ctrl+n (recalculate normals outside.)
The second most common cause of weird visual results is doubled vertices and interior faces or edges. To remove doubles, select all vertices and type W>>Remove Doubles. To find interior faces or edges, add a subsurf modifier and look for places where the smoothed mesh pinches or creases or seems to get pulled into the mesh.
Set Smooth can sometimes cause weird visual results, and selecting Auto-Smooth (Editing buttons, Mesh Panel) or using an edge split modifier can usually fix them.
Thanks. I tried making something quickly (a briefcase) I noticed the strange visual result that you’d get from not recalculating normals, but I didn’t think about removing doubles and using auto-smooth.
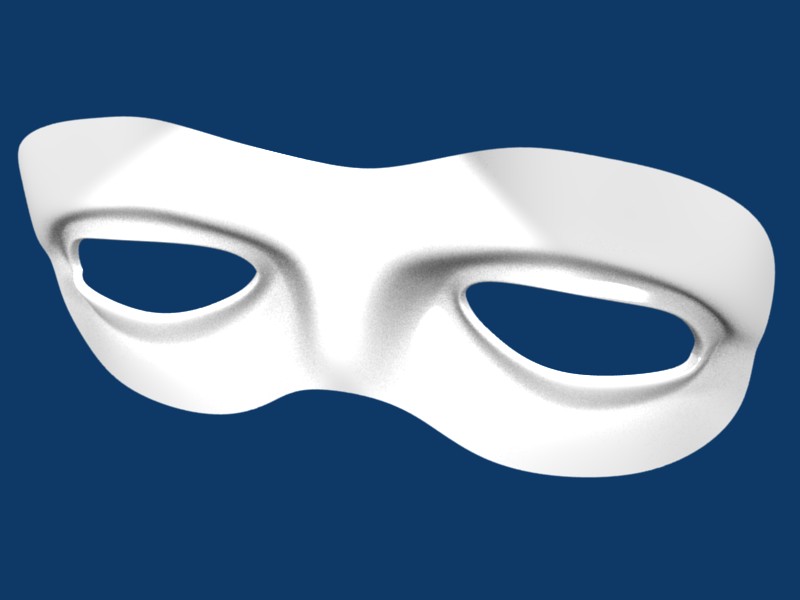
To add to my progress, I created an eye(loosely following a tutorial), duplicated it, mirrored it, and then attached the two eyes together. Then I raised where the bridge of the nose might be. It looks a bit like a mask, and I rather like it. I have two images; the first one is with ambient occlusion turned on, which brightened the entire scene quite a bit and made the object white, so it looks like a mask. The second one is with the Fresnel shader and a bump map texture to make it look a bit more real or alive. At least I’ve made a bit of progress.
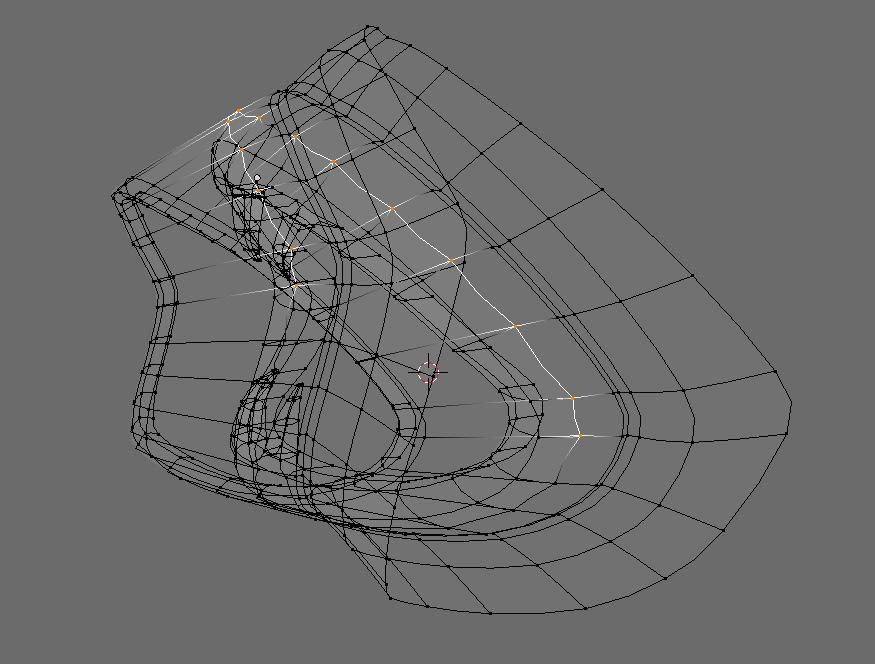
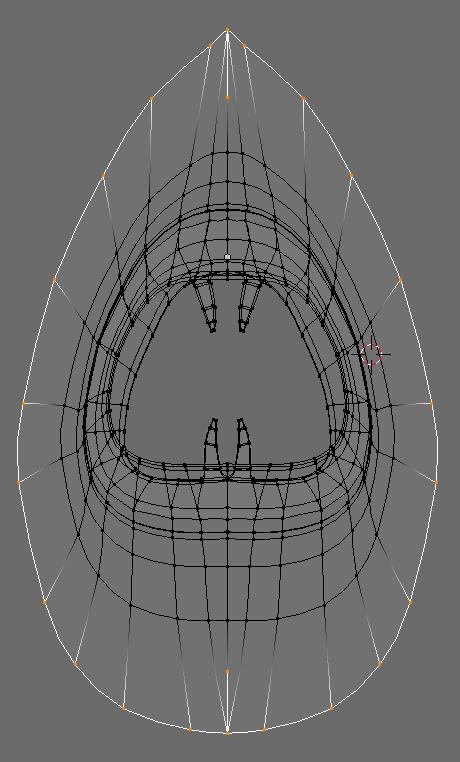
I seem to have run into a problem. I’ve been trying the mirror modifier, but I can’t figure out how to use it correctly so as to not make the model mess up when I scale parts of it or move some vertexes around. Take a look at the bottom of the post.
In the colored image, the normals are quite visibly messed up. Also, there’s something wrong with an edge loop in the middle of the forehead-like region, as you can see, because of some shading issues. I looked at the wireframe and one edge loop has squiggly edges inside, and I can’t figure out why. Another issue is with scaling: when I extrude the outermost edge loop and scale it, it goes in a strange inward up-and-down direction and it makes the quad turn into a triangle when it gets close enough to the seam. I don’t know if it’s because of my own fallacy or whether you’re just not supposed to do that. I don’t know any workaround right now, I’m still a beginner.
I’m thinking the reason why there’s that shading(not the normals) problem in the shaded picture is because, if you look closely, I extruded an edge loop out to encase the mouth within another, and that might have created the weird squiggly effect. I wanted to make that encasing, but I didn’t know that’d cause problems. Any way to fix it?
I don’t know why the normals are flipped(around the teeth where I attatched them by creating faces between the teeth and “gums,” and some places inside, if it matters). I had to re-flip them in weird ways, such as making some point inward to make it look normal. If you want to see an image with all normals calculated outside, just ask.
Anyway, any help would be appreciated. I want to start making creatures and faces, but this mirror modifier has halted me. Any advice on using it would be nice.