Holy majog! That was NO fun!
Okay, this thing I’m just pulling out of render. The flyby was supposed to go on till the cam flips around and watches the ship recede from view, but… I was advising zen and buddhist chanting and patience and everything when dealing with a BI render, but Yoda and Ghandi would have been ripping each other’s faces off at this point. It took a while.
I believe I started the render on this monster at 9:48pm on Sunday. And I had to shut it off a few times during so that I could do other things on my machine. Otherwise, it’s been chewing my CPU this whole time. I’m sick of it. So, this is probably my last BI render. I’m going to learn as much as possible about Cycles from here on out. OL77’s BICycles hybrid above could prove quite useful, however. BI is good at doing distant things and doing them rather well. But for a big object close to the cam, it just sucks. And that’s what this whale is.
Difficult to make out scale here, but simply put, it’s a city with a big solar sail and FTL engine strapped on. A work in progress, the model’s basic shape is there. I’ll make minor changes to it over time, but this is the general outline.
Sorry for the shimmeriness on the citylights texture. I didn’t UVunwrap it. Instead, the only approach I could get to make it look like tiny lights was to simply select UV and leave it unwrapped. Unfortunately, I used raytrace for almost the whole video. During the flyby (when it really became agonizingly slow) I switched to approx. That stopped the shimmering, but it also introduced that weird blue blocky artifact from the reflection of the engines. So, yeah, Cycles…
Anyway, here’s the monstrosity.
Why is it so noisy?
Because the “city” structure is not UVUnwrapped. The best look I could get for making little “skyscraper”-style lights all over the surface was to leave it un-UVUnwrapped, then set it it UV. I tried everything. That was the best I could do.
Unfortunately, I also had to set it to ray-trace. Setting approx caused a big blocky blue reflection from the engines to appear in the center of the hub, just hanging in space. I tried a lot of things, and couldn’t get that to go away. I wasn’t sure if it was going to shimmer like that during animation, so I gave it a shot.
Only when I was done with the turntable animation did I find that the shimmering was completely unbearable.
Setting for Approx would have cured that, but you then would have that ugly blocky blue reflection all over the place.
You can see halfway through the flyby that I did exactly that. The shimmeriness disappears from the citylights texture. But that’s when the blockiness shows up too. Like I said, this is a monstrosity.
So, it’s more a lesson in “WHAT NOT TO DO” than anything else.
I was going to make a WIP thread for it, to get crowdsourcing on the modelling. But this was so horrible a render that I decided instead to put it here, as an illustration on something that I hate about bad animation.
My next stop on this model is to do a Cycles version. I tested this close-up shot in Cycles last night, and it just flew. Texturing will be more of challenge. But my GPU makes breakfast out of this model. The BI was taking hours to do a couple of frames on the flyby close up. That’s why I killed it half-way through.
I suppose one could say that this thread is an exercise in planned obsolescence. That flyby portion of this render proves how much BI sucks at handling a big model with a big vertcount close up with anything resembling speed. However, as you’ve pointed out before yourself, it is good at doing big things in the background with some artfulness. Planets for example. I think it still has use, but that use will be best, probably, with your BICycles hybrid approach.
was it over sampled? Full AA or anything?
Nah. I just used AA8. What I always use. (11 takes FOREVER, and this was already taking FOREVER. Three days of nearly continuous rendering. Seriously: Cycles is the way to do a big model close up. This thing just flies in Cycles today.) It’s because it wasn’t UVUnwrapped and the lights texture was just on the UV. It never happens when you use Approx or UVUnwrap something.
Thanks for watching, though 3Point. Sorry it wasn’t up to the quality that Dan puts in Giant Spaceship Thread. I’m going to redo it as a Cycles animation tonight though. I’ll make a new WIP or FC thread to crowdsource about the model. Hope you guys will all turn out. Maybe we can talk Dan into getting serious about Cycles… ![]()
Lets face it, he isnt doing to badly without it! I think you should post a comparative still here from BI and Cycles. Just so anyone seeing this thread knows why it died.
Yeah, you’re right. I’ve been working on it in Cycles a lot today. I’m having a lot of trouble getting the citylights texture to map in a similar way as it does here. But I haven’t bitten the bullet and gone to UVUnwrapping (I hate it sooooo much…) yet. So…
Yeah, you’re right. I’ve been working on it in Cycles a lot today. I’m having a lot of trouble getting the citylights texture to map in a similar way as it does here. But I haven’t bitten the bullet and gone to UVUnwrapping (I hate it sooooo much…) yet. So…
Listen, I used to avoid UV unwrapping like the plague(And still do), but really, the bark is worse than the bite. ![]()
+1 I hate it too, perhaps elevation projections would be better unwraps for you. Although all those round shapes would probably kill you with image stretch.
Exactamundo.
However, as OL is saying…
I was trying it a while back when I first started wanting to do animation on this. But it was pissing me off. So I switched to BI, and the UV look got what I wanted… except then, as animation (after a million year render) it was shimmering like a nuke victim toasting bread.
I’ve been playing with today as Parametric and getting a very nice look.
I’ll throw some animation out for it, probably tomorrow, from Cycles…
Watching the render play back full screen certainly works at the end (fly in) but only at a certain distance. Too far looses detail, too close looks yuck (bad detail).
Can’t wait to see how the rest looks. Why was it flickering anyway? Blender Foundation (open movies) seem to be able to create huge textures that don’t flicker so much.
As I said, it does that in raytrace if you don’t UVUnwrap. It’s just something you have to expect. That’s why Cycles absolutely requires UVUnwrapping for any form of animation.
In BI, you can map to object and get away with it if you use Approx gather. But not raytrace.
We just have to start watching and doing some killer UVUnwrap tutorials, and get real good and used to it.
We’re all about to become Old Hands at UVUnwrap, come hell or highwater. Mark my words…
Today’s experiment with Blender Stars while watching the Occupy protest in Rome get ugly…
This was three different renders, in succession. The first two are 250 frames each, simply keyframing the star SEP from 2 to 25.
The second and third I used a Render Layer node setup, and the third I dropped the keyframes on the Star SEP out, leaving the SEP at 2. The cam simply moves straight forward through the star pattern, although on that one I did increase the cam clip end to about 400.
The node setup was simple, just a Lens Distortion and a Fog Glow Glare.
(If someone can tell me how to take a snapshot of the whole screen like they do to post node sets in Cycles Tests, I’ll post the nodes here…)
Ah, Schubert. Great job with the stars.
Use a screen capture program(I use ScreenHunter for stills and BlueBerry(BB) Flashback Express for video).
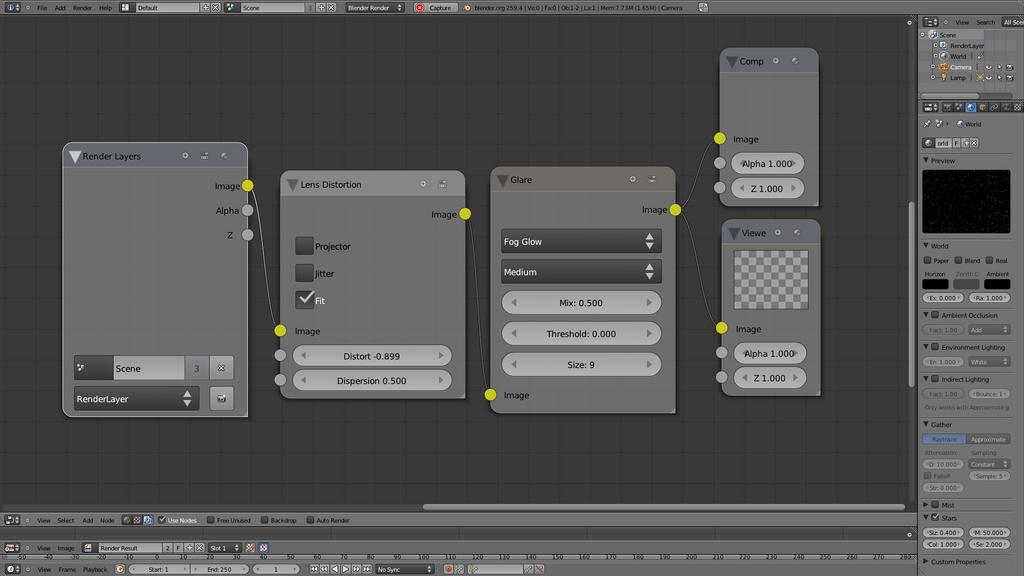
The nodes for the above Warpy animation.
(Thanks to ZanQDo for telling me about Alt-F3)
(And thanks to Animaniac for an alternative approach; I’d use screengrab software more, if it weren’t for “Unregistered fraps …” on the screen; good for blowing crap up in a Flanker mission, though  )
)
Ok, I am sold on Cycles. I just stuck an old project that had heavy post-pro with DOF, through Cycles. The results are (spotty) but amazing. No more stupid pretend blur. But no GPU for me, work machines are dumb office hacks. Oh well 
Sorry to hear it, but glad you’re getting into Cycles. It really is amazing. I’m just uploading the new animation of the Fleet Carrier we were discussing, now in Cycles. I’ll post in Cycles Tests as soon as it’s processed on YouTube.
3Point, if you can, I’d save a little to get a new home machine, and then a decent graphics card (a CUDA one, for sure!) I think Cycles would floor you at that point.
I’m also starting a new thread with this upcoming animation render in “Focused Critique” to crowd source on this model and some of the others I’ll be working on. Hope you and all the other Giant Spaceship Thread denizens might drop in from time to time with your usual good critiques…
Later ![]()
Here’s a space test I did:
The main purpose was to test 2 things: a glow effect and a sort of space flythrough effect(?), which I sort of screwed up by forgetting to keyframe the dispersion along with the distortion. I would change it, but Blender crashed at about 230 something frames into the animation, and I don’t think it’s worth redoing it for 15 minutes and waiting an extra 70 minutes to render.
Hey, that’s pretty cool animaniac. However, I think the only thing I keyframed in mine was the cam movement (at least in that final chunk.) I didn’t keyframe dispersion or any of the nodestuff. ’
I guess, though, what you’re trying to do is to get the effect of it starting the warp by keyframing the dispersion so that space looks normal, but then starts to get that smear effect…?
It’s a cool start anyway.
A new attempt, this time focusing on the acceleration effect, I think the blur and dispersion should be focused at the end.