That might work already if you’re using the mannequin skeleton for the mo-cap and/or can export the animation from the mannequin in UE4.
1 Like
The trouble is there are many different ways to rig and weight paint a custom character mesh so auto-rigging to the mannequin is kind of tricky without compromising the original deformation of the mesh, currently in the next update the export script is unlocked to work on any mesh/armature in case i don’t have a proper system in place by the time it’s due so at least those lovely customs can be easily exported with their own armatures at the right scale.
One idea i had was moving away from the auto-rigging weight idea and implementing a scaling system so a user could scale the mannequin to their mesh. With a system like that the user could simply control proportions through animation instead of rigging. So you could blend between animations depending on different character proportions using the same skeleton, this would be really good alongside shape-keys for morph-able characters that could… grow from child to adult over time for example.
2 Likes
Just in case people are not aware there is an unreal engine stream where a guy is showing how he use Mr Mannequins with UE4 and he explain in detail procedure like how he mix upper body animations with lower body walk cycle, it’s an excellent stream if you are in the character animation workflow in UE4;
2 Likes
Much love to Matt Workman, you should subscribe to his YouTube channel, sometimes he does his own Blender + UE4 streams! https://www.youtube.com/channel/UCnw2-4hXY26-W2w9Ja9GBvw
1 Like
Will surely do thank!
Just about figured out a two step re-targeting process!

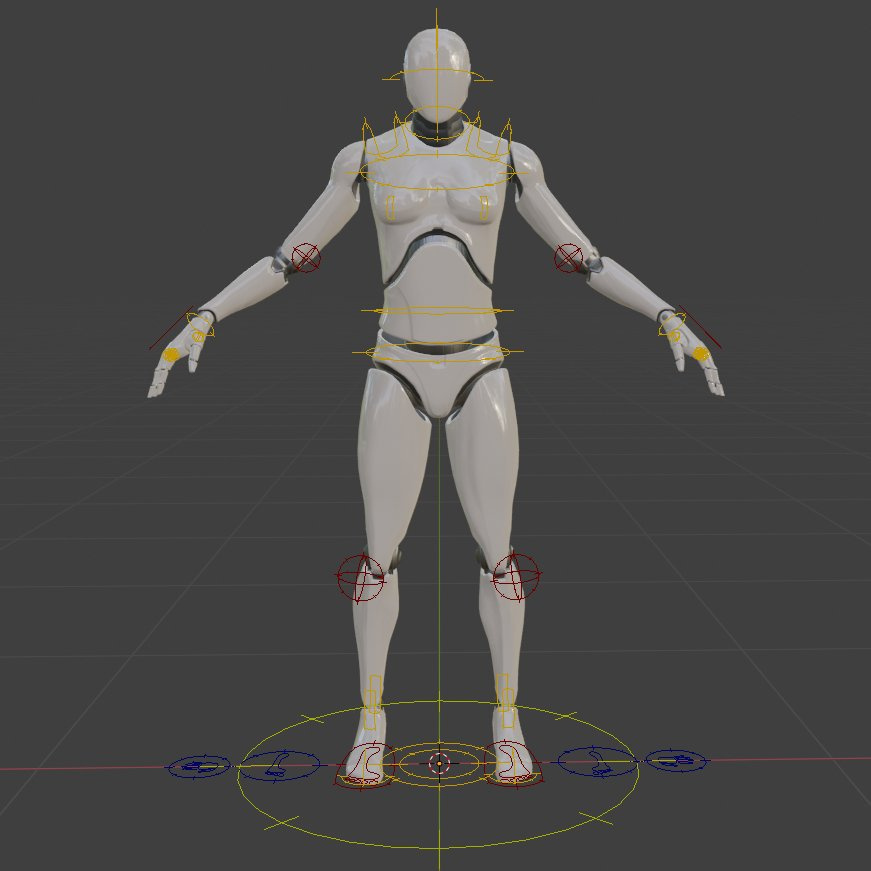
The idea is you will import and/or click a retarget button on any armature that is not already the mannequin one, which sets a template mannequin armature up like this, then the user can tweak things before clicking an apply button to set everything into place and add in all my IK chains and control bones and constraints.
The purple bones are ones that user will likely need to rotate into position (they are end bones so i don’t have a location to set their tails too) and the yellow bones are probably where they should be but can still be tweaked if needed.
(extra bones do get created as well but i’ve hidden them so you can see what’s going on)
What do you think?
3 Likes
let me see if I understand this idea correctly-
- Bring in arbitrary humanoid mesh with armature
- Click some sort of retarget button
a. this does some magic to create a highlighted, editable copy of the mannequin armature? - Adjust the highlighted armature to fit properly
- click some bind button
a. this makes the bindings, controls, etc as the new default pose for the mannequin armature? - Rest of workflow remains the same
Is that correct? Does that mean re-weighting to the mannequin or does it tie the controls to the original armature? I’m having a hard time seeing how an arbitrary skeleton could be tied to controls without mapping the bone names and further steps.
Alternately, is it perhaps using the bone hierarchy to create the template which you then adjust, basically just applying rig controls and anims are simply on the original armature on export?
Either sounds like real wizardry.
1 Like
You are pretty close!
-
Yeah pretty much! Though for now this is designed for armatures that have been exported from UE4 and use the mannequin skeleton but might of had their rest pose changed (like in the example of Boris i showed) though it should work on any armature with the same bone names.
-
Click a re-target button after selecting the mannequin template from a drop down menu (so i can add in more templates)
a. it loads the control bones of a template and snaps them into position on the target armature, from which i can create the rest of the controls when it gets applied (some mechanisms like the foot roll and twist bones require specific bones rolls in relation to other control bones) -
Yeap primarily adjust the purple (and green extra bones that i havn’t shown) and it is possible to also edit the yellow control bones if needed.
-
Hitting the bind button will apply the templates position to it’s rest pose, then join the armature that’s being retargeted into the template armature and force them to follow the control bones when animating and then generate all my rig controls like the IK targets and foot roll mechanism etc.
a. Almost right, it will create a new Mr Mannequin armature which has been fitted to a different skeleton. -
Workflow should indeed remain the same, at least the export does, importing animations should work but i haven’t tested it yet.
This does not account for weight painting on custom meshes… yet! But there shouldn’t be any need to to change any weights on a mesh that’s already rigged to the armature that gets retargeted.
When it comes to mapping bone names, to begin with it will only pick up bone names that the template uses, though i’m planning to create some lists of common bone names to check from in order define what gets snapped where. So renaming a non-mannequins bones to fit the mannequins naming should get this to work on any humanoid 
Just like the default mannequin rig in the add-on, all that gets exported is the deform bones of the armature, no matter which way they point in Blender they will follow the control bones which don’t get exported
I think i’ve explained that as best as i can 
AH. I see. So Boris there has the altered rest pose of the default mannequin - the black armature and that is simply made into children of the new copy which is then used to generate the rig and the exported anims are deform only on the original skeleton in black. Makes sense, given trying to do literally anything to the skeleton from UE4 in edit mode destroys it on export. 
Something like this article under the hood perhaps?
https://connect.unity.com/p/retargeting-animations-with-blender-2-80
bone lists… This would be interesting, but I have a slightly interesting idea: what if there was say, a list where you could click on the retarget bone, and pick the bone from the source you want to map it to? Ideally, this list could be exported to reuse later 
That would make a way to say, push animations from mixamo, or bvh files like http://mocap.cs.cmu.edu/ to the mannequin or even the other way around… Anyway. Just an idea. Now I wonder if there’s an addon already that does the empty>empty retargeting method. 
1 Like
Yeap, a lot like that article but using bones that also don’t get exported instead of empties.
The choose a bone to target thing i had already planned to implement, but not quite in the way you mentioned… why didn’t i think of that! hahaha.
The only problem with doing that exactly as you said would mean getting rid of all the extra bones that get generated if they aren’t in the template rig, which i could do when the a new bone gets selected but there could also be problems with the parenting of the template… it would also be a lot of work for a user doing every bone by hand if none have the same names… perhaps i could still use bone lists to kick off the setup before the user has to start manual re-mapping…
I’m sure i could figure it out, i’ll definitely be trying to get that working thank you sir! 
I will test the retargeting as soon as it’s available, I think it could work well.
i guess some people like to do animations on the mannequin… I don’t really… it’s a robot… the weight paint is not matching with a normal humanoid weightpainting… can’t test the twist bones etc… so it will be nice when i can import a real (virtual) human.
Gettin different skeletons into the system would be nice eventually (mixamo, makehuman, daz whatever)
Below some feedbacks about the current mannequin rig, consider that I’m not an animatior, just getting into it as a hobby.
I mostly have experience with the rigify rig (or the autorig pro one which is 90% the same regarding the controls). Some things I miss:
-independent hip rotation which leaves the rest of the spine in place
-I don’t really like operating with poles, so i much prefer rigify’s approach of rotating the upper arm on a single axis to position the elbow.
I found that in some cases using FK in switchable mode the IK stiffness became too limiting, the rig couldn’t do motions that I can in RL.
That’s it so far,
Great work!
1 Like
The advantage of making animations on the mannequin is that they can be sold on the UE4 marketplace i guess, his twist bones work fine, some of his weight painting is pretty bad on the torso for a human, but then the mannequin is made of solid parts not bone and muscle.
One thing i cannot stand about him is his hands, specifically the finger tips, they have a bad rest pose to use IK with, luckily with the way this add-on works i’ve set the control bones up to be IK compatible there… though i can’t fix the fact that his metacarpals would be tiny, his wrist (carpals) would be huge, and the base of the thumb is way too far forward… other wise most of his points of rotation are pretty good… for a barrel chested, hunchback, half robot, super human with no face lol
I think the hip rotation would be as simple as turning “inherit rotation” off for the first spine bone, i thought about putting it in as an option and it will probably appear in the interface at some point.
There are pro’s and cons to pole targets, ultimately i find they make animation much quicker at the loss some manual control, that is a good idea for an option though, i’ll try and work it in at some point 
And yeah the IK limits here are a little tight but they are pretty close to real for the mannequin, i’ll be adding them to the interface in the near future so they can be changed and/or keyframed more easily
Honestly i can’t really say too much about rigify or auto-rig (or any other rigging add-ons) i’ve never used them, always done my own rigging and i’m a bit OCD about custom shapes too hehehe, from what i’ve seen there are a half dozen animation systems that i can put in as options (eg, mutilation switches) that might never be included in other add-ons due to their complexity
2 Likes
Sometimes we all get caught in the technical side of how to code it and miss a small idea that seems obvious as soon as someone asks. I know I’m guilty.
And thinking about the exported list again… That can even be shared for others to use, too! I’m now imagining obscure skeletons from stuff I’ve never heard of being shared in a personal delusion of grandeur.
Maybe shared lists will be enough to cover common skeletons, but I think rigify uses some sort of hierarchy matching that might be worth a look later on if not? Probably hard to do, but humanoids all have similar joint structures, so maybe? Might be hard to get it to a state the user can verify it before committing though. that’s a tough one. Selecting bones auto selects the child bone so they both highlight? Eh. Problem for another day.
1 Like
Look really interesting that re target feature and would save a lot of work.
Also what would be amazing is a dismemberment system since most system on the unreal market place are not very good or too cumbersome to setup and they are not replicated for network.
1 Like
Yeah i was thinking along the lines of searching bone names for strings like “arm” and “leg” and then checking parenting to set up lists, this current armature re-targeting system already accounts for hierarchy changes quite well though, i’ve tried to keep it all as dynamic as possible
Thanks, still pretty unsure about auto-weight painting meshes but getting the armatures accurate is half the battle.
I actually have a pretty awesome dismemberment system (with localised body part simulation) almost built for Unreal, and the Blender side of it isn’t far off good to go! My plan is to get the Blender side built into this add-on then finalise the UE4 asset, run a tutorial for it so people can make it themselves then see if the marketplace wants it in case people don’t want to follow a 10 hour tutorial lol
I started working on it a while ago, here’s a testing video from ages ago (things are much better now) - https://youtu.be/EhXKmdMJ_00
I hadn’t set up the collision in that video, but it gives a good example
2 Likes
Amazing work Jim you are very talented and the community is very lucky to have you in!
2 Likes
Mrs Mannequin (aka “Femmequin”) weighted, rigged and ready for action, just need to fix some normals and UV’s and she’s finished, thanks for the feedback everyone! ![]() (sorry i didn’t want her to be any bustier)
(sorry i didn’t want her to be any bustier)
2 Likes
Looks great! is it a morph of the original mannequin or a new model? I wonder if it wasn’t better for the mannequins if they wouldn’t consist separated mesh parts but a continous one to see mesh deformations better.
1 Like
It’s not a morph but it could become one in the future, i decided to create her separately because the mannequin doesn’t mirror very well and i didn’t want to have to replicate everything across from one side to the other for every edit  Her vert count is about 30 verts off the mannequins… i’m not sure why though because i didn’t delete anything haha but i do have a way to fix that and then she could be made into a shape key/morph target
And yes 100% it’s a total pain in the butt that so many parts are separate, i think the reason they are is for easy hard edges and UV unwrapping… though it means more verts than are really needed and makes the mesh difficult to edit on certain edges.
2 Likes