Nobody will ever fix all the basic (ie unsexy) stuff in Blender so this thread is to vent a little bit. Many of the items are written in an angry tone, because I wrote them when I encountered the issues and again, needed to vent. Feel free to add yours to the list.
- When you unhide part of the mesh in edit mode it becomes selected so if you are attempting to hide something that’s in the way in order to more easily make a selection you are screwed.
EDIT: Guess I should update this first one, as I finally managed to fix it using settings in… guess where? The keymap… not intuitive ones either, and I didn’t manage to get it working on the first try. - Show / hide menu options aren’t under view as you would expect… they’re in the mesh menu…
- Output path in the output properties panel has no meaning. No file or passes will be saved. You must use nodes in the compositor to get your passes into separate files.
- Object index and material index will not automatically render a clown pass. You probably need to use cryptomatte for that, enters advanced user territory when there also could be a simple option.
- Deselecting all render passes and selecting only, for example, a cryptomatte object pass, will still render a regular pass using the full render time.
- Packing all external data into a file will not pack any linked collections and Blender will not ask you about it either.
- Make local data on a linked collection will seemingly do nothing. You have to find the Apply menu and make instances “real” first. Two operations that should be one for normal users. At least there should be a warning that you can’t make local what isn’t “real” (horrible word to use in this context, btw).
- Right clicking on a single rotation value of a bone and inserting a keyframe creates keyframes for all the rotation values instead of just the one you right clicked on. You must then go in and manually delete the others.
- A transparent shader has a color setting, but apparently cannot show any color. You need to set it to white, use an alpha and then mix it with another shader. So why not just have an alpha slider on that shader to both eliminate user error and confusion about what it does?
- The shading workspace has an image viewer in the bottom left but no way to easily click on an image texture node and get that texture to display in the image viewer. (EDIT: This is supposed to “just work” but the functionality isn’t stable and stops working seemingly randomly.)
- The only way to see where an image (texture) is located on disk is to open a data-api panel, search for the image name and then look in the list (which has two entries for File Name for some reason). And of course Blender uses some weird, non-standard relative path instead of displaying the absolute one that the user can simply copy and paste into a file explorer (ok, luckily there is a menu option to change it, but it’s not located in the data-api panel and you can’t do it for individual files).
- There are no dynamic sliders or dynamic number ranges in any value input boxes. Even if you hold down shift, you sometimes operate between such small intervals that it doesn’t help, so you have to resort to manual typing. (I think this is why so many people don’t realize that the bump node height only works with an extremely low value so they begin to fiddle with the strength instead, which looks very bad in Eevee).
- The Z depth pass is basically shunned by any artist you ask due to several issues (not being anti-aliased is just one) and most people recommend you to use the “most pass” instead, which isn’t logical at all and apparently it’s been this way since 2014 or earlier (so at least there are a lot of search results for when you have to look up why your Z pass didn’t work as expected). (Since I wrote this, the depth pass was dropped from the UI in the new options for 2.93…)
- The Action in the browse drop down in the Action editor does not always correspond to the animation displayed in the 3D viewport. In fact, it changes depending on your current selection in the outliner. Extremely confusing to a beginner and I do not see a pattern yet.
- The weight painting color overlay is almost impossible to see because it is so dark. You have to switch to wireframe mode in order to see anything, but that means extra clicks every time you switch to and from weight painting (unless you create a workspace for it).
- The way a frame is implemented in the node editor is of course as convoluted as anything else. You cannot double click on a title to change the name. Rename pops up a dialog instead of directly typing into the frame. You can no longer resize the frame once a node is inside of it. You can’t use a modifier key to drag a node out of the frame. There is not even a right click context menu option to separate nodes from the frame.
- Snapping is absolutely horrible in object mode to the point of feeling utterly broken and totally unusable. The only thing you can snap by is an invisible bounding box. There is not even an origin snap! To do that you must do several operations involving the 3D cursor.
- You have the animation workspace open. You move the current frame indicator. You open the materials tab. You select insert keyframe on a material parameter. You see nothing in the timeline. You get confirmation that the Blender ui sucks for beginners.
- Blender can’t even predict render times well. It thought a 360 frame sequence where the last few frames had took 4 minutes would take 7 hours to complete… next day, it said it was 4 hours left and the last render was still around 4 minutes. 4 hours later, still 4 more hours remaining with last rendered frame still 4 minutes…
- Not being able to apply transforms to an instanced mesh is just failure on the most basic level.
- In the shader editor, the fact that switching materials in the drop down doesn’t just update the viewport, like in the image viewer, but actually changes the material assignment on the object is super illogical…
- If you create a new texture, start painting on it and then press the shield to protect it from deletion, what you painted will not be saved. There is no warning upon saving the file either, but next time you load it the texture will be blank! You must know to select pack from the menu (and only after you’ve done that does an “unpack” button appear next to the shield).
- When you append an object it gets highlighted in the viewport but none of the properties panels update.
- https://developer.blender.org/T64245 (typical bug reporting futility of UI design issues)
- Linking an object freezes it in place. If you shift click the library override button on it and then adjust its transform you get an invisible copy.
- You cannot rename a node group while inside the node group. Also, renaming the node of a node group renames it for that instance only. You need to rename it in the selection menu or open the hidden N panel, go to item, expand the collapsed properties section and then edit the name…
- You can’t cut/copy something from within a shader node group and paste it outside the group.
- There is no apparent way to adjust the type of input or output when you create inputs and outputs for node groups via the side panel node properties. You get the correct types if you collapse an existing set of nodes into a group or drag a new node over the input/output nodes while expanded. Does blender want me to use the side panel or no?
- There is no standard looking drop down menu to select/create new UV maps/channels in the UV Editor. You can only do this in the object data properties.
- The relation between the UV Map node in a material and the UV Maps in the object properties panel is unclear because you can name them anything. In other software, you have ordered material slots and ordered channels, so there is no question what happens when you put a material on a different object with a different set of UV maps because you refer to it by index, but in the Blender UI you refer to a name instead so now it seems you must check your spelling when you name UV maps? Also material slots can be re-ordered in Blender but not UV maps.
- The circle showing the size of the proportional modification range is a crap way of displaying that information, because quite often you zoom in on an area you wish to change and then the circle is too large to even show up in the view and if you’re unsure of if you need to use mousewheel up or down to reduce its size and since you can’t see it you need to cancel out of the command and zoom the view out first.
- Blender has a nice new built in sky node. However you must put the strength to 0.1 in order for it to look natural (ie magic numbers, sig). Oh, and the elevation setting doesn’t appear to be in meters either.
- Blender textures default to linear interpolation. Everyone else have been using filtering for 30 years but in Blender you manually have to change this for every texture…
- You can’t save/export objects to a new .blend file.
- One of the most baffling fundamental issues is that if you set an object’s mesh to be that of another object, you also by default link materials. No warning, no question, no obvious (to a beginner) way of changing. Yes, you can set a preference for it, and there is a (tiny) menu, but it uses weird language that you wouldn’t immediately associate to this behavior. Also, the behavior is fine for instances that you want to change materials on, but when you don’t start out with an instance and just want to link a mesh, then it becomes confusing (doubly so because the behavior also isn’t a part of the relations or linked object menu options).
- Features with options don’t show them by default and there’s not even a setting to have them shown. Instead, every time you want to tweak an option you must restore a minimized dialog in the corner of the screen. Every. Time.
- Geometry Node object input as a pipers tool in the node editor, but not in the modifier stack.
- Geometry node modifiers must reside on a mesh object, but the output isn’t a mesh (you can’t Boolean with it) unless you Attribute Fill which apparently produces “real” geometry.
- By default, back face culling is off but you can’t select objects from their backs… users unfamiliar with this concept will be very confused by this since there is no visual feedback as to what is going on.
- In the image editor, replacing an image through the menu option with the same image under a new name does nothing. A new user is lost here and probably closes Blender, renames the file, reopens Blender and hopes to replace all broken textures, but that does not work because Blender has now somehow. cacher that image internally despite the user never packing any external data.
- You can’t delete modifiers from the outliner. If you use a shortcut, the entire object gets deleted.
- The image editors in the UV workspace and the Shader workspace don’t automatically switch to the texture in the material (if you only have one texture, but it doesn’t even switch to a texture from the object’s material).
- Why can’t object visibility be set per workspace?
- There are no “expand hierarchy” or “collapse hierarchy” context menu options in the outliner. The only options which are there also act globally, not on the selection.
- There are armature actions and model actions but the UI doesn’t do a good job at explaining the difference (and a beginner can easily assign an action to the wrong thing).
- You can’t see exactly who the users are in the Data API editor. You can only see a total count.
- You could easily get grey hairs until you discover that the only way to quickly select bones in weight painting mode is to previously have been in the pose mode for the armature.
- There is an eye dropper for armature but never one for bones…
- Object mode doesn’t respect hidden faces which is annoying, but when weight painting doesn’t do it either it becomes a hindrance.
- Toggle X-ray also gets ignored by weight painting (the hit testing at least, and by default the visual too, although an advanced user can know that the overlay opacity can be reduced… still, why that default).
- Clearing all NLA tracks from an armature does not remove them completely from the outliner until you restart Blender.
- In the timeline, the row highlight does only extend to the sidebar, not the entire timeline.
- You can’t drag a workspace tab to where you want it and the only reorder options are either the front or the back. There is no single step movement at all…
- In the curve editor, there are no corresponding buttons to select curve, handles or keyframe (also with the 1, 2, 3 keys) like there is with faces edges and vertices.
- Continuing from the above, there is no menu option for toggling between scaling keyframes and handles (you need to switch editors for that).
- Even in the orthogonal view the move tool gizmo disappears during transforms so it is very cumbersome to line something up to the grid.
- Vertex paint mode covers the entire mesh with a grey overlay so you can’t see the proper existing color or the color you are painting (yes, you can turn off overlays but why should you have to).
- Vertex paint mode seems to also be the last hiding place of wireframes without any anti-aliasing…
- A material selection menu has the number of users separate to it’s (poorly named) new material button, but a Blender mesh selection menu only has the number of users, and you need to click it to make a new mesh…
- When a new version of Blender is released (hello 3.0) and you select “load old settings”, you don’t get your theme… so what else is missing (not sure about the startup file either, actually)?
- So in the “new scene” menu there is linked copy and full copy (so “duplicate scene” really), but there’s no instanced copy so you can move things around or change materials easily for different renders?
- It’s very easy to move things to a different collection, but how about different scene? I see no menu for it, and while dragging and dropping in the outliner says “move” in the tooltip, it appears to actually just link.
- When things are linked in multiple scenes, there’s zero evidence of this in the outliner. No icon or anything. Also, if the developers wanted to be Ux friendly, delete should either just unlink, or ask if the user wants to remove the object from all scenes, or just the one.
- Similarly, when you change a material on an instanced object, wouldn’t it be nice if Blender asked if you wanted to apply it to just that instance, or all instances? You know, like a normal app with good Ux?
- The entire Ux around bezier curves if course also crazy bad. One would expect 1, 2, 3 in a curve edit mode to be handle, point, curve but I guess not.
- You can’t select a curve segment in curve edit mode (in order to for example move it or insert a new point on it).
- If you select the a bezier curve point and do “selection to cursor”, the handles will collapse upon the cursor.
- Compositor is a whole new level of crazy. Just the fact that you need to hook up a viewer node to see what is going on (and that every tutorial tells you not to use the default background preview thing) and then a file output node to save something (that’s entirely separate from the output properties) is a lot to take in. Other software might drown you in a (possibly overwhelming) myriad of options, but at least someone designed that and you can read through it to find what you want to change. Here, you basically need to design the UI yourself as nothing is set up by default.
- Again, tutorials might have lead me astray here, but when working on an animation, it feels crazy that they recommend using an “image” node and that it’s “offline” (doesn’t update frame count if you change it, for example). That belongs more in the video editor portion of Blender than where it currently is.
- Similarly, that a super common lens effect like bloom, that’s so easy in Eevee, has to be done in the compositor for Cycles meaning that all of the above needs to make sense first, which is a huge, huge learning threshold for someone new to Blender.
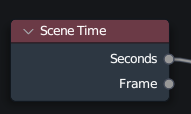
- Even if you switch the animation timeline’s view mode to seconds, the End value in the same panel is still listed in frames (as is the “Frame Range” in the output panel, which cannot be switched).
- The “+frames after the second” text that appear after you do the above switch also makes the entire thing near unreadable until you zoom out quite a bit.
- Then again, attempting to view in seconds is pretty much moot since the Dope Sheet only seems to work in frames anyway (probably the Curve Editor too). Again, super high threshold for beginners or someone who just wants to make a simple transform animation and don’t want to do all math in their head.
- When you have so many objects keyframed in the Dope Sheet that you need to vertically scroll the list to see everything (because the zoom controls from the Graph Editor don’t work here for some reason), you can’t use box select to select all keyframes in an interval, because the panel doesn’t auto scroll (something that was added to the node editor only after I started this list, I think). The solution is to first use the “Collapse Channels” command.
- Since we’re on animation now, “Clear parents and keep transform” does not work on anything that has been keyframed. The cleared object will jump to a different place in the viewport unless you delete all keyframes first.
- Similarly, “clear parents and keep transform” also doesn’t work if parent objects have different scales (common with imports from CAD). You need to apply the scale of each parent first.
- Graph editor has duplicated pivot and proportional toolbars, but not snap? Default snap seems to only be to the graph grid and I’d like to snap to other curve points in the graph.
- You can’t click on a curve the graph editor to select it, you need to drag across it… (and after you’ve selected a curve, the left column, doesn’t highlight what you selected and there’s no menu option for it either).
- In the graph editor again, when I right-click and choose “insert keyframes”, I get a keyframe. That very same menu tells me the shortcut is the I key, but when I hit that, I instead get a menu that asks me a question about what channel I want to insert into (something a beginner has no clue about)
- When you use a shortcut (that new users aren’t familiar with) you can parent and keep transform, but when you use the menu, you can only clear the parent and do the same.
- Snapping to origins can only be done when the snapping is using the active mode.
- Depending on a solidify modifier’s offset direction, the material offets also work differently…
- The boolean modifier doesn’t have the option for material offsets that the solidify modifier does.
- You can’t get keyframes of something that’s disabled in the viewport to show up in the dope sheet even though you’ve selected it via the outliner.
- Most of the parenting menus just mentions “object”. This is terrible for Blender beginners. It should say “active object” (Blender’s default color difference between active and selected is also terrible, but that can at least be fixed with themes).
- If you’re in edit mode and delete a modifier, Blender will undo everything else but not that.
- Dropping multiple images from a file manager into the shader window only adds a single image texture node.
- Only show selected in the dope sheet does not take into account any keyframed material parameters (though you can frame selected to locate it).
- You can’t select more than one thing in the outliner for “select hierarchy” (it always only just selects the hierarchy of the first item).
- All hierarchies start out fully expanded in the outliner when you open a file. This is insane if you are working with thousands of nested objects, especially since there’s no easy button or context menu option to collapse all (I bet there’s a shortcut, but how do beginners find out about it?).
- Even if you turn snap to face on, the Knife tool snaps to some arbitraty point in space, so it’s impossible to accurately cut something three dimensional in one go since the moment you move the camera, your cut is ruined.
- When you subdivide something and use the numerical keyboard to enter the amount of subdivisons and hit enter, if you attempt to continue to write a new number you instead begin to control the camera. You have to click in the number option between each time you write a number.
- Getting render layers out of the compositor is maddening. Hooking up a Glare node to a File Output still gives you a composite output. Who thought this “everything nodes” system was a good idea? It’s atrocious UI design for beginners! Even worse than flat touch UI where users don’t know what is and isn’t a button, because here you even have to place the buttons yourself.
- Curves again! You can you the shortcut G-G to slide a vertex along an edge in a mesh. Why can’t you use the same shortcut for the same effect in curves?
- Ok, I now hate the compositor MORE than the outliner. It’s like it’s made to screw beginners over. Not only are there no presets or buttons, but when the user drags a “file output” node into their own haphazardly self-designed UI that is the graph, the default output name is the same for all nodes regardless of what you connect it to, so Blender happily overwrites the different passes you wish to save.
- Also, just to drive the point home that the Blender developers really, really have a disdain for new users, the glare node (which should really also be a pass, similar to bloom), has a default value of zero so you’re left scratching your head why it doesn’t show up when you add it.
- If you have more than one object selected and choose “select linked materials”, Blender will only look at the materials in the active object, so it’s impossible to select all red and green objects by selecting a red and green object first…
- You can’t undo camera movements, so as a user, you need to constrain or lock the camera or you are screwed. No fast workflows supported here!
- Unlike a linked object, a linked collection doesn’t have a convenient “make override” button in the details panel. It’s buried in the “object-relations” menu, even though collections perhaps aren’t objects?
- The details panel of a linked collection is also nearly void of any and all information, like how many objects/meshes/textures are linked and most importantly, in which file they originate from (and how to re-link them to a different file).
- In order to jump between keyframes in the dope sheet/graph editor, you must have an active object… what you see on screen is not enough for some reason and there’s no filter options that help you either.
- Most things in Blender goes between 0 and 1… except for the Follow Path constraint which goes between 0 and 100…
- The label text length in geometry node frames have to be quite short, so you can’t write good comments explaining what’s happening.
- There is no auto smooth normals angle for a curve with a custom profile.
- There is no undo for accidentally dragging the camera gizmo’s focal length…
- Even child/sub collections must have unique names, so you end up with a collection tree containing unnecessarily long names. A better Ux would be to automatically rename child collections if you ever move them outside the parent collection.
- Weight painting ignores any modifier that moves a vertex, despite Blender having three different settings to preview that in the viewport. You need to turn them all off in order to accurately see what you are vertex painting (making things like shrink-wrap a constant flipping between realtime view on and off).
- When you sync UV Selection, you often really only want to sync UV viewing. Because the nasty side effect of this button is that when you move the border of one island, the syncing causes the borders of other islands to move as well, which I cannot image is ever a desirable result.
- Renaming a vertex group breaks all modifiers using it, and the bug is 6 years old!?
- How do you make a linked, overriden collection and its contents “native” to the current file? Pack linked libraries doesn’t work. Make instanced face does something very weird. Make local all gives you a regular collection, but the contents doesn’t seem accessible. Can it even be done? Who knows.
- If you throw away the input geometry on a geometry nodes modifier, you can never read the material list from the object the node is on. So essentially, you’d be required to ignore the materials tab and assign new materials inside the geometry node modifier…
- Stretchy IK bones isn’t stretching. It’s actually scaling (the opposite of what you want, since something stretched becomes thinner in most cases).
- Stretchy IK bones are seemingly always enabled (via a checkbox), but the actual way to enable them is located in an entirely different panel, by setting a magic number to a non-zero value (super intuitive)!
- The “mean radius” property of a curve point is not a radius, it’s a scale because it’s only used to scale curve profile geometry or path animation. However, apart from the poor naming, it also doesn’t get applied when you apply the scale of the curve object.
- Overriden Linked things don’t count as external files. Running the Report Missing Files option in the External Data menu says nothing is missing, yet I don’t see my character and I’m guessing this white symbol here indicates a broken link? And of course, there’s still no proper UI for seeing what location links used to point to or individually re-link them.

- The right-click rename menu option for a collection is not at the top level. It’s under a sub menu called “ID Data” where of course everyone who is new to Blender automatically looks.
- Guess why I can’t see anything in my geometry node window here despite the correct object being selected… does anyone think a beginner can figure out why this happens?
- Someone finally implemented this… but only for geometry nodes, not materials because a beginner should of course know about drivers and their hidden keywords (a bit similar to something else I posted recently).
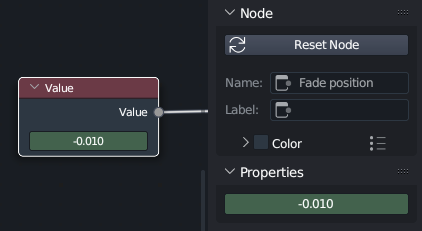
- You can rename a node in the side panel, but the editor will still show the default “value”…
- Just as how there’s no 1, 2, 3 shortcuts (even visible buttons) to select curves, points, handles in the curve edit mode like there is in the mesh edit mode, this brilliant quick filtering selection is also missing in the graph editor. A box select always selects the curves, even if you wanted just the handles. And similarly, a box select around a point always selects also the handles, so if you want to scale keyframes you have to switch to the dope sheet.
- However, in that graph editor, you do have the common show and hide shortcuts and even visible buttons, but in the dope sheet you don’t…
- The live filtering string in the graph editor refuses to work some of the time or even most of the time. Not sure what the problem is, but some words it just refuses to find, while others it can find with no issue.
- The above gets even worse because when you have an object selected you don’t see any keyframes for its materials in neither the dope sheet or animation graph. Only way to see them is to remove the selection filter and then search through the entire list.
- But with selection filtering disabled, you can’t use the next or previous frame button (in the graph editor).
- If you shift-H to hide everything but the selected curve in the graph editor, and then move to a different object which isn’t keyframed yet and add a keyframe, the new curve won’t be visible (even if you switch to selection filtering).
- If you alt-H to show everything in the graph editor, collapsed channels still won’t show (this might be good for advanced workflows, but compounded by the UX issues mentioned above, this bit me in the ass at one point… also, are certain things collapsed by default, like keyframed material nodes?).
- When you select a curve in the graph editor, it doesn’t highlight in the sidebar and you can’t zoom to it in the sidebar like you can in the graph editor either (or like how you can zoom to selections in the outliner).
- When you link an object, the first step is maybe you want to move it. For that, you need to make a library override, but the default behavior of what looks like that button is to instead make the entire thing local. But local is the last resort of something you linked, isn’t it? So why do you have to shift-click that button to take that first step? What’s the UX thinking here? I linked something, but then immediately I want to make it local?
- There doesn’t seem to be a proper vertex group input for Geometry nodes, rather you must use a Boolean group input (not logical) and then click a magic button and select your vertex group amongst a lot of other options. Further, if you rename your vertex group, the geometry node doesn’t update.
- Not sure why I have to separately save a texture painted image even though I’ve saved the .blend file itself. Seems like an unnecessary extra step, but at least Blender warns when you’re about the close the file.
- The Texture painting workspace can become de-synched between the left and right windows, so you’re actually painting on a different texture than you think. I guess this is a limitation between how loosely the workspaces are implemented, but it’s very annoying when it happens and took a long time for a first timer to figure out. (Similarly annoying as to when the same happens in the shading workspace with the texture preview in the bottom left.)
- Blender developers finally added a confirmation dialog for applying transforms to instanced objects, but the only option they gave the users was to remove the instancing for that object. There isn’t any option to apply the transform to all other instances, so that still has to be done in two separate steps…
- A node group in a material will never get the “new” icon (which is really a duplicate icon). Instead, you must duplicate the node which contains the node group, and then click on the number button.
- There is no change of icon in the outliner of a linked object which has been removed in the original file. You only get a console notification of the fact. There’s also no highlighting or automatic removing of such zombie links in the “external data” menu.
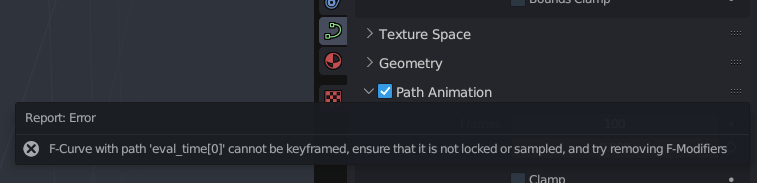
- When you add a driver to a value, the default dialog has an error message!
- When you open the driver editor for the first time, you still need to click the default value in order to reveal the tab with the modifiers.
- There is no option to copy constraints in the relations menu.
- If you scale a timeline with keyframes, they can end up “between” frames. But the timeline has some inherent snapping even if snapping is turned off, so even if you use the next/previous keyframe button and update a value, a new keyframe will still be generated snapped to the closest even frame so it’s effectively impossible to update the existing scaled keyframe.
- Now if you have an “in between” keyframe after a scale as mentioned above, and you want to move that to the closest even frame you can’t, because there’s no snap to nearest keyframe (“nearest marker” is apparently something different).
- Blender 2.9 has a geometry node called a Plane, but that was too intuitive, so for 3.x they had to remove that and change it to a Grid instead, which of course every beginner naturally searches for when they want a plane…
- Setting up a simple follow path animation for a camera is absolutely maddening! It’s like the world championships in making obtuse constraints with hide and seek properties… EDIT: Using the “fixed position” option is apparently the way you make that constraint behave in a sane way.
- Editing stashed actions feels like the new king of obtuse UX. There’s so many possibilities for user error in accidentally creating a new stash/action (is there a difference?) and then not being able to remove it either through the NLA editor or the Outliner.
- Changing an object’s material assignment to instance specific removes the already assigned material. But of course it’s “technically not a bug”, just crappy UX.
- If you want to check your math on something in a geometry node, adding a viewer node to an isolated math example isn’t enough, because unless there’s geometry, something like an integer or a float won’t be evaluated (because the viewer node doesn’t technically count as a “context”, apparently). EDIT: Apparently you can just hover over a Value node to see the value in a tooltip but that’s less discoverable and why not just implement that feature in the viewer node as well?
- The developers are so afraid of global vs local transformation values that they named it “original | relative” in geometry nodes (don’t get me started on the transformation panel in the main UI). The fact that they haven’t gotten this down (despite literally everyone else in the industry making the proper distinction easily exposed in the UI or simply avoiding global transforms on children at all) is their next “right-click” stubbornness.
- In Geometry Nodes, there’s a transform geometry node, but if you want to do the same for instances, you need to go through two different nodes. Why the inconsistency? And why not have all three nodes for both types of objects as a convencience?
- In Geometry Nodes, for example Sample Index has an input AND output calle Value. That’s quite unintuitive. The Input should at least be called Type.
- It’s especially noticeable in Geometry Nodes, but apparently no node editor in Blender remember the position of where you had zoomed to. It’s all global, so every time you switch graphs, you have to pan and zoom around like crazy. Totally RSI inducing!
- For example the Join Geometry node’s default behavior is to add the lastest new connection on top, making a jumble of all connected lines. The drag area for adjusting this is also terrible small (and additionally apparently not available in the Python API).
- Selecting a bone during weight painting is convoluted. First, you need to select the armature and mesh at the same time in the correct order before entering weight painting mode, and then you need to hit shift+control+left mouse at the same time to select a bone. There’s zero information about any of this in the UI (only the status bar at the bottom changes to a generic “select” when you hold down shift and control).
- Animations can’t be assigned to an armature like you can, for example, assign materials, modifiers and constraints. You can, however still add fake users to an animation and unlink it, but that has to be done via the outliner it seems.
- Shrinkwrap modifier has an offset, but shrinkwrap constraint does not.
- There’s no math invert in geometry nodes.
- You can’t search for individual math sub-functions like multiply or divide.
- When you input an image into a geometry node, you don’t get the open button in the modifier panel like everywhere else. You need to first open the image from an image editor.
- Sculpt mode doesn’t count as edit mode when it comes to disabling modifier stacks, so that can be a real performance killer (and lots of back and forth clicking to manually disable, for example, several geometry nodes).
- So now there’s vertex colors, color attributes, attributes and face sets… but face sets do not have its own panel in the object data properties.
- Renaming a data properties panel list (like Vertex Groups or UV Maps) is very difficult in a heavy scene, because the interval for the two clicks required seems tied to framerate, and there is no right-click context menu to rename (and F2 goes to the Outliner and not where the mouse cursor is).
- In Geometry Nodes, there’s “set position”, which is nice but no set scale (there’s “scale elements”) and no set rotation (there’s “rotate instances”) which isn’t very consistent. But sure, I guess they want you to use “transform geometry” instead.

Dragging and dropping a video into Blender and having it just work is pretty much the only thing so far that has been surprisingly intuitive…
EDIT: Bonus gif of that wonderful hidden menu that every new user knows about and is so easy to discover…
And this from the outliner (still one of the worst parts of the Blender UI):
Dissolve an edge between two triangles to make a quad:
MORE GIFS IF YOU FILTER THIS THREAD FOR MY POSTS!
