hello, all.
I have one more question.
How can i make something like a blur effect of an object (i wana make something like radioactive) is that possible?
Ty, already.
You’d probably do this in the Compositor. If you only want one thing to glow, you can isolate it using an object ID node, and then blur that with a blur node, and composite that result over the original image using a mix node set to Screen.
As Benu mentioned, you can add a blur effect (or a glare effect as well for a radioactive look) through the compositor.
You can also use render layers to isolate objects if you need more than one particular object to glow. As a quick example, I used render layers to apply the effects to the red and orange cubes, but not to the blue and green cubes.

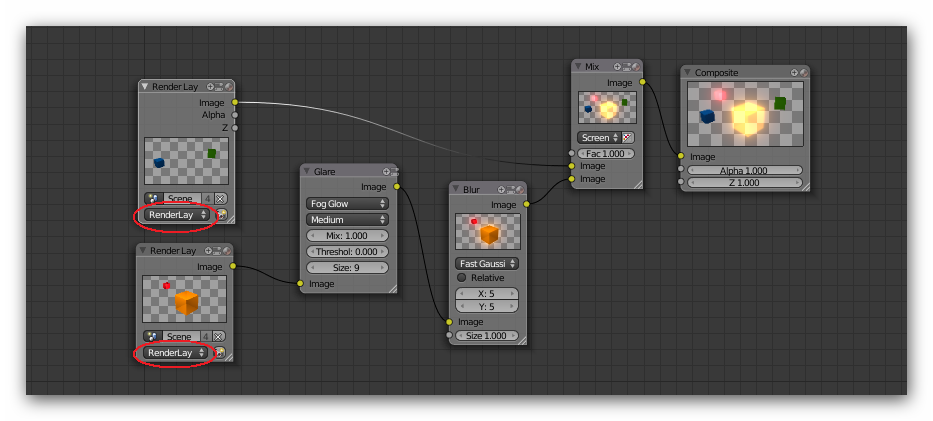
Here is a screenshot of the node setup that I used to make the glow for the picture if you would like an example to look at.

i’m very bad in notes so how can i make 2 seperate render layers if you have 4 objects in 1 scene?
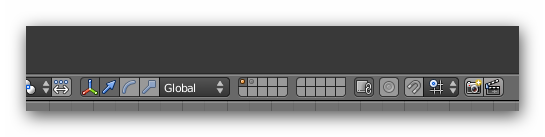
To setup render layers in a scene, when you look on the Blender header you can see the layer buttons, for this example I placed the blue and green cubes on the first layer, and the orange and red ones on the second. Later, when you render, be sure to select all of the layers that you want it to render, otherwise it will only render part of the scene.
Then, under your render settings tab, there is the “layers” panel. As default, it will only have one render layer, so you will have to hit the add button next to it. Just below the list of render layers it says “Scene” and “Layer”. The scene settings will stay the same, but click on layer one for the first render layer, and the second layer for the “renderlayer.001”. What those buttons do, is select which layers are used for the render layers such as “renderlayer.001” etc.

To input the render layers into the compositor, it needs a render layer node for each layer. It defaults with one, but you can add another layer node through the Add > Input > Render Layers menu. After you add another layer the only thing that’s left to do before compositing is select which node inputs the right render layers. In the picture below, I’ve highlighted the menu that selects the layer. As you can see in the picture, since I wanted the glare and blur to be applied to the red and orange cubes, I attached the nodes to the second render layer, and then eventually attached both layers to the mix node, which mixes the result into the final composite output node.
Also, for this example I’m using Blender 2.5, so if you’re using 2.49 it will look a little different, but the procedure is basically the same.
Sorry if the explanation was too long, but I hope it helps.
one note on BlenderRender32’s explanation: select an object and press M (while in the 3D view) to move an object from one layer to another.
Where do i have to select then the layers i wana use as result?
It’s the layer buttons on the header that need to be selected for it to render the complete scene (hold Shift while clicking them to select multible layers).

You’re welcome, I’m glad it helped!