Ranquin - Thanks for the tip with the nose; I tried it out tonight and it definitely does look better. I had tried to make the nostrils flare a bit for the smile, but looking again, I think they should mostly just go outwards instead of going up as well. That’s neat to start to see how he’ll look with eyes. I wasn’t sure if it was the second thing or not, but I’ll be sure to look into making the pupil for the eye smaller when I go to do the eyes. It definitely does look a bit strange right now without being able to see the iris. Thanks again for taking the time to let me know 
I commend your artistic vision and you skill at modeling such a difficult object as a human face. I also respect your ability to see art in evey the humblest and most overlooked of images.
ArtOfLight you are a god! I’m starting a petition to have everyone in this forum kiss the ground you walk on… seriouslee. I’ve been desperate to figure out how to do knitted objects and you’re mini tutorial will help me tons… now if only I could decipher what was written on your posts… hehe just kidding. I just sped read through it so I don’t fully understand it, but at least I now have your post to reference for when I tackle stupid fashion knitted objects bleh. I also might come over your house to kiss the ground you walk on and ask questions… just kidding, I’ll just message you if I have questions.
lexx - Thank you, it definitely is a challenge doing a head; there’s really a lot that goes on in the face. That spaceship you’re working on is looking pretty nice as well. It’s neat to see how everything you’re adding has a purpose to it. With the other thing you mentioned, I guess it’s just always seemed, to me at least, that something shouldn’t be valueless just because one doesn’t know how to do something as well as someone else. When you think about it as well, there are a lot of things that even beginners make nowadays that would have been seen as pretty amazing 15 or 20 years ago.
edgarej - Thanks, that is very kind, but please believe me when I say I am no one to be worshipped With the clothing, that would be great if it helps! If you can get the stitching modeled correctly, it’s actually not too difficult to get a good result; it’s just a matter of using the resulting image in a displacement modifier, then using vertex groups and multiple displacement modifiers to control which map, or type of stitching, goes where. Then tweaking the UV’s until the stitching looks the way you want. As with everything in life, it is a process though and just takes a lot of trial and error and gradually making refinements to the different pieces until it looks the way you want.
artoflight - that’s actually a very good piece of advice. when I sped read your post I didn’t see/read how you actually did the textures, but the photo you showed of the stitch model got me thinking of another way I could solve my knit problem. I could model a separate stitch pattern just like you did, import those knits as objs into zbrush, use matchmaker brush to have the knits follow the shape of the clothing, then ‘project all’ the knits onto the knit clothing, then bake all details into a normal map. What do you think oh wise ninja of light?
edgarej - Yes, sorry, I didn’t go very in depth about the clothing. Just to give a short explanation, the workflow I had used was to create one stitch with Bezier curves, then use several array modifiers to create the others. I also put a plane behind the stitches so it wasn’t just infinite space behind them when I went to render it. Then I used an orthographic camera set directly above the stitches that looked straight down and rendered it with a 4096 x 4096 sized camera, or whatever size you need. After this you go to the compositor, as can be seen below, and use the Z depth pass with a normalize node to make the Z-depth pass values between 0 and 1, and an invert node so the whitest part is at the top of the stitch. Then you save the image as a 16-bit PNG image so that all the values between 0 and 1 will be stored.

One tricky part is making sure the stitches are seamless, and the best way I found to do that was to go to the camera’s view in the 3D view and render it with the Open-GL render option. Then in the UV/Image Editor, press N to open the properties panel and turn on repeat under the display settings to see what parts aren’t lining up in the rendered image. After this you can parent everything having to do with the stitches to an empty object and just scale the empty object along the x or y axis by small amounts until things line up correctly. And I think that’s everything; hopefully it will help.
I’ve never used zbrush before, so I wouldn’t know for sure, but it sounds like that would work. If you were doing an entire shirt, you would definitely have to use normal maps as well for the final render since Blender wouldn’t be able to handle such a dense mesh. You’ll just have to experiment with it and find out ![]() I don’t know how zbrush handles the matchmaker brush, but I suppose one thing to keep in mind while doing it might be making sure it’s as easy as possible to change small things later on in case there is something that isn’t looking right.
I don’t know how zbrush handles the matchmaker brush, but I suppose one thing to keep in mind while doing it might be making sure it’s as easy as possible to change small things later on in case there is something that isn’t looking right.
If it doesn’t work out, one other option might be to use the basic idea I had mentioned before of creating a seamless texture, but mix the different maps in the Cycles material editor instead of using displacement modifiers. Hopefully you can see what I mean below, but each type of stitching would go into a MixRGB node, then you can paint a black and white mask texture to control which type of stitching goes where. I haven’t actually tried this, but I’m pretty sure it would work.

artoflight, thanks for your very informative post. I learned a lot. I didn’t think of using bezier curves to model the object, but now that you mentioned it I actually think it’s a great idea. Thank you so much!
Just giving a small update; you can see him with eyes now. I have also been working on the tongue. It really was fun creating the eyes; I’ve always found it kind of fascinating the way that some eyes almost look like fire with the way the Iris emanates out from the Pupil. I don’t know if you can see it a whole lot in the final render, but it was fun trying to recreate that look. As per Ranquin’s suggestion, I did end up making them a little bit smaller as well.
I was able to get the teeth and the eyebrows put in as well as the eyelashes. It took a little while to try to figure out how to get the eyebrows looking right, and I think they’re still going to need some work but at least they’re closer to what I had in mind. It really is cool seeing him come to life  Hopefully everything is looking natural and not too out of place, or at least the way one might expect someone older without teeth to look. You can see the shader setup I ended up using for the eyebrows below. I’m not sure how accurate it is or how useful it would be to anyone else, but it does seem to work well in different lighting conditions as well as work for both black and white hair.


I’ve been working on the main hair today, but I ran into a little bit of a snag with the hair color that I was wondering if anyone could help with. As far as I’ve been able to tell, you seem to only be able to change the color of the guide hair and then all of the children become the color of the guide hair, but I was wondering if there is any way to have the hair color change for each individual child instead. If I need to, I can go ahead and add another hair system for the other color, but I would really prefer to do it through the materials if anyone knows how. Thanks in advance!
The rest of the hair is put in, including those tiny little hairs that go all over the face. I also changed the description a little bit in the first post. You’ll have to excuse some of the areas I haven’t worked on since they won’t be seen, like the top of the head and ears, but you can see how he’s looking in a sunlit environment below as well. I think I’m going to need to try and make the face a bit more wrinkly, but I thought I would wait and get the clothes done before I work on that. Other than that, I think the face might almost be done! Any suggestions for what could be better are welcome; I’m really not an expert on any of this.


This project is great. I have a lot of respect for how careful and methodical you are with your progress. The idea is great and when this is finished it probably won’t have any weak spots. Keep it up!
Thanks ToshiCG, it really has been quite a journey, and definitely a lot of trial and error getting the different pieces looking right. I never knew there was so much to do and think about in a face; I can see why people enjoy doing them so much. That’s nice to know that he is looking alright. That project you’re working on with Matt Damon is really looking nice; it’s amazing how much it looks like him. It will be neat to see how the scene comes together in the end.
Yeah, a lot to do, right!
I think it’s a good idea to go through the process carefully and figure out a pipeline that makes sense.
Looking forward to your finished scene too!
Ah, yes, I see what you mean; I would definitely agree. Thanks!
I thought I looked at an picture. Awesome work
Thanks! I’m glad it’s looking realistic
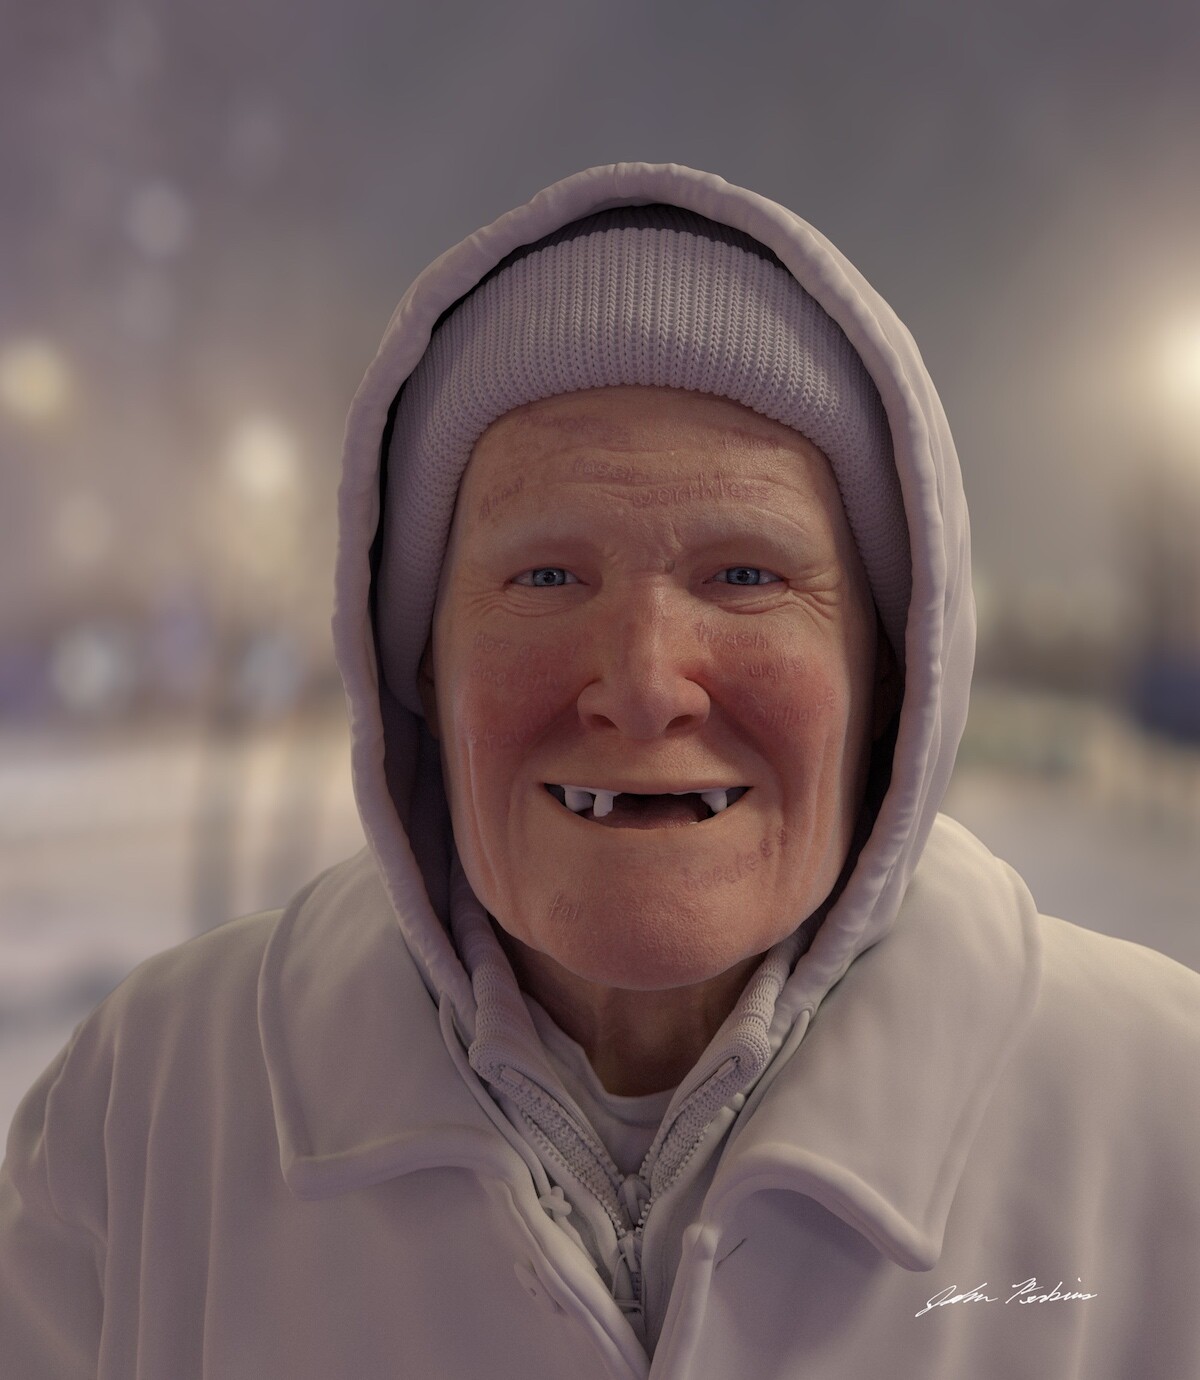
Here is another update. Kind of a lot to say this time. I was able to get the word loved finished. I tried to go for kind of a paintbrush feel for it. The beanie hat and shirt are put in as well. There was something feeling a little bit stiff with the wrinkling around the eye, so I tried to make it feel a bit more natural and part of the face more. Also tried out the new SSS algorithm in Blender that’s supposed to keep the details in the mesh a bit better. The difference is small, but I think it does do better. Interestingly, you do seem to have to raise the SSS scale quite a bit compared to the other options, yet it still maintains the details better. Ranquin also had an idea of adding freckles to the face, but I decided not to in the end just so the words would be as easy as possible to read

Oh man, the detail on the hat is killer.
I also noticed you have to tweak some values with the new SSS algorithm but overall it’s nice.
Not sure if that’s called freckles but a guy that age would have those brownish skin spots that come with older age. If it distracts the viewer from the intended message tho I think it’s OK to omit them.
Thanks ToshiCG! Yeah, it seems to have turned out pretty well in the end. I wasn’t sure what I was going to be able to get it looking like. With the freckles and sun spots, it can definitely be difficult sometimes trying to balance the story and realism, and I think I would definitely agree that the story is more important in the end. I thought I would try adding them in again towards the end of the project and see if I could get them fitting better with the scars.