Every 3dp file is one part of a more complex object,
multiple 3dps are assembled in the game engine using each part’s attachment point.
Questions:
1.) where / how is defined, which parts belong to one object?
2.) is there a single material per part? (because there is no information such as per-face assignment of materials or some sort of grouping - or is the padding a material offset maybe, and just happens to be 0 most of the time?)
3.) could materials be loaded as images into Blender? (format? path to file?)
Parts could be organized as Blender groups, LODs on layers. On export, every group would create a separate 3dp file and every layer a LOD block (up to 6th layer). The first empty found in a group would be used as attachment point. You could optionally parent the empty to something, but I wouldn’t make a script rely on parenting (it’s easy enough to find empties in groups).
To make the exporter use vertex normals, do the following:
# replace the following line:
                    file.write(struct.pack("<3f", *f.loops[i].calc_normal()))

# by this code:
                    file.write(struct.pack("<3f", *f.verts[i].normal))
I tried to improve the importer to support UVs and normals, but it crashes on setting the normals. I’ll need to contact the developers and find out what the problem is.
//edit: I managed to solve the issue, but we can actually ignore normals completely, assuming all models use automatically calculated vertex normals for smooth shading (the ones generated by Blender should equal the imported normals).
Every 3dp file is one part of a more complex object,
multiple 3dps are assembled in the game engine using each part’s attachment point.
Yes you have it right. Before going on I’ll just clarify something about attachment points and other details.
The main body files for locos, tenders, etc always have an attachment point at 0 ,0, 0 for x,y and z. IOW, the attachment point is the origin of the main body.
Truck, wheels and drivetrain components have their coordinates defined relative to the main body’s origin, with one RT3 unit being 10" at full scale. So a wheel that is 30" off the centreline at full scale will have a Y coordinate of + or - 3, and if it is say 60" forward of the body origin at full scale then it will have an X coordinate of -6 for its axle (ie: at centroid). For wheels, the attachment point is the centroid of the wheel.
Truck attachment points vary depending on what gives the best visual result on curved and/or uneven track. The game is pretty rough in this respect, so the idea is to just fudge it by trial and error so it looks reasonable most of the time.
How much the truck pivots depends on where the attachment point is placed. If a truck is attached at the main body’s origin (0,0,0) then it will not move relative to the main body. This is actually used sometimes for adding extra components that are required to not move (for example, an observation dome on a passenger car can be added as an extra “truck”, so the same base model can be reused in two different configurations).
Connecting rod attachment points are the point where they attach to a drivewheel. Piston attachment points are the point where the other end of the connecting rod goes. The game automatically sorts out the animation of the rod based on these two points.
Coupling bar attachment points are also the point where they attach to a drivewheel.
Ok, so questions:
1.) where / how is defined, which parts belong to one object?
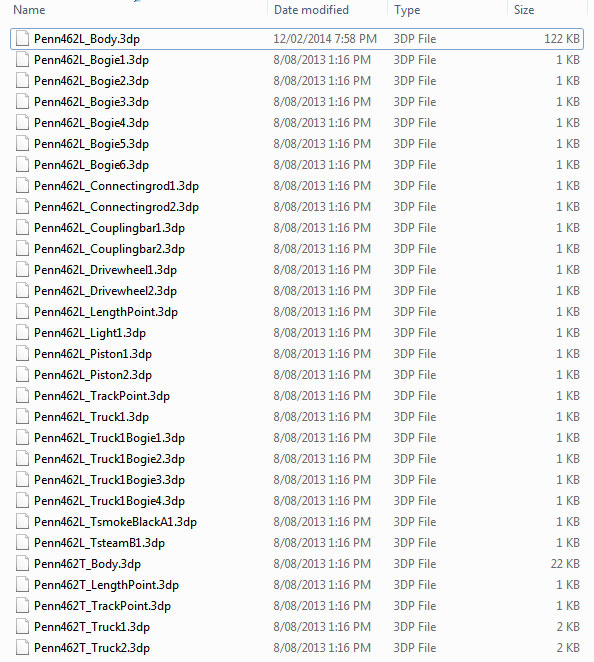
The game recognises file types based partially on naming conventions, as shown in the following screenshot. This shot shows all the .3dp files for an average steam loco and tender.
Don’t worry about the LengthPoint, TrackPoint, Light, TSmoke or TSteam files. They’re nominally .3dp but have a very simple structure that isn’t connected to mesh modelling as such. There’s no need to generate those from Blender. The other files are what defines the various components.
Apart from the .3dp files there are other files like the .lco file (for locos) and the .car file (for all units) which define some things like which skin is called, and what the code name is for the unit (Penn462 in the example shot, with suffix L for loco and T for tender) as well as some other details (car weight, years of operation, etc).
2.) is there a single material per part? (because there is no information such as per-face assignment of materials or some sort of grouping - or is the padding a material offset maybe, and just happens to be 0 most of the time?)
It’s even simpler than one material per part. It’s one skin image per body file, with all sub-components relying on that that same skin image. So locos (for example) can only have one skin image for all parts, with a maximum size of 1024x1024. The skin image is called by the .car file for that unit.
3.) could materials be loaded as images into Blender? (format? path to file?)
Yup, you could do that. I assume you’re thinking of .3dp importing of existing models here, so all that would be required would be to import the UV mapping along with the mesh, and then apply the correct skin image in Blender’s UV editor.
By the way, about this face normal thing: I understand what you were saying but perhaps I didn’t explain my opinion properly.
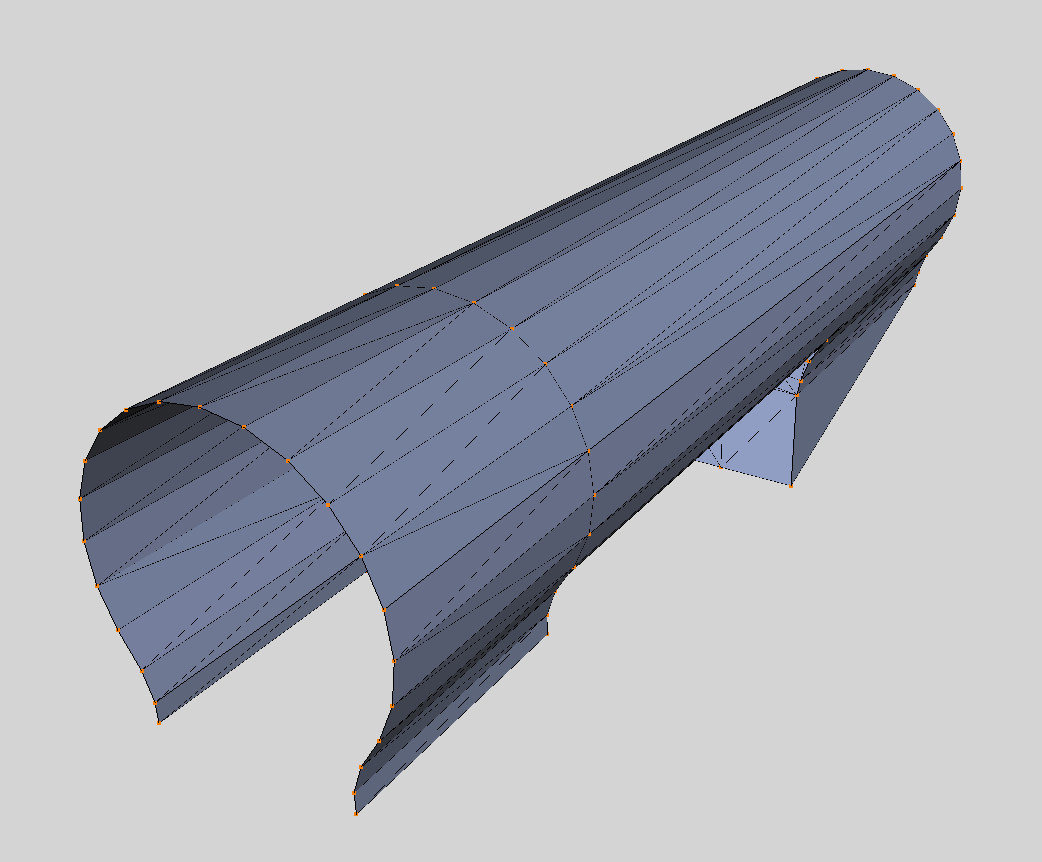
With the use of face normals giving a flat shaded result, that’s not really what’s wanted for this game. A steam loco is basically a big, in your face, cylindrical boiler on wheels. This will not look good if flat shaded. Other components are often sections of cylinders or other curved shapes too. This applies even to modern non-steam locos and cars. They often have curved sections and will suit a smooth shading much better. This is what I was referring to when I said that face normals would bork things.
Getting an accurate flat shading is far less important since hardly anything will require it, and it can be done by adjusting how you build the mesh anyway. If you were worried about high grade architectural renders you’d definitely want your flat shading accurate, but it’s not relevant for this use case. What’s required here is idiot-proof smooth shading. The best way of getting this, as far as I know, is to just use vertex normals and be done with it. It’ll work. If it also simplifies the code, so much the better.
I just noticed your edit to your post. Missed it the other day. I’ve thought of a couple of other details as well (nothing scary).
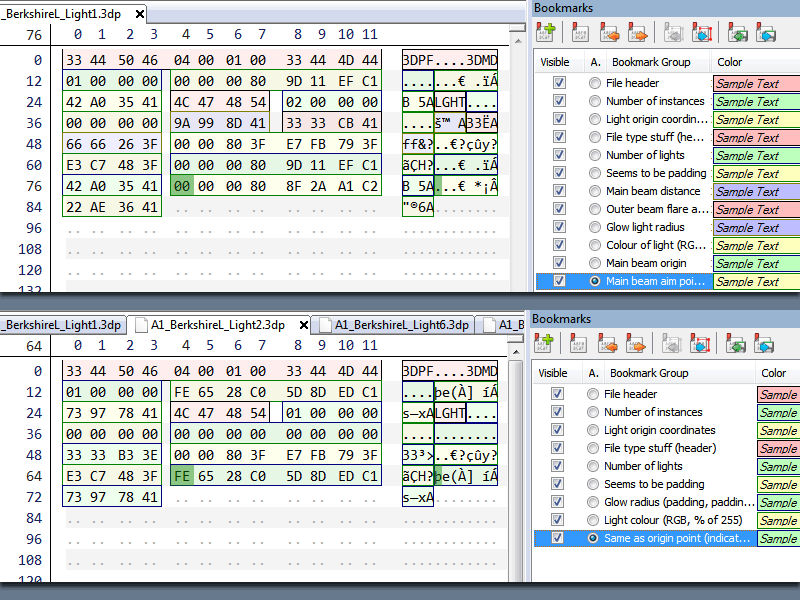
About this bit: the padding is, according to a bloke who tried to decipher this stuff some time back, a four byte integer that defines a “main direction”, whatever that is.
His notes say “4 bytes: int: main direction (0=-x, 1=+x, 2=+y, 3=-y, 4=-z, 5=+z)”. This may be correct, since all values in the default files are between 0 and 5, which could correspond to directions on the 3 major axes.
The thing is that I have checked it out by both looking through files and trying to correlate this “main direction” with the directions the face actually faces, and by testing what happens to the shading when the value is inverted (like changing 4 to 5 to get +z instead of the original -z).
The given value does not appear to have any correlation to the orientation of the face. I’ve found numerous examples of faces that share the same orientation, but have different or opposite “main directions”. IOW, just looking at the hex gives the impression that it doesn’t do anything. This is borne out when testing by reversing the value and checking the resulting shading. It seems to have no effect.
Since these bytes appear to have no relation to the actual mesh geometry, it is something which AFAICT is impossible to calculate without having access to the working notes of the original game developers. It may be something they were thinking of using for some purpose but was never implemented.* The game code does seem to have a few examples of stuff like that. However, since trying to calculate it appears to be impossible, and since the value seems irrelevant anyway, my assumption was that rather than stop implementation of a useful script it made more sense to just treat those bytes as padding. That way the game has a value it will accept (supposedly -x for all faces), and nobody needs to drive themselves nuts trying to figure out where the default values came from.
To make the exporter use vertex normals, do the following:
# replace the following line:
                    file.write(struct.pack("<3f", *f.loops[i].calc_normal()))
I tried to improve the importer to support UVs and normals, but it crashes on setting the normals. I’ll need to contact the developers and find out what the problem is.
//edit: I managed to solve the issue, but we can actually ignore normals completely, assuming all models use automatically calculated vertex normals for smooth shading (the ones generated by Blender should equal the imported normals).
Ok, thanks for the vertex normals tip.
And yes, ignoring the imported normals sounds like the way to go, if they are going to cause trouble. As you say, Blender will figure it out anyway, and exporting of normals works just fine. If the UV mapping can be imported that would be perfectly adequate.
*It is possible that the “main direction” was intended to indicate which direction the face was “mostly” facing. IOW, it may have been intended to get a direction the face normal was most inclined to. If this was the case, then the faces which don’t appear to have any correlation between “main direction” and face normal may just be modelling errors.
However, I still can’t see that it makes any real difference in practice. If it’s easy for you to calculate such a direction and you feel like throwing it into the code I wouldn’t argue, but based on my own testing I think just treating it as padding is fine.
CoDEmanX , I’m currently in the process of getting an actual custom model UV mapped and skinned to the point where it will look like something worth testing live (even though it will still be far from finished). Should have that sorted in the next day or two.
I had a thought about how to make things more usable.
Parts could be organized as Blender groups, LODs on layers. On export, every group would create a separate 3dp file and every layer a LOD block (up to 6th layer).
This idea of yours seems like a good one on the whole, but I was thinking that a useful addition would be to only make the script export objects that were not hidden.
This would be great for testing, when you have a model you want to try live in the game to see how it runs, or how the skin looks under game lighting, but that has unfinished and/or unmapped components. All that would be required would be to set the unfinished components to hidden before exporting.
So the script would check layer first, to get the overall LOD, then for groups, to get stuff for each separate .3dp file, then for non-hidden objects to get the export content for that file.
If that’s getting too convoluted, it may be best to just model the whole thing first, and then split it down into a separate .blend for each separate file. This would be fairly quick and easy since it would just be a matter of selecting and then deleting all bits that weren’t to be in that file, before saving as a new .blend.
These models aren’t hugely complex, so this would not be difficult to do. Advantage here is that you’d end up with a .blend to match each exported .3dp, which may be easier for people to get their heads around. Each blend could carry the same name as the matching .3dp, and the script could just take the .3dp file name from the .blend name.
So in that case there would be no need for the script to worry about groups. I would only need to check for layers and for non-hidden objects within layers. The script also wouldn’t have to worry about how to generate a plethora of different named .3dp files, since it would only be exporting one.
Doing it this way may keep things more manageable, both in terms of coding and in terms of general usability (bearing in mind that the target users for this script are mostly kids and old tradesmen who just like trains).
Ok dude, I just got around to exporting a stripped down and partially skinned locomotive model from Blender, and packing it into the game’s required format complete with all the required ancillary files. I was keen to test this thing out even if it wasn’t finished.
You may be pleased to know that it works. I certainly am. In fact I’m effing stoked. This is a lot better than hex editing entire models.
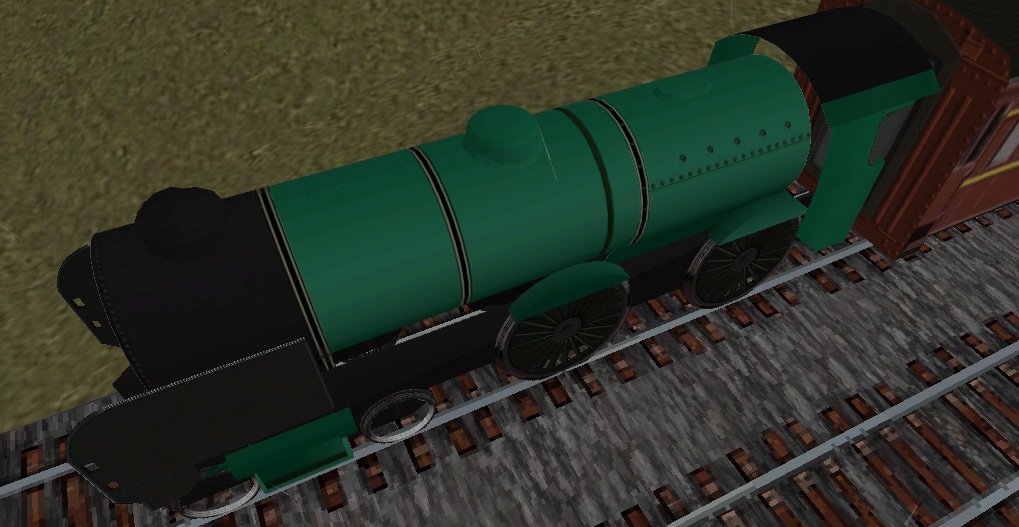
The skin looks like crap under the game’s lighting (which is different to basic Blender lighting) so I’ll have to lighten it up and bit and otherwise play around with it, but that’s all good fun. The model runs just fine in the game though, which is the main thing. The rest is just eye candy.
If you can find the time and motivation to add some of the improvements to the script that you were talking about, that would be great. Even if you can’t find the extra time and motivation it’s all good anyway. The script is quite usable in its current form.
Thank you very much for your efforts here. You just made yourself into a Railroad Tycoon legend. :RocknRoll:
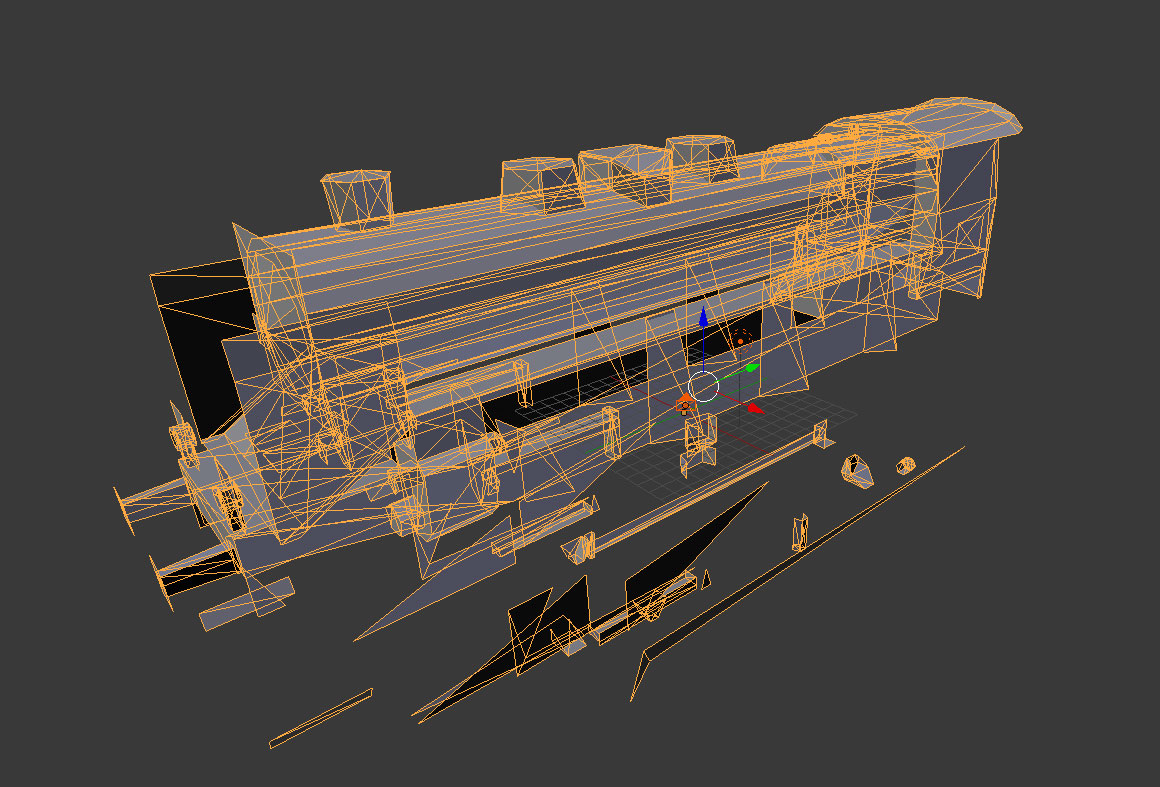
Ok, problem. Now that I have a lighter trial skin on the test model I can see what’s going on a bit better.
The problem is that it’s still being flat-shaded. Screenshot attached.
I made the suggested change to the script the other day, and only did the exporting for the model yesterday, so the script was edited before the exporting was done. It’s still flat-shaded though.
Export code for faces is currently this:
        file.seek(faces_offset)
        for f in bm.faces:
            for i in range(3):
                file.write(struct.pack("<i", f.verts[i].index + vc))
            for i in range(3):
                file.write(struct.pack("<3f", *f.verts[i].normal))
            for i in range(3):
                u, v = f.loops[i][uv_layer].uv
                file.write(struct.pack("<2f", u, 1-v))
            file.write(b"\0" * 4)
Which AFAICT is what you said it should be changed to.
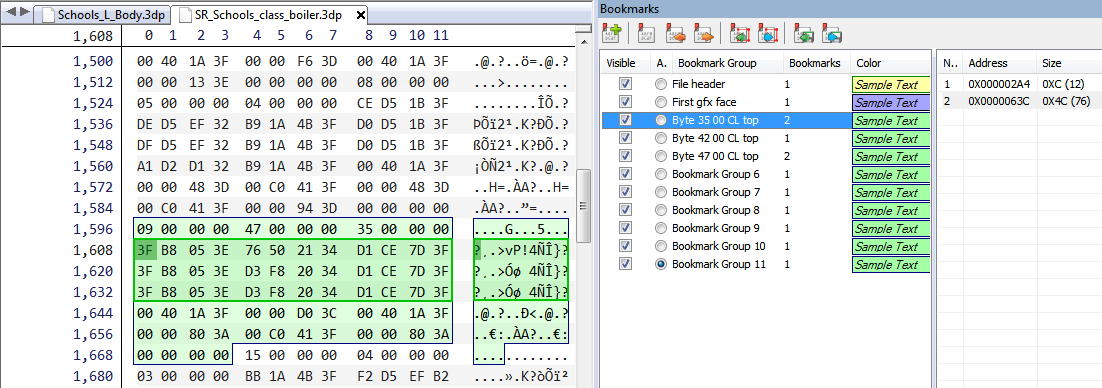
Edit: Just ran another test. Stripped the model down to the boiler only, to simplify things, then exported that as a .3dp. Opened it in a hex editor and tracked down the vertices for the centreline along the top, and the faces tied to those verts.
The hex shows the file has been exported with face normals, not vertex normals. All three verts are sharing the same values for the normal (apart from miniscule rounding error) and in this situation only two verts (the ones on the centreline) should have the same values, which should be 0, 0, 1 in decimal. The third one should be different, and 15 degrees off on the X axis.
All three are showing hex values that equate to sin 7.5 degrees, 0, cos 7.5 degrees. That’s the correct face normal for the first face next to the centreline, for a 24 sided cylinder.
Ok, so can we haz vertex normals? Pretty please? Vertex normals would be awesomesauce. :yes:
The problem is that I’m a colossally dopey bastard when I’m short of sleep.
I had edited the wrong copy of the file. :rolleyes:
After editing the right copy of the file, it does a wonderful job of exporting vertex normals. The shading in the game is now as smooth as silk knickers. This is just dandy.
However, if you got the code for UV importing working (you indicated that you had) then I would love to also have that at some point, when you have the time.
First i’m sorry for waking up an old thread. (If it is. I dont know the time frame for which a thread is considerd active.)
I find your RT3 .3dp import/export script very interesting. Because of that i would like to know of there have been any further development to it? In any case i would like if CoDEmanX could paste your latest code containing what you have done further to it. I would like it even if it’s not in a working state. I undstand that CoDEmanX have had some illness back when there were last posted. I hope that you are well again
People who give out code for free like to see results. I know this from personal experience, have written quite a lot of free non-Python code for umpteen people over the past several years. It’s mildly annoying when you write free code and then it doesn’t get used, or it does get used but they make a complete cock-up of it.
This script is going to have a very limited user base. RT3 is old game that is only played by a few diehards, and even they usually only play it intermittently. The number of people prepared to go to the trouble of actually modelling things for the game is far fewer.
Although it doesn’t have every bell and whistle imaginable the current script is quite usable. The amount of work required to use the script to make the required .3dp files is far, far less than the amount of other work required to make a functioning game model to a good standard. I can generate the actual .3dp files for even a complex model in a matter of minutes.
If you want to encourage CoDEmanX to write more code, I suggest the best way of doing it would be to show how you have used the existing code to make awesome stuff. I admit that I have been rather remiss in this respect myself, due to getting myself into a bit of a corner and the finding I had to spend time on more pressing matters, but I hope to be able to return to it soon.
PS: If you think things are tough now, you should try it the way we had to do it before this script was available. That was a really gruesome process that involved direct manual editing of the hex code.
Hey, I recently recovered and finished some high priority work, so that I should find some time to write a better script in the next days. Did anything change (use cases, opinions) that I should be aware of?
At the moment, I think the best improvement would be to get the import script to import UV mapping. My reasoning is that this would allow easy customisation of existing models without relying on extra software, which IMO would be the best way to get more people enthused about using the thing.
Constructing entirely new models from scratch can be a lot of work, and most people who still play the game either don’t seem to have the time or enthusiasm for complex modelling projects, or are worried that the bar to entry seems too high for them. I think they’d be more comfortable with taking something that already works and tweaking it to suit a new purpose.
Currently, the only way of getting models into Blender with UV mapping intact is to import the .3dp to 3dconverter, and then export from 3dconverter as .obj (making sure you select the right type of .obj from the options), then import the .obj into Blender, then rotate it 90 degrees around the x axis (due to the exported .obj being out of whack compared to Blender’s axes), and then assign the components to the right skin image. It works, but it’s a bit of a rigmarole and is reliant on software that requires payment for the license if you want to keep using it (there is a free trial version of 3dconverter available, but it has a 30 day limit).
If the import stuff can be sorted so it’s just straight .3dp>Blender with UV mapping intact, that would be very helpful. Even better if it cane be made to do all components in one hit (ie: batch import of .3dp’s) by just putting all the required files into one folder, and then importing the lot at once.
If you want to take things further than that, some way of automating handling of LOD’s would be useful too. TBH, handling the LOD’s manually is not that big a problem for anyone who knows how the file structure works. It requires a bit of careful copy/pasting but it’s simple enough.
Some hex editing is still going to be necessary anyway for some of the game files involved, so anyone who wants to do this stuff is going to have to know how to handle the hex to some extent. This means you don’t necessarily have to worry about trying to automate everything if it ends up being too much bother.
Anyway, if you’re into it I can see how it should be theoretically possible to make the import script grab each LOD from an existing .3dp, and assign each LOD to a different layer. The biggest problem is with different components that have their own files.
If you’re modelling a locomotive that has connecting rods, wheels, etc, etc and these all have their own .3dp files, I can see the import process becoming quite convoluted if you want to automate it all. It’d have to go through all .3dp’s and pull out the bits and assign them all to the right layers in the same overall model.
It may end up a bit of a monster if everything is automated. Up to you how far you want to try and take it.
And I’ll have to give possible improvements some more thought. TBH I’ve been busy with other things lately, so haven’t given the existing script a lot of use.
Can you tell me more about the lco / car files, or even provide me a full set of files related to a single model? (loco, tender, skin, lco, car, …). I believe they will be needed for a good import.
Is the game using tga textures, or something similar? dds, jpg?
The TSteam, Light and similar simple 3dp files, do they just contain an attachment point? Or do they actually have mesh data?
Might the “main direction” bytes be used for physics and not shading?
Regarding attachment points: using groups is an option, but not fail-safe, because objects could be part of multiple groups or not of any. It’s still the best option IMO, because groups can be named (=part name) and an empty be used to determine the attachment point. A preflight check could inform the user if there are objects, which are not hidden and not part of any group (=not exported), or if they are part of multiple groups (=exported multiple times).
I changed the addon slightly and hope it imports UVs correctly:
bl_info = {    "name": "Railroad Tycoon 3 (.3dp)",
    "author": "CoDEmanX",
    "version": (0, 5),
    "blender": (2, 74, 0),
    "location": "File > Import | File > Export",
    "description": "Export (and partially import) 3dp file format.",
    "warning": "",
    "wiki_url": "",
    "category": "Import-Export",
}

import bpy
import bmesh
import struct
import os
from binascii import unhexlify
from bpy_extras.io_utils import ExportHelper, ImportHelper
from bpy.props import StringProperty
from bpy.types import Operator


def write(context, filepath):

    class QUAD:
        BEAUTY = 0
        FIXED = 1
        ALTERNATE = 2
        SHORTEDGE = 3


    class NGON:
        BEAUTY = 0
        EARCLIP = 1

    try:
        file = open(filepath, "wb")

        file.write(unhexlify(
            "33 44 50 46  04 00 01 00  33 44 4D 44  01 00 00 00"
            "00 00 3E C0  ED 1E 5F C1  09 0A 4D 40  49 4E 53 54"
            "00 00 00 00  00 00 00 00".replace(" ", ""))
        )
        verts_offset = file.tell()


        scene = context.scene

        verts_total = sum(len(ob.data.vertices) for ob in scene.objects if ob.type == 'MESH')
        faces_offset = verts_total * 12 + verts_offset

        vc = 0
        tc = 0


        for ob in scene.objects:
            if ob.type != 'MESH':
                continue
            bm = bmesh.new()
            bm.from_object(ob, scene)
            bm.transform(ob.matrix_world)
            bmesh.ops.triangulate(bm, faces=bm.faces, quad_method=QUAD.BEAUTY, ngon_method=NGON.BEAUTY)
            uv_layer = bm.loops.layers.uv.active
            if uv_layer is None:
                raise Exception("'{}' has no active UV map.".format(ob.name))

            file.seek(verts_offset)
            for v in bm.verts:
                file.write(struct.pack("<3f", *v.co))
            verts_offset = file.tell()

            file.seek(faces_offset)
            for f in bm.faces:
                for i in range(3):
                    file.write(struct.pack("<i", f.verts[i].index + vc))
                for i in range(3):
                    file.write(struct.pack("<3f", *f.loops[i].calc_normal()))
                for i in range(3):
                    u, v = f.loops[i][uv_layer].uv
                    file.write(struct.pack("<2f", u, 1-v))
                file.write(b"\0" * 4)


            faces_offset = file.tell()
            vc += len(bm.verts)
            tc += len(bm.faces)
            bm.free()

        file.seek(32)
        file.write(struct.pack("<2i", vc, tc))
    except (IOError, OSError) as err:
        return "There was trouble writing the file '{}':
{}".format(
            bpy.path.basename(filepath), err)
    except Exception as err:
        return "An error occurred:
{}".format(err)
    finally:
        file.close()


def read(context, filepath):
    try:
        scene = context.scene
        faces = []
        uvs = []
        invert_v = lambda x: 1 - x[1] if x[0] % 2 else x[1]

        file = open(filepath, 'rb')
        file.seek(32)
        vert_count, face_count = struct.unpack("<2i", file.read(8))

        verts = struct.unpack("<{}f".format(3*vert_count), file.read(12*vert_count))

        for i in range(face_count):
            faces.extend(struct.unpack("<3i", file.read(12)))
            file.seek(36, os.SEEK_CUR)
            uvs.extend(map(invert_v, enumerate(struct.unpack("<6f", file.read(24)))))
            file.seek(4, os.SEEK_CUR)


        me = bpy.data.meshes.new("imported_3dp")
        me.vertices.add(vert_count)
        me.vertices.foreach_set("co", verts)


        me.loops.add(3*face_count)
        me.loops.foreach_set("vertex_index", faces)


        me.polygons.add(face_count)
        me.polygons.foreach_set("loop_start", range(0, 3*face_count, 3))
        me.polygons.foreach_set("loop_total", [3] * face_count)

        uv_tex = me.uv_textures.new()
        uv_layer = me.uv_layers[-1]
        uv_layer.data.foreach_set("uv", uvs)


        mat = bpy.data.materials.new("Skin")
        ts = mat.texture_slots.add()
        ts.texture_coords = 'UV'
        ts.uv_layer = uv_layer.name
        tex = bpy.data.textures.new("Tex", 'IMAGE')
        ts.texture = tex
        me.materials.append(mat)


        me.validate()
        me.update(True)
        me.calc_normals()

        for ob in scene.objects:
            ob.select = False
        ob = bpy.data.objects.new("imported_3dp", me)
        ob.select = True
        scene.objects.link(ob)
        scene.objects.active = ob
        scene.update()
    except (IOError, OSError):
        return "There was trouble reading the file '{}':
{}".format(
            bpy.path.basename(filepath), err)
    except Exception as err:
        return "An error occurred:
{}".format(err)
    finally:
        file.close()


class Export3dp(Operator, ExportHelper):
    """Export Railroad Tycoon 3 (.3dp)"""
    bl_idname = "export_mesh.3dp"
    bl_label = "Export 3dp"


    # ExportHelper mixin class uses this
    filename_ext = ".3dp"


    filter_glob = StringProperty(
        default="*.3dp",
        options={'HIDDEN'},
    )


    def execute(self, context):
        err = write(context, self.filepath)
        if err:
            self.report({'ERROR'}, err)
            return {'CANCELLED'}
        return {'FINISHED'}


class Import3dp(Operator, ImportHelper):
    """Import Railroad Tycoon 3 (.3dp)
       NOTE: Does not support vertex normals and UV mapping
    """
    bl_idname = "import_mesh.3dp"
    bl_label = "Import 3dp"


    # ImportHelper mixin class uses this
    filename_ext = ".3dp"


    filter_glob = StringProperty(
        default="*.3dp",
        options={'HIDDEN'},
    )


    def execute(self, context):
        err = read(context, self.filepath)
        if err is not None:
            self.report({'ERROR'}, err)
            return {'CANCELLED'}
        return {'FINISHED'}


def menu_func_export(self, context):
    self.layout.operator(Export3dp.bl_idname, text="Railroad Tycoon 3 (.3dp)")

def menu_func_import(self, context):
    self.layout.operator(Import3dp.bl_idname, text="Railroad Tycoon 3 (.3dp)")


def register():
    bpy.utils.register_module(__name__)
    bpy.types.INFO_MT_file_export.append(menu_func_export)
    bpy.types.INFO_MT_file_import.append(menu_func_import)


def unregister():
    bpy.utils.unregister_module(__name__)
    bpy.types.INFO_MT_file_export.remove(menu_func_export)
    bpy.types.INFO_MT_file_import.remove(menu_func_import)


if __name__ == "__main__":
    register()
It creates a material and a texture, but you need to load an image manually and assign it in UV editor.
Yeah sure, I can give you all that if you really want it. The .lco and .car files have nothing to do with the actual modelling though. They’re purely for setting things like ID’s, weights, power, fuel economy, etc, etc. Do you still want everything?
Is the game using tga textures, or something similar? dds, jpg?
DDS by default (DXT3 version) but it will accept TGA as well. Dead basic in both cases, with no allowances for normal maps or anything fancy. Just a plain image.
The TSteam, Light and similar simple 3dp files, do they just contain an attachment point? Or do they actually have mesh data?
The smoke and steam ones are just attachment points. The light files contain a bit of other trickery as well (light colour and size, etc). No actual mesh data in either case.
Might the “main direction” bytes be used for physics and not shading?
Possibly, although offhand I don’t see how. There are no deformation physics in the game. Can you think of a way in which those bytes could be used for some sort of physics?
Regarding attachment points: using groups is an option, but not fail-safe, because objects could be part of multiple groups or not of any. It’s still the best option IMO, because groups can be named (=part name) and an empty be used to determine the attachment point. A preflight check could inform the user if there are objects, which are not hidden and not part of any group (=not exported), or if they are part of multiple groups (=exported multiple times).
I was thinking about this a bit. If an object is part of multiple groups it would usually be in a situation like the locomotive body, where you have lots of bits and pieces that you want to all end up in the body file after exporting. You might have various groups to keep them all handy while modelling, but set all of those to one parent group for the entire body file. If the export script only checked for parent groups and ignored all child groups, that should solve that problem.
I can still see it being a nuisance in other ways. For example, it’s sometimes handy to hide all the wheels while modelling so it’d be natural to group those for convenience. If the export script checks for parent groups it would then try to export all wheels to one file, which would obviously bork things, so you’d have to get rid of the parent group before exporting and make sure all wheels were set to individual groups of their own. That’s not a major problem, as long as people remember to do it.
Same for ungrouped components. If necessary, just make it a requirement that all objects are assigned to a group, even if they’re the only object in their group. Putting them in a group is a bit more work, but not much in the scheme of things.
I changed the addon slightly and hope it imports UVs correctly:
    scene = context.scene

    verts_total = sum(len(ob.data.vertices) for ob in scene.objects if ob.type == 'MESH')
    faces_offset = verts_total * 12 + verts_offset

    vc = 0
    tc = 0
    for ob in scene.objects:
        if ob.type != 'MESH':
            continue
        bm = bmesh.new()
        bm.from_object(ob, scene)
        bm.transform(ob.matrix_world)
        bmesh.ops.triangulate(bm, faces=bm.faces, quad_method=QUAD.BEAUTY, ngon_method=NGON.BEAUTY)
        uv_layer = bm.loops.layers.uv.active
        if uv_layer is None:
            raise Exception("'{}' has no active UV map.".format(ob.name))

        file.seek(verts_offset)
        for v in bm.verts:
            file.write(struct.pack("<3f", *v.co))
        verts_offset = file.tell()

        file.seek(faces_offset)
        for f in bm.faces:
            for i in range(3):
                file.write(struct.pack("<i", f.verts[i].index + vc))
            for i in range(3):
                file.write(struct.pack("<3f", *f.loops[i].calc_normal()))
            for i in range(3):
                u, v = f.loops[i][uv_layer].uv
                file.write(struct.pack("<2f", u, 1-v))
            file.write(b"\0" * 4)
        faces_offset = file.tell()
        vc += len(bm.verts)
        tc += len(bm.faces)
        bm.free()

    file.seek(32)
    file.write(struct.pack("<2i", vc, tc))
except (IOError, OSError) as err:
    return "There was trouble writing the file '{}':
    me.validate()
    me.update(True)
    me.calc_normals()

    for ob in scene.objects:
        ob.select = False
    ob = bpy.data.objects.new("imported_3dp", me)
    ob.select = True
    scene.objects.link(ob)
    scene.objects.active = ob
    scene.update()
except (IOError, OSError):
    return "There was trouble reading the file '{}':
class Import3dp(Operator, ImportHelper):
“”“Import Railroad Tycoon 3 (.3dp)
NOTE: Does not support vertex normals and UV mapping
“””
bl_idname = “import_mesh.3dp”
bl_label = “Import 3dp”
# ImportHelper mixin class uses this
filename_ext = ".3dp"
It creates a material and a texture, but you need to load an image manually and assign it in UV editor.
Sounds good. It’s too late tonight, but I’ll give it some testing tomorrow night. Cheers.
If you can provide me a full set of files and some explanation for each, that would be great (mainly what the contained bytes mean and what the data structures are).
I was thinking the mysterious bytes might be used for collision tests, but it’s unlikely in a game like this.
Ok, I’ll whip up a comprehensive guide to an example model. I’ve done a lot of the work already, but reformatting it for better clarity is a good idea anyway.
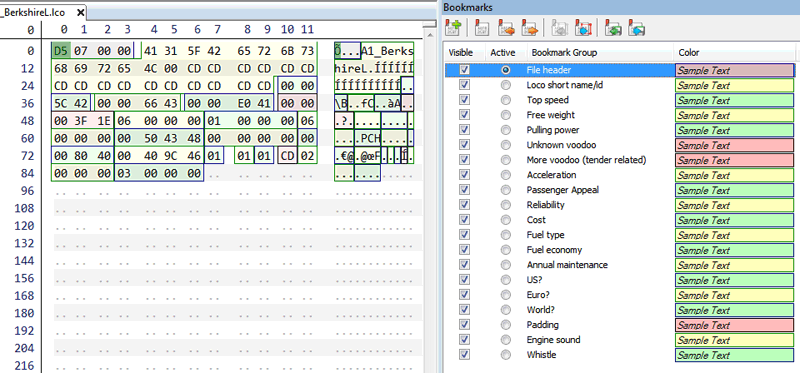
Just as a quick existing example, here are screenshots I had for an .lco file, a .car file, and for two different light files.
As you can see, the .lco file doesn’t have any mesh data. Apart from setting an ID for the unit, the content is all to do with stats.
The “Unknown voodoo” and “More voodoo (tender related)” bytes are again things which do not appear to do much.
The first “Unknown voodoo” bytes have the same value for all locos, with one exception for one locomotive. As far as anyone has been able to tell from testing over the years, these bytes don’t actually have any purpose. There’s nothing discernably different about that locomotive. Those bytes are probably just a leftover from alpha, at a guess.
The “More voodoo (tender related)” will set a tender slot as long as the value is not 255, but again all the other values don’t seem to affect anything noticeable. So for a diesel or electric loco with no tender those bytes are set to 255, but for steam locos you can set it to 34 or 218 without being able to tell the difference.
The .car file sets availability dates, but apart from that its content is to do with which skin images are called, and which profile icon is called for the in-game menus.
The ***_Light1.3dp is for a headlight, which has a point light for lens glow and a main beam spotlight that extends forward. The ***_Light3.3dp is for a simpler small light, which just has a point glow.
This game doesn’t do collisions. If two trains approach on the same track, the game handles it by stopping the train with the lower value cargo, or with the lower priority setting, and making it translucent while the higher priority train just passes straight through it. Collision physics are way beyond the scope of this old game.
I’ve been mulling over the grouping thing too, but haven’t really got any thoughts in order yet.
ETA: Since you’re German I’ll let you pick your favourite example from the available default locomotives. Would you like a complete guide to the BR 01 model, or would you prefer the BR 52? Either is good for me.
Later edit: Just gave the new script a quick test. Yes, it seems to import UV mapping just fine. Very handy. Thanks for that.
One thought I have had already: at the moment each imported component is being named as imported_3dp, imported_3dp.001, imported_3dp.002, etc. How difficult would it be to make the import script pick up the name of the .3dp file and use that instead?
So for example, if you’re importing Class01L_Body.3dp the import script would give the new Blender object the name of Class01L_Body instead of imported_3dp. If this is easy to arrange I think it would be very useful.
I see. The .car file seems very important then, because it references the skin and the base name for all 3dp files (or is there another file that lists all parts of loco+tender?).
Ok, I’ll whip up a guide for that one. Give me a day or so to get it all together.
The .car file is important and yes, it does set the base name for all files. However, taking the case of the BR 01 as an example, the base name is “Class01L” but then all the various components extend that base name with an underscore, followed by the name of the component. This is how the file names for components are constructed, so you end up with Class01L_Body.3dp for the loco body and Class01L_Drivewheel1.3dp for the right side drivewheel, etc, etc.
This means that when it comes to naming objects on import, the .car file isn’t really useful. It’d be better to just grab the file name of the .3dp and use that, if possible. If the script can do that, all components will automatically be named the same as the .3dp files they come from, which is going to be the most convenient in practice.
If making the script do this is too much of a PITA, it’s not a big deal. People can just rename objects themselves, via copy/paste, as they import the files.
 This is a lot better than hex editing entire models.