Hello everyone, I am somewhat new to blender, but I can do some complex models, the problem is that I have a lot of trouble with the bones.
Right now, I’m trying to finish an alien (from the movie alien) but the head bone deforms incorrectly. the back of the head deforms a lot.
I made a single model, and a single bone structure starting from the head, there’s a small bone which is the starting bone, and from there, two bones come out, the head bone, and the neck bone.
also, all the other bones seem to move the part of the back of the head that moves weirdly.
I already turned off the bone envelopes
TBH - I’d have to see the .blend file… So I could see what vertex groups you have and what the weighting is on them. Otherwise, it would just be a guessing game.
Normally, if the .blend files are small enough, you can add them to your post as an attachment, just like I think you did with your picture. But as an anti-spam measure, your post count has to be above a certain number (not sure what that number is). Try hitting the ‘go advanced’ button below and use the paper clip icon to attach the file.
If that won’t work, another way would be to post your .blend to a file sharing site and post the link to it here. Once again you can’t post links unless your post count is above a certain number. So if you can’t post a link, type in the address in your reply with maybe some spaces in it.
you can upload it to somewhere in the net (media fire might be best, but I just download and dont knowhow to upload there)
then post the link here.
but dont send the virus otherwise no one will open it ^^
Thanks SGPSGP for posting the .blend file, I found your problem. I personally hate being a member of a ton of websites, but a file sharing site does help you to share files too big to share on this site.
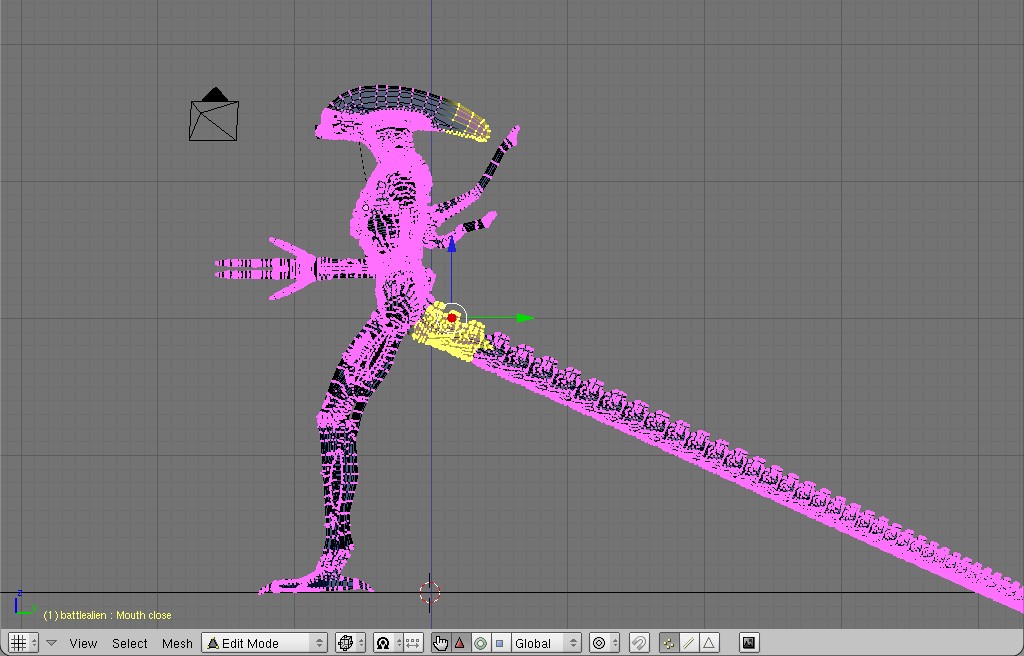
You problem is fairly simple. In this screen shot all the selected vertices are part of the bone group B TS1 I think it was.
The mis behaving parts of the head are partly influenced by a vertex group named ‘B TS 1’.
To see this for yourself, select the mesh in object mode, go to edit mode, and in the links and materials panel select the vertex group ‘B TS1’ and hit the button ‘select’ right below. That will select all vertices belonging to that group. So basically, the back of the head is influenced by the tail bone. I couldn’t fix it with weight paint. I manually selected the vertices at the back of the head, selected the ‘B TS1’ vertex group and hit the remove button to remove those vertices from that group. Then the head worked just like you want it to.
I suspect you probably weight painted the tail portion, and a bit of weight painting ‘overspray’ caused this to happen. If you want me to, I can upload the fixed up .blend file to my 4shared account so you can see it yourself, just let me know…