I got my scene to look almost perfect, which also allowed me to see what the original creator was doing while creating this scene, but I just can’t figure out where to put the light relative to the teapot in order to get the lighting the same and the shadow in the correct spot.
If you have a few minutes, I’d appreciate you taking a look at the scene and seeing if you can figure out where the lightsource was placed in the original; or better yet, if you have POVRay and can take a look at the preview scene, it’s in 3.7\scenes\advanced\teapot.
All feedback is highly appreciated, also if you have tipps or could tell me your opinion on how I’ve done so far. Thank you!
Looking at the reflections in the original, it seems like the light source is accompanied by some kind of reflector object that’s placed behind it. Also, the original has self reflections, which you won’t be able to replicate in Eevee.
I think your light source is already roughly in the correct spot, but the shading doesn’t match the original. Ironically, you might be able to replicate a 90s render easier in Cycles than in Eevee: back then, they were often using low quality ray tracing and had not yet started using the tricks and real time optimizations found in Eevee.
Just make sure you have 0 diffuse bounces, use only diffuse and glossy materials with no roughness, set the point light radius to 0 for sharp shadows, set the filter width (in the “film” section) as low as possible to remove the anti-aliasing, and Cycles will be almost there.
However, I’m not sure it would be possible to fully match the original. The original has sharp reflections, but the specular caused by the lamp is blurry. This isn’t something that modern renderers can even really do. Maybe it would be possible to get close by doing a secondary render pass with a rough material and only light objects visible, and compositing that into the render.
@etn249 was pretty spot on with Cycles and thank you for the tipps.
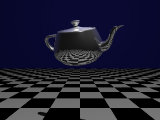
First, this is the point light now confidently in the right spot (or at least 90% close enough): my recreation the original
Overlay them, the confidence is way over 90% for the positioning of the point light and the raytracing. The only missing piece is the brightness. I submit to you, area light (emission plane):
IT’S SOOO CLOSE, I can taste it!
Interestingly, the point light shadow disappears, because the area light is too bright. So to conclude: In order to accurately represent the sharp reflections, the point shadow and everything else, we definitely need to make some sort of composite. But my ultimate goal is still to get everything in one pass.
Again, any and all tipps and recommendations are welcome.
You should put the roughness reflection in the teapot material to 0.
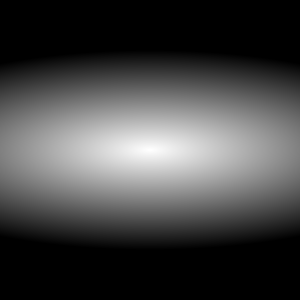
You might fake the pale blue halo in the edge of the teapot by adding a circle or emisphere to the scene, make the center emissive with that blue/desaturated color , and the borders transparent ( a gradient basically).
Then set this object to show up only in the reflection. And put it bellow and behind the teapot.
Thank you for your feedback, I’m gonna try experimenting with this. But the roughness is not just the factor needed to recreate the blue halo. The complication is that, yes you’re right, the roughness should be 0, which would cause clean reflection of the checkered floor etc., but the surface of the teapot also actually diffuses the lightsources, which afaik can only be achieved with a certain roughness amount. The two are mutually exclusive, but somehow have to appear together.
I should have added my file, gonna do that now.
Old renderers did the reflection of light objects in a way that was faked and not physically correct. Basically, they artificially added a bright spot where the light source would have appeared in the reflection. If you wanted to replicate this, you would need to create a spherical emissive object with a gradient, which appears only in the reflection and replaces the point light’s glossy contribution.
here is an exemple, using a sphere which becomes transparent at an angle.
Here is the scene. Note that both the point light and blurry sphere have their visibility settings altered so there are no incorrect shadows or double speculars. blurry_light.blend (986.5 KB)
Thanks, @etn249 explained it very nicely, once again, just before you. But, I think I’m getting there with a few more experiments based on this new information. The file is now on the top of my update post.
Ok, so I started a new file because of a glitch where the world color wouldn’t show up in cycles, but anyway. This file contains the almost final product, I dialed it in to near perfection. The biggest problem was interpreting the illusive T_Chrome_5E material from POVRay, which apparently is only possible with two seperate materials, one diffuse and one glossy, which I think @etn249 suggested at the very start.
A perfect way would be to get the transparent or translucent yet glossy material to be visible in all parts that reflect something, but completely invisible in the parts that don’t, but I’m not sure how to do that.
I also dialed in the way light interacts with the other planes and I should mention that this scene is modelled by aligning the objects the same way they are in the original POVRay file.
I tried to see what I can do to make it closer. I think I got part of the way there and managed to make the specular quite close using my blurry object trick and by completely changing the teapot’s material.
However, the blue background is reflecting differently. Looking at the original, I’m not sure the blue background is actually reflecting in the teapot. Either the background was replaced, or the material’s reflection works way differently from how Cycles does it.
When I look at the reflections in the original, it looks like there are actually multiple walls and a ceiling, which might have lighter colors than the blue background. You can see the teapot reflecting some light blue shades on the sides, only the parts that face the camera are showing black, like it’s a 3 walled room with an opening behind the camera.
Would make sense, I mean where else would the blue wraparound and the top light come from. Except, in the orignal, it’s just a plane with an undefined size:
Does povray even work in Blender still? I once tried it a few years ago and could only get it to work partially, it seemed to lack some of its features and looked quite buggy.
I never got it to work… but blender also crashes if I intend to use any version newer than 2.80, so…
BUT, I have an even better answer. What does T_Chrome_5E look like if it had to be recreated in blender cycles? Like this:
By putting some walls with a gradient around the scene, it’s possible to re-create the side reflections.
For this image, I also lowered the filter size in the render settings, so the anti-aliasing is less perfect and has a slight pixellated look, like the original.
This. Is perfect.
Of course it’s not “perfect”-perfect, but I think this is as close as we can get without custom render engines. I’m satisfied… for now.
You’re pretty awesome, I’m glad we found some conclusion. Thanks for your help ^^
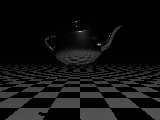 my recreation


![https://www.deepakg.com/_images/2017/teapot/[email protected]](https://www.deepakg.com/_images/2017/teapot/teapot@2x.png)