As the title says:
Is there a way to lock a mapped image so you can move vertices beneath it independently, without moving the image?
As the title says:
Is there a way to lock a mapped image so you can move vertices beneath it independently, without moving the image?
User preference setting in Input allows you to slide edge loops with correct UVs. Look for 3D view twirl down, then Mesh twirl down. In the Loop and slide section select Correct UVs. I have not found a way to slide vertex with correct UVs.
Thank you - I tried, but the image is still changed when I move the underlying mesh.
Sorry, works for me 2.69 r60991. this from bug tracker
The only way i found to enable “Correct UV” for the Loop Cut (CTRL+R) function is this :
Now you can go back at adding your CTRL+R loop cut and you will see that the UV is now corrected as it should.
That inconsistency and odd method is not the only one :
We saw that “Correct UV” is only editable through a CTRL+E -> Edge Slide.
But now, load default factory so the Correct UV is disabled by default again.
The “Correct UV” setting is not there (while it is there if you went through CTRL+E -> Edge Slide)
Thank you again! It’s strange, I think I followed the procedure but the image still followed the movements of the mesh. At any rate, I think I hoped there was a bit more straight forward method.
But it was interesting to get a look into areas of Blender where I haven’t been before (the depths of user preferences…).
UV project modifier is one way.
It uses another object as a projector and keeps the UVs in place so you can modify the mesh however you like.
Thank you - that sounds very interesting! I’m going to try it first thing tomorrow.
If you have two meshes, A and B - and B’s UVs are projected to A - can you then after editing copy or move the UVs from B to A, so that you can delete B? Or are you stuck with both versions of the mesh permanently?
There is no UV transfer happening. Existing UV map is modified to line-up with another object, or even multiple objects.
Edit: here’s a comparison
Thank you very much for your time! And please excuse me for not quite following this; I do my best to wrap my head around it, so to speak, but I’m new at this. ![]()
What I mean is: Doesn’t this method imply that you have two versions of the same mesh in your project, permanently? And if so, won’t that complicate things further down the road, at least by making the project larger, and perhaps also render- and animation-wise?
No. In the example I used a plane object as a projector for each mesh that uses the UV project modifier. They’re just shown as wireframe to not block the view. That’s 4 vertices, 1 face, 2 triangles more, not a duplicate of the original.
For animation you could parent the helper object to the object or vertices, or just apply the modifier. Could also bake the textures to one in blender render if needed.
Thank you again, JA12. May I ask if this means that I can delete the ‘projector’ mesh after I have applied the modifier?
Do you happen to know a reasonably understable site that explains how the modifier should be used, step by step? I’ve spent a couple of hours trying to figure it out, but no luck so far.
(I created two objects - A and B - and tried any combination I could think of as to which one should be the projector and which one should be the ‘projectee’, as this isn’t clear (at least not to me) in the Blender manual, and tried variations where only A or B (or both) had UV-mapped images on them, and I tried most of these variations in combination with different modifier Options. Still, nothing happened.)
Yes the helper object is not needed after that. Just remember not to apply modifiers (in general) until you absolutely have to.
Also note that UV project modifier is just one suggestion that answers your question but does not apply to all texturing/mesh editing work.
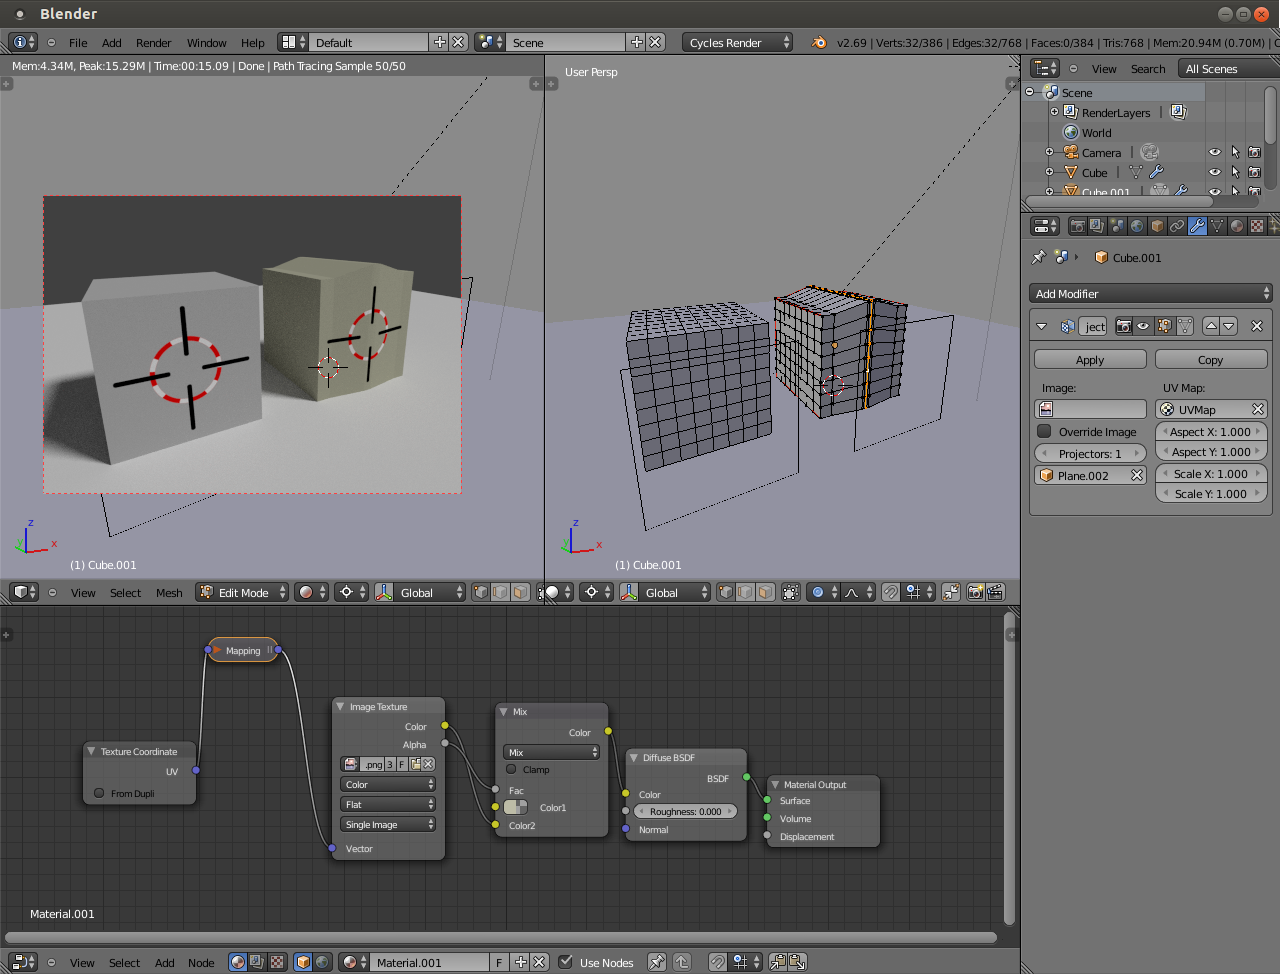
I don’t know where to find a good tutorial. I’ll try to explain the process here.
There are already screenshots of these so I use two objects: Cube, which is our main object and Plane which is our projector.
Thank you very much for your great tutorial.
Now it works. I think the point I’ve been missing was the (probably obvious) fact that the projector should face the target.
So the projector - the plane - actually functions a bit like a mirror that reflects the target’s own mapped image (though it also projects ‘around corners’). I’m very grateful for this, it can obviously be used for a really wide range of things.
And yes, the mesh can freely be edited without moving the projected image. Now I just hope it will survive in Octane Render, as many texture related things behave rather differently in that program.
There’s just one thing I don’t quite get, and I can’t figure out yet whether it’s important or not… As far as I can see, there’s no longer any way to edit the mapping itself in the UV-editor. So I guess that in the end you have to choose if you’ll use ordinary mapping or the UV Project Modifier.