Here is a simplified example:
CarCurve.blend (871.0 KB)
To fully understand it I recommend you recreate it reading carefully Batfinger’s instructions in the stack exchange thread to create the control mesh and bones.
He uses a simple line of vertexes with vertex groups, I made an arrow shape, (a simple line of vertices may be more accurate but also more tricky to select)
He was using the z location of the control mesh for the curve modifier I used the y location, you may have to try different axis’s depending on how and where you create the curve and control mesh.
I also added 2 things to his example.
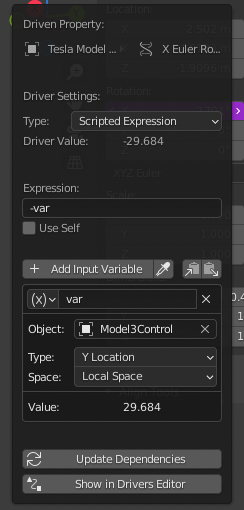
1: I used the y location of the control plane as a driver variable for the wheels rotation, look at the driver in the wheel’s rotation value. I had to multiply it by -1 to get the rotation right and I also divided by 2 because they rotated too fast. To get the exact rotation speed you would have to calculate the circumference of the wheels and work out the equation with the y displacement.
2: I used the front bone to turn the front wheels when doing bends.
As you can see in my animation the wheels rotate correctly around all the corners and up and down hills. If you manually move the control mesh on the y axis you will see that the wheels will turn forwards when you go forwards and backwards when you go backwards.
The key points to it all are:
a. The control mesh has a curve modifier that deforms the vertices along the curve on one axis.
When you move the mesh on that world axis the vertices move along the curve.
b. The 2 bones have 3 constraints the back “car” bone has a copy location constraint to the back vertex group, it also has a track to constraint pointing to the middle vertex group.
The front bone has a track to constraint pointing to the front vertex group.
c. I parented the car body and back wheels to the back bone “CarBone” and the front wheels to the front one “SteeringBone”.
d. I added a driver to the wheels x rotation using the y location of the control mesh as the main value.
Good luck and happy blending.