Character Bust - 3D Digital Sculpting

Hello Guys! This is my first time posting here, I am a 3rd year 3D student at a University in Glasgow, and for one of my module I was tasked to create a photo-realistic character bust with proper human anatomy. Our lecturer gave us freedom to use any render engine for our renders and any additional software so it was clear for me I will use Blender as my main software :smiley:

This is my first time approaching to create a photo-realistic character, so I was really excited about it. I am fairly new to sculpting as well (although I did some practice last summer with some stylized characters), so learning about anatomy was the first thing I did.

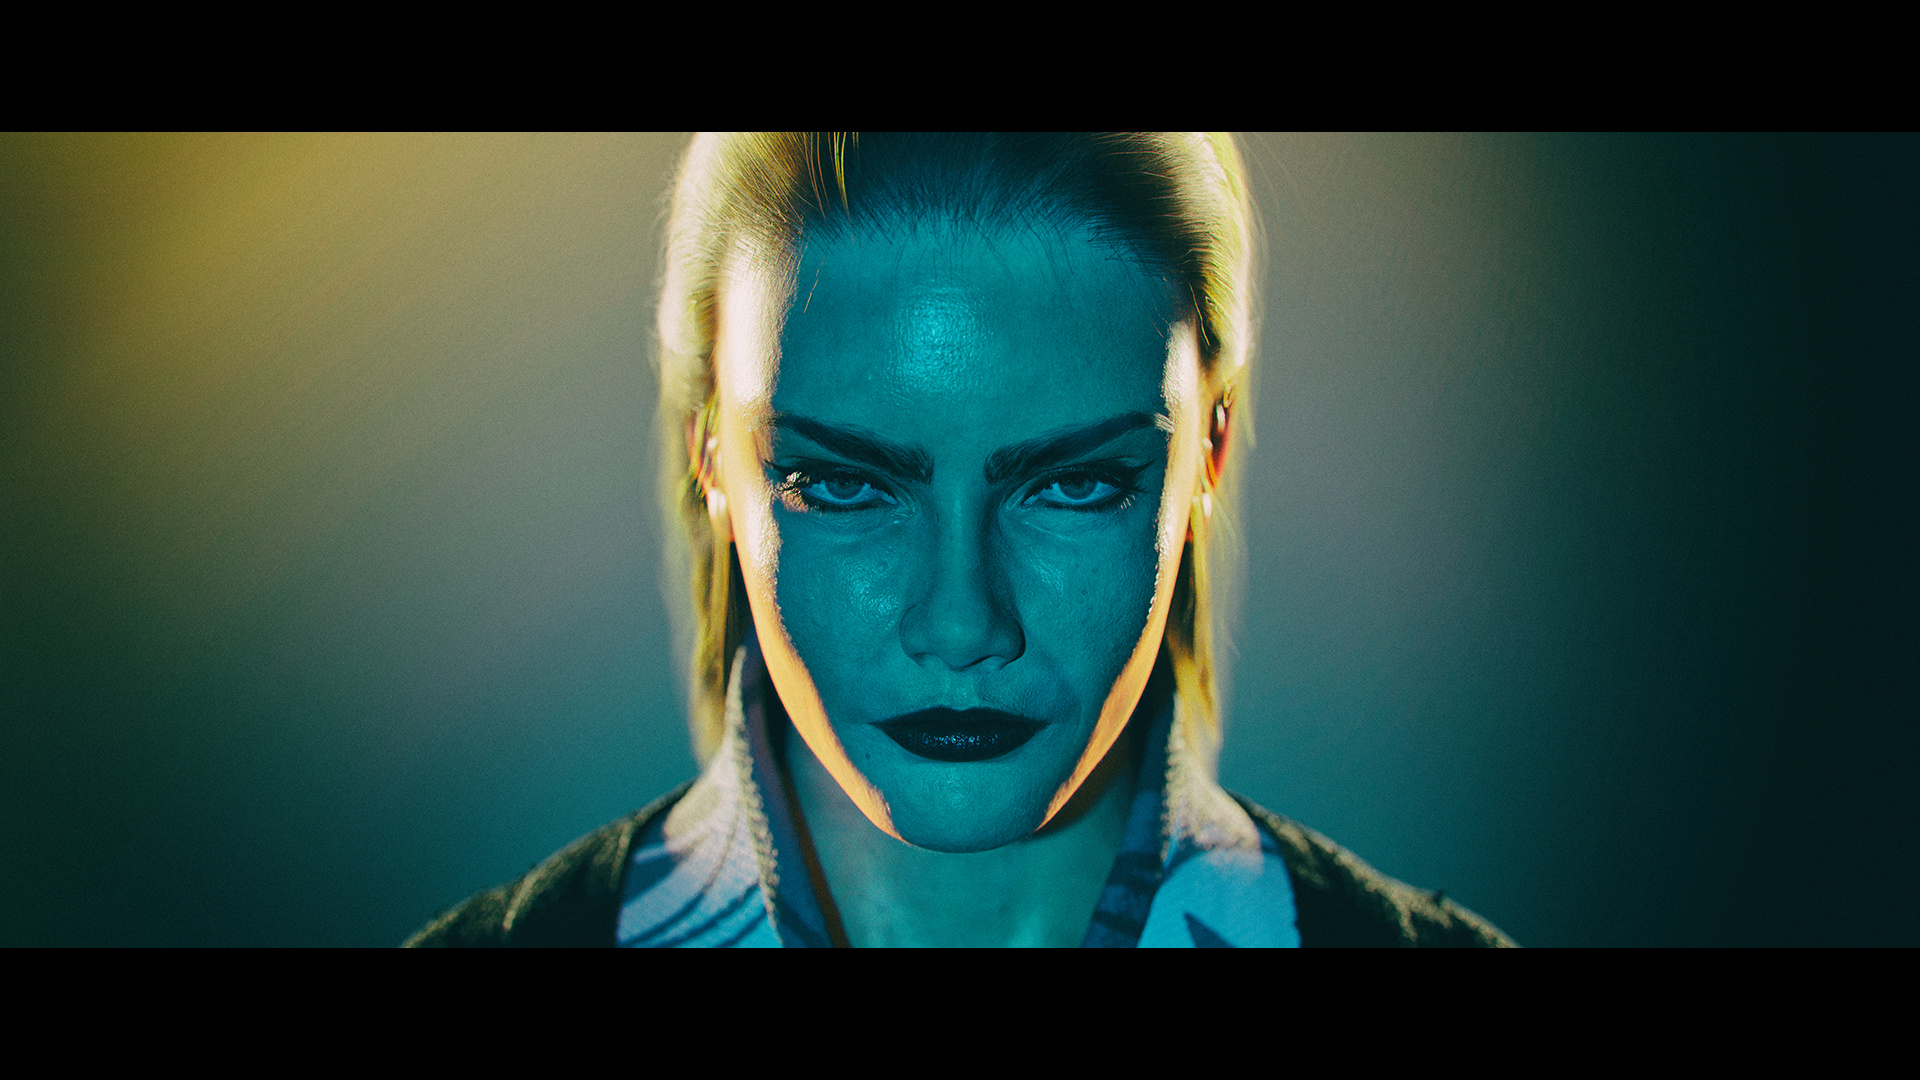
My idea for the character was to make her fit into the Star Wars universe (original idea was that she would the “The Mother of Mortis”, but then she ended up as some sort of Jedi-ish character), who would be a force wielder, but good and evil at the same time.

I chose Cara Delevigne as the likeness for my character, since she is a beautiful yet a very powerful looking woman.

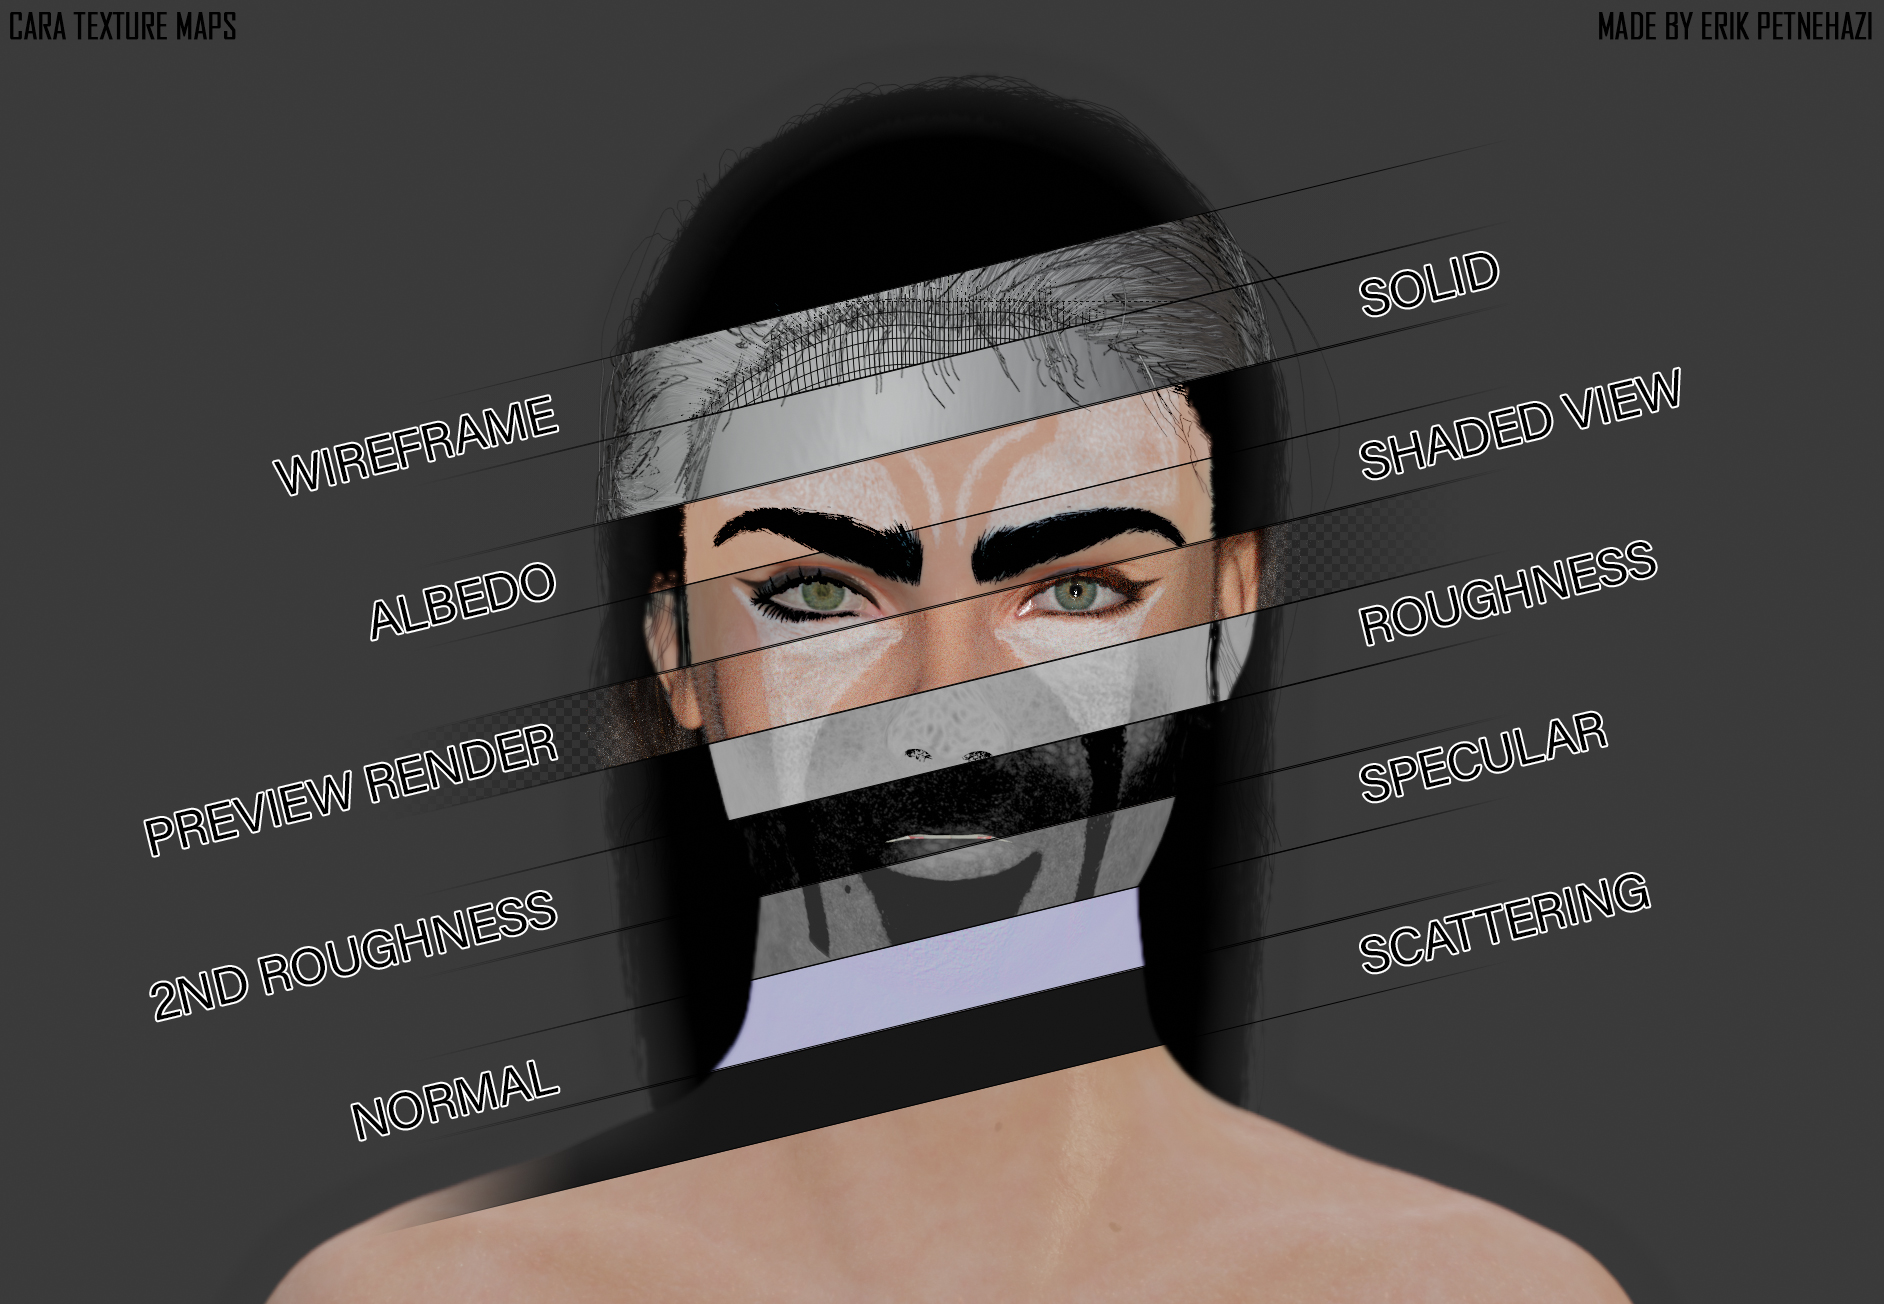
I used Blender and zBrush for sculpting, Maya for retopology, 3DS Max for unwrapping, Substance Painter for texturing, Blender for rendering (Cycles) and Photoshop for post production.

I researched a lot about the human face itself, trying to spot the little nuances that makes a 3D head look real, and trying to pass the uncanny valley. The many test renders and the constant feedback (from lecturers, friends and family) and actually listening to those feedbacks really helped me to improve. I am a little bit sad that I just found this website once i finished the project, as I see there are wip and critiques section.

As I am a new user I can only put one image but I uploaded the project to my ArtStation as well with some additional development images:
https://www.artstation.com/artwork/oO51b4

EDIT: As I earned the Basic status I added some more renders
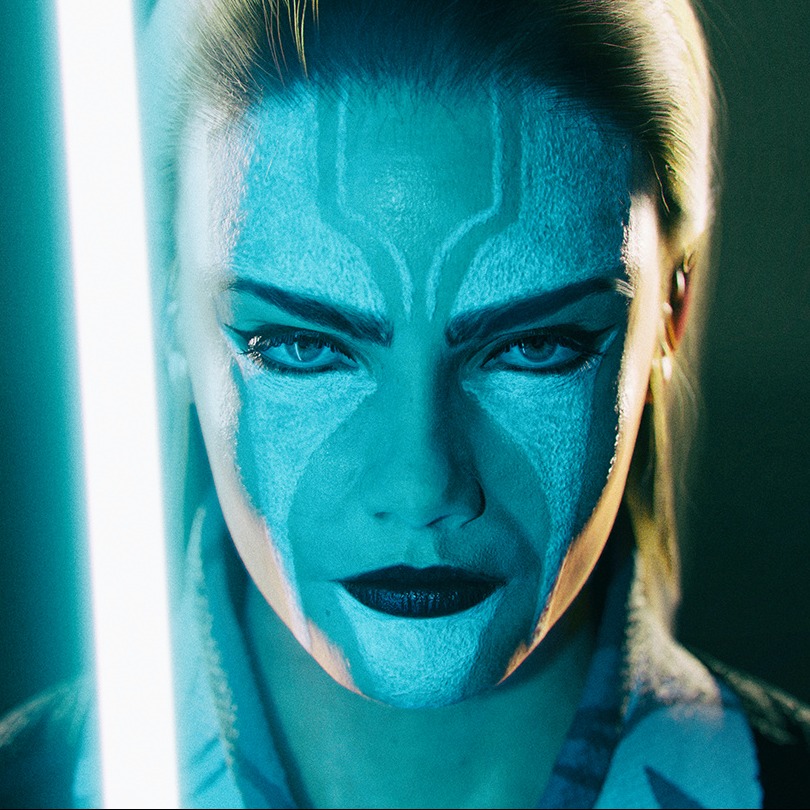
Final Render

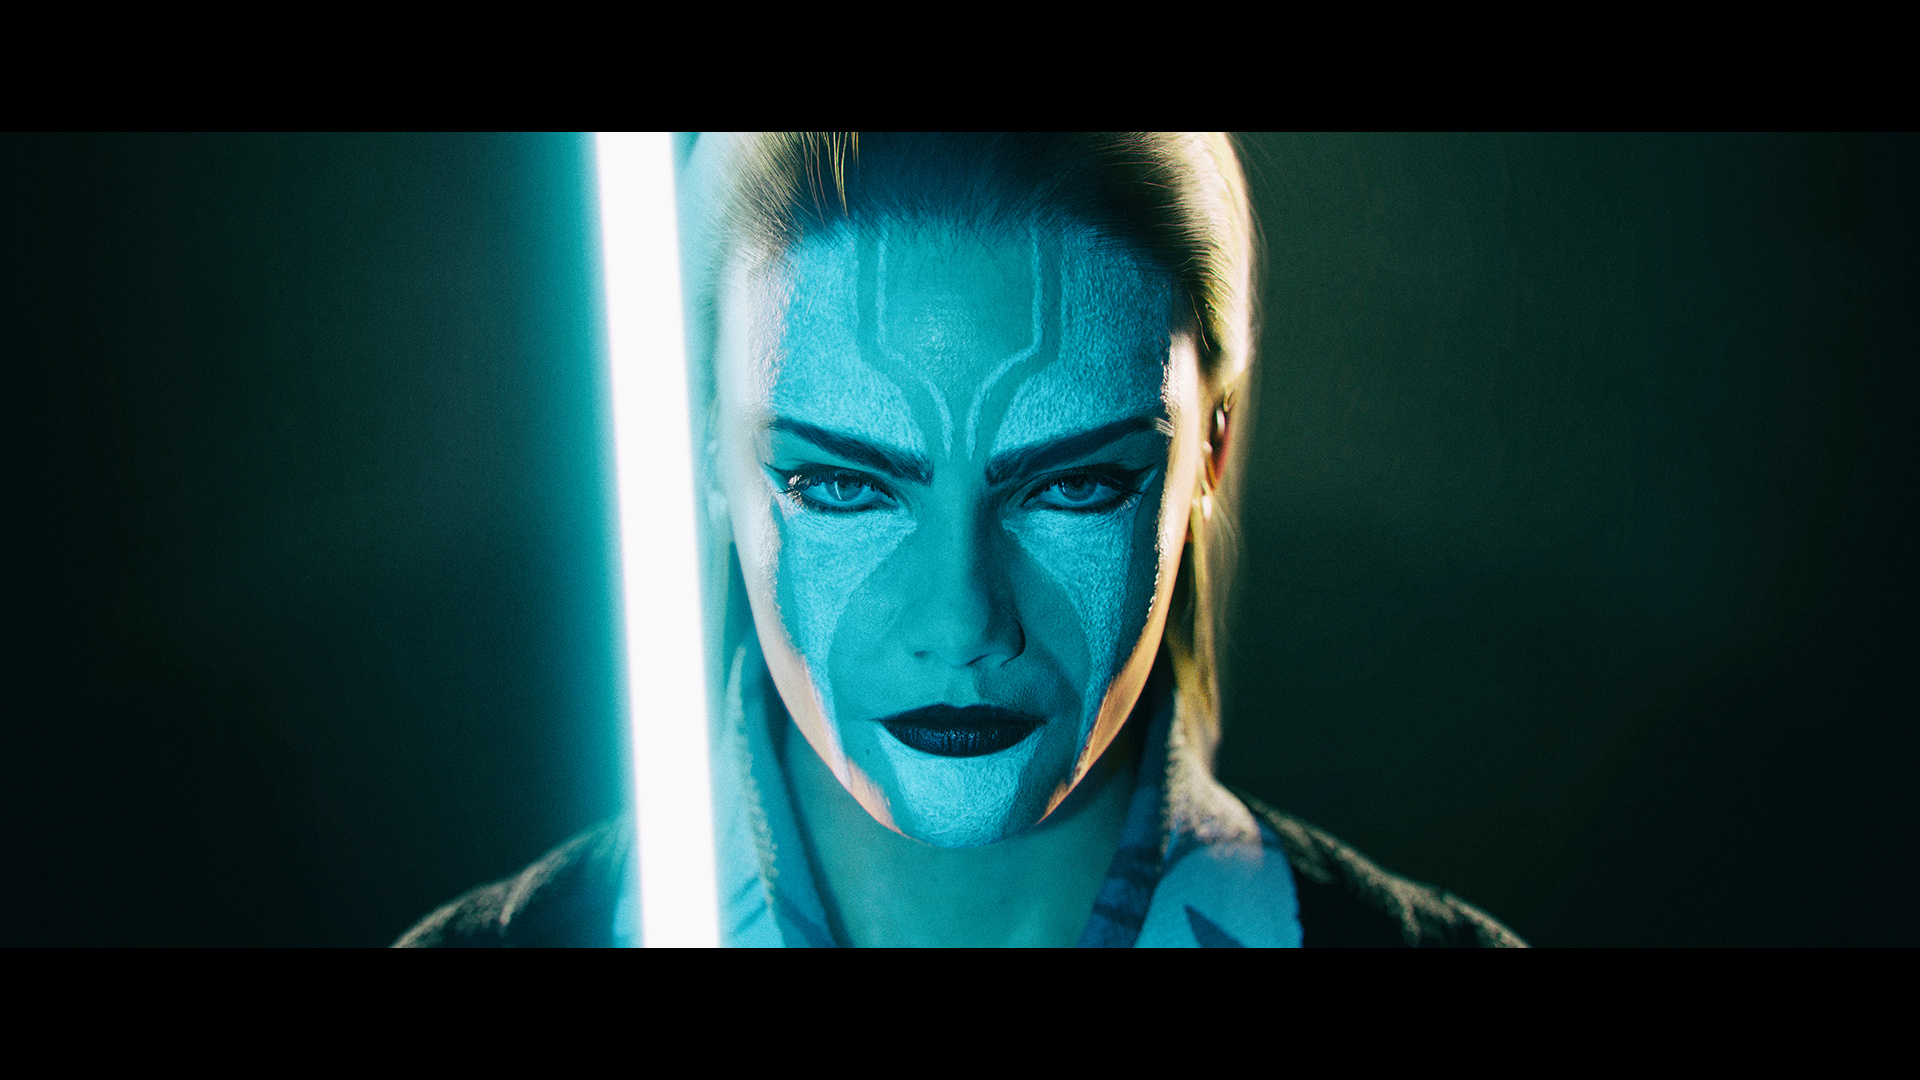
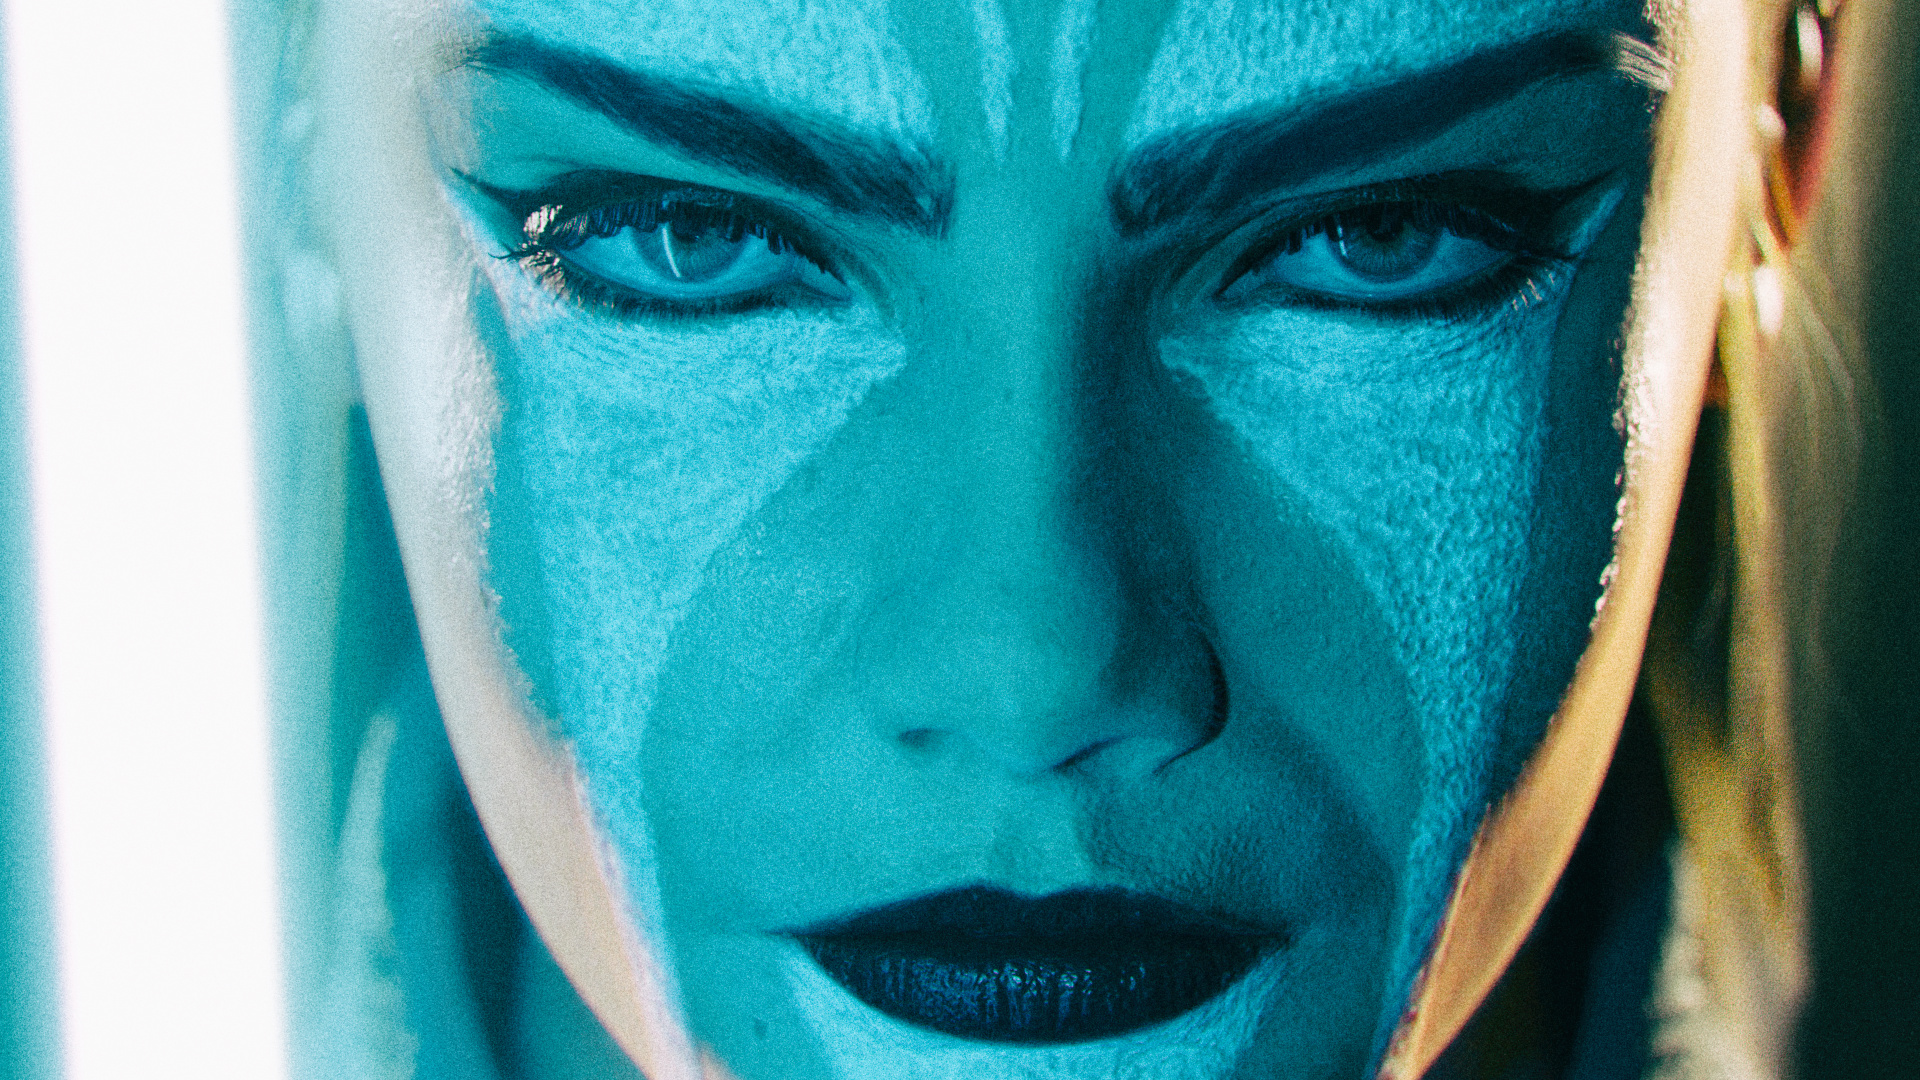
Final Render - Close Up

Without the Facial Paint and Lightsaber

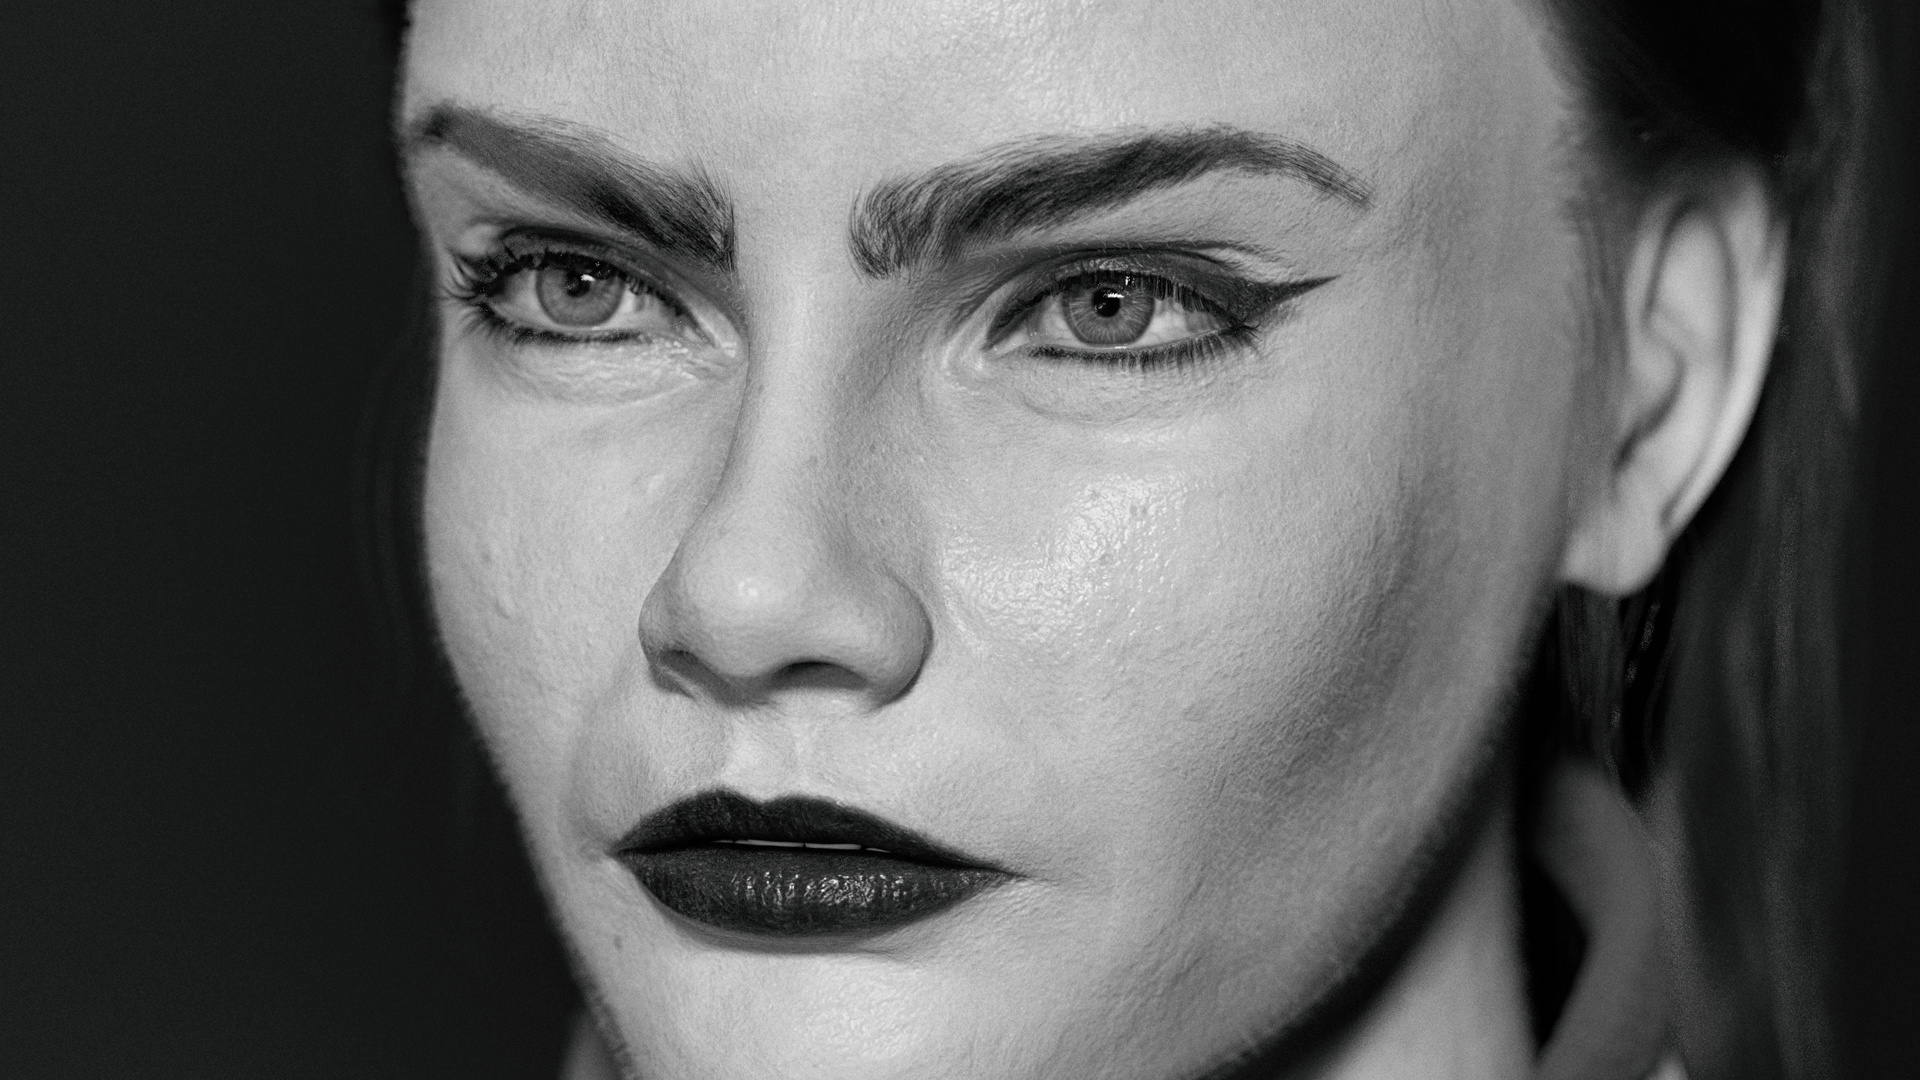
Black and White Close-Up

Texture Maps

Thumbnail

89 Likes

I featured you on BlenderNation, have a great weekend :slight_smile:

1 Like

She looks pretty good. Even her eyes have personality. I’m a sucker for process shots and concept art so I’m glad you linked to your ArtStation.

That said, it’s really easy to earn Basic status if you want to add more images to posts in the future.

2 Likes

Thanks! I am happy you say that because I spent a lot of times on the eyes, as I knew that’s the hardest thing to get right. I looked up a lot of amazing digital character portraits an noted what makes them real and what makes them look CG, and most of them had the same issue, they had “dead eyes” which gave it away that its CG, and surprisingly the hair was a big challenge as well.

Also, I earned the basic status today, thanks for the info :slight_smile:

You’re on the #featured row! :+1:

2 Likes

Oh wow thank you very much! :smiley:

2 Likes

He man nice work impressive…
“Most impressive!”

Best Cycles render ive ever seen by far this year already :scream:

Fred/K.S

1 Like

Dang love that BLack / white images. Looks SICK !

Perhaps to much soft skin hair and ears look bit weird?!?

1 Like

wow it is great!
and wow you use a lot of software :))
but would be great on your CV to have some Cinema 4D to serve for film industry better. Some might correct me but is just my opinion.

Very very VERY cool work and you open a very promising 2020

1 Like

Nice work!

I can understand the usage of SP and ZBrush since they are fairly specialized and powerful software at what they do but to be honest I don’t get why one would also use both Maya and 3DS Max… The hassle would be marginally higher than any kind of benefits.

1 Like

Thanks mate!

Oh the ears haha… well actually in the original concepts the ears were covered by the hair and as this project was only 1 from the 5 other projects I had to do simultaneously for my Uni submissions I decided to save some time on the ears, so I didn’t put much work into them (of course with the approval of my lecturer). So, I retopologised the sculpt in this mindset leaving the ears super low poly, but then when I got to the hair I used my artistic freedom to play around with different hair styles, and it soon turned out that the hair designs that I like the most will not cover the ears actually, so I had to do some really late and quick modification to the mesh and faking some of the details around the ears with normal maps as I started to run out of time haha. So it was a little bit of rush but it looked good enough from the main render’s point of view (the front renders) so I was happy with it. But of course there is always some space for improvements! :slight_smile:

1 Like

Thank you very much!

Yeah Cinema 4D is definitely a software I will try out in the near future :slight_smile:

1 Like

Thank you!

Yeah it might seem a bit weird, you know for my personal projects my workflow is usually just Blender / zBrush -> Painter -> Blender.

But this project was for one of my University submission, and there they teach us Maya / Max and zBrush, although our lecturer was so nice and allowed us to use any render engine we would like to (I of course knew I will use Blender Cycles) and any additional software (such as Substance Painter or Blender) to complete our project. But one of the criteria was that I had to use the “industry standard software” - meaning zBrush, Maya and Max - at some point during the production, so I had to include them in my workflow to be able to pass the module. That’s the reason why I divided up my workflow this much and used Maya and Max.

2 Likes

Great work, congrats.

1 Like

Thanks for the reply. It still amazing sculpt, those details are minor, they just caught my eye when looking for extended period on the image

1 Like

So you could have done a lot of work in blender only and say you did use other software. Like all the loops you jumped through just to get the criteria, that’s insane. Though I guess max unwrapping is better then blenders version. Though blender has majestic addons. I made a bridge for headus uvlayout for blender. Works like a charm

1 Like

Thank you very much! :slight_smile:

1 Like

Haha yeah, to be honest I could have cut zBrush, Maya and Max and do the complete sculpting, retopo and UV just in Blender as well, but I had to document everything (I have like a 70 pages long word document filled with screenshots and annotations, it’s like a daily log of my progress to track and prove my work to the lecturers) and I had to provide the project files in the submission as well, so I did it properly as they asked, as I don’t wanted to risk to lose marks or not be able to pass because of such a thing haha.

And oh yeah Blender addons are magic, I own a couple of paid ones, and many free ones hehe. In terms of UV mapping I think both Blender and Max has decent default features, and wow that headus uvlayout for Blender sounds interesting!

Very impressive. You’ve come darn close - if you haven’t - to overcoming the uncanny valley (I love the “peach fuzz”). The problem is that the closer you come to realistic, the more work it demands to get there. There are a few tiny anatomy give-aways that tag this as CG, but at first glance, it doesn’t register as such. Additionally, given that you’ve only been doing this for a few years, I think you have a bright future ahead of you. Again, very impressive work!

1 Like

Thank you very much, I really appreciate your words! :slight_smile: Yeah I only started sculpting last year June, and I made 4 stylized characters to practice (they are on my ArtStation) before starting Uni, so anatomy is definitely something I will have to learn more about :slight_smile: And in general I feel learning 3D is like a never ending journey, its a field where you just can’t stop learning :smiley: