Finally added the scarf. Couldn’t find a reference that I liked, so had to improvise. I think the ring should work?
Tested with an old wire bracelet and some fabric irl, but I don’t have a scarf that long/big. It was a little unwieldy to tie. Seems to hold though.
Highlighted in orange are GN-modified curves.
After a bit of struggle, it finally dawned on me that all things should be really-really modular and interchangeable
There are 3 types of GN modifiers that should be placed in the exact order:
“curve modifiers” (wrap-and-tilt to surface, mirror);
“mesh on curve” generators (simple-from-profile, rim-from-profile, array);
“mesh modifiers” (wrap-with-offset to surface, transform relative to curve normals).
I keep going back to the asset file to fix some stupid mistakes. And I mean incredibly stupid - just today replaced a node tree that made ABSOLUTELY NO SENSE (except in one very unlikely case, which apparently happened to be the test case)
Well, retopo was a complete nightmare. The poly density is… out of control. I mean, yeah, it’s not like I’m required to follow any standard, so I eventually let it go, but… suddenly, I was very tempted to just give up on the model.
Keep telling myself that I can remake it, model new clothes/hair/accessories anytime (in the future) - the base mesh is solid enough, right…?
Everything became too complicated, and I don’t even want to think how badly it’s going to deform. Oh well. Worry about it when/if I get there.
On the bright side, I’ve tried out xNormal. It took a few attempts, but baked some clean normal maps (with only a couple of artifacts caused by silly topology/seams). The only real problem was with the mesh itself - some parts turned out to be too lowpoly (relatively), so I had to go back and forth and retopo/rebake them for a while.
No idea how other maps settings work though.
Also, controlling triangulation of the exported mesh is really-really important… but I still had to make that mistake before realizing it
As a result:
~31k tris, including the sword (which, despite my panic, is only slightly above target count);
two 1k (head and accessories) and one 2k (main body) texture sets (no limits here, just want to paint).
I love seeing the process! Keep it up, youre so far and he looks so good.
My favorite name amongst the three that I mentioned is probably Edmund. But use whatever name you think is best.
@LMalachi , thanks! Here’s hoping I figure the name out by the end =D It would have been much easier if my thinking process didn’t go like: “Oh, [NAME] sounds good… but the guy in the game I’m currently playing is called the same and he’s very suspicious and just hearing it makes me look for the nearest safezone…” This character is cursed, really…
@good_omen, thank you Everything looks so much better with a normal map… at least from some angles… before it’s rigged =D
I want to finish it this year, at least the texture part… aaaaaalmost done.
You’re welcome!
Lol I totally understand. What I struggle with the most is coming up with titles for books or movie scripts. I can never seem to find something original. So I understand your pain.
Yep, didn’t make it in time: between frantic holiday preparations and learning new software, it was too unlikely anyway
Besides, there has been a rather embarrassing… brain failure…
Sooo, I had all these reference images and I did refer to this step as “handpainting”. What I didn’t realize is that I was going stylized PBR way, when my imagination was set to some kind of NPR Shading style that I have no idea how to achieve yet. Or indeed, I don’t have a precise idea what it has to look like. Something that I can’t just conjure up on the fly.
So, for now I’m going with stylized PBR - learn a bit about Substance Painter and baking, rig this and call it done.
Then I’m going to learn more about shading and materials. Do some other art on different points of realism spectrum. Then, hopefully, come back for this and make a new version someday. But this particular iteration is not going to stay WiP.
Here’s what I ended up with.
This was not easy. Sure SP has something crucial Blender doesn’t - performance.
But it’s not a modeling editor, so some things seem ridiculously complicated - like isolating pieces of a mesh Also having overlapping (from mirror) UVs, what a pain.
But I guess there’s always something to complain about, when switching to new software.
The various greys are mostly rusty redish color to go with orange and red. Except for bracelets / sword-related leather - they go into blue, because I felt like it. Is it weird?
Also, I got some issues with texture resolution. There was not enough of it for ornaments (so my ferret-wizard suffered further stylization can you recognize the poor guy?). Just increasing resolution didn’t make much sense though. Maybe the situation calls for decals?
Also “body” material has exactly two small fully metallic pieces - could’ve placed them on the texture with other metals
It is. Having to manually un-overlap UVs when I reuse meshes and textures in a way that requires remirroring is one of my least favorite parts.
Not at all. Blue and Orange are complementary colors, so it’s a socially acceptable (wrong term, but you get the idea, I hope) color scheme.
Also, I like blue and orange together, for what that’s worth.
The character’s coming together really well. The detailing on his bracelet and ring is really nice. It reminds me of those videos where people soak wood and burn it with electricity.
He looks like a Nathan to me, if you’re looking for name suggestions.
He was already such a likeable character but the textures have just brought him to life. He looks so good!
I have to agree with the others that the colors look fine. I dont see anything wrong with the colors you chose, but then again, colors schemes have never been my specialty.
Keep up the incredible work. Cant wait to see the results of the final steps in your character creation journey.
“Those two areas” are the most time-consuming parts of the thing.
The hardest part is to accept that (at least for “game-ready” [-ish] model) there are limits of what can be done (this late in the process).
The character was modeled in A-pose, based on the assumption that he’s going to spend more time with his hands down, so the shoulders should look good. That means he can’t really raise his hands. Not far. Not without stretching the texture into oblivion. Not with this topology. Not without extra bones too.
Is there a better way? I don’t know. Gotta keep my eyes open for game examples of models actually capable of it
Finding the correct joint placement is a puzzle of its own - the armature is not a skeleton (it is often inspired by a skeleton though)
Hips are even worse, because there’s no way out of this case - it’s going to get ugly.
Eventually I gave up and added corrective bones (like in Royal Skies “Pelvis Weight Paint Drivers” tutorial, but without drivers). It solved some of the deformation. Not the extreme case, of course, but some of it.
Well it seems to me you are making great progress with the rigging process. This is the part of character creation that I am dreading. But seeing you defeat it will provide me with some courage, so I hope you can work out those pesky problems. I’ll have to get some tips off you as well when I get to that part of my character creation journey.
I do all my stuff in A pose, as I find T to be too difficult to judge proportion and size. I was playing with some new modifier combos tonight, that may help (assuming you don’t have pipeline issues that would conflict).
I’m signed off my workstation for the night but I’ll DM you screenshot stuff in the AM.
Though it’s impossible to miss them, as they are quite popular, I thought I’d list some sources I liked. Rigging is the only aspect that makes it necessary to actually follow along tutorials
Dikko: fun and informative. And goes through the whole process of character creation - modeling videos go hand in hand with rigging.
Royal Skies: loud, but short and to the point. It’s easy to pick just those things that you want without repeating the whole process.
And these were especially helpful in deceptively small ways:
It’s for Maya, but helped me learn how to use Lock Vertex Group option to control the normalization of weights and clean up the painting bone by bone:
Then there’s Pierrick Picaut, of course. This video explained something about bone orientations (Edit Mode: set to NORMAL orientation, to slide along the bone axes!):
How to set up a corrective bone in a joint (couldn’t read it to the end yet, because Tumblr won’t let me register for some reason x_x):
Bit by bit, starting to make sense of this whole rigging thing.
It’s still very awkward, but I can understand some concepts now, instead of just blindly repeating tutorials.
As usual, testing on smaller scale is important. Today I learned a bit about setting a corrective bone on a simple joint:
In practice, the wrist (being IK target) turned out to be a little (a lot) more complicated then I realized. It took a while to make sense of hierarchy and which rotation I should read.
In the end, I think, the problem really had to do with weird bone placement and rolls It should work now. Probably. There’s something weird with the forearm twist bone now, but I’m not sure if it’s related.
Things finally stopped exploding (and imploding). Hopefully. For now.
At least on the main body. Still have to adjust weights on extra objects.
I suspect I’ll end up adding individual bones for charms It’s not like I have a hard limit on bone count or anything.
Maybe even learn about jiggle bones while I’m at it?
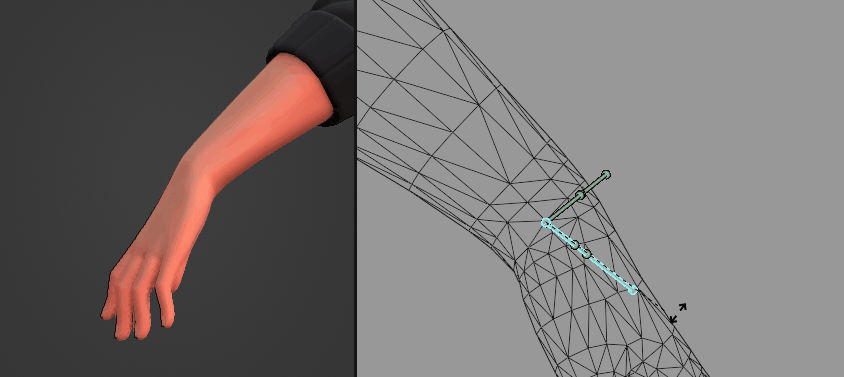
As I want to avoid use of shapekeys, drivers or corrective modifiers (for export purposes), I’ve added 7 corrective bones: 1 for each wrist, and 5 for pelvis area. They don’t account for all angles, but it’s much worse without them, so…
Also decided against knee/elbow correction. I’ve tried “double joints”, but in this case things don’t get much better. Not worth it for now.
Subdivided a bit of geometry on outer knee and inner wrist regions. Should take a note about proper density ratio somewhere…
…Should take a lot of notes actually. Or do it more often so I won’t forget. Again.
Just have to clean up finger controls and the main armature is done (It’s an iterative process, so I’ll get back to modifying it at some point no matter what I say).
Going to try full face rigging for the first time.


")