pls stop it,i know this and i have allready explaned, that i need the refractive angle based on view.
Ok, you know it. Then calculate.
How does Vray Refract compare with Cycles Refraction? or is Vray Refract a complete glass shader? I’m not a Vray user.
No, Vray calculates TIR, Blender’s Refraction shader doesn’t…
You can change reflection color of the glass on Vray, but in Cycles, you can not change. I created this with VSHADE sytem but normally you can not do this.
Can you draw up the difference in a diagram, showing what Cycles interaction of refracted and reflected rays don’t do? I mean on a hollow sphere with a thickness to it. I’m not doubting, I just want to understand it better.
I am not use Vray now. But I show you with my VSHADE system:

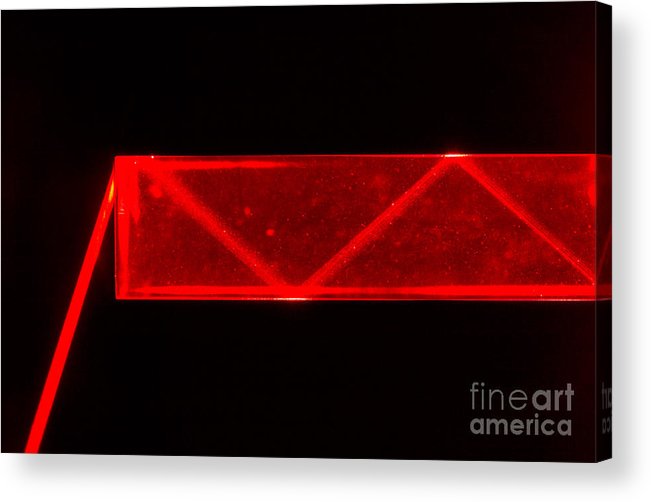
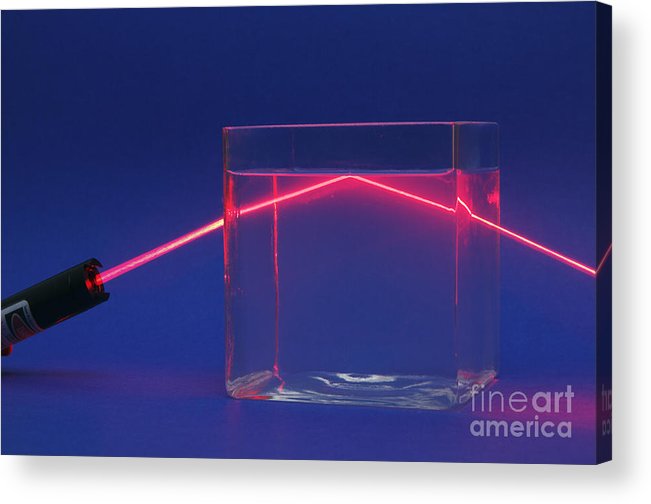
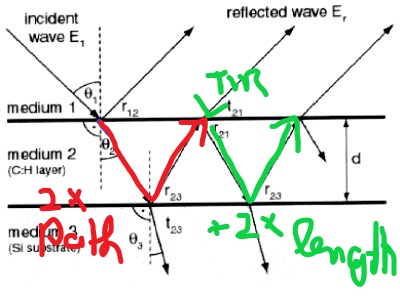
LEFT: Refraction like Vray (Refraction + Total Internal Reflection)
RIGHT: Glass (Refracton + Internal and External Reflection)
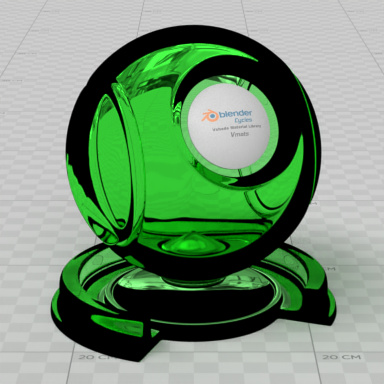
Blender’s Refraction Shader (Black Areas = TIR areas)
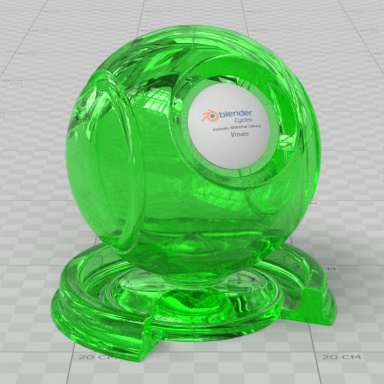
Blender’s Glass Shader
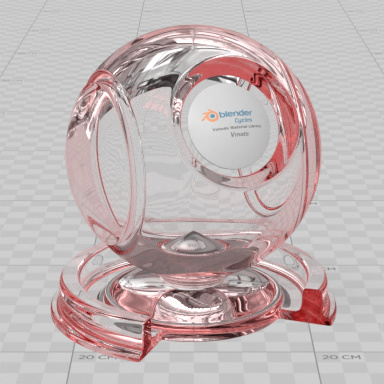
You can’t do this with Cycles normally, but VSHADE and VRAY can do.
(Refraction and TIR color is white, Reflection color is Red)
TOTAL INTERNAL REFLECTION

I haven’t took the time to read every post in the other thread, thougth it’s an interesting thema.
Starting with some information:
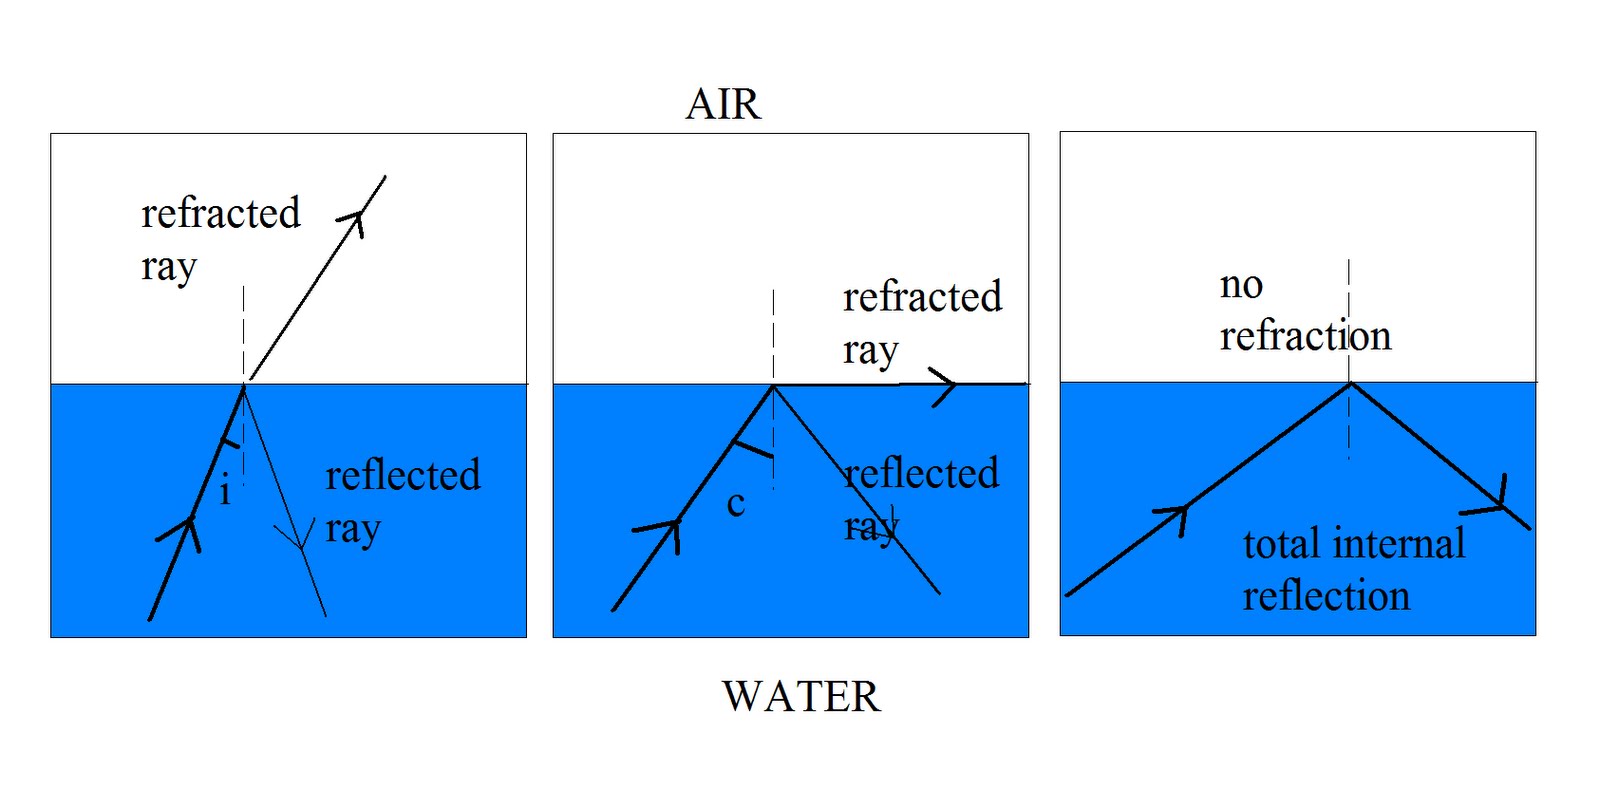
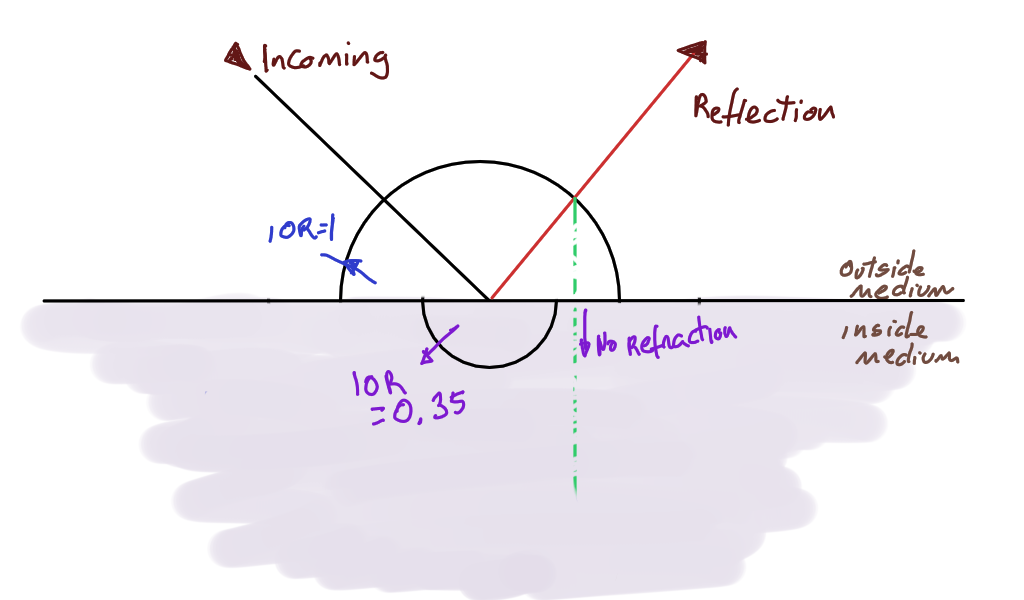
- IOR is a relation factor (between vacuum and the material) that can be used to determine two different behaviors (in dielectric materials):
How much light is reflected, and which direction the rest of the light goes (the refracted part).
In mediums where the refracted light don’t do travel more than a few picometers (diffuse substances), we can assume that the diffuse function is enough (some absorption in terms of heat, some reflection in terms of radiance).
In transparent mediums (there’s no such thing, really! but sometimes the absorption is outside the visible spectrum), the light that is not reflected, is bent!
This bending (again, in dieletric substances,) is also related to the IOR…
The relation is something like this (going visual because you all understand this better :P):
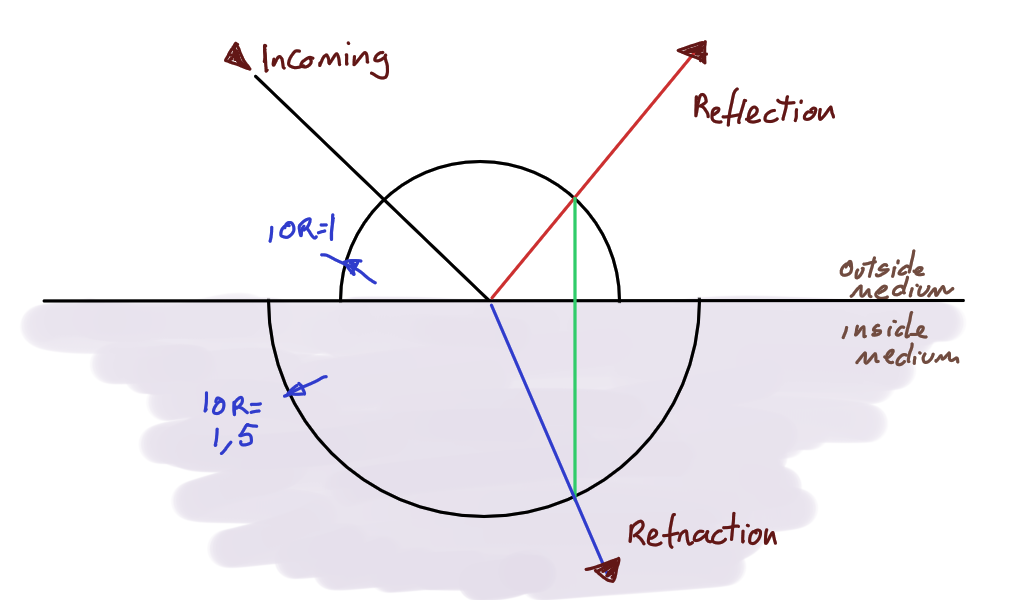
Normally, render engines allways assume that the incoming ray is of IOR 1, and that’s why blender checks [if backface then IOR= 1/IOR].
As you can see in the image above, the reflected ray can be simply described by
Rf=2*N-(cos(I, N)*I), and the refraction is just that projection into the medium’s IOR scale.When this projection doesn’t happen, you get the Total Internal Reflection! In the example above, the upper medium has an IOR of 1, and the lower medium of 1,5 (so there’s allways a refraction for each reflection)… but if you switch both, it’s easy to see that for some incoming rays there will be no refracted ray possible, and all light will just be reflected (the Total Internal Reflection, because normally this happens when the ray hits a surface from a denser medium).
In coated surfaces, however, these equations are a bit useless, and depend on other factors… First, because there’re two surfaces, there’s a distance between surfaces (a depth, or a width), and the IOR of the inner surface no longer relates to the vacuum, but to the IOR of the outer surface.
Not to mention that some situations have other ramifications… (the frequency of a photon highly changes the outcoming result)…
2 Likes
First off thanks for reply.The idea of masking the TIR, is simply to give the absorptive distance in the clear coat a additional bounce length for the absorption .since we dont have access to the light vector (unfortunately) we can only work with vectors they are accessable, like the dot produc from the Normal/View.
Yes i know this.Here a grafik how a clear coat layer or every other layer could look like
In the clear coat threat,we have allready the outside reflection,and
for the sublayer (clear coat).additonal as sayed with the possibility of a absorption based on beer lamberts law.
The absorption distance,like in a thinfilm shader configuration,or in Mitsubas clear coat is useing the double thickness of the medium,to get a path length of the (first)refractive ray and the reflecting ray from the substrate back trough the medium for absorption.
The idea is if the refractive angle its at or exceed this angle of the TIR angle ,then the absorption should be get a addional pathlegth of one bounce for the absorption.
1 Like
That is really a nice though! Although we can’t access where the light comes from, that ‘addional pathlegth’ (funny but understood) could let us use some other closure (like a glossy) to incorporate that incoming radiance into the final “to pixel” value.
(note that this is if we’re rendering a scene with objects bigger than a few millimeters ![]() )
)
1 Like
you got the idea,nice isn’t it? 
limitations are how often it should bounce.but for this is OSL or another clever pathlength calculation.
3 Likes
My personal versions of a coat shader are OSL, just because it’s possible to strip an input of a shader type and do whatever we want from it… In SVM that’s not possible, so if you want to change some value of the ‘under’ shader, you need to tweek the values of that shader node directly. SVM only allows you to add new closures (mixing shaders is also an addition: (A*(1-fac)) + (B * fac)); it doesn’t allow to change the closures that you already get as input (so a ‘wonderfull_coating’ node is difficult to do).
Edit: But it’s still possible to do a good coated shader in SVM (and quite easy if the only shader being used is a Pricipled or a non mixed)… just that you can’t have a solution that works in every case.
2 Likes
I’m excited to follow this after your help on mine. This is gonna be fire 
1 Like
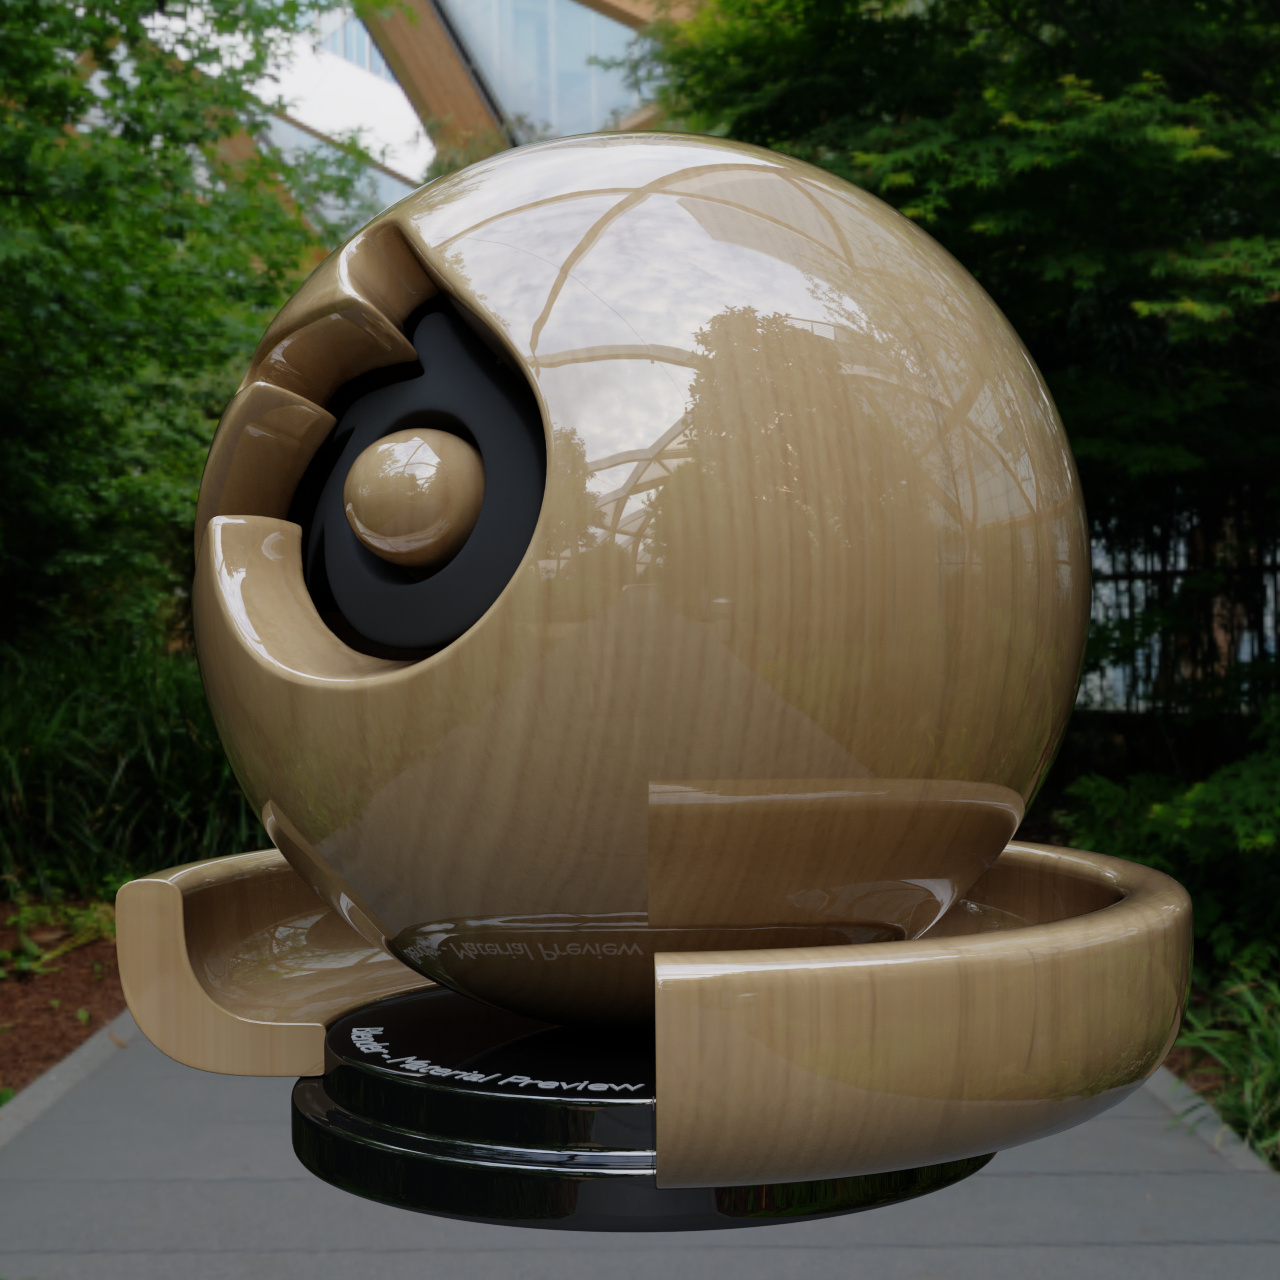
Shader ball is not so good showing transparent material when object thickness makes all differencies. Anyways V-Ray glass with differerent thickness (ball part) from left to rite, 1mm, 5mm, 1cm and 5cm. More thickness, more fog color.

2 Likes
I guess, this works similar like a absorption shader with a distance scale ?
The clear coat build approach, is not a volumetric shader,its uses a absorption coefficient (similar to a absorption color) with a exponential absorption based on beer lambert with a thickness value as multiply.
Maybe in a few days i working further on the shader.just as info for interested readers.
1 Like
I have worked on the shader further and found absorption coefficents of real clear coat.
I have made a complete new build with fresnel equations for each layer, to calc the correct intensitys of the layer.
Then i compared the fresnel equation vs the fresnel node, resulting with no difference.then i rebuild almost the same setup from the first build with the absorption in the transmission.
Now the difference between the old build is,that now the substrate get a own reflection layer with correct calculated refraction angle and intensity from the first layer with a own IOR .
The IOR from the material could or should be a typical value for the material,as example a acryl paint has a value around 1.5.
next thing to do is to check water darken effect due differnet IOR (clearcoat or water IOR vs substrate IOR).
These are testrender with high reflective clearcoat (IOR 2.03) and a thickness of 5mm.this gives a slightly yellowish tint to the clearcoat.
test render with clearcoat on raw wood.
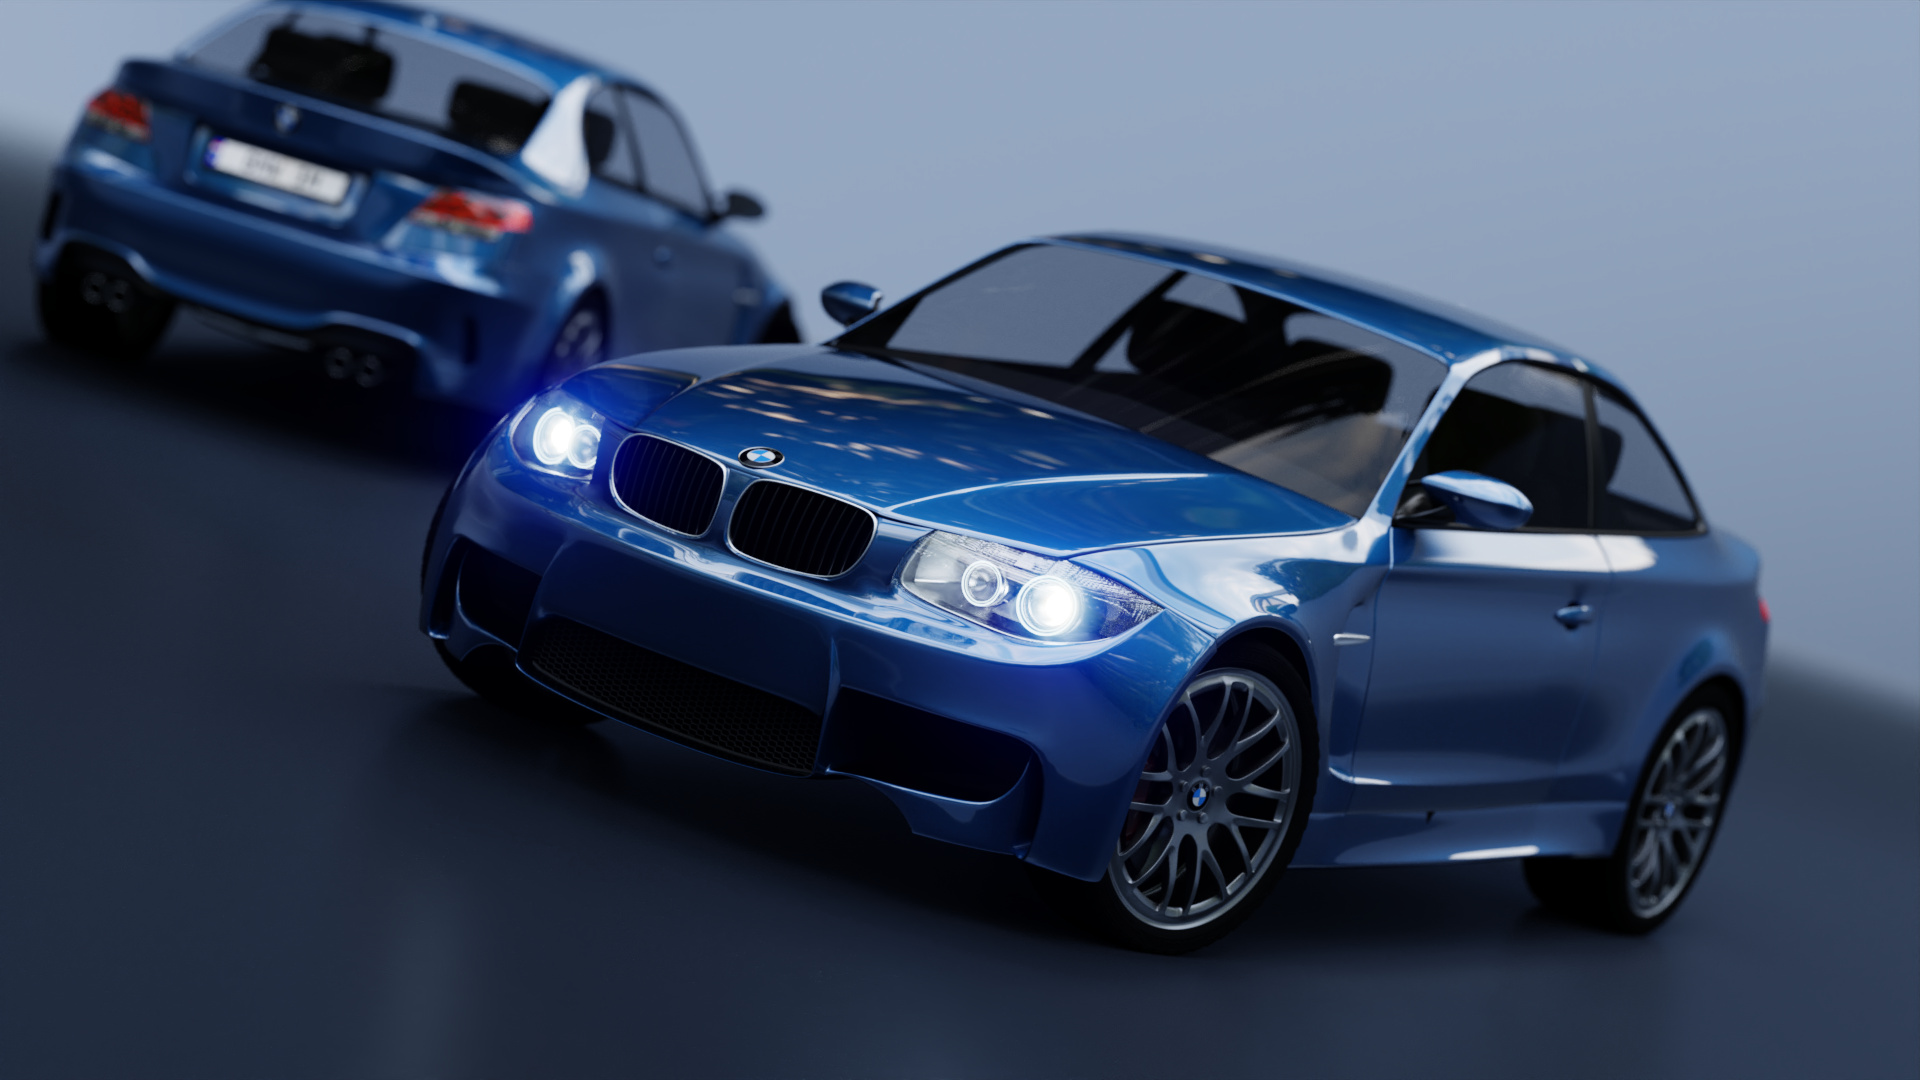
test render of the BMW scene with HDRI as light,and the clearcoat shader with a blue basis color.same high reflective clearcoat IOR and absorption data.
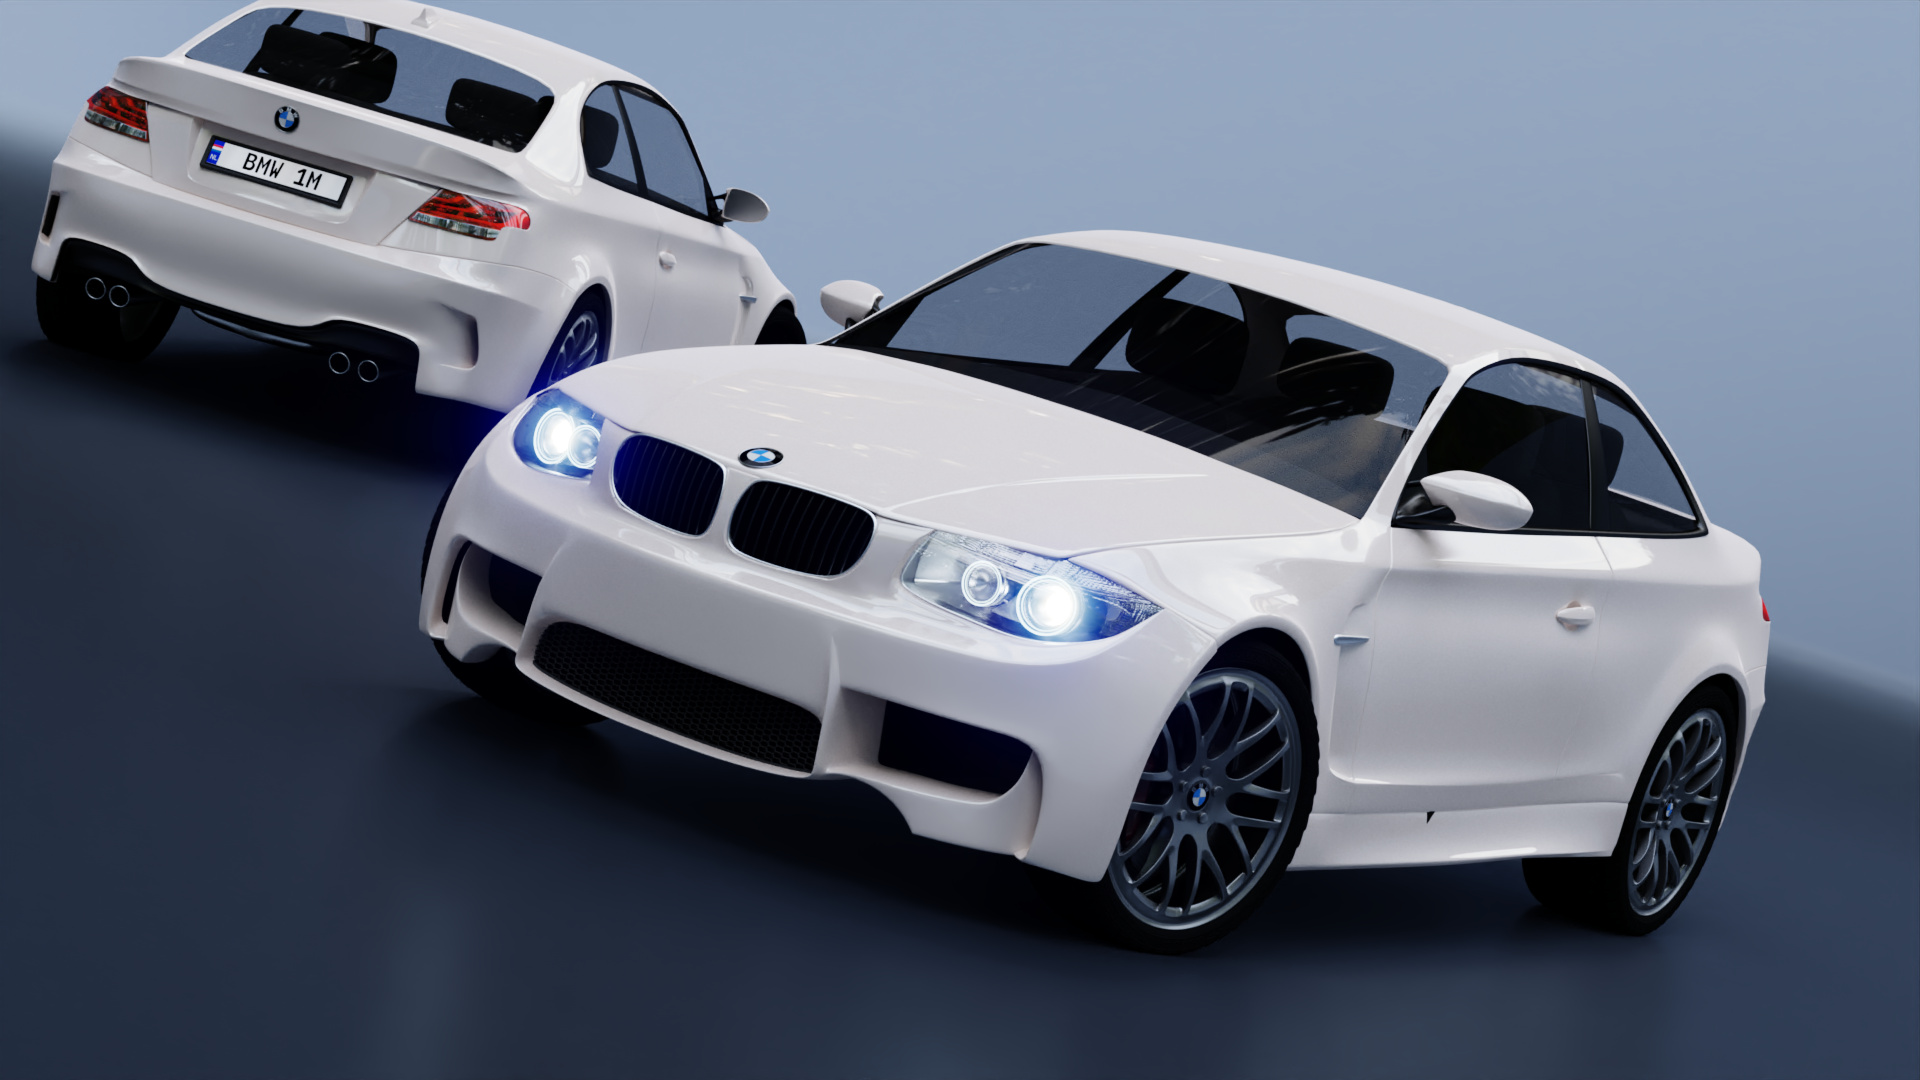
testrender white coat,with slight orange peel. without DOF.

5 Likes
Since only materials with porosity and water or clearcoat on its surface can have a darken effect,i found a way to fake its effect with a own porosity control.
Here a screenshot from a raw wood material,that uses the raw texture on the left on the shaderball,with a clearcoat on top with absorption and porosity darkening.
The texture in the middle is a varnished texture from the same texturepack for comparison,i increased the clearcoat thickness untill it looks similar to the varnished texture.

next thing to do,clean everything up and group it together.i post the blend if i think its ready.
2 Likes
Thats awesome. Thats going straight to my materials library Would you be willing to post the blend file on here or send it to me?
bmw testrender with darken effects,its subtle because its only a few mm thick clear coat.btw i have a new idea about flakes ect.
Hasn’t flakes been done to death already? They’re metallic, so they wouldn’t undergo a visible darkening from layered IORs.
Sure,its idea is the possibility to get a absorption and roughness effect increased with deeper/thicker layers.Imagine the clearcoat similar to a absorptive glass shader with flakes in it.In deeper flake distribution the absorption color is more present,and more rough (within a min max value) to get a subtle effects on coloring the flakes too.otherwise, how would the flakes be looking if they are just added or mixed in?In small thickness the absorption is more subtle though.it scales with increasing thickness then.
I have seen a few videos about flakes in other renderengines,and i noticed that we are missing the density control in the voronoi shader.Do you know how to build a simple density control with nodes?