Composit node effects, techniques, solutions ...

Composite Node links:
DOF and Motion Blur by cekuhnen https://blenderartists.org/forum/viewtopic.php?t=61399
Simple/quick DOF by purple https://blenderartists.org/forum/viewtopic.php?t=23338&start=1200

A better DOF Technique …

The problem with DOF (depth of field) approximation is that in it’s simplest form the foreground, area of focus and background layers are not separated when performing the blur. This causes the blur to bleed between these layers. However the basic approximation for a sizable focal plane is good enough.

For a more advanced approach you have to …

(1) mask out and blur the foreground
(2) mask out and blur the background
(3) mask out the area of focus
(4) composit these results together so that focal area is over the background and the foreground is over focal area.

I have two examples I have raised the blur quite high so exaggerate the result.

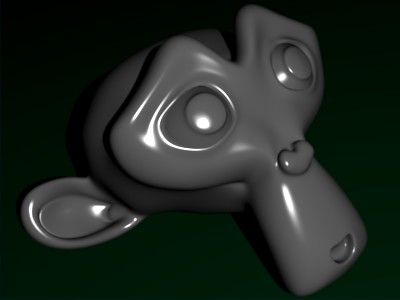
First the basic approximation,
http://www.dogobe.com/blender/DOF_with_bleed.jpg

Notice the blur around the mouth and the back of the monkey’s head. This is the bleed I refer to. Try holding your finger a few inches from your eye and focus on something 2 or 3 feet away. You’ll see that there is no distortion of what you are focusing on. Your finger should be out of focus (blurred) with a halo. That’s what we want from the red ball just in front of the monkey.

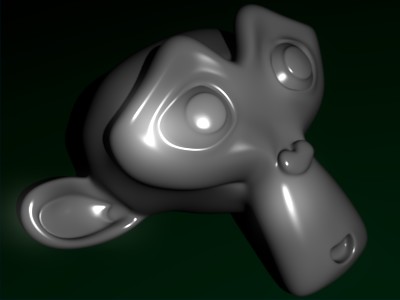
Second the more advanced approximation (the best result I could get anyway),
http://www.dogobe.com/blender/DOF_advanced.jpg

The result is deficient in the following ways,
(a) the value mapped Z depth is an approximation. If you look closely at the monkey’s head you notice a jagged line, i.e. a lack of antialiasing. This might be improved by softening the Z depth with a filter before using the colour ramps.
(b) the method of composit (add) dulls the blur overlap - the red glow from foreground over the monkey’s face. This is because I couldn’t use alpha masks in a straight foreword way - I guess you could use color ramps in some way but I couldn’t figure a good method.

Tools I needed that were missing …
(a) an assignAlpha node that took an image and a grayscale image (as the alpha layer to apply). This would make the final composit using overAlpha much more effective than the add I was forced to use.
(b) not really related to the DOF effect but … the group function [ctrl]+[g] is great and everything for organising a hierarchy of nodes but doesn’t present the important parameters for adjustment and I couldn’t figure out if you could descend/transverse/edit a group without ungrouping it. Group function also causes crashes - alot.

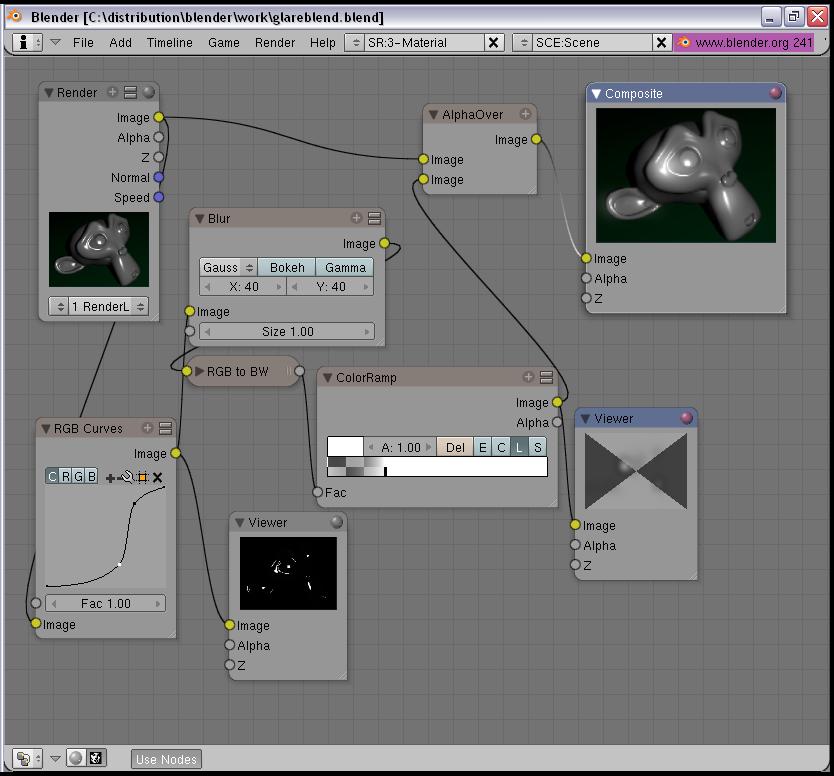
See a screen shot of the composit nodes I have used - with brief explanation and spelling mistakes!

Can anyone improve on this? Have I missed something? Is there a different method?

The blend file can be downloaded here. You’ll need a bf build feb 6th or newer. Open it and it and render [f12]. TIP: After the first render if you adjust composit values/assignments you only have to press [f11] to see the result - you do not have to render again.

ta,
P

P.S. When you read monkey please interchange freely with suzzane :wink:

great post, great example. i’ve been wanting to start a general thread for all composite techniques, motion blur, glowing edges, toon, keying… etc…

Perhaps you wouldn’t mind changing the title of this one to be more open to all composite effects.

Cheers!

done lucidMonkey. Consider this post open!!

Specular Flare

Before,
http://www.dogobe.com/blender/specflare_none.jpg

After,
http://www.dogobe.com/blender/specflare.jpg

Basically add the following nodes,

  • RGB curve - create sharp ‘s’ shape to isolate required specular highlights
  • Blur - blur the highlights
  • colorRamp - reduce the alpha of the black control to 0. Bringing the white controller further left will exaggerate the flare effect.
  • alphOver - Combine the render image and the specular flare

Click here for screen shot of nodes.

Click here for blend file.

Very good!

Specular flare is nice (unlike lensflare) :smiley:

Koba

Wow! That is great! That specular flare has a film noir quality to it. Nice to make a female head model ‘softer’.

That is nice. That’s an effect I’ll be needing for my movie.

Man, the noodles have me so excited. But since toon was mentioned above, and toon lines are one of those parts of Blender that has always been lacklustre, has anyone come up with a better solution using the noodles?

http://projects.blender.org/pipermail/bf-blender-cvs/2006-February/006027.html

Great idea, this should be a sticky.
P

that’s great news broken - thanks

( … purple goes off to sign up to cvs mailing list :smiley: )

schuh was nice enough to share his setup for his clown! Thanks schuh!

http://www.dreaminmaniax.de/blender/nodes.jpg

http://www.dreaminmaniax.de/blender/clown_nodes.jpg

I made this one a sticky, as it will become a huge resource thread in the very near future.

Everyone, please upload examples and example blend files for this thread.

BgDM

This post was removed by Deep_Though because of relevancy

I’ll start a how-to thread for my questions…

DT

very nice improvement on the new nodes and the “elimination” of some innecesary nodes.
my congratulations to the developers on this module. broken… good job!
here is another key extraction taking advantage of the new nodes, using the green channel and the hue information to extract the key. curves manipulation on the green channel allows to axtract good details.
http://d26.yousendit.com/F/08QWZJ1U0TK0O0DJDSEFI33HVC/blenderkeylow.png
some features to request:

  • combine RGBA (oposite of separate RGBA)
  • simple merge (foreground over background)… could have the same mixing modes of the MIX node
  • add value adjustment to the HUE / SATURATION node
  • hue suppresion http://d22.yousendit.com/E/0ALKULO9MERGY3N1BY8EQ59QSH/supression.png
  • channel switcher (this will allow to, for example, extract the color information in a seepd/vector channel and do color changes to it)
  • been able to see several viewers at the same time.

I am currently developing a DOF node based on the improved technique described at the beginning of this post.

I just have anti-aliasing to do and a couple of techniques to improve effect. Should be complete by end of next week. At the moment it is much much faster than the combined blur/mask nodes.

… watch this space :slight_smile:

Both of these are useful and should be really simple to code - they’re already on my todo list. No time to do it now, though, it’s crunch time and we’re only spending time implementing what we need to get our shots done :slight_smile:

  • simple merge (foreground over background)… could have the same mixing modes of the MIX node

Could you explain this a bit better? is it like Alpha Over?

  • add value adjustment to the HUE / SATURATION node

Ton thought it would be better to to not implement it here since there’s much better control with a curve node…

  • hue suppresion

You can kinda rig this together using the Separate HSVA node - I used it the other day to mask out and turn down the saturation on Proog’s jacket as a quick postprocess. Here i combined it with masking by saturation, but it’s a quick and dirty job :slight_smile:

(edit: dammit, i just looked at your last screenshot and saw you used the same technique… oh well i spent some time taking that picture so I’ll leave it for the benefit of others)

http://mke3.net/blender/etc/hue_remove_s.jpg

  • been able to see several viewers at the same time.

Yes, this would be great. The architecture allows for it - it was one of our original requests, but there have been more important things to worry about for now.

In any case, I would guess you can expect to see most work on this (at least from Ton and co) tailored towards comping CG renders, rather than features for live-action, colour keying etc. Of course people are free to submit patches for whatever nodes they like, but I think the focus will remain on CG.

As far as my feature requests, the first one on my list would be dilate/erode, but I’m not sure if my meagre coding and math skills are up to task!

Hi all

This is the best adition to blender (in my humble opinion…) yet, but I’m a real node-head.

A couple of requests though:
I second the combine channels (RGBA and HSVA) request,

Also, it would be great if there were a simple channel math node, such that you can select different channels as inputs and apply math expressions to them. Like Alpha = G - (R + 0.5B), or G = sin(R2) or whatever.

I would Love a mask drawing tool…

And (if this can be done with the time node, please tell me…) a way of animating the position, size etc of inputs.

I would love to help contribute to this process in some way, so if someone can help me out with how to start a node code etc… (I’m new to Blender) I’d be very grateful.

I’ll try to post a screenshot sometine soon.

EXCELLENT STUFF,
cheers
DT.

Could you explain this a bit better? is it like Alpha Over?

well simple merge would be like an alpha over, but the foreground will have already the alpha embeded. that way, if you want to make any change in the foregorund (like a transform and a blur) you dont have to do it twice.

I think that this node could have three inputs: FG(with alpha), BG and a MATTE input (in some of the current node is called FAC.). this matte will allow to add an extra alpha input for the foreground. an aditional feature could be to have the option to crop the resulting image, based on the FG size or the BG size… but this could be done later on.

this node would be very important if you are thinking mainly in CG comp. later I can put some examples… now back to work

Ton thought it would be better to to not implement it here since there’s much better control with a curve node…

suppose that you are doing a hue shift (like your example), but you also want to change the brightness of you selection. wouldnt be nice to do it all in one node?


about the HUE suppression… yeah, it could be done like we did, with some nodes combination, but as you said, is dirty job and very hard to get a fast result. so a node spesificaly dedicated to this would be better… but I know that at this stage the compositor is going towards CG comp, so we can wait.

T

I’ve looked all over, and I just can’t find it: How do you render the composite output to file?

I’ve figured out how to preview by using the viewer, and I understand that you need to use the Composite Node to actually save the output, but how do you do that?

input your final image to a composite node

make sure [use composite] is set

hit render (f12) -note: render window is updated if you change any node values after rendering-you can tweek your nodes without rerendering

and save (f3)