So, I think I’ve achieved the minimum of what you are trying to do: match the RGB value of a material with that of a lamp RGB value. Here’s how I did it:
Preface: I’m not sure this is the best way to do this, so any other clarification would be appreciated. Also, I’m using Blender 2.80 beta, so older versions may behave differently.
With the default scene (default cube, camera, point light), I right selected the light and gave it a color value other than its default color (with different R, G, and B values) so I could tell if my drivers were working for the individual channels - specifically, (1.0, .5, .25).
I then selected my cube and went to the Shader Editor. By default the Principled BSDF node connects to the Material Output node’s Surface input. I added an RGB node by pressing Shift + A, hovering over Input, and clicking RGB. On the RGB node, there is a color preview at the bottom that you can click to display the RGBA selection sliders. Right click on the preview without opening it and select Add Driver. You’ll get a “Show in Drivers Editor” popup - ignore it. Now, click the color preview and the RGBA selection sliders popup will show. You’ll see that the inputs have been colored purple. The process is basically the same for each color component, so I’ll only explain it fully once.
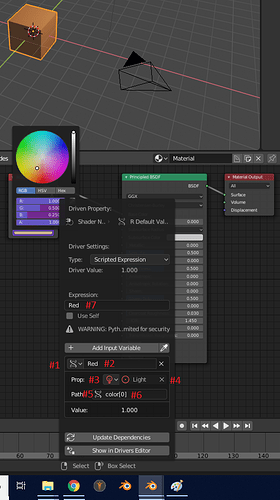
First, you want to select your source for your driver expression. Do this by selecting your lamp - in the default scene, the object is called “Light”. Go to the light object panel, hover over the light color preview, right-click and select “Copy Data Path”. Select your object again and your Shader Editor will show its node tree again. Click on the color preview of the RGB node to bring up the selection sliders. Right-click on the R: component slider and choose Edit Driver. Now follow the below steps referencing the attached screenshot:
- Click the Driver Variable Type dropdown and change it from Transform Channel to Single Property.
- Change the name of the variable from var to Red. This variable name is not directly connected to your lamp’s R value. It could literally be named Elephant, but when dealing with programming languages you want to use variable names that are meaningful, and var does not mean anything to you at this point.
- Click the ID block Type dropdown and select Light.
- Click the ID block Name list and select the name of your light (in this case, its name is Light).
- Click in the Path field, and paste the data path we copied before. It should now show as simply the word color.
- Blender stores the RGBA data for the color of a lamp in a collection. In programming, individual items in a collection can be referenced by using their index number - in Python, referencing the first item in a collection is done by starting at zero and looks like
collection[0]. You want to reference the first item in the color collection (the red component value), so you will type [0] at the end of the color path that you just pasted. For subsequent drivers, green will be referenced by adding [1] at the end of the pasted data path and blue will be referenced by adding [2] at the end of the pasted data path.
- Finally, change your Expression to simply reference the name of the variable you created in step 2 - Red.
Repeat those steps for the green and blue component drivers, and your drivers are done. Finally, connect the color output of the RGB node into the base color input of the Principled BSDF node. Now any change in the color of the light will update the color of your object’s base color.
Screenshot:
Please let me know if you need clarification or additional assistance. Happy blending!
