The hits just keep coming!
1 Like
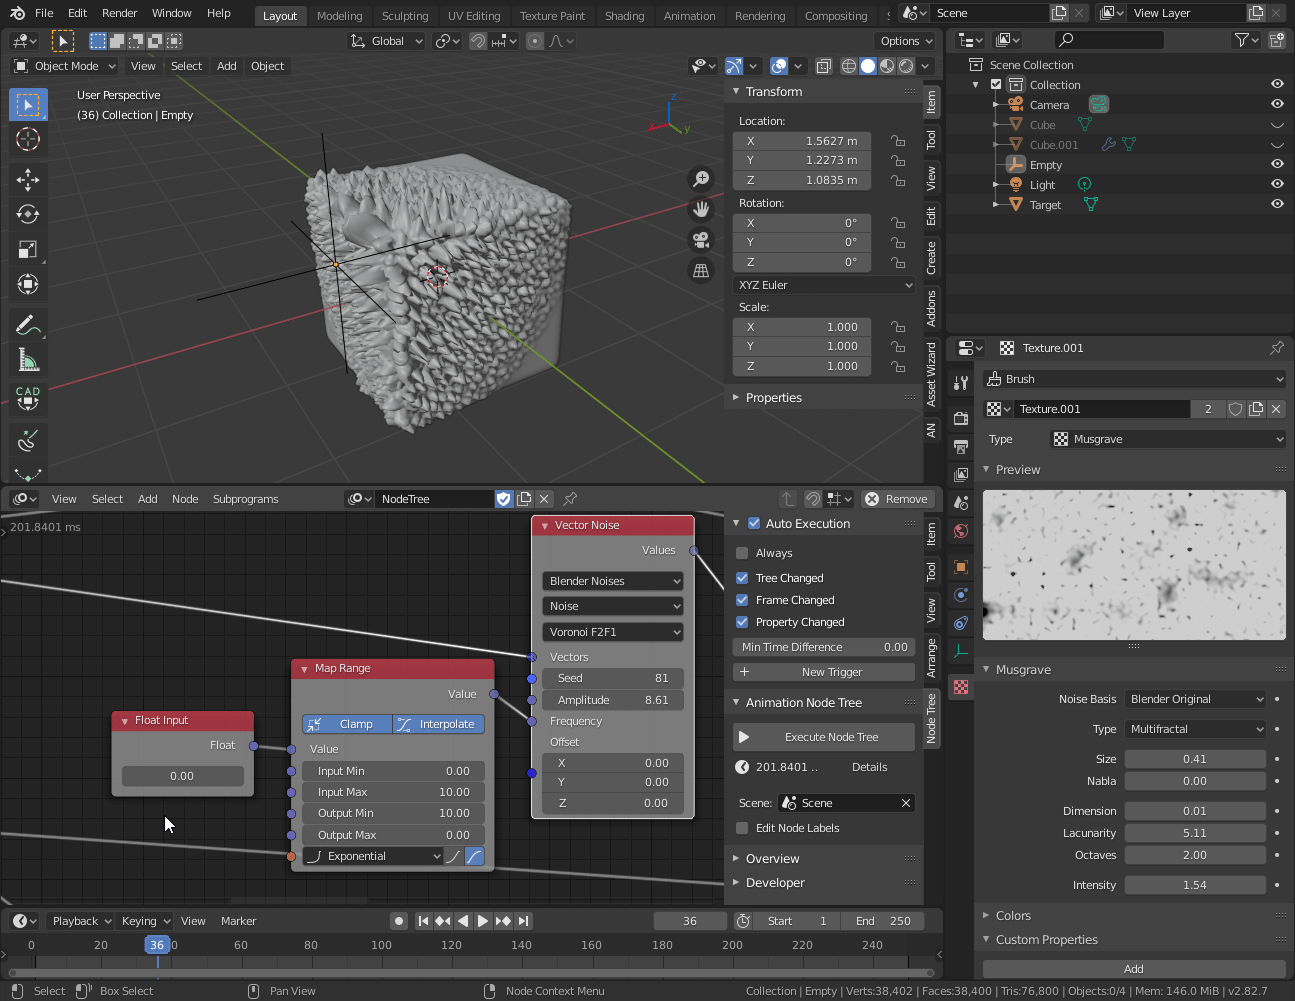
Forgot the most important part. ![]() With nodes you can also remap the values so big scale values makes big textures.
With nodes you can also remap the values so big scale values makes big textures.
4 Likes
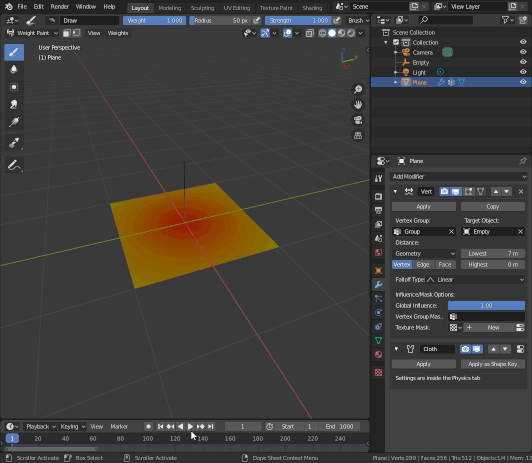
PROXIMITY modifier! Sweet. 
1 Like
Yes, it’s very useful. Animated weightmaps is so useful in so many cases, not possible in LW.
Here’s a good example using animated weights with proximity modifier affecting the pin vertex group of a cloth. Cool stuff!
3 Likes
That’s some awfully sexy stuff.
2 Likes
Thanks Mikael for the tips,
Yes…I figured I could remap the values to go the other way, but why I even should have to is a mystery to me, it´s just unlogic to increase values and expect a decrease in size when you scale it.
Also…still no way to set exact mm or meter scaling directly? and no way to see it either in the values.
With that said…and from my perspective, Lightwave does it just simply right as for the basic workflow…you do not have to guess the scaling and no remapping needed, functionality overall is another matter though.
For weightmaps, yes, sweet and more powerful in blender I guess.
To further not about workflow or equal features, previously I thought the physical sky or dpont sky…was better than blenders native sky texture…since it was harder in blenderto set matching sun with correct color.
But Now blender 2.90 implemented a newer sky texture…which seem to have jumped further ahead of the Lightwave sky background, so I will be looking forward to check that one on…it was needed.
When it says size or scale then I agree. In animation nodes it actually says frequency instead and then it makes more sense that smaller values gives larger less noisy texture.
Agree…absolutely.
Had the quandary of what to do with easyspline in Blender. Ha, an answer comes:
This thing is growing so fast. So challenging to stay abreast of all that is new. Refreshing.
Seemingly, what Advanced Placement was supposed to be if it had been completed/supported.
Blender Hair from Lighwtave splines, fibers.
This may also be posted in some hairnet threads perhaps, but let´s start here where other lw users may have found a home.
Been trying out hairnet 0.61 version …with blender 2.83 beta ( the others later)
initially I thought something was wrong because 2.73 used shift select in the outliner for selecting mesh and strand objects, and that is what I used in 2.83…which is different now with ctrl selecting…so that was giving errors not surprisingly…
Anyway…been trying with some spline curves in lightwave, copy and paste edges and saving out as obj and running the hairnet plugin, and it works just fine now, you just have to adjust radius settings and then continue to tweak the styling sections, adding interpolated hair also where needed in particle edit.
Will not post it all here initially though, I have it covered on the newtek forums for 1001 ways to use lightwave and blender together…
See attached test obj files and my dummy guide on how to get spline guides over to blender, you can also use layout directly and grow fibers …convert to polys with polygonize and send to obj for hairnet in blender as well.
Wether or not you find that completly off the charts as being useful for you…then don´t enter any discussion with me about it, if you find it useful…please do.
Test objects and dummy guide here…
This just dropped in Blender.
LightWave users will recognize the concept. I have not looked into it at all yet. Curious for any reports from LightWave folks about what it can and can’t do.
LW Bones +spline -style snake movements in Blender:
If any LWers were missing this functionality, user ZTreem very kindly showed me the way in this thread:
You might want to jump towards the end to get their explanation.
Frustratingly, if you didn’t want to export such an animation, this is EASILY accomplished within Blender using the Curve Modifier directly on the mesh, so, do that if you don’t need bones. Unfortunately the Blender>>Unity pipeline seems to lack a free MDD/PCC solution (for $$$ they do exist) so that seems to be no good as of this writing (it’s hard to say, everything is changing so fast).
Unity does (now, 2021) directly import Blend files, but Unity itself seems to discourage that practice, suggesting instead that FBX is a more secure method. Unfortunately, I’m still struggling to get that to work.
For vertex animation, I use Alembic. Unity supports that. (actually started to prefer that in LW as well) The reason to use .fbx is it gives you options on export that can affect the result in Unity import. I think with .blend you would have only the import options in Unity. But I never really used the .blend format much for Unity and I think I generally thought it was missing those valuable export options. I like having more control, and I have found that I need that.
Also for more coolness with many things snake and trail like, have a look at animation nodes.

1 Like
I tried an Alembic export first time today, but I think I need a lot more Unity knowledge to use it productively.
…so tired of learning stuff….so tired…
Right. Unity basics are required.
It is an animation. So can just you use Timeline. Which is pretty simple once you get the hang of it and then just play it in the view port.
Alembic asset would be added as a track you play.
To make a video you need the Unity Recorder, and then add a recorder track.
https://docs.unity3d.com/Packages/[email protected]/manual/RecordingTimelineTrack.html
1 Like
Hi folks,
I haven´t checked this thread properly or other places where Alembic and Lightwave is refered when it comes to workflow/pipeline.
Testing Alembic export to blender.
Lightwave 2019.5 - Blender 2.92 Alpha
Findings…(Lightwave to Blender)
 Camera matching: Yes (I believe it comes through “pixel perfect”)
Nodal motion: Yes (nice)
Particles nodal motion cloning/object clones: Yes… which means you could use nodal motion and clone items on to the particles as object clones.
Fx motion: Yes(nice).
Displacement/animated ok.
Bone deformation on mesh/animated: Yes.
 Rig/Bones: No.
Textures: No, but surfaces and uv´s ok, you can however… and would have to re-assign all textures.
Particles: No (use particle, mdd scan instead and apply blenders native particle system on that).
Lights: No …But you get null placement for position, rotation…and also if animated in sequenced cache, so you may parent blenders light´s to that.
So one workflow/pipeline that will probably work well, that is to setup motion and camera in lightwave and mesh cloud objects, play in opengl and see a rough preview of it all, send it to blender with alembic exporter and make sure to set the view to the proper camera (I would suggest delete any default cameras before importing).
Use blenders add empty volume, and use volume to mesh modifier and volume displacement, and you have volumetric clouds based on whatever cloud mesh you made in whatever software you did the main mesh in, but you are utilizing the nice setup and camera and motions from Lightwave.
Renders of that comes though ok after my tests.
With this approach if you find it easier and nice to move around camera and objects in lightwave for flights etc, you can tap in to that, and then tap in to blenders better multiple scattering in volumetrics, and it´s faster workflow with mesh to volume and fractal displace of that, instead of waiting for calculating any noise advection on to vdb elements in Lightwave…it´s just simpler and faster this way, and you get better volume quality as well.
The rest is up to your ability to set proper real scale and make good cloud model cloud meshes.
VDB files with clouds is a different approach, you can not see them in opengl and not sculpt design them either (well you can but it has to be processed yet more steps before getting it right with converting to vdb volumes)
Another case would be for motion graphics where you may want the whole nodal displacement package in Lightwave, but to render it out in realtime with glowing bloom surfaces, or lights if parenting it all can be made smoothly with a lot of lights.
1 Like
Light instancing…
Well, we can´t exactly instance Lights in Lightwave, but either fx link or nodal motion clone lights to particles or vertices, which means you can set different colors per light and intensity etc.
Now…blender offers parenting of lights and setting instances per particle or vertices so there is only one light to control all other lights as I am aware of, unless overriding the instances to be cloned lights, not sure if that is possible within that instance menu in blender?
Edit…well just found it, ctrl-a to make instance real works for the lights.
Thoughts, differences etc?
1 Like