door texture
Hello
how can I make a single material be applied to several objects but with different texture parts?
example: each piece of a door with different parts of the wood
without having to create a material for each piece?
thank you
door texture
Hello
how can I make a single material be applied to several objects but with different texture parts?
example: each piece of a door with different parts of the wood
without having to create a material for each piece?
Go to the object you want to add an existing material to.

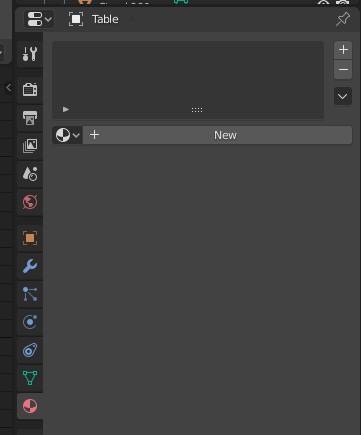
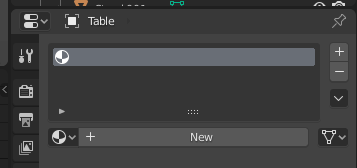
Now, in the material properties, instead of pressing New, click the plus to the right of the box. This will create a material slot.

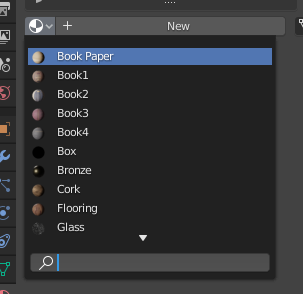
Now, with this material slot, you can select the material to go into it. That is the little circular material icon to the left of the New button.

And as simple as that, you have an existing material added to the object, without having to create a completely new material.
Now, once you have that understood, there is something else that you might find of use: Multiple materials assigned to one object.
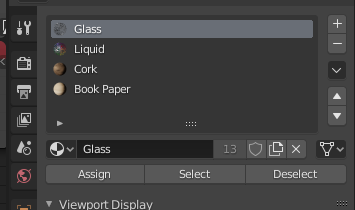
The process is similar as above. You can add multiple material slots like in the picture below and have multiple materials to be used.

To choose which faces get which material, you can select a face (or bunch of faces), and click the assign button to add it to those faces. You have to be in edit mode to select faces and assign materials.
Thank you for your help
but you didn’t understand the doubt
I have this door of several objects
I want to apply the same wood material to all the objects that make up the door
but I want to scale and rotate the texture on each object without having to create more than one material
another doubt:
how can i apply a material to several objects at once?
I tried to select the various objects but when I apply the material only one of the objects receives it.
This can be done using the Object Info node. It has a Random output that you can use to drive the offset/rotation/scale of the texture via a Mapping node. Easiest way is probably to just plug the Random Output into a White Noise set to 1D and use the color output to drive the mapping.
I can go into more detail, if you’ve got more questions.
Yes, right now blender only let’s you change the property of the active object (the last selected).
In default blender the way you’d do this is to change the material of the active object to whatever you want and then press ctrl+L and select Material to link the material of the active object to all selected objects.
If you’re gonna do this a lot, I can recommend the Material Utilities Add-on. It comes with Blender by default and just has to be activated in the preferences. It gives you quick menus/shortcuts to assign a material to all selected object or even select objects by material.
in fact I need to rotate the texture of the object above the door and the rectangles in the middle of the door 90 degrees
and dimension the texture of some of them
without having to create new materials
it’s possible ?
Oh, got it. In that case you should probably just rotate the UV and origin of those objects by 90°.
You can change the proportions by scaling the UV. You won’t be able to scale the generated texture coordinates outside of the node tree as those are created based on the bounding box of the mesh. You my want to use the object coordinates for those parts of the material.
I think, in general for textures like wood (or material characteristics) it’s a good idea to use the object coordinates. That way the scale of the texture will be the same on all objects you apply it to by default and you can still make adjustments changing the objects coordinates scale/rotation by transforming the origin or using an empty.
I just select all the objects the door consists of, and UV/Average island scale.
If you need random offsets and variations per UV island, you can create a separate UV layout where you collapse the UV islands to points, move them around, and use the white noise generator on them and add wherever you want. I didn’t do that here, but this is a modified archipack standard door - note that solidify and bevel modifiers are not applied, so even in WIP stage they look fairly convincing as old cracked wooden doors.
You can apply the same material to each object and then apply your texture to one of them via nodes and it will apply to all of them. At this point you can manipulate the uv maps to change the texturing of each object how you like.
I’m actually using procedural textures
so there is no point in rotating the UV
is there another way to do this that works with procedural textures?
In the setup you posted, you’re using the UV coordinates as input for the Wave Texture to map it onto the objects.
So manipulating the UV will also affect the procedural textures.
Again that won’t affect the generated coordinates, but those just seem to drive some value variation, so it’s probably not that important.
I did not understand
I already ran the UV coordinates in the UV editor and it didn’t work
can you be clearer?
thank you
Just looking at your node setup, I don’t see the reason, why modifying the UV shouldn’t work. Here is what i mean:
it worked here
thank you very much and I’m sorry for the inconvenience
Can’t you use a mapping node?
Yes, you can, however using that affects the material itself which means that all objects with the material will also have those changes. You’ll still want to use UVs for texture mapping individual parts.
There are several ways to texture a door.
where can i get this node: mapping box simple ?
It’s a custom node group. Inside it is a bunch of nodes with connections made to the outside through those inputs and outputs you see connected there. It makes node setups tidier as you can group up things that do one thing, plus it is easy to copy to other projects because eveything is packaged inside.
Node groups can be created by selecting some nodes, and pressing Ctrl+G to make them go in to a new group. To access the group and exit it, select the node group and press tab.
If you want that specific node group, you’ll have to get @CarlG to show what is inside so you can create it, or get a copy of the .blend file.
could you give me this file of the node?
and teach me how to install?