Im a huge fan of the series and the books, and since the end of season 4 Ive been bored as hell. So I thought id give a dragon a go. I havent added detail like webbing, teeth, claws and spikes ect yet, but is my Base mesh okay? :spin:
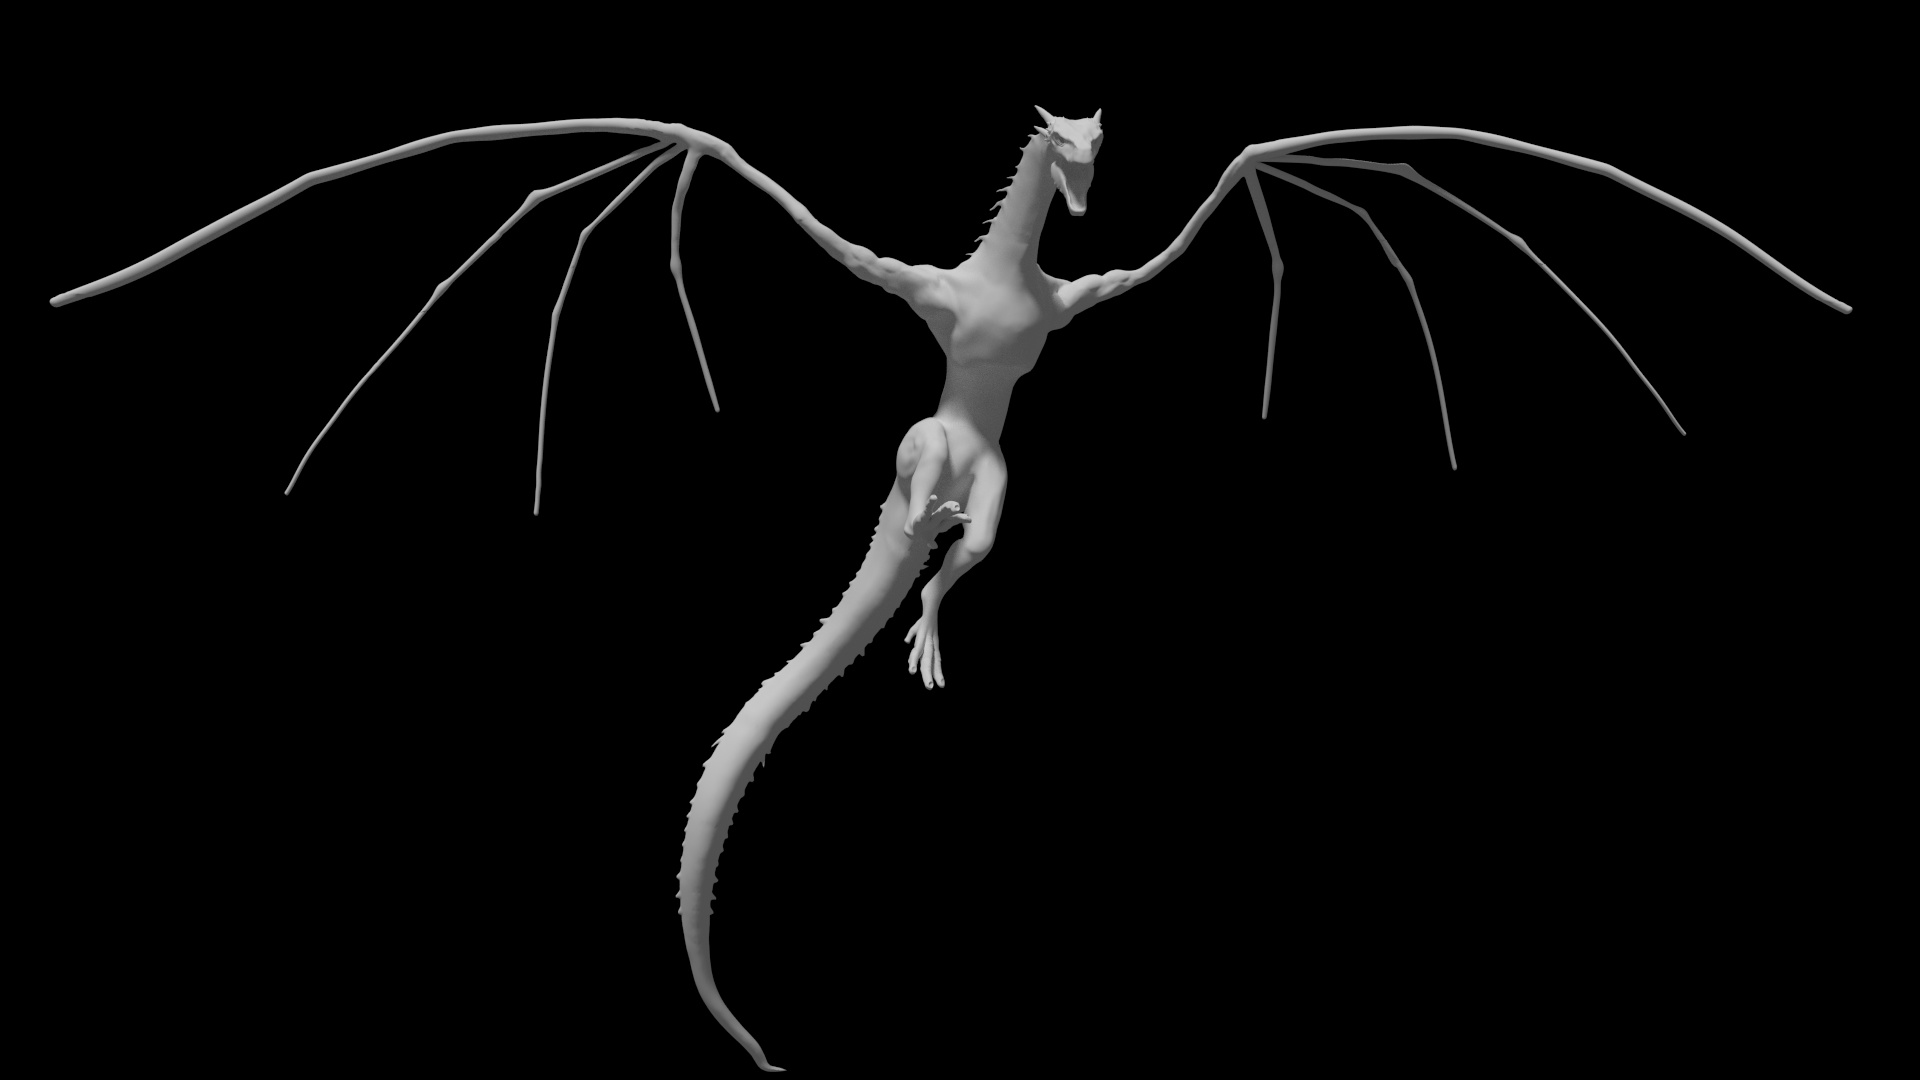
Nice job, it looks like a very well-balanced dragon model. I particularly like the head. I think the torso needs some tweaking—you should beef up the belly area a bit—and some more sculpting detail would be nice eventually, but it’s a great start.
It’s a nice start for sure, did you use Dyntopo or any form of sculpting on it?
Owldude; I think he might be basing it on the Dragons in the Game of Thrones TV show, the pictures I’ve seen of them, I don’t think their bellies are quite as thick as the classical Dragon designs. Nevertheless, I get excited when a new round of Dragon projects get started (such awesome creatures) 
Thanks for the feedback. Yeah I am basing it on one of the dragons from Game of Thrones. Th problem is it will be difficult for me to sculpt more detail as I am extremely limited by my parent’s awful computer. I used dyntopo to add what little detail there is. Is there any way of adding detail that wont be as taxing on my crap hardware? :spin:
This first image is the head after some more sculpting. I had to reduce the poly count drastically to allow my computer to even work  the second image is the model before I reduced it
  Blender crashes when I try to open the high res model, only my free trial of Zbrush can handle it for some reason. Is there any way I can bake a normal map using Zbrush? and then use it on the lower poly version of the model?
Attachments


Your sculpting looks great so far! Yeah zbrush handles a lot of vertices soooooooooooooooooooooooo much better than blender. I just use blender sculpting for simple stuff I want to do quick. Unfortunately i do not know how to bake a normal from zbrush but I assume someone else will have an idea for you. Good luck!
Well i’m currently working to earn a bit of money to finally buy my own computer  I think the one i’m using is outdated by around 10 years. I’ve applied for college for a course including stuff like this so I hope I get in
hi Allyc, just a tip, when you cant sculpt more detail on Dyntopo is time to add a hi-res bumpmapping or normalmap texture on your model and paint the detais with texture paint. 
but also if you dont like blender texture paint style ill recomend you to try substance painter to paint and detail your models textures.
at my point of view this scales can be a bump map too reducing the poly count.
But that would involve retopology and UV unwrapping and all sorts  never really been very good at that. Atm moment its near impossible to paint directly onto the model, for some reason its insanely slow. Can you recommend any good tutorials on how I would uv map such a high poly model?
I think you will need use decimate modifier to decrease the mesh polycount until it not loose all details and then do the uv-unwrap to start painting.
But then id lose detail? which is what im trying to avoid.
Bake the normals from the scaled dragon and then decimate it.
Just drag the decimate bar, you will see in real time the results on mesh reduce it until all scales are removed i think 60k poly will be the point.
But in order to bake normals I need a uv map, which is proving difficult to create
A dyntopo mesh cannot be UVmapped because it consists of triangles while mapping algorithms work with quads.
If you want a mappable model, then you will need to use the shrinkwrap modifier on a new mesh and trace a new quad-based topology over the original (known as the retopo step).
Good luck! Looks great so far, can’t wait to see how it turns out huge fan of the books+series too
Yes it can be mapped, go to edit mode, select all mesh, press space bar and write tris to quads or just pres alt j… ^^
then you will have a quad mesh! fantastic!
but also if you pc still broke when uv mapping, use the decimate and reduce the poly count until it no frezze, thats a hardware limit problem! ^^
Just a quick update, this is a low res model with the normals baked onto it from the high poly model. I’ve also been messing around with the translucency for the thinner parts of the wing membranes.
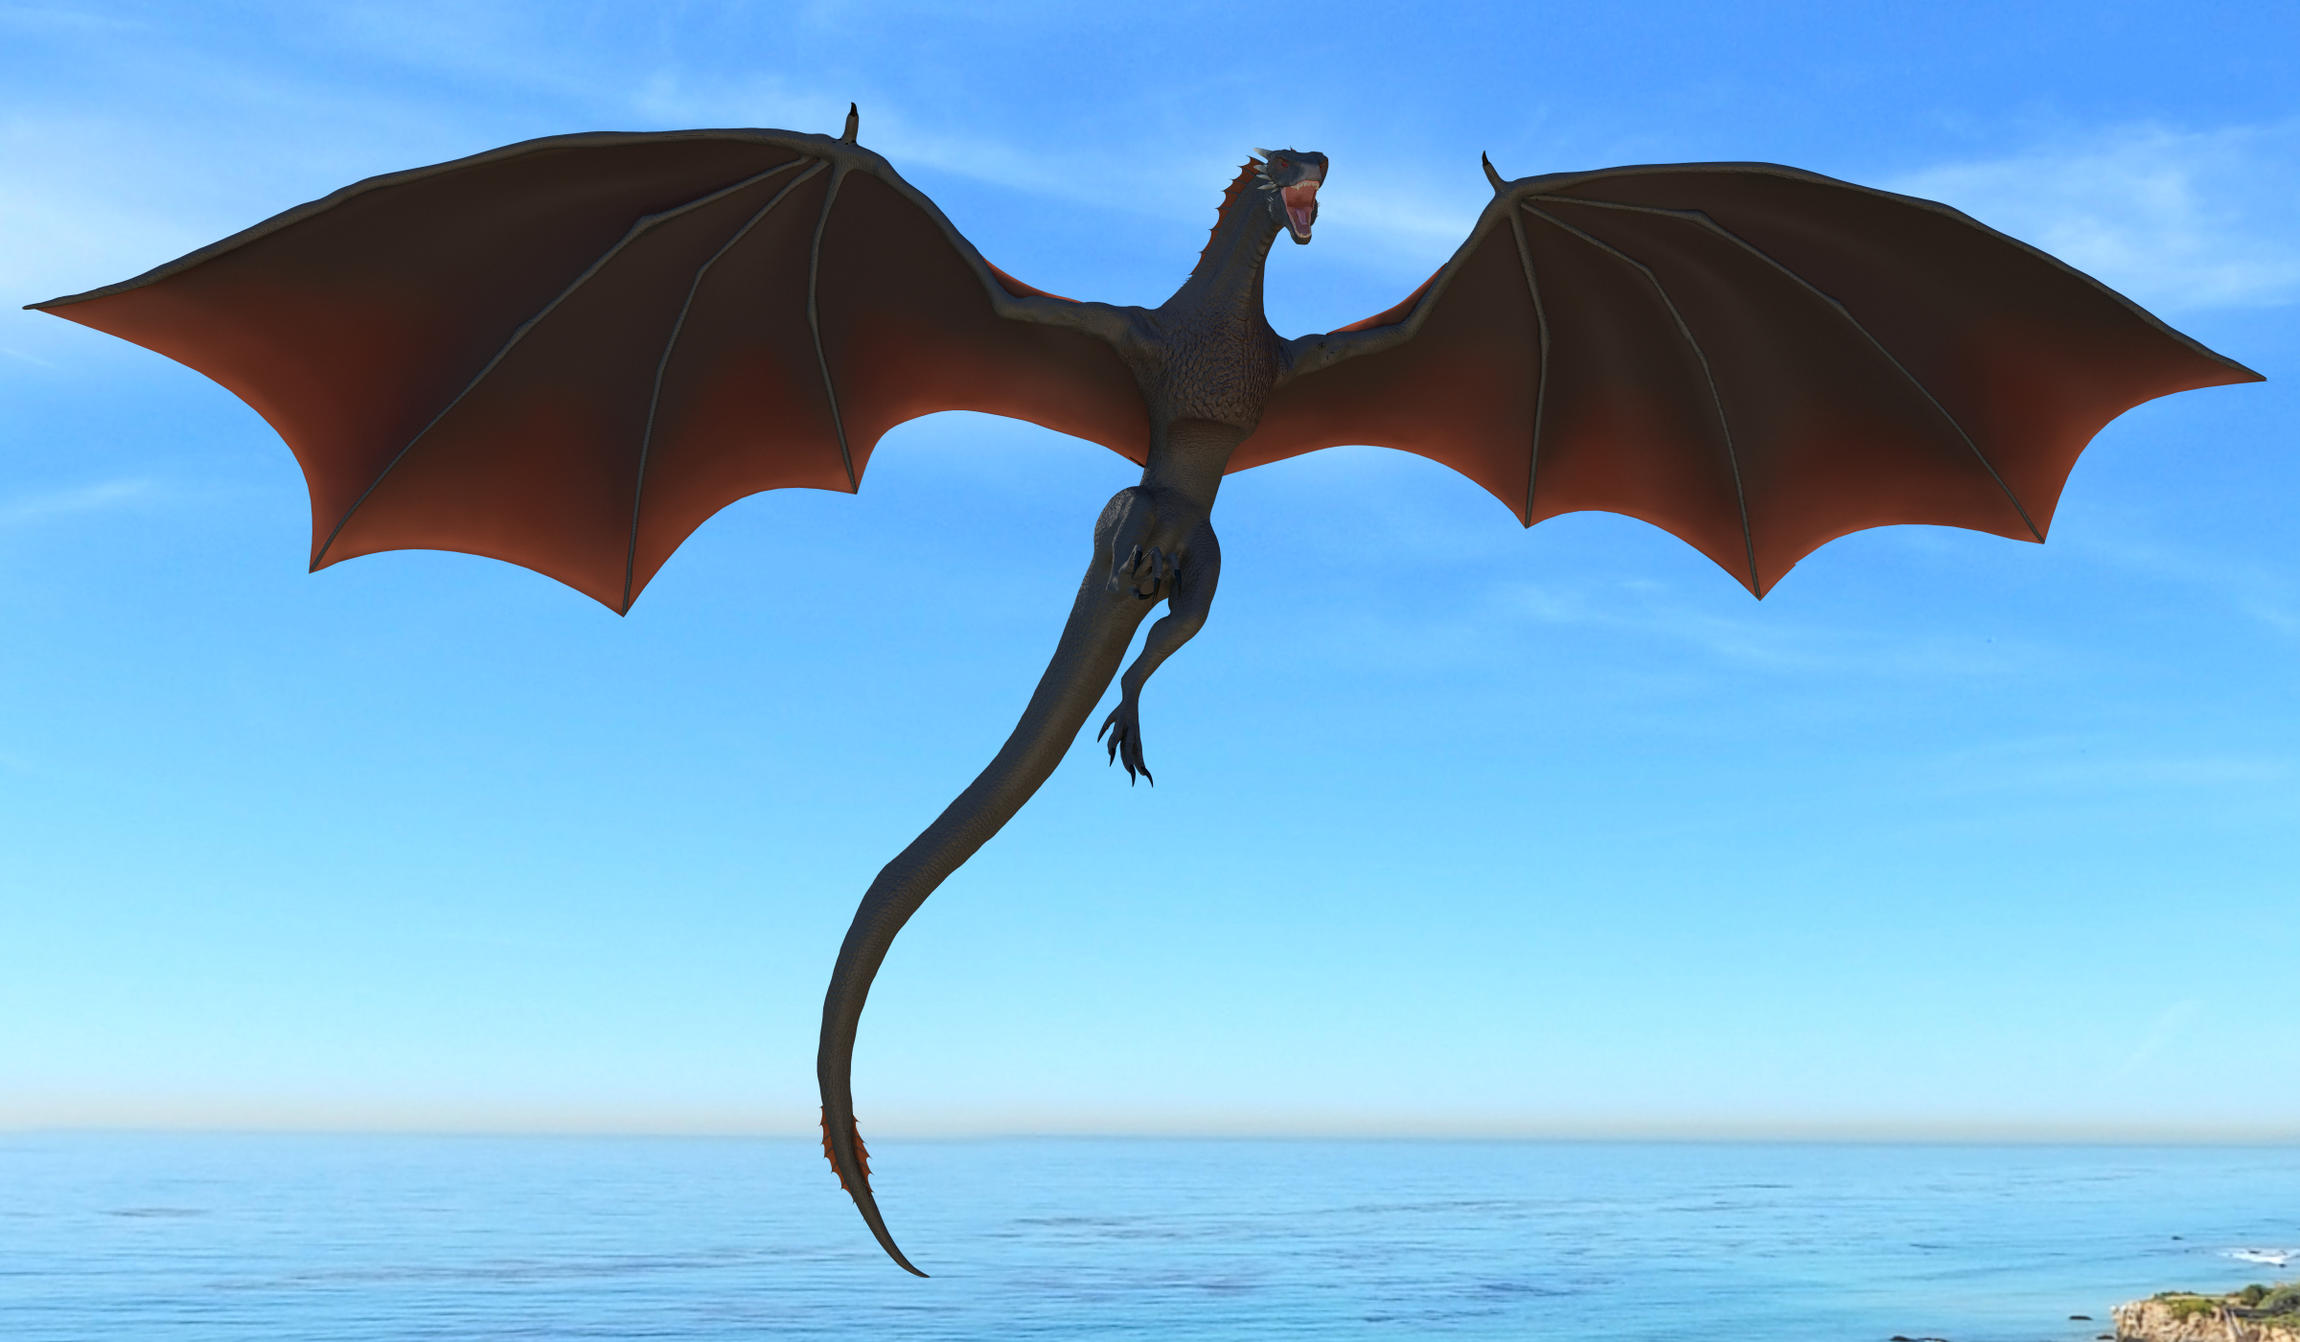
The model is awesome, but the lighting needs work. Don’t start shading until you have a realistic lighting setup (if it’s realism you’re going for, which I assume it is)
For a daylight scene like that background, the sun would be very bright, which will make the translucency you have now way too strong - hence the rule to only shade once you have decent lighting.
Is it lit with an HDRI? If so, find a better one with correct sun brightness. If not, find one, or make your sun lamp much brighter.
I’ve never been very good at lighting, I’ll look up tutorials and see if I can learn a thing or two Its not an HDRI, I cant seem to find any at decent resolutions. I prefer using the high res model over the low res one with normals, it doesn’t seem to slow down much other than when im texture painting.
For advanced algorithms like LSCM and Angle-based unwrapping, it still won’t work because that function will not give you the topological quality needed for that function (along with animation).
Now for something like using the smart unwrap for the purpose of using projection painting, maybe, but there’s still that little thing called topology.
As for Drogon himself, the shading step looks to be like a good start, but I do agree that lighting can be worked on.